City of Ash
Contents | ||

Books
|
Show History | ||||
| Book | Kind | Edition | Last update | |
| | ||||
| | Rulebook | 4 | May 2026 | |
| | ||||
| | Expansion | 4 | April 2026 | |
Path to Glory Battlepack
SPEARHEAD
The Age of Sigmar grows fraught. On horizons yonder, the forces of Chaos loom, threatening to engulf the Mortal Realms in mayhem and violence once more. In the wake of these troubling times, Spearhead forces are dispatched across the realms to seek out ancient sites of power that still reside deep within the uncharted hinterlands. Will you take up the call to battle and lead a Spearhead force to victory?Welcome to the world of Spearhead. In this game mode, players engage in small-scale battles that are fast and tactical, suitable for newcomers and veterans alike. In Spearhead, each army is available as a self-contained boxset, allowing players to quickly muster a force. In addition, Spearhead battles are fought upon a compact battleeld, meaning you can set up a game even with limited space. Spearhead uses specially tailored rules to ensure that every battle is a tense and exciting aair that comes right down to the final moments.
SPEARHEAD BOX SETSFighting a Spearhead battle could not be easier. Each player picks their army by choosing one of the many Spearhead box sets available. Each of these is a complete army, including all the miniatures a player will need to do battle. The rules for Spearhead box sets are available in faction pages. | ||
Path to Glory Battlepack
Getting Started
Below is a handy step-by-step guide to help you prepare for your rst few Spearhead battles. Following these steps will help you get up and running with Spearhead in no time!1. PICK A SPEARHEAD ARMYIn Spearhead, players use a mixed set of units called a Spearhead army that has its own rules and warscrolls. Each has a corresponding box set that contains all the models you need. | ||
2. CHOOSE A REALM BATTLEFIELDSpearhead battles are fought on realm battlefields. Each side of a realm battlefield is themed around one of the eight Mortal Realms. | ||
3. PICK YOUR REGIMENT ABILITY AND ENHANCEMENTEach Spearhead army has a choice of 2 different regiment abilities and 4 different enhancements for your general. At the start of the battle, you must pick 1 of each for your army (see Spearhead Armies). | ||
- Every Spearhead army has a set of battle traits, regiment abilities and enhancements.
- The battle traits are rules and abilities for your army that you will use in every battle.
- The regiment abilities and enhancements are picked at the start of every battle. You can experiment with different combinations to see what works best for you. Some regiment abilities and enhancements are better against certain foes, so it pays to study the strengths and weaknesses of the enemy before making your choice!
- Every unit in a Spearhead army has its own warscroll, where you can see its characteristics and weapons.
- Any unique abilities the unit can use will also be found on its warscroll.
- At the bottom of every warscroll you can find its keywords, such as HERO, WIZARD, MONSTER or INFANTRY.
- Some warscrolls have a number in a red circle above the Save characteristic. This is the unit’s ward save, which is also shown on its keywords line.
Spearhead Battlepack
City of Ash
1.0 Spearhead Armies
Each player in a Spearhead battle is the commander of a Spearhead army. A Spearhead army is a set of units that comes with its own rules and warscrolls. You can find the rules for Spearhead armies on your faction page.
THE CORE RULESTo play a game using this battlepack, you’ll need the Core Rules. The Core Rules explain the basics of Warhammer Age of Sigmar, such as how to move your models and how to use abilities.You don’t need the Advanced Rules to use this battlepack. | ||
1.1 Army Composition
On the first page of every Spearhead army’s rules, you will find the army composition. This lists which units are included in the Spearhead army and who the general is. Unlike other Warhammer Age of Sigmar armies, the composition of a Spearhead army is fixed and cannot be changed.1.2 Battle Traits
Every Spearhead army has one or more battle traits. These are powerful and thematic abilities that apply to some or all of the units in the army. For example, the ‘Ranger Doctrines’ battle trait enables the Sentinels of Emberguard to strike and reposition to gain a powerful tactical advantage, while the ‘Cloaked in Shadow’ battle trait grants Crixxit’s Kill-Pack the unparalleled ability to pursue and eliminate the enemy’s leaders.1.3 Regiment Abilities
Every Spearhead army has a choice of 2 regiment abilities, each of which provides the army with a different strength in battle.1.4 Enhancements
Every Spearhead army has a set of 4 enhancements to pick from. These are upgrades for the army’s general that make them more powerful in a variety of ways.1.5 Spearhead Warscrolls
The warscrolls for all of the units in each Spearhead army are included in this battlepack. Although Spearhead warscrolls are similar to the warscrolls found in battletomes, they have been tailored to work specically with Spearhead and cannot be used with other battlepacks.WIZARDS AND PRIESTS IN SPEARHEADSome units in Spearhead have the WIZARD or PRIEST keyword. If you are familiar with other battlepacks, it is important to note the Magic module in the Advanced Rules is not used in Spearhead. As a result, there are no unbinding rolls and no chance of miscasts (among other things). Spells and prayers are resolved like any other ability. | ||
2.0 Realm Battlefields
Spearhead battles are fought on realm battlefields. Once the players have picked their Spearhead armies, they must agree on a realm battlefield to use. Each realm battlefield comes with a matching Spearhead deck, along with a battleplan that explains how to fight a battle on that realm battlefield.A realm battlefield is 30" x 22" and double-sided, with each side corresponding to a different location in the Mortal Realms. In this edition of Spearhead, each side of the board represents a different part of Embergard, the City of Ash. On one side of the board, scouting forces meet in a standoff at the Shattered Crossroads. On the other side, regiments hold one another in a siege around the ruins of the Ashen Bastion.
Spearhead decks are sets of cards that are used in Spearhead battles. Each realm battlefield has its own Spearhead deck. Each Spearhead deck consists of 2 twist decks (one for each side of the realm battlefield) and 2 battle tactic decks (one for each player).
2.1 Twist Cards
Each twist deck is made up of twist cards. A twist is a special rule that applies to the battle round being played. Each deck of twist cards corresponds to a specific side of the realm battlefield.2.2 Battle Tactic Cards
Each battle tactic deck is made up of battle tactic cards. The rules on each are split into 2 parts: a battle tactic and a command. You can either score the battle tactic at the end of your turn if you meet its conditions (to gain victory points) or you can use the command on the card for a more immediate benefit. You cannot do both, so choose wisely!Each command will say when it can be used and what effect it has. After the effect has been resolved, the card is discarded. You can issue multiple commands to the same unit in the same phase.
3.0 Spearhead Battleplans
Each realm battlefield has a corresponding battleplan. The battleplan is a set of instructions on how to fight the battle and how to determine the winner.You can find the battleplans for the City of Ash realm battlefield here.
4.0 Terrain and the Shattered Crossroads
In every City of Ash Spearhead battle, the armies fight around 2 large terrain features.Before the armies are deployed, each player will set up 1 large terrain feature wholly within their territory and on a corner of a rectangular objective.
Each large terrain feature has the following passive abilities:
|
The Shattered Crossroads realm battlefield is split by straight roads and has a large circle in the middle called the junction. For rules purposes, the junction is considered part of the roads (but not vice versa).
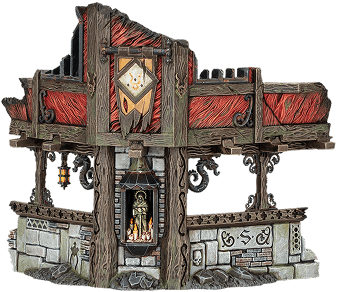
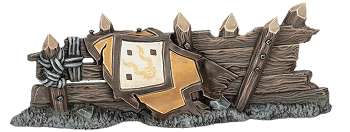
Ruined Manor
(Large Terrain Feature)
(Large Terrain Feature)

Ruined Manor
(Large Terrain Feature)
(Large Terrain Feature)
5.0 Relics
In this battlepack, scouting forces fight over the ruins of Embergard searching for valuable treasures. These are represented by 5 relics, which have powerful effects that can turn the tide of battle.
Each time the rules tell you to place a relic, it must be placed wholly on the battlefield, more than 3" from all enemy units and more than 6" from all other relics.
Relics are contested and controlled in the same manner as terrain features (Core Rules, 32.3) and have the Unstable terrain ability.
Each relic has a unique ability that can be used by both players:
 Once Per Turn (Army), Your Hero Phase Once Per Turn (Army), Your Hero Phase |
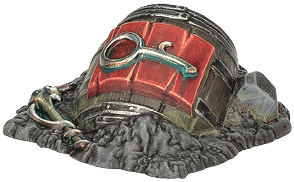
BARREL OF EMBERSTONE: Aqshian realmstone stokes the battle fervour of those in its vicinity, lending strength to their sword arms.
Declare: Pick a friendly unit within 3" of this relic to be the target.
Effect: Add 1 to wound rolls for the target’s attacks for the rest of the turn.
Effect: Add 1 to wound rolls for the target’s attacks for the rest of the turn.
 Passive Passive |
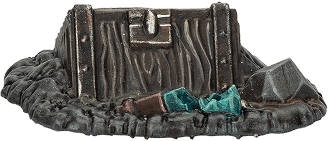
CRATE OF AQUA GHYRANIS: Smuggled from distant Ghyran, the precious liquid in these vials grants the imbiber great vigour and resilience.
Effect: Units have WARD (5+) while they are wholly within 6" of this relic.
| Once Per Turn (Army), Your Combat Phase |
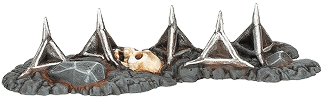
ULGUAN STEEL CALTROPS: These wicked traps are difficult to spot – but they certainly leave a mark.
Declare: You must use this ability if this relic is within 3" of any units (friendly or enemy) that charged this turn. Pick those units to be the targets.
Effect: Roll a D3 for each target. On a 2+, inflict an amount of mortal damage on the target equal to the roll.
Effect: Roll a D3 for each target. On a 2+, inflict an amount of mortal damage on the target equal to the roll.
| Passive |
BATTERED BARRICADE: Though swiftly improvised and heavily patched up, this barrier can still provide protection from incoming fire.
Effect: Units wholly within 3" of this relic cannot be targeted by shooting attacks unless the attacking model is within their combat range.
 Once Per Turn (Army), Your Movement Phase Once Per Turn (Army), Your Movement Phase |
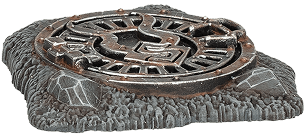
INCONSPICUOUS MANHOLE: Embergard is built atop a warren of tunnels that can be traversed to gain a tactical advantage.
Declare: Pick a friendly unit wholly within 3" of this relic to be the target.
Effect: Remove the target from the battlefield and set it up again wholly within friendly territory and more than 6" from all enemy units.
Effect: Remove the target from the battlefield and set it up again wholly within friendly territory and more than 6" from all enemy units.
Barrel of Emberstone
Crate of Aqua Ghyranis
Ulgan Steel Caltrops
Battered Barricade
Inconspicuous Manhole
6.0 Objectives
In Spearhead battles, objectives are printed on the surface of each realm battlefield. The Shattered Crossroads battlefield has 4 small rectangular objectives and 1 large circular objective. The Ashen Bastion battlefield has 4 small circular objectives and 1 large rectangular objective.Objectives with terrain features on them are fortified objectives. While every model in a unit is contesting a fortified objective, that unit is in Cover.
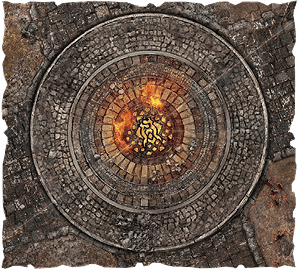
The large circular objective in the middle of the Shattered Crossroads is the junction. The whole circle is the objective, not just the symbol in the centre.
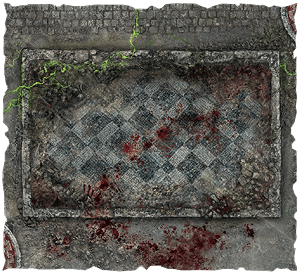
The large rectangular objective in the middle of the Ashen Bastion is the ruin. The whole rectangle is the objective, including the walls.
6.1 Contesting Objectives
In Spearhead battles, while a model is on an objective (wholly or partially), it is contesting it.The small objectives are named after Sigmarite symbols: Ghal Maraz (the hammer), the Twin-Tailed Comet, the High Star and the Great Wheel.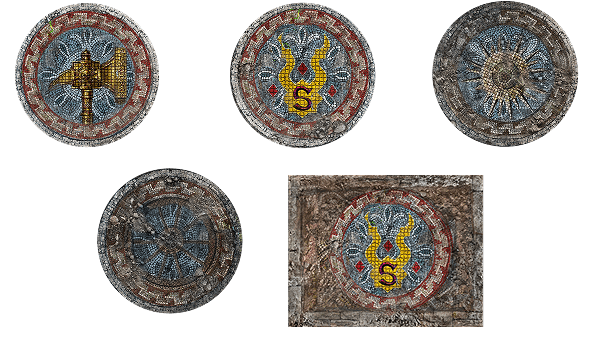 In the case of the rectangle versions of these objectives, the whole rectangle is the objective, not just the circle in the middle. | ||
7.0 Reinforcements
Some units have the REINFORCEMENTS keyword. These units can be brought back to the battlefield after being destroyed as replacement units (Core Rules, 24.2).If any of your units have the REINFORCEMENTS keyword, you can use the following ability:
 Once Per Turn, Your Movement Phase Once Per Turn, Your Movement Phase |
CALL FOR REINFORCEMENTS: A second wave of troops enters the fray, replacing those lost to the rigours of battle.
Declare: Pick a friendly REINFORCEMENTS unit that has been destroyed.
Effect: Set up an identical replacement unit on the battlefield, wholly within friendly territory, wholly within 6" of the battleeld edge and not in combat.
Each REINFORCEMENTS unit can only be replaced once. Replacement units cannot themselves be replaced.
Effect: Set up an identical replacement unit on the battlefield, wholly within friendly territory, wholly within 6" of the battleeld edge and not in combat.
Each REINFORCEMENTS unit can only be replaced once. Replacement units cannot themselves be replaced.
| KEYWORDS | CORE |
| Units with the REINFORCEMENTS keyword have this icon bellow of their warscroll stats for ease of use. | ||
Battleplan
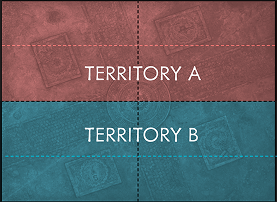
Battleplan City of AshEmbergard echoes once more to the sound of steel and screams. Warbands roam the crumbling streets, watching every shadow for threats. Amongst the smoky darkness flickers a hellish orange glare – the glow of emberstone, Embergard’s true wealth. The pulse of this arcane resource also illuminates fortifications and resources that could be seized by a canny commander. Yet in Embergard, a trap can easily swing back on those who would spring it... PRE BATTLE SEQUENCE 1. Roll off. The winner chooses who is the attacker and who is the defender.2. The attacker picks their regiment ability and their enhancement. Then the defender does the same. 3. The defender chooses which side of the realm battlefield the players will fight on: the Shattered Crossroads or the Ashen Bastion. 4. The defender picks 1 of the deployment maps on the right and chooses which territory belongs to which player. 5. The defender sets up one large terrain feature wholly within their territory and on a corner of a rectangular objective, then the attacker does the same. The objectives on which the terrain features are placed then become fortified objectives. 6. The defender picks one of the starting relics (see below) and sets it up wholly within their territory. The attacker then sets up the other starting relic wholly within their territory. On the Ashen Bastion realm battlefield, the starting relics are the Battered Barricade and the Inconspicuous Manhole. On the Shattered Crossroads realm battlefield, the starting relics are the Barrel of Emberstone and the Crate of Aqua Ghyranis. 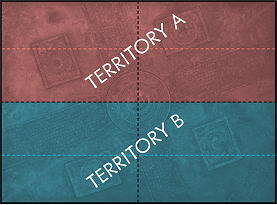 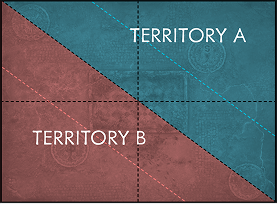 DEPLOYMENT Do not deploy armies as described in the Core Rules. Instead, the attacker sets up all their units in their army first, followed by the defender. Each unit must be set up wholly within friendly territory and more than 6" from enemy territory.BATTLE LENGTH The battle lasts for 4 battle rounds.SPECIAL RULES PREPARING THE SPEARHEAD DECK This battle uses the City of Ash Spearhead deck. One player takes the twist deck that corresponds to the side of the battlefield the players are fighting on, shuffles it and places it face down next to the battlefield (the other twist deck is not used). Then, each player takes 1 battle tactic deck, shuffles it and places it face down where they can reach it during the battle. START OF THE BATTLE ROUND SEQUENCE The following sequence is resolved at the start of each battle round:1. If it is the first battle round, the attacker chooses who will take the first turn. In any other battle round, the players make a priority roll (Core Rules, 12.0). 2. Determine the underdog (Core Rules, 12.0). 3. The twist card is drawn (see below). 4. The players draw battle tactic cards (see below). 5. Any abilities with the Start of Battle Round timing are used.TWIST CARDS One twist card is drawn at the start of each battle round. Follow the rules on it as soon as it is drawn.BATTLE TACTIC CARDS At the start of the first battle round, each player draws a hand of 3 battle tactic cards.At the start of each subsequent battle round, each player draws battle tactic cards until they once more have a hand of 3 battle tactic cards. Before they do so, they can discard any number of battle tactic cards in their hand. Cards are discarded face-up.
VICTORY POINTS Each player scores victory points at the end of each of their turns as follows:
GLORIOUS VICTORY The player with the most victory points at the end of the battle is the winner. If the players are tied on victory points, the battle is a draw. | |||||||||||
Hiden in the Ashes
Even though Embergard is a smoking ruin, only a fool would ignore it. There are treasures to be recovered amidst the rubble and ashes, from ammunition and weapons to precious yet volatile emberstone. Following a violent earthquake, your warriors have returned to camp with talk of a realmstone seam now exposed beneath the broken flagstones of a former residence. With the occupants gone (and unlikely to return...) there is little to prevent you from claiming this arcane prize.
However, secrets are not kept for long in Embergard. Forces are moving through the rubble and past the ever-burning pyres: rivals, coming to steal your prize. Rather than rush in and leave your rearguard exposed, you have devised a plan to set up a series of staging posts before making the final push toward the emberstone deposit.
Hidden in the Ashes is a mini campaign comprising three linked Spearhead battles played between two players, who are each trying to recover a hoard of emberstone buried at a secret location in Embergard. Spearhead games typically take around an hour to complete, so this campaign will probably take an entire afternoon or evening to play through.
This campaign comprises three linked battles that are played in the order shown below.
RULES CHANGES
When playing this campaign, instead of using the City of Ash battleplan pre-battle sequence here, use the sequence below.
1. Unless specified otherwise, roll off. The winner chooses who is the attacker and who is the defender.
2. The attacker picks their regiment ability and their enhancement. Then the defender does the same.
3. Unless otherwise specified, the defender chooses which territory belongs to which player.
4. The defender sets up one large terrain feature wholly within their territory and on a corner of a rectangular objective, then the attacker does the same. The objectives the terrain features are placed on then become fortified objectives.
5. The defender picks one of the starting relics and sets it up wholly within their territory. The attacker then sets up the other starting relic wholly within their territory.
INJURIES AND DEATHS
After each battle, your army has a bit of time to recuperate, recover their wounded and, if necessary, recruit replacement warriors. Therefore, your army starts at full strength in the next battle.
TOTAL VICTORY POINTS
During the campaign, each player should keep track of their total number of victory points. This is the combined number of victory points they have scored in all of the battles fought so far.
However, secrets are not kept for long in Embergard. Forces are moving through the rubble and past the ever-burning pyres: rivals, coming to steal your prize. Rather than rush in and leave your rearguard exposed, you have devised a plan to set up a series of staging posts before making the final push toward the emberstone deposit.
Hidden in the Ashes is a mini campaign comprising three linked Spearhead battles played between two players, who are each trying to recover a hoard of emberstone buried at a secret location in Embergard. Spearhead games typically take around an hour to complete, so this campaign will probably take an entire afternoon or evening to play through.
Hidden in the Ashes Rules
This campaign uses the City of Ash battlepack rules in addition to the rules on these pages.
PICKING YOUR SPEARHEAD ARMY
Before starting the first battle in a Hidden in the Ashes campaign, the players roll off. The winner picks a Spearhead army to use for the entire campaign, so they should choose wisely. Then, their opponent does the same.
CAMPAIGN PATHWAYPICKING YOUR SPEARHEAD ARMY
Before starting the first battle in a Hidden in the Ashes campaign, the players roll off. The winner picks a Spearhead army to use for the entire campaign, so they should choose wisely. Then, their opponent does the same.
WHICH SPEARHEAD ARMY CAN I USE?While this campaign has been designed to be played with the Sentinels of Embergard and Crixxit’s Kill-Pack, you should feel free to use any Spearhead armies you like. After all, there are nefarious agents and hostile warbands of many different factions lurking in the ruins of Embergard! | ||
This campaign comprises three linked battles that are played in the order shown below.
| BATTLE 1 – SMOULDERING SKIRMISH (ASHEN BASTION) BATTLE 2 – BLAZING BLOCKADE (SHATTERED CROSSROADS) BATTLE 3 – FINAL CONFLAGRATION (ASHEN BASTION) | ||
RULES CHANGES
When playing this campaign, instead of using the City of Ash battleplan pre-battle sequence here, use the sequence below.
1. Unless specified otherwise, roll off. The winner chooses who is the attacker and who is the defender.
2. The attacker picks their regiment ability and their enhancement. Then the defender does the same.
3. Unless otherwise specified, the defender chooses which territory belongs to which player.
4. The defender sets up one large terrain feature wholly within their territory and on a corner of a rectangular objective, then the attacker does the same. The objectives the terrain features are placed on then become fortified objectives.
5. The defender picks one of the starting relics and sets it up wholly within their territory. The attacker then sets up the other starting relic wholly within their territory.
INJURIES AND DEATHS
After each battle, your army has a bit of time to recuperate, recover their wounded and, if necessary, recruit replacement warriors. Therefore, your army starts at full strength in the next battle.
TOTAL VICTORY POINTS
During the campaign, each player should keep track of their total number of victory points. This is the combined number of victory points they have scored in all of the battles fought so far.
Battleplans
Deployment
Do not deploy armies as described in the Core Rules or the City of Ash battleplan on pages 14-15. Instead, the defender sets up all the units in their army first, wholly within their territory. Then the attacker sets up all the units in their army, wholly within their territory and more than 6" from enemy territory. The defender chooses which player takes the first turn.CAMPAIGN BATTLE 1 – SMOULDERING SKIRMISHThe starting relics for this battleplan are the Battered Barricade and Ulguan Steel Caltrops. If a twist requires a player to place the Ulguan Steel Caltrops, that player must instead place the Inconspicuous Manhole.  | ||
CAMPAIGN BATTLE 2 – BLAZING BLOCKADEIf one player has more total victory points than their opponent, the rules below apply for this battle:
 | ||
CAMPAIGN BATTLE 3 – FINAL CONFLAGRATIONIf one player has more total victory points than their opponent, the rules below apply for this battle: GLORIOUS VICTORY
If one player controls the Barrel of Emberstone at the end of the battle and that player has more total victory points than their opponent, they win a major victory. Their warriors return to their hideout to work out a plan to share the reward among the survivors. If one player controls the Barrel of Emberstone at the end of the battle and that player has fewer total victory points than their opponent, they win a minor victory. While they escape with a decent amount of emberstone, their paymaster will require more treasures! Their adventuring days are not yet over... If neither player controls the Barrel of Emberstone at the end of the battle but one player has more total victory points than their opponent, they win a minor victory. They slink back to their hideout, empty-handed but ready for the next adventure. Any other result is a hard-fought draw! 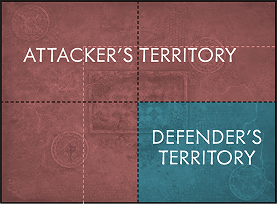 | ||
Cards
Ashen Bastion Twist
• ASHEN BASTION TWIST •
STAGING POSTS This battle has another purpose – to establish redoubts from which to strike deeper into Embergard.
Starting with the active player, each player picks an objective on the battlefield. Each player scores 1 extra victory point at the end of their turn for each of those objectives they control.
The underdog can roll a dice. On a 3+, they can force their opponent to pick a different objective.
The underdog can roll a dice. On a 3+, they can force their opponent to pick a different objective.
• ASHEN BASTION TWIST •
CURSED TREASURE Perhaps this artefact is surrounded by an ominous whispering that instils paranoia in those nearby, or perhaps it simply smells worse than an ogor midden at high noon. Either way, proximity to it is highly distracting.
Starting with the active player, each player picks an enemy unit within 3" of a relic. For the rest of the battle round, that unit has a maximum control score of 1.
The underdog must place the Ulguan Steel Caltrops. If there is no underdog, the players roll off and the winner must place them.
The underdog must place the Ulguan Steel Caltrops. If there is no underdog, the players roll off and the winner must place them.
• ASHEN BASTION TWIST •
EQUIVALENT ESCALADES By a twist of fate, both forces receive the order to besiege their enemy's defences at the same moment.
Each player scores 1 extra victory point at the end of their turn if they control the large terrain feature in enemy territory.
The underdog must place the Barrel of Emberstone. If there is no underdog, the players roll off and the winner must place it.
The underdog must place the Barrel of Emberstone. If there is no underdog, the players roll off and the winner must place it.
• ASHEN BASTION TWIST •
A TIMELY EXIT The thought occurs – you have your smouldering prizes, but do you have a way out?
The underdog can pick a battlefield edge to be obstructed.
Each player scores 1 extra victory point at the end of their turn for each battlefield edge that is not obstructed and has no enemy units within 3" of it.
Each player scores 1 extra victory point at the end of their turn for each battlefield edge that is not obstructed and has no enemy units within 3" of it.
• ASHEN BASTION TWIST •
GOT YOUR BACK Friends or flunkies, comrades or cronies – it's all the same: safety in numbers.
For the rest of the battle round, add 1 to save rolls for friendly units while they are within 3" of any other friendly units.
The underdog must place the Crate of Aqua Ghyranis. If there is no underdog, the players roll off and the winner must place it.
The underdog must place the Crate of Aqua Ghyranis. If there is no underdog, the players roll off and the winner must place it.
• ASHEN BASTION TWIST •
WE'LL HAVE THAT! That your opponent covets a thing is enough reason to go and seize it.
Shattered Crossroads Twist
• SHATTERED CROSSROADS TWIST •
ASSASSINATE The timely elimination of a chosen foe can all but ensure victory.
Starting with the active player, each player picks an enemy unit to be the mark. Each player receives 1 extra victory point at the end of the battle round if the enemy mark is destroyed this battle round.
The underdog must place the Inconspicuous Manhole. If there is no underdog, the players roll off and the winner must place it.
The underdog must place the Inconspicuous Manhole. If there is no underdog, the players roll off and the winner must place it.
• SHATTERED CROSSROADS TWIST •
AGGRESSIVE VALUATION A group of foes is guarding a particular item of loot with greater zeal than their other gains. Seize it to see what all the fuss is about...
Starting with the active player, each player picks a friendly unit to have the guarded loot. Each player receives 1 extra victory point at the end of the battle round if the enemy unit that has the guarded loot is destroyed this battle round.
The underdog can roll a dice. On a 3+, they can force their opponent to pick a different unit to have the guarded loot.
The underdog can roll a dice. On a 3+, they can force their opponent to pick a different unit to have the guarded loot.
• SHATTERED CROSSROADS TWIST •
STOCKPILING DRIVE In Embergard, disaster preparation is just a fact of life.
Each player receives 1 extra victory point at the end of their turn for each relic they control that they did not control at the start of their turn.
The underdog must place the Battered Barricade. If there is no underdog, the players roll off and the winner must place it.
The underdog must place the Battered Barricade. If there is no underdog, the players roll off and the winner must place it.
• SHATTERED CROSSROADS TWIST •
CRUX POINT Now you see it – the centre of the crossroads is the axle around which victory turns.
Each player receives 1 extra victory point at the end of their turn if they control the junction (the large circular objective in the centre).
The underdog must place the Ulguan Steel Caltrops. If there is no underdog, the players roll off and the winner must place them.
The underdog must place the Ulguan Steel Caltrops. If there is no underdog, the players roll off and the winner must place them.
• SHATTERED CROSSROADS TWIST •
ADRENALINE RUSH The arcane fluctuations of the emberstone deposits beneath Embergard can imbue those who battle above with unexpected vigour.
Starting with the underdog, each player can pick up to 2 friendly units that are not in combat to immediately move up to 3". If there is no underdog, the active player moves their units first.
The underdog’s units can end those moves in combat.
The underdog’s units can end those moves in combat.
• SHATTERED CROSSROADS TWIST •
RAPID MANOEUVRES Though their cobbled surface is cracked and pitted, Embergard’s roads still allow for swift movement – leaving more strength for cutting.
While a unit is wholly on the roads, it can use CHARGE abilities even if it used a RUN ability in the same turn.
The underdog can pick a friendly unit. That unit’s melee weapons gain Anti-charge (+1 Rend) for the rest of the battle round.
The underdog can pick a friendly unit. That unit’s melee weapons gain Anti-charge (+1 Rend) for the rest of the battle round.
Battle Tactic
• BATTLE TACTIC •
TAKE WHAT'S THEIRS They don't own it; they're merely holding onto it until you run them through.
You complete this battle tactic at the end of the turn if you control a relic that is within enemy territory.
• COMMAND •
| Enemy Movement Phase |
PREPARED RIPOSTE: These warriors are ready to use their foes’ over-eager fury against them.
Declare: Pick a friendly unit to be the target.
Effect: For the rest of the turn, the target has STRIKE-FIRST while it is in combat with an enemy unit that charged in the same turn.
Effect: For the rest of the turn, the target has STRIKE-FIRST while it is in combat with an enemy unit that charged in the same turn.
• BATTLE TACTIC •
PITLESS MURDER There is no honour in Embergard, and many meet their end surrounded and set upon in some dismal alley.
You complete this battle tactic at the end of your turn if an enemy unit was picked to be the target of all the combat attacks made by 2 or more different friendly units this turn.
• COMMAND •
 Any Hero Phase Any Hero Phase |
MOTIVATED BY GREED: These warriors need only to glimpse their reward to find new courage.
Declare: Pick a friendly unit within 6" of a relic to be the target.
Effect: Add D6 to the target’s control score until the start of your next turn.
Effect: Add D6 to the target’s control score until the start of your next turn.
• BATTLE TACTIC •
TAKE THE FLANKS Surround the enemy before you close in for the kill.
You complete this battle tactic at the end of your turn if there are any friendly units within 3" of each short battlefield edge.
• COMMAND •
| End of Any Turn |
RIGGED EXPLOSIONS: 'Is it... meant to be hissing like that?'
Declare: Pick a relic. Then, pick each unit (friendly and enemy) within 3" of that relic to be the targets.
Effect: Roll a D3 for each target. Inflict an amount of mortal damage on the target equal to the roll.
Effect: Roll a D3 for each target. Inflict an amount of mortal damage on the target equal to the roll.
• BATTLE TACTIC •
CUT OFF THE HEAD Claim the head of the enemy's general to shatter their morale.
You complete this battle tactic at the end of your turn if the enemy general was slain this turn
OR
the enemy general was slain in an earlier turn and any enemy units were destroyed this turn.• COMMAND •
| Enemy Charge Phase |
COUNTER-CHARGE: These warriors charge forth to stall the enemy's advance or enact a bold interception.
Declare: Pick a friendly unit that is not in combat to use this ability.
Effect: That unit can use a CHARGE ability as if it were your charge phase.
Effect: That unit can use a CHARGE ability as if it were your charge phase.
• BATTLE TACTIC •
RAID Drive deep into enemy territory and wreak havoc!
You complete this battle tactic at the end of your turn if any friendly units are wholly within enemy territory and not in combat.
• COMMAND •
| Any Charge Phase |
RACE FOR THE LOOT: Spying something valuable, your warriors make all haste to claim it.
Declare: Pick a relic on the battlefield to be the target.
Effect: For the rest of the turn, friendly units can finish charge moves within ½" of the target as if it were an enemy unit.
Effect: For the rest of the turn, friendly units can finish charge moves within ½" of the target as if it were an enemy unit.
• BATTLE TACTIC •
PROTECT THE LOOT What good is treasure if you can't hang onto it?
You complete this battle tactic at the end of your turn if an enemy unit was destroyed by a friendly unit while that friendly unit was within 3" of a relic.
• COMMAND •
| Your Hero Phase |
LAST-DITCH EFFORT: 'Giving up' is not a term that is part of these warriors’ lexicon.
Declare: Pick a friendly unit that has been destroyed and has not already been replaced.
Effect: Set up either a replacement unit with a combined Health characteristic of up to 4 or a single-model replacement unit with X damage points already allocated to it, where X is its Health characteristic minus 4. The unit must be set up more than 6" from all enemy units.
Effect: Set up either a replacement unit with a combined Health characteristic of up to 4 or a single-model replacement unit with X damage points already allocated to it, where X is its Health characteristic minus 4. The unit must be set up more than 6" from all enemy units.
• BATTLE TACTIC •
HOLD THE CENTRE Take the middle ground, and be the rock upon which the enemy shatters.
You complete this battle tactic at the end of your turn if there are 2 or more friendly units within 3" of the centre of the battlefield.
• COMMAND •
| Any Combat Phase |
SLIP AWAY: Embergard is a place of ash and confusion, making it easy for these warriors to evade their enemies.
Declare: Pick a friendly unit that is in combat to be the target.
Effect: The target can move 5". It can move through the combat ranges of enemy units but it cannot end that move in combat.
Effect: The target can move 5". It can move through the combat ranges of enemy units but it cannot end that move in combat.
• BATTLE TACTIC •
RAZE Break through enemy lines so you can plunge into the city beyond.
You complete this battle tactic at the end of your turn if there are any friendly units within 3" of the long battlefield edge in enemy territory.
• COMMAND •
| Any Combat Phase |
COVETOUS FRENZY: Is madness a consequence of or prerequisite for wealth?
Declare: Pick a relic to be the target.
Effect: For the rest of the turn, add 1 to hit rolls for attacks made by friendly units while they are within 3" of the target.
Effect: For the rest of the turn, add 1 to hit rolls for attacks made by friendly units while they are within 3" of the target.
• BATTLE TACTIC •
DAIS OF THE COMET The Twin-Tailed Comet is an omen of great significance.
You complete this battle tactic at the end of your turn if you control the Twin-Tailed Comet objective.
• COMMAND •
| Any Hero Phase |
GO DOWN FIGHTING: Teeth gritted, these warriors refuse to simply surrender.
Declare: Pick a friendly unit to be the target.
Effect: For the rest of the turn, each time you make an unmodified save roll of 5+ for a combat attack that targets this unit, inflict 1 mortal damage on the attacking unit after the FIGHT ability has been resolved.
Effect: For the rest of the turn, each time you make an unmodified save roll of 5+ for a combat attack that targets this unit, inflict 1 mortal damage on the attacking unit after the FIGHT ability has been resolved.
• BATTLE TACTIC •
DAIS OF THE HAMMER Sigmar’s sacred hammer is a potent symbol of might.
You complete this battle tactic at the end of your turn if you control the Ghal Maraz objective.
• COMMAND •
 End of Any Turn End of Any Turn |
FOOL'S GOLD: Something glinting among the rubble turns out to be less than worthless.
Declare: Pick a relic on the battlefield to be the target.
Effect: Remove the target from the battlefield, then set it up again more than 3" from all enemy units and more than 6" away from all other relics.
Effect: Remove the target from the battlefield, then set it up again more than 3" from all enemy units and more than 6" away from all other relics.
• BATTLE TACTIC •
COMB THE AREA It has been impressed on all of your warriors that returning empty-handed is not an option.
You complete this battle tactic at the end of your turn if all friendly units are within 3" of a relic (it does not need to be the same relic).
• COMMAND •
| Enemy Movement Phase |
REDEPLOY: Taking initiative, the warriors hastily reposition to respond to enemy movements.
Declare: Pick a friendly unit that is not in combat to use this ability.
Effect: That unit can move D6". That move cannot pass through or end within the combat range of an enemy unit.
Effect: That unit can move D6". That move cannot pass through or end within the combat range of an enemy unit.
• BATTLE TACTIC •
MATERIAL GAINS Valuable resources lie scattered about this quarter of Embergard. Secure them before the enemy can do the same.
You complete this battle tactic at the end of your turn if you control more relics than your opponent.
• COMMAND •
| Any Combat Phase |
GRIND THEM TO DUST: These warriors fight with reckless fury to annihilate the enemy.
Declare: Pick a friendly unit to use this ability.
Effect: That unit can use 2 FIGHT abilities this phase. After the first is used, however, inflict D3 mortal damage on that unit and it has STRIKE-LAST for the rest of the turn.
Effect: That unit can use 2 FIGHT abilities this phase. After the first is used, however, inflict D3 mortal damage on that unit and it has STRIKE-LAST for the rest of the turn.
5.0 Abilities
The vast majority of things that units can do in Warhammer Age of Sigmar are called abilities. This is an example of an ability: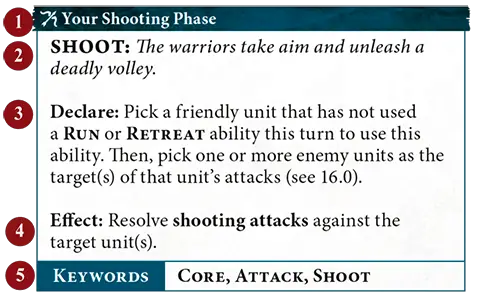
1
Timing2
Name and description3
Declare instructions4
Effect5
KeywordsAbility icons give you an idea what kind of effect the ability has at a glance.Movement AbilityOffensive AbilityDefensive Ability Shooting AbilityRallying AbilitySpecial AbilityControl Ability Shooting AbilityRallying AbilitySpecial AbilityControl Ability | ||
1.0 Wizards and Priests
WIZARDS are special units that can cast spells, and PRIESTS are special units that can chant prayers. Spells and prayers are powerful abilities that can have a dramatic impact on the battle.
6.0 Visibility
A target model is visible to another model (which we’ll call the ‘observing model’) if you can draw a straight line through the air (whether horizontal, diagonal or vertical) from any point on the observing model to any point on the target model that does not intersect any objects except for other models in the observing model’s unit. A target unit is visible to an observing unit if at least 1 model in the target unit is visible to at least 1 model in the observing unit. A model is always considered to be visible to itself.If a rule or ability requires a target to be both within a given range of and visible to the unit using that ability, or to a model in that unit, both conditions must be met by the same model in the target. You could not, for instance, target a unit where one model is within range but not visible and another model is not in range but is visible.
| ||
| In some cases, it might not be immediately clear whether a model is visible. If so, stoop down to get a look from behind the observing model. If any part of the other model is visible, even if it is just the tip of a spear, then that model is visible for rules purposes. | ||
18.1 Ward Saves
Units with the WARD keyword have the ‘Ward Save’ passive ability. The number after the WARD keyword indicates the ward value for the ward save. If a unit had WARD (5+), for example, its ward value would be 5. If a unit has more than one ward save, only the ward save with the lowest value applies to it; the other has no effect.| Passive |
WARD SAVE: Whether through their uncanny reflexes, unnatural toughness or a source of mystical protection, these warriors can avoid otherwise lethal attacks.
Effect: In step 1 of the damage sequence (see 18.0), make a ward roll of D6 for each damage point in this unit’s damage pool. If the roll equals or exceeds this unit’s ward value, remove that damage point from the damage pool.
2.0 Spells
The declare step of each spell will tell you to make a casting roll of 2D6. If the roll does not equal or exceed the spell’s casting value (at the top-right corner of the spell), the spell fails and its effect is not resolved.If the unmodified casting roll includes 2 or more rolls of 1, the spell is miscast: the spell fails, its effect is not resolved, D3 mortal damage is inflicted on the WIZARD that used it, and that WIZARD cannot use any more spells in that phase.
Enemy reactions can only be used if the casting roll equals or exceeds the spell’s casting value. So long as the spell is not unbound (see 4.0), then it is successfully cast: resolve its effect.
EXAMPLE SPELL
| Your Hero Phase | 6 |
MYSTIC SHIELD: The caster's allies are bathed in an unearthly glow that protects them from harm.
Declare: Pick a visible friendly unit wholly within 12" of this WIZARD to be the target. Then, make a casting roll of 2D6.
Effect: The target has WARD (6+) this turn.
Effect: The target has WARD (6+) this turn.
| KEYWORDS | SPELL |
Unbind
| Reaction: Opponent declared a SPELL ability |
UNBIND: The wizard saps the energy from an enemy’s spell, nullifying its effects.
Used By: A friendly WIZARD within 30" of the enemy WIZARD casting the spell.
Effect: Make an unbinding roll of 2D6. If the roll exceeds the casting roll tor the spell, then the spell is unbound and its effect is not resolved. This reaction cannot be used more than once per casting roll.
Effect: Make an unbinding roll of 2D6. If the roll exceeds the casting roll tor the spell, then the spell is unbound and its effect is not resolved. This reaction cannot be used more than once per casting roll.
| KEYWORDS | UNBIND |
Hit Roll
Roll a dice. If the roll equals or exceeds the attacking weapon’s Hit characteristic, the attack scores a successful hit: move on to the next step. If not, the attack fails and the attack sequence ends. Unmodified hit rolls of 1 always fail. If an unmodified hit roll for an attack made with a weapon is a 6, that attack is a critical hit.| Critical hits have no effect on their own but often trigger additional effects (see 20.0 Weapon Abilities). | ||
1.1 Wholly on Terrain and Behind Terrain
A model is wholly on a terrain feature if its base is on that terrain feature and no part of its base extends past the edge of that terrain feature. A unit is wholly on a terrain feature if every model in that unit is wholly on that terrain feature.When a unit is targeted by an attack, if it is impossible to draw a straight line from the closest point on the attacking model’s base to the closest point on the base of a model in the target unit that is in range without that line passing over that terrain feature, the target unit is considered to be behind a terrain feature for the attack made by that attacking model. Ignore parts of the terrain feature within the attacking model’s combat range for the purposes of determining if the target is behind that terrain feature.
Universal Core Abilities - Charge Phase
| Your Charge Phase |
CHARGE: With a mighty battle cry, the warriors charge into combat with the enemy.
Declare: Pick a friendly unit that is not in combat and has not used a RUN or RETREAT ability this turn to use this ability. Then, make a charge roll of 2D6.
Effect: That unit can move a distance up to the value of the charge roll. That unit can move through the combat ranges of any enemy units and must end that move within 1/2" of a visible enemy unit. If it does so, the unit using this ability has charged.
Effect: That unit can move a distance up to the value of the charge roll. That unit can move through the combat ranges of any enemy units and must end that move within 1/2" of a visible enemy unit. If it does so, the unit using this ability has charged.
| KEYWORDS | CORE, MOVE, CHARGE |
7.0 Combat Range
Each model has a combat range that extends 3" horizontally from its base and any distance vertically from that circle to form a cylinder. The combat range of a unit extends 3" horizontally and any distance vertically from every model in that unit. Units from opposing armies that are within each other’s combat range and that are visible to each other are in combat with each other. When a unit that is not in combat enters the combat range of a visible enemy unit, it moves into combat.
A model is considered to be in combat with an enemy unit if that unit is within the model’s combat range and visible to it’
A model is considered to be in combat with an enemy unit if that unit is within the model’s combat range and visible to it’
| ||
| Passive |
FLY: Soaring above the battlefield, this unit can reach destinations that are inaccessible to other troops.
Effect: As this unit moves, it ignores other models, terrain features and the combat ranges of enemy units. It cannot end its move in combat unless specified in the ability that allowed it to move. Ignore any vertical distance moved for this unit.
32.1 Contesting Objectives
Unless otherwise specified, if an objective is within a model’s combat range, that model is contesting that objective. If any models in a unit are contesting an objective, that unit is contesting that objective.Each unit can only count as contesting a single objective for the purposes of determining objective control (see 32.2). Before determining objective control, for each of their units contesting two or more objectives, the active player must pick one of those objectives for it to contest. Then, their opponent does the same.
Designer’s Note: For purposes other than determining objective control, a unit can contest more than one objective.
32.2 Objective Control
In the deployment phase after all Deployment Phase abilities have been used and at the end of each turn, follow this sequence for each objective in an order chosen by the active player:- Starting with the active player, each player determines the control score of each of their units that is contesting that objective. A unit’s control score is the combined Control characteristics of all the models in that unit that are contesting the objective. Some abilities modify a unit’s control score, but it cannot be reduced to less than 1.
- Each player adds up the control scores of all of their units contesting that objective. This is their army control score for that objective.
- The players compare their army control scores for that objective. If one player’s score is higher, that player gains control of that objective. Once a player gains control of an objective, it remains under their control until their opponent gains control of it.
| Sometimes objective markers get accidentally nudged while you are moving models around. This is perfectly fine - just remember to put them back in their proper positions when determining objective control. | ||
Wound Roll
Roll a dice. If the roll equals or exceeds the attacking weapon’s Wound characteristic, the attack successfully wounds: move on to the next step. If not, the attack fails and the attack sequence ends. Unmodified wound rolls of 1 always fail.17.2 Mortal Damage
Some abilities inflict mortal damage. If an ability inflicts mortal damage on a unit, add that number of damage points to the unit’s damage pool for that ability (see 18.2 Allocating Damage).
Shooting attacks
Shooting attacks are made with ranged weapons. The target unit(s) must be within a distance equal to the Range characteristic of the weapon being used and visible to the attacking model. Models cannot make shooting attacks if their unit is in combat, unless otherwise specified (see 20.0 Weapon Abilities).32.0 Objectives
Many battleplans award victory points for controlling objectives, which are represented by objective markers. Unless otherwise specified, objective markers are round and 40mm wide. Models can move over and end their moves on objective markers. If an objective marker is on the border between territories, it is within all those territories but wholly within none of them. Objective markers don’t block visibility.
24.2 Replacement Units
Some abilities allow you to set up a replacement unit. When setting up that unit, it should have the same warscroll type, weapon options and number of models as the original unit, unless otherwise specified in the ability. Many of these abilities specify the proportion of models in the replacement unit (e.g. half the number of models from the original unit). In these cases, you can pick which models from the original unit are set up.The replacement unit is otherwise treated as a new unit; any keywords or abilities the original unit gained during the battle, and any persisting effects that applied to it, do not apply to the replacement unit. Each unit can only be replaced once, and you cannot replace replacement units.
If the original unit was reinforced and the replacement unit has more than half the number of models from the original unit, the replacement unit is considered to be reinforced.
| Because a replacement unit is treated as a completely new unit, it could, for instance, use a Once Per Battle ability on its warscroll even if the unit it replaced used that ability earlier in the battle. | ||
Roll-off
If you are instructed to roll off, each player should roll a dice. Whichever player has a higher roll wins the roll-off. If the result is a tie, each player should roll off again until there is a clear winner, unless otherwise specified.12.0 Start of Battle Round
At the start of each battle round, follow these steps:1. Determine the Active Player: If it is the first battle round, the player who finished setting up their army first decides who will take the first turn (unless otherwise specified in the battlepack or battleplan).
If it is not the first battle round, the players make a roll-off called the priority roll and the winner decides who will take the first turn. If the roll-off is a tie, the player who took the first turn in the previous battle round decides who will take the first turn in the current battle round.
When it is a player’s turn, regardless of whether they take the first or second turn, they are referred to as the active player.
2. Determine the Underdog: Whichever player has the fewest victory points is the underdog for the battle round. If the players are tied (e.g. in the first battle round), then there is no underdog, unless otherwise specified.
3. Start of Battle Round Abilities: The active player can use any
Start of Battle Round
abilities first, then their opponent can do the same.
Determine the Underdog
Whichever player has the fewest victory points is the underdog for the battle round. If the players are tied (e.g. in the first battle round), then there is no underdog, unless otherwise specified.Save Roll
The commander of the target unit rolls a dice, subtracting the attacking weapon’s Rend characteristic from the roll. Unmodified save rolls of 1 always fail. If the roll equals or exceeds the Save characteristic of the target unit, the attack fails and the attack sequence ends. If not, it is a successful attack: move on to the next step.14.3 Charge Phase
| Your Charge Phase |
CHARGE: With a mighty battle cry, the warriors charge into combat with the enemy.
Declare: Pick a friendly unit that is not in combat and has not used a RUN or RETREAT ability this turn to use this ability. Then, make a charge roll of 2D6.
Effect: That unit can move a distance up to the value of the charge roll. That unit can move through the combat ranges of any enemy units and must end that move within 1/2" of a visible enemy unit. If it does so, the unit using this ability has charged.
Effect: That unit can move a distance up to the value of the charge roll. That unit can move through the combat ranges of any enemy units and must end that move within 1/2" of a visible enemy unit. If it does so, the unit using this ability has charged.
| KEYWORDS | CORE, MOVE, CHARGE |
Anti-X (+1 Rend)
Add 1 to this weapon’s Rend characteristic if the target has the keyword after ‘Anti-’ or fulfils the condition after ‘Anti-’. Multiples of this ability are cumulative. For example, if a weapon has both Anti-charge (+1 Rend) and Anti-HERO (+1 Rend), then add 2 to the Rend characteristic of the weapon for attacks that target a HERO that charged in the same turn.15.3 Pile-in Moves
Some abilities, such as FIGHT abilities, allow a unit to make a short move called a pile-in move to get into a better position for combat. To do so:If your unit is in combat: Pick an enemy unit your unit is in combat with to be the target of the pile-in move. Each model in your unit can move up to 3". That move can pass through the combat ranges of any enemy units, but each model must end that move no further from the target unit. At the end of the move, your unit must still be in combat with all units that it was in combat with at the start of the move.
If your unit is not in combat: Each model in your unit can move 3" in any direction. That move can pass through and end within the combat ranges of any enemy units.
| ||
19.0 Strike-first and Strike-last
If there are any STRIKE-FIRST units in combat after any non-FIGHT combat phase abilities have been used, other units cannot be picked to use a FIGHT ability until those units have been picked to use a FIGHT ability. After all those STRIKE-FIRST units have fought, the active player picks the next unit to fight.If there are any STRIKE-LAST units in combat, they cannot be picked to use a FIGHT ability if there are any units in combat that do not have STRIKE-LAST and have not yet used a FIGHT ability.
If a unit has STRIKE-FIRST and STRIKE-LAST, treat it as if it had neither.
| There may be situations when a unit that has STRIKE-FIRST is not in combat at the start of the phase, but because of moves such as pile-in moves, it is ‘pulled into combat’ later in the phase. In such cases, STRIKE-FIRST has no effect on that unit because it was not in combat at the start of the phase. Abilities that allow a unit to use a FIGHT ability immediately after another unit do not override the STRIKE-FIRST or STRIKE-LAST constraints, so you could not pick a unit with STRIKE-LAST to fight immediately after a unit with STRIKE-FIRST. | ||
Combat attacks
Combat attacks are made with melee weapons. The target unit(s) must be within the combat range of the attacking model and visible to it. The model must attack with all of the melee weapons it is armed with.13.1 Fight Abilities
Abilities with the FIGHT keyword follow a different sequence to other abilities. When the players are using Combat Phase
abilities as described in 13.0, they cannot use FIGHT abilities.After the players have finished using
Combat Phase
abilities that are not FIGHT abilities, they must alternate picking 1 eligible unit to use a FIGHT ability, starting with the active player. Each unit in combat must use a FIGHT ability if it is able to.Once a player has no more units that are eligible to use a FIGHT ability, the other player continues to pick units that are eligible to use a FIGHT ability, one after another, until there are no more units that are eligible to use a FIGHT ability.
| ||
Contents | ||