Boarding Action Rules

Books
| Book | Kind | Edition | Version | Last update |
 Boarding Actions Boarding Actions | ||||
| Boarding Actions | Expansion | 10 | 1.1 | July 2025 |
Introduction
While many Warhammer 40,000 battles feature large armies clashing on the field of battle, Boarding Actions missions allow you to play out those crucial assaults that can turn the tide of the greater conflict. Boarding Actions armies will also look different to what you might be used to. Your forces will not have access to the Detachment rules, Enhancements or Stratagems featured in your Codex or Index, but can instead utilise a new range of bespoke options specifically tailored to this deadly form of combat, found both within this book and other publications.
Besides these rules, in order to take your forces out to fight amongst the stars, you will need to pick up a copy of the Warhammer 40,000: Boarding Actions Terrain Set.
This set provides everything that you see here, with a myriad of different wall pieces, hatchways and architectural elements included. In addition, it also contains two fully detailed game boards depicting the crumbling decking and pipework of the ships you are fighting aboard - everything you need to begin battling your way across the void craft of the 41st Millennium.
Boarding Actions Battlefields
Boarding Actions battles involve a series of new components that differ from those you may have used in other games of Warhammer 40,000. Additional details on how to use these can be found below.Boarding Action Boards
When fighting a Boarding Actions battle, your battlefield will be made up of two Boarding Actions game boards, laid side by side to create the battlefield area. Each mission will contain a mission map that not only shows you the important details required to play that mission, but also shows the layout of the two game boards and how they should be set up. In some missions this will be so that they are touching, but in others, it may require the two game boards to be separated.Each game board is made up of a series of squares, called Zones, like the one shown below.

These squares will often be used to denote certain areas of the battlefield, most commonly Entry Zones, which are used when setting up your units on the battlefield.
Terrain
Most of the terrain in Boarding Actions games consists of Walls (which includes any attached Pillars), and in amongst these will be Hatchways, which include a Hatch that can be opened. An example of such a piece of scenery is shown below.
Hatchways can be in one of two states: closed or open. When a Hatchway is closed, it will prevent movement and visibility. When a Hatchway is open, models will be able to move freely through it and see through it.


Boarding Actions can be used to play battles with your Crusade force in the normal way - your units still have all of their Battle Honours and other upgrades as they would in any other game. However, some of the Agendas found within various publications are not appropriate for Boarding Actions games, either because they reference rules mechanics that do not exist in these battles, such as deployment zones, or because narratively they do not fit within the environment. We recommend players have a discussion before the game to mutually agree which Agendas from their factions are appropriate for the game they are about to play.
Set Up
Boarding Actions battles use unique terrain to lay out the claustrophobic corridors of the spacecraft where your fights will take place. This terrain is highly modular and can be attached together in a large variety of configurations. If you are playing a Boarding Actions mission, the mission map will also show you where to set up the terrain features, along with the positions of each Hatchway.Each piece of terrain on the mission map will be coded, allowing you to quickly identify which piece it corresponds to, and where that piece should be positioned on the game boards. You can find a key denoting the code for each piece in Components section. We also recommend painting or writing the codes for each piece onto the underside of that piece - this will allow you to identify them quickly when setting up your game.
When placing these terrain pieces on the game board, the Wall sections line up with the lines between the Zones on the board, and any Pillars line up with the smaller squares in the corner of each Zone, as shown below.

Rules Adaptations
In this section you will find a number of additional rules or amendments to the Core Rules for Warhammer 40,000 that are used when fighting Boarding Action battles.The following documents, all available on warhammer-community.com, have particular relevance to Boarding Actions games.
MUSTERING RULES
The Boarding Actions Mustering Rules document is the go-to place for the most up-to-date rules you need to put your forces on the battlefield. It includes army construction rules for every faction, as well as any updates to their datasheets to account for the unique constraints of Boarding Actions games. This document will be updated as new Codexes and models are released and, over time, it will supersede the mustering rules found within this book.
Before the Battle
DEEP STRIKE ABILITYPlayers decide whether units with this ability are placed into Reserves at the start of the Deploy Armies step, instead of in the Declare Battle Formations step. In addition, at least half the units in a players army must be set up normally and cannot be placed into Reserves using this rule.
During the battle, unless specified otherwise, players can only set up units from their army on the battlefield using this ability in the second and third battle rounds, and when doing so, cannot set up more than one unit per battle round in this manner. Any units placed into Reserves using this ability that are not set up by the end of the third battle round are considered to be destroyed.
Movement Phase
Impassable Terrain and Other Models
Walls, closed Hatchways and other models are considered impassable, meaning models cannot move through or end a move overlapping them.
IMPASSABLE TERRAIN
Model A and Model B are 5" apart, as the Wall cannot be measured through (indicated by the dashed red line).
Open Hatchways
Models can move through open Hatchways without hindrance, even if their base is wider than that of the Hatchway, but a model cannot end a move with its base in the middle of an open Hatchway. The Hatch of an open Hatchway is ignored for all purposes.
HATCHWAYS
Model A and Model B are 5" apart, as the Hatchway on the left is closed and so must be measured around (indicated by the white lines). However, the Hatchway on the right is open and so is measured through.
Measurement
When measuring the distance between two points, you cannot measure through Walls or closed Hatchways - instead you must measure the closest path around these. If you cannot trace a path between two points, they are considered to be an infinite distance apart.Engagement Range
When measuring through an open Hatchway, while a model is within 2" horizontally of an enemy model, those models are within Engagement Range of each other.
ENGAGEMENT RANGE
- Both Models B and C are within Engagement Range of Model A, as the shortest distance between them passes through an open Hatchway and they are within 2" of Model A.
- However, Model D is not within 2" of Model A, so these two models are not within Engagement Range of each other.
Each player will have one or more deployment zones called Entry Zones. Each time a unit is set up, it must be set up wholly within one of your Entry Zones. If a unit will not fit wholly within an Entry Zone, all of its models must be set up as close to the centre of that Entry Zone as possible.
In the Deploy Armies step, you can set up a maximum of one unit without the CHARACTER keyword and a maximum of one unit with the CHARACTER keyword in each Entry Zone. Each time a unit is set up using an Entry Zone, if every model in that unit has the Infiltrators ability, that unit can instead be set up anywhere on the battlefield wholly within 6" of that Entry Zone (normal Infiltrators rules do not apply), but counts as having been set up in that Entry Zone.
During the battle, you cannot set up a unit within an Entry Zone if any other unit is within that Entry Zone. Rules that prevent a unit from being set up within a specific distance of another model or unit cannot prevent a unit from being set up within an Entry Zone.
Deep Strike Ability
Each time a model with this ability is set up on the battlefield using this ability, when measuring the horizontal distance to enemy models, Walls and closed Hatchways are ignored. This also applies to abilities that prevent units from being set up using the Deep Strike ability.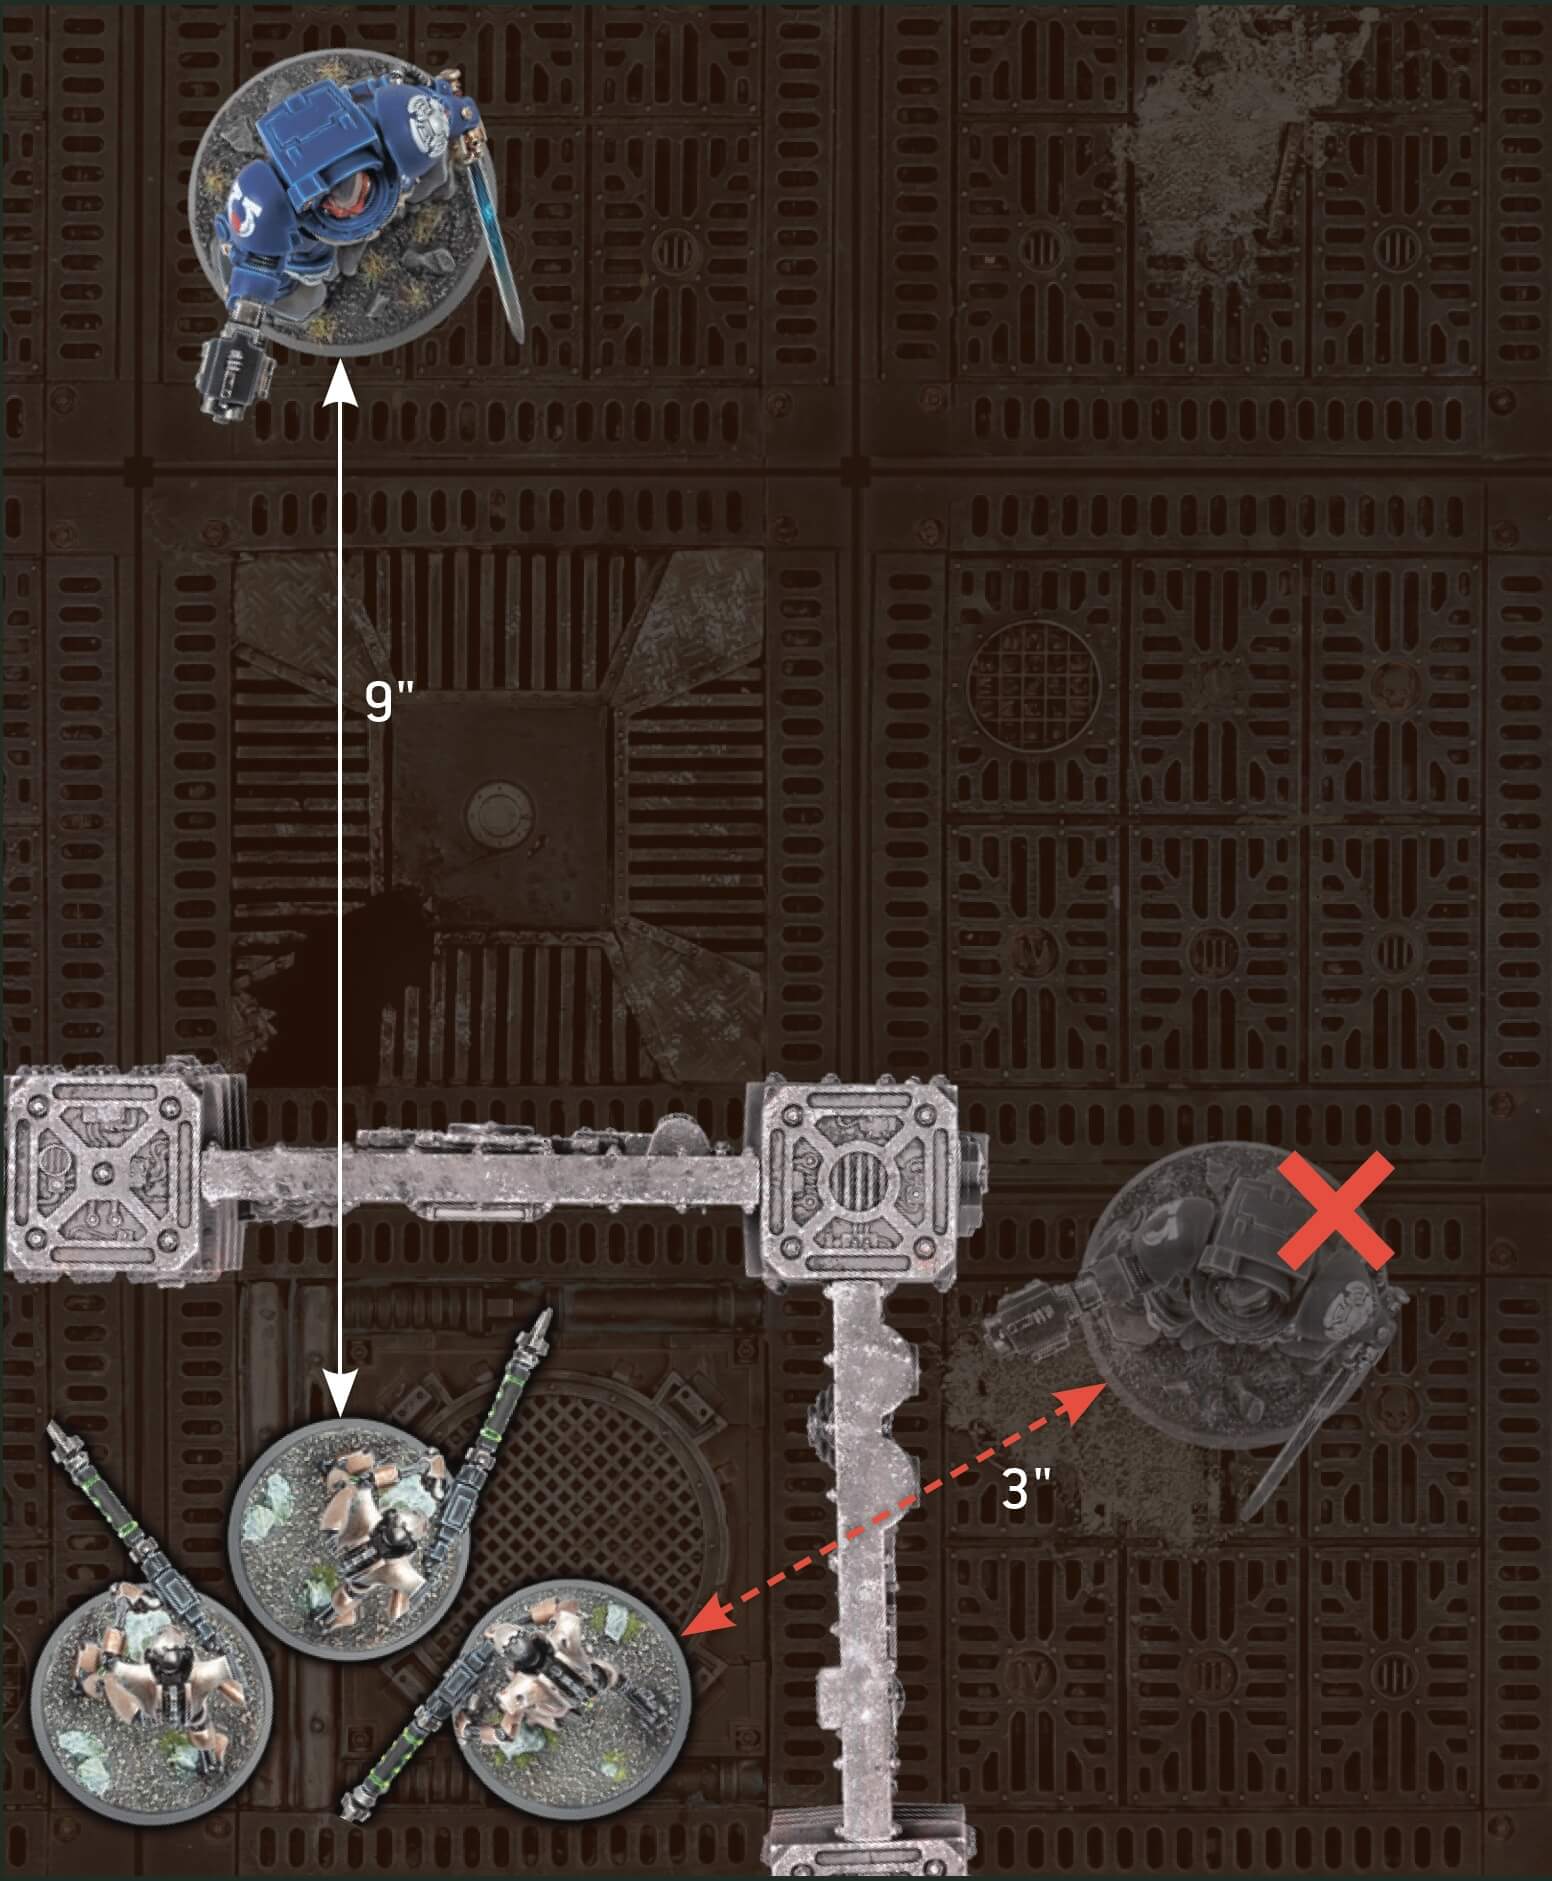
DEEP STRIKE ABILITY
The TERMINATOR model cannot be deployed to the position on the right using the Deep Strike ability, as while normally when measuring the distance between two points we would measure around Walls and closed Hatchways (thereby making the distance greater than 9" and valid for deployment), for the purpose of the Deep Strike ability these terrain features are ignored, meaning that this position would be considered to be within 9" of the enemy models and therefore invalid. The deployment position at the top is valid, however, as it is more than 9" away from the enemy models while ignoring the Walls and Hatchway.
Opposite Sides of a Hatchway
If the shortest line between two models would pass through a Hatchway when it is opened, regardless of whether or not it is open at the time, then those models are said to be on the opposide sides of that Hatchway from one another. If every model in a unit is on the opposite side of a Hatchway from every model in another unit, then those units are said to be wholly on the opposite sides of that Hatchway from one another.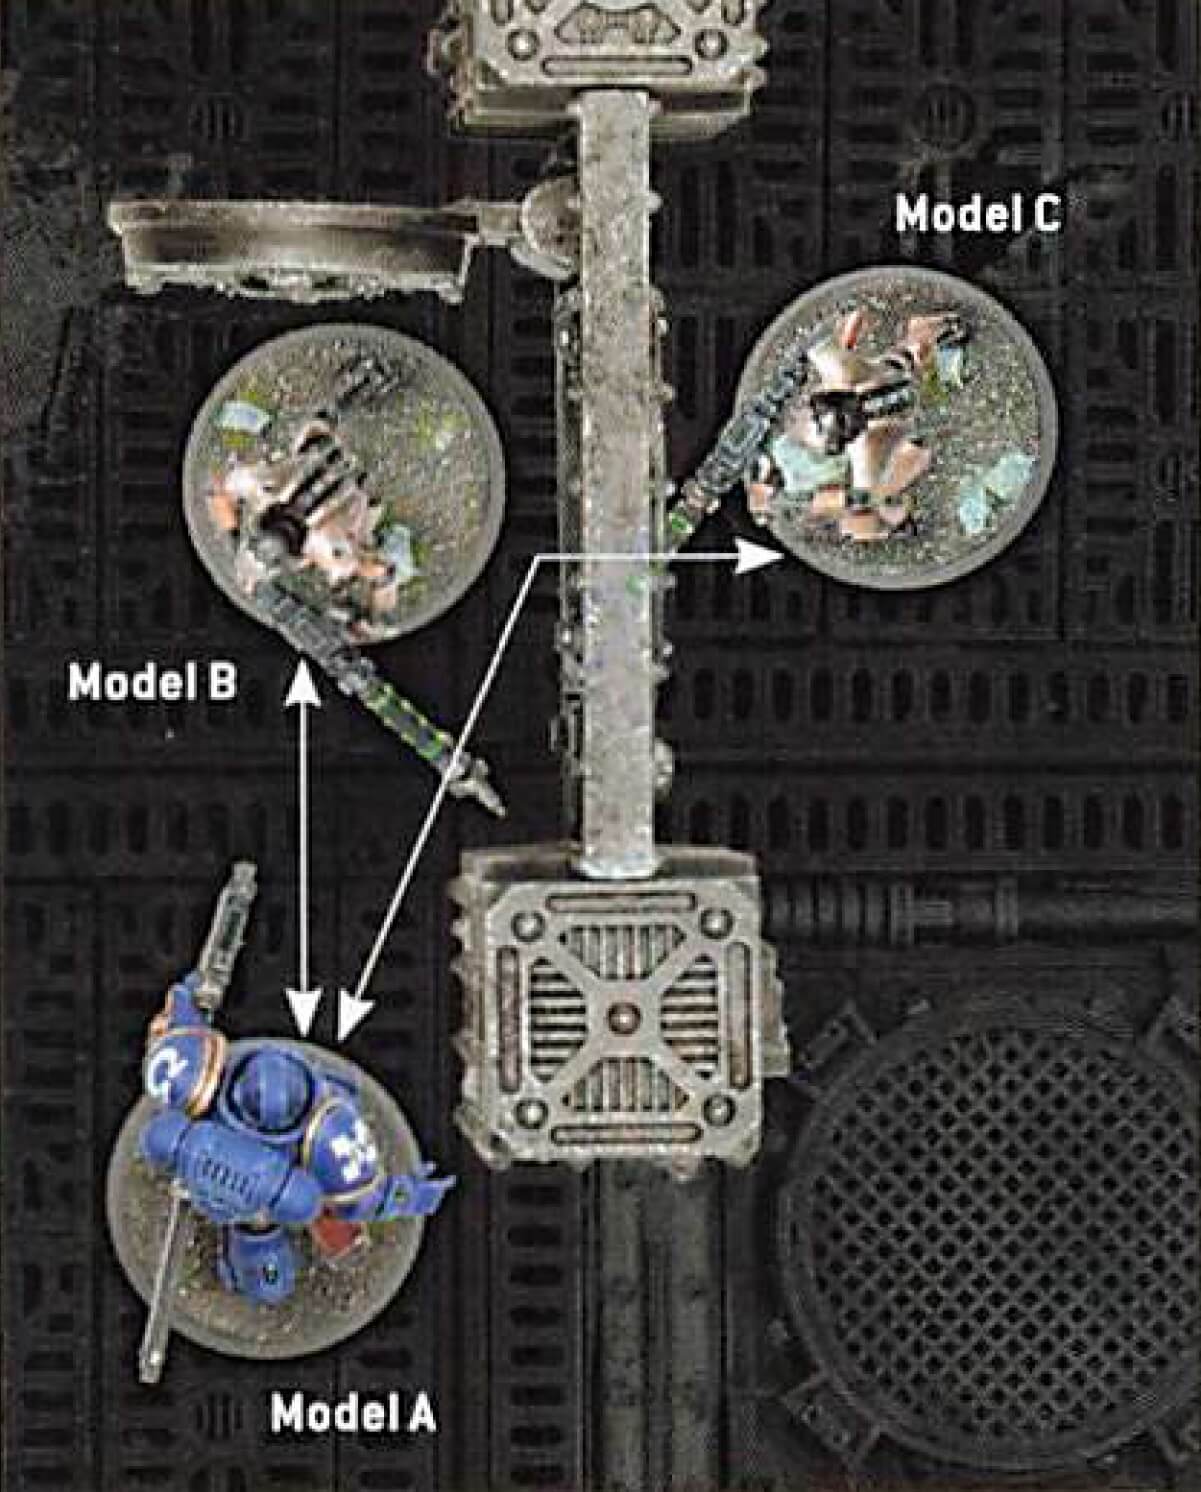
MODELS ON OPPOSITE SIDES OF A HATCHWAY
In this example, Model C is on the opposite side of the Hatchway from Model A, as the shortest distance between them passes through the open Hatchway. This is not the case for Models A and B, however. As such, the Necrons unit is not wholly on the opposite side of the Hatchway from the Space Marines unit.
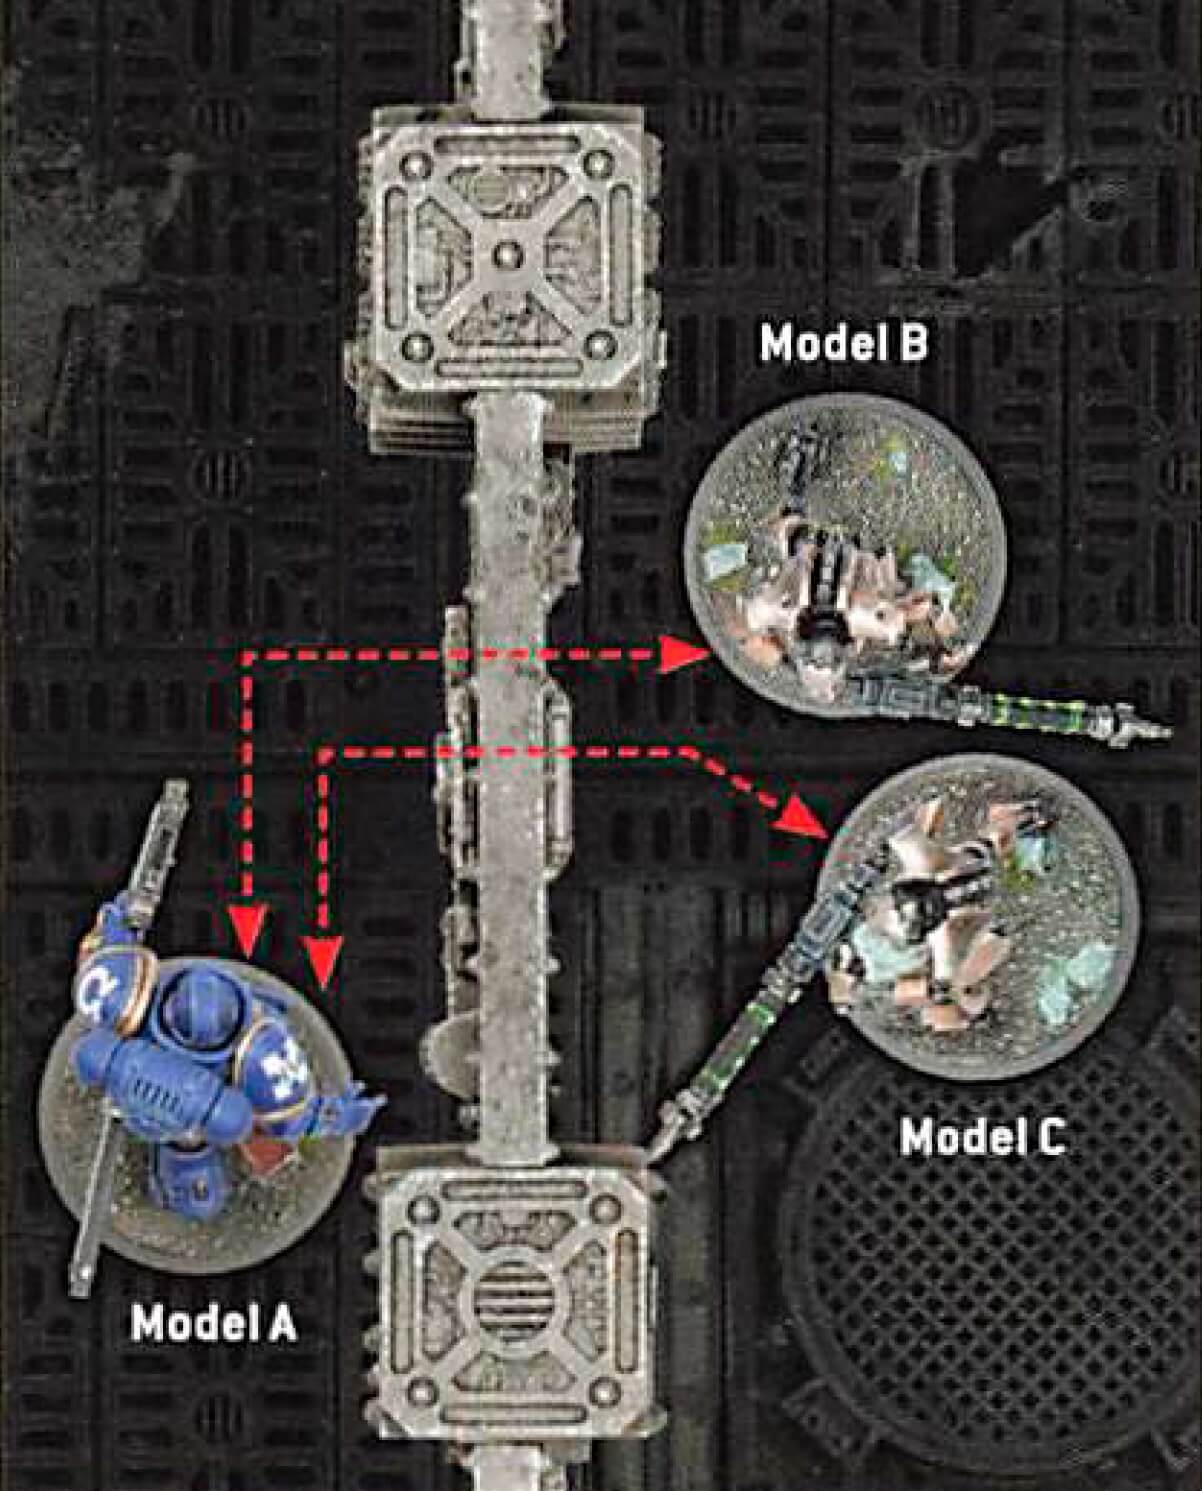
UNITS ON OPPOSITE SIDES OF A HATCHWAY
In this example, although the Hatchway is closed, the shortest distance between Model A and Models B and C would pass through the Hatchway if it was opened. Not only does this mean that each Necrons model is on the opposite side of the Hatchway from Model A, but their unit is also considered wholly on the opposite side of the Hatchway from Model As unit.
Flying
While on the battlefield, models lose the Fly keyword if they have it, and cannot Fly. In addition, at the start of the battle, if their Move characteristic is greater than 9", it is reduced to 9".Objective Markers
Models can move over objective markers as if they were not there, and they can end a move on top of an objective marker. A model is within range of an objective marker if it is within 1" horizontally of that objective marker.Operating Hatchways
At the end of the Move Units step of each players Movement phase, one or more units from that players army (excluding units that are within Engagement Range of one or more enemy models) can attempt to operate one Hatchway each. For a unit to do so, that player must select a Hatchway within 1" of their unit. If there are any enemy units on the opposite side of and within 1" of that Hatchway, their opponent can choose for one of those enemy units to try to prevent that Hatchway from being operated. If they do, the players roll off, each adding the Toughness characteristic of one of the models from their respective units to their results. If the player attempting to operate the Hatchway wins that roll off, or if their opponent does not try to prevent them from doing so, that Hatchway changes from open to closed or from closed to open, depending on its current state.If a Hatchway opens and units on opposite sides of that Hatchway now find themselves within Engagement Range of each other, then those units will be eligible to fight during the subsequent Fight phase, but none of those units count as having made a Charge move this turn.
If a rule specifies that a unit from a player’s army can operate a Hatchway, then a unit from the opponent’s army can attempt to prevent it in the normal manner described above. If, however, a rule says explicitly to open or close a Hatchway, then this cannot be prevented.
A Hatchway can never be closed if there are models from the same unit on opposite sides of that Hatchway, no matter the reason.


Shooting Phase
Visibility
A model is visible to an observing model if you can trace a straight line from any part of its base to any part of the observing models base, without that line passing through any of the following:- A Wall.
- A closed Hatchway.
- A model that is not part of the target models unit.
If you can draw a straight line to every part of a model’s base from any part of an observing model’s base, as described above, then that model is said to be fully visible to the observing model.

- Model A cannot see Model B as it is not possible to draw a line from Model As base to Model B’s base without it passing through a Wall.
- Model A can see Model C as a line can be drawn, but part of Model C is still hidden from Model A by the Wall. As such, it will have the Benefit of Cover against ranged attacks made by Model A.
- Model D is fully visible to Model A, so Model D will not have the Benefit of Cover.

- Model B cannot see Model A as it is not possible to draw a line from Model B’s base to Model As base without it passing through either a Wall or a closed Hatchway.
- Model B can see Model C as such a line can be drawn through an open Hatchway and Model C is considered fully visible to it.

- Models B, C and D are all from the same unit.
- When Model D’s unit is selected to shoot, Model D cannot make any ranged attacks against Model A, as it is not possible to draw a line between their bases without it passing through Models B or C.
- However, when Model A is selected to shoot, because Models B and C are part of the same unit as Model D, Model D is considered visible for the purposes of allocating attacks to it.
- Model D is fully visible to Model A, and so Model D would not have the Benefit of Cover.

- Models B and C are from one unit. Models D and E are from a different unit.
- When Model A is selected to shoot, it cannot make any ranged attacks against Model D's unit, as it is not possible to draw a line between their bases without it passing through Models B or C, which are not part of Model D’s unit.
Blast Weapons
Each time a model makes an attack with a weapon with the [BLAST] ability, when determining how many models are in the target unit for the purpose of that ability, only count the models that are visible to the attacking model.Allocating Attacks
When allocating ranged attacks to a model in a unit that has not already lost one or more wounds, that attack must be allocated to a model that is visible to one or more models in the shooting unit. If there is no such model to allocate the attack to, the attack sequence ends.Benefit of Cover
Each time a ranged attack is allocated to a model, that model has the Benefit of Cover against that attack unless it is fully visible to one or more models in the attacking unit.Tactical Manoeuvres
At the start of your Shooting phase, you can select one or more units from your army to each perform one Tactical Manoeuvre.In order for a unit to perform a Tactical Manoeuvre:
- It must not be Battle-shocked.
- It must not be within Engagement Range of one or more enemy models.
- It must not have Advanced or Fallen Back this turn.
- It must not have been set up on the battlefield this turn.
That player can then select one of the following Tactical Manoeuvres for that unit to perform and, until the end of the turn, that unit is not eligible to shoot or declare a charge.
Some mission rules will add new Tactical Manoeuvres that units from your army can perform. When doing so, all of the rules above also apply to those Tactical Manoeuvres.
Secure Site
BATTLELINE units only. Select one objective marker you control that is within range of that unit. At the start of your next Command phase, provided that unit is not Battle-shocked, is still within range of that objective marker, and you still control that objective marker, that unit Seizes that objective marker (see below).Set to Defend
Until the start of your next Command phase, each time a model in that unit makes a melee attack, add 1 to the Hit roll.Set Overwatch
Until the end of your opponents next turn, just after an enemy unit is set up or when an enemy unit ends a Normal, Advance or Fall Back move, declares a charge, or opens a Hatchway, your unit can fire Overwatch at that enemy unit.Each time a unit fires Overwatch, it can shoot as if it were your Shooting phase, but when doing so:
- Models in that unit can only make attacks that target that enemy unit (and only if it is an eligible target).
- Each time a model in that unit makes an attack, an unmodified Hit roll of 6 is required to score a hit, irrespective of the attacking weapons Ballistic Skill or any modifiers.
- Critical Hits are only ever scored on an unmodified Hit roll of 6, irrespective of any other abilities.
- Each unit cannot fire Overwatch more than once per turn.
When a players unit Seizes an Objective Marker, that objective marker is Secured by that player’s army. When an objective marker is Secured by a players army, that objective marker is controlled by that player and remains so, even if they have no models within range of it, until their opponent controls it at the start or end of any turn. Note that some rules allow an army to Secure an objective marker without having a unit actually Seize it.
Charge Phase
Visibility
A unit can only be selected as a target of a charge if it is visible to the charging unit.Fight Phase
Pile-in and Consolidation Moves
Each time a model makes a Pile-in or Consolidation move:- It cannot end that move within Engagement Range of a unit that was not visible to its own unit when it started that move.
- It does not need to end that move closer to the closest enemy model, provided it ends that move as close as possible to the closest enemy unit that is visble to its own unit.
Leaders
Units with the Leader ability are normally able to be attached to Bodyguard units, starting the battle as a single unit. In Boarding Actions battles this is not the case - Leaders cannot be attached to Bodyguard units and instead remain as their own independent unit for the entire battle.Leader Abilities
Many Character units have abilities that they confer while attached to a Bodyguard unit, that begin with the phrase ‘while this model is leading a unit’ or ‘while this unit is leading a unit’. Such abilities are called Leader abilities and can still be conferred onto friendly units using the Battlefield Command Stratagem.When using this Stratagem, you can select one friendly unit that your Leader could normally be attached to; that unit will gain the effects of that Leader ability as if that Leader was attached to it. Note, however, that the Leader cannot itself benefit from such abilities; only the selected unit will benefit.
- Alpha Warrior: While this model is leading a unit, weapons equipped by models in that unit have the [SUSTAINED HITS 1] ability.
Once the effect of the Battlefield Command Stratagem has been applied, there is no requirement for the TYRANID WARRIORS WITH MELEE BIO-WEAPONS unit to stay within 6" of that Winged Tyranid Prime.
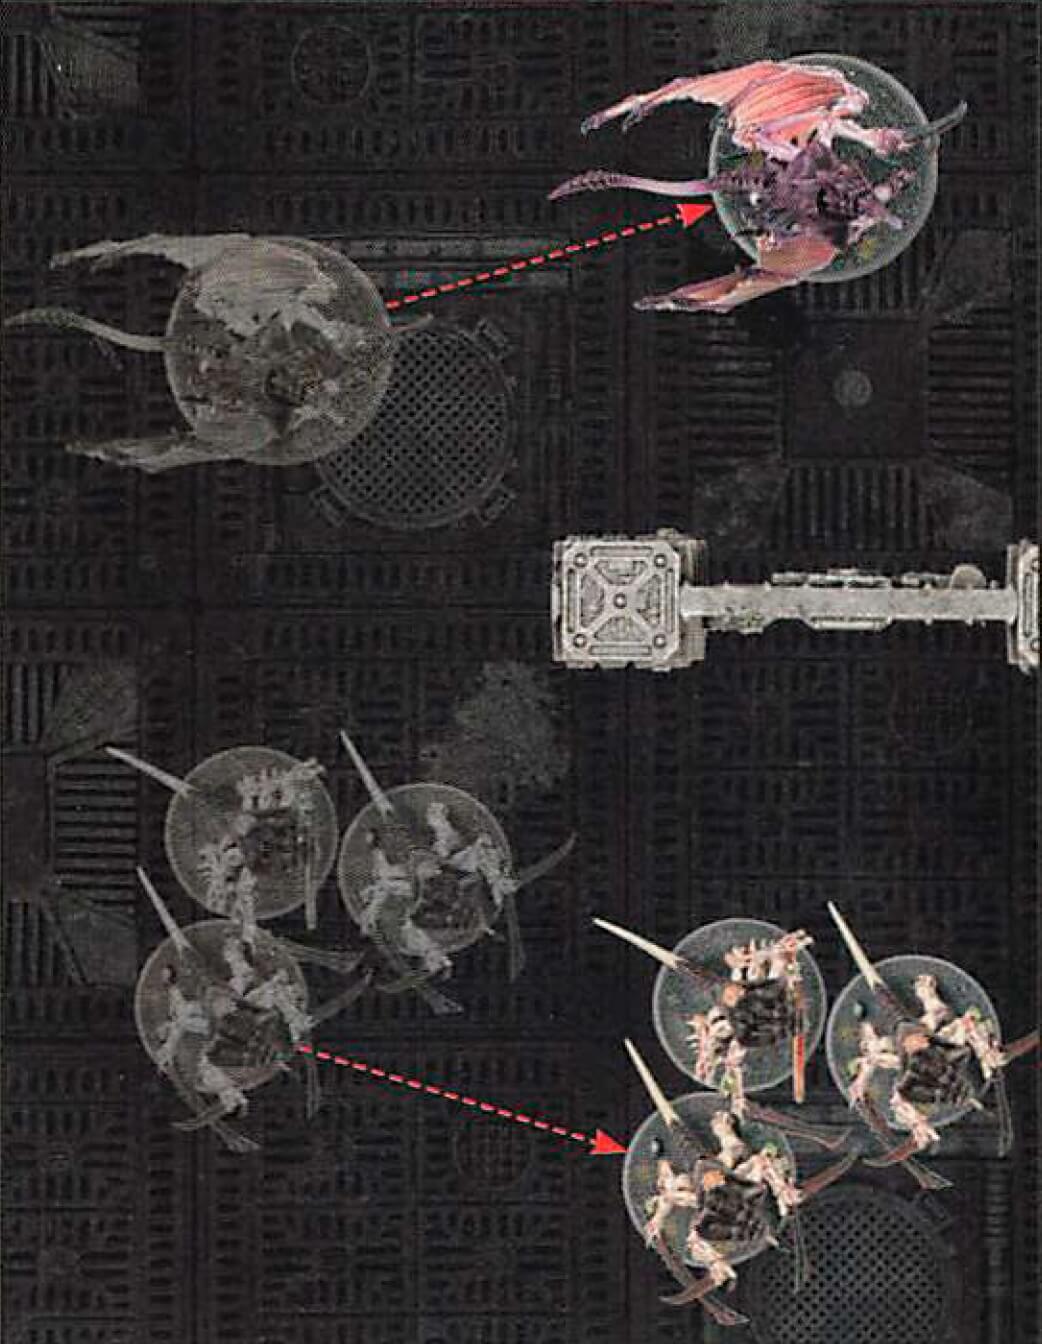
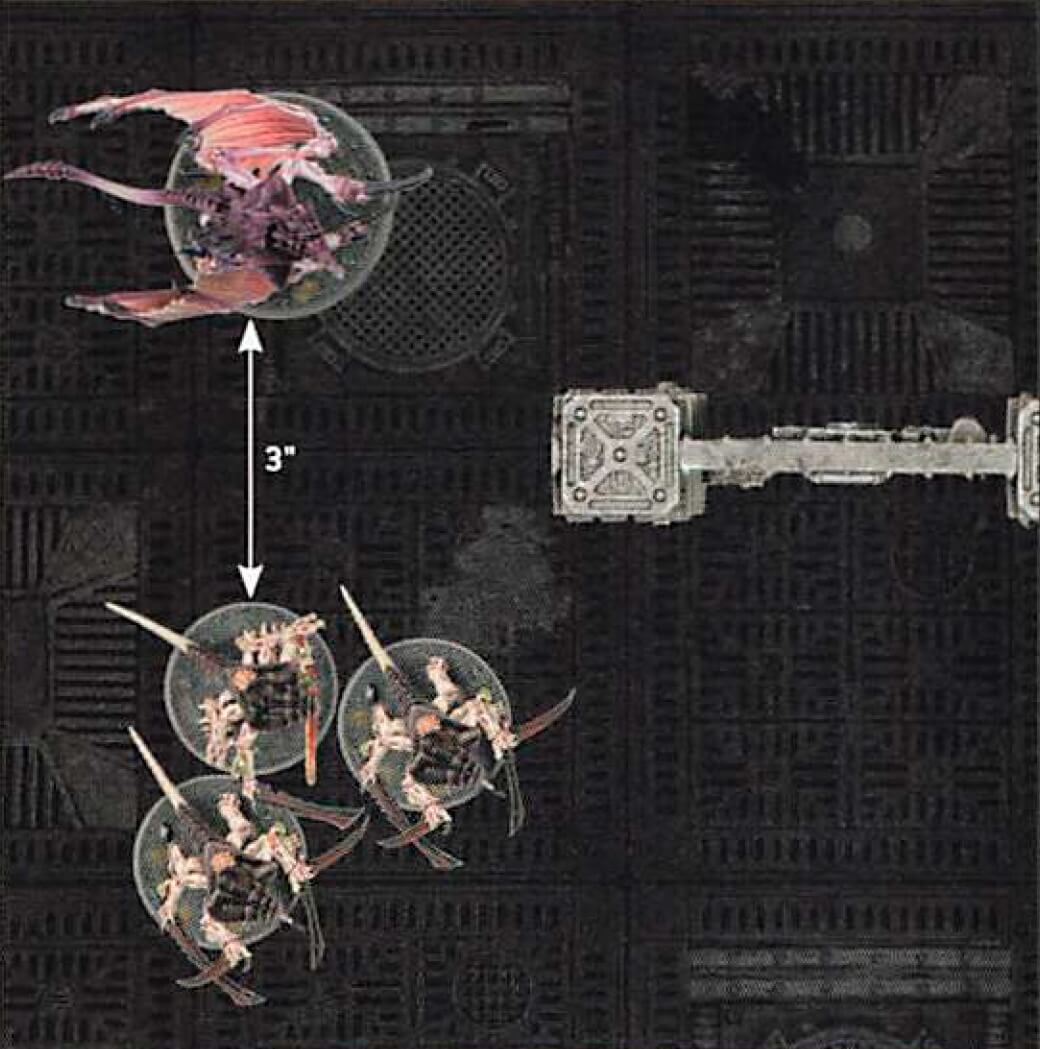
Even though the WINGED TYRANID PRIME and the TYRANID WARRIORS move away from one another, the TYRANID WARRIORS will continue to gain the benefit of the Winged Tyranid Primes Alpha Warrior ability for as long as the Battlefield Command Stratagem allows.
Led-by Abilities
Some units have abilities that take effect while they are being led by a unit with the Leader ability. These typically contain the phrase ‘leading this unit’ and are called Led-by abilities.- Electro-infusion: While a CHARACTER model is leading this unit, each time an attack targets this unit, subtract 1 from the Wound roll.
Stratagems
You cannot use any Stratagems other than the ones below and those found within Boarding Actions Detachments.
TARGET: That unit or model from your army.
EFFECT: You re-roll that roll, test or saving throw.
TARGET: One Leader unit from your army and one friendly Bodyguard unit within 6" of it that it could normally be attached to.
EFFECT: Select one of your Leader unit’s Leader abilities. Until the start of your next Command phase, that Bodyguard unit is treated as being led by that Leader unit for the purposes of that Leader ability.
RESTRICTIONS: Once you target a unit with this Stratagem, that unit cannot be targeted with it again until your next Command phase.
TARGET: One unit from your army that is within Engagement Range of one or more enemy units and that has not already been selected to fight this phase.
EFFECT: Your unit fights next.
TARGET: The unit from your army that Battle-shock test was just taken for (even though your Battle-shocked units cannot normally be affected by your Stratagems).
EFFECT: Your unit is treated as having passed that test instead, and is not Battle-shocked as a result.
TARGET: One unit from your army that has not been selected to shoot this phase.
EFFECT: Select one model in your unit that is equipped with a weapon with the [BLAST] ability. Until the end of the phase, when determining how many models are in the target unit for the purpose of that ability, include models that are not visible to the attacking model. In addition, attacks made with that weapon can be allocated to models that are not visible to the attacking model.
Enhancements
In Boarding Actions, you cannot use the Enhancements found within Codexes or Indexes. Instead, the Enhancements below and those found within Boarding Actions Detachments can be used when mustering your Boarding Patrol, and doing so costs no additional points. When selecting an Enhancement found within a Boarding Actions Detachment, it can only be given to a unit that has that Detachment’s Faction keyword.Superior Boarding Tactics This leader is a veteran of ship-to-ship battles, directing their forces with ease to secure their objectives and destroy their foes. You start the battle with 2CP. |
Close-Quarters Killer Exulting in the thrill of close-quarters combat, boarding actions are the natural environment for this commander, whose martial prowess shines when face to face with their foe. Each time the bearer makes a melee attack, you can re-roll the Wound roll. |
Peerless Leader This commander observes the battle with masterful insight, enabling them to guide multiple squads with precision. Once per battle round, the bearer can be targeted with the Battlefield Command Stratagem for 0CP, even if you have already targeted a different unit with that Stratagem this phase. |
Expert Breacher This officer has perfected the art of moving their forces swiftly from chamber to chamber and catching the foe off their guard. The bearer’s unit can attempt to operate a Hatchway at the start or end of the Move Units step of your Movement phase. The bearer’s unit cannot attempt to operate more than one Hatchway per turn. |
Personal Teleporter This leader is able to attack their foe from unexpected angles. The bearer has the Deep Strike ability. |
Trademark Weapon This leader wields an iconic weapon whose sheer killing might is guaranteed to fell enemies in short order. When you select this Enhancement, select one ranged weapon equipped by the bearer (excluding Torrent weapons) and make a note of this on your Army Roster. Add 1 to the Strength and Damage characteristics of that weapon. |
Mustering your Boarding Patrol
In order to play a game of Boarding Actions, you will need to muster a Boarding Patrol. To do so, follow the sequence below.
You can download blank Army Roster sheets from this link.
In Boarding Actions games, players will build a Boarding Patrol containing up to 500 points of units. Points are a measure of a unit’s power on the battlefield; the higher a unit’s points value, the more powerful that unit is.
You can only include a unit in your army if:
- You have enough points remaining.
- That unit is allowed by your Detachment’s Mustering Rules, and you have not reached the maximum number of that unit that your army can include. Note that the Mustering Rules will also specify the valid Starting Strengths for each unit you can include.
If the mustering rules for your Detachment allow you to take a unit at a size that is not in the Munitorum Field Manual and there is an entry for it at twice that size, the smaller unit’s points value is half that of the larger unit’s (rounding up).
Up to two CHARACTER models from your army (excluding EPIC HERO models) can be given one Enhancement each. You cannot include the same Enhancement more than once. Make a note on your Army Roster which, if any, Enhancements your models have. Enhancements do not cost any points to include in your army.
Boarding Actions Missions
SYMMETRIC MISSIONS
These missions feature the same objectives for both players, alongside matching deployments and terrain setups, ensuring the most balanced experience possible. For new players, we recommend starting here as you familiarise yourself with the rules.
ASYMMETRIC MISSIONS
All of the missions in this section feature an Attacker and a Defender, with very different objectives for each. These battles take the strong narrative elements of the Symmetric Missions and ramp them up to a new level, providing very different experiences not just between the missions themselves but between which of the two roles a player takes on.
THE ROCK BESIEGED CAMPAIGN MISSIONS
These interlinked missions allow two players to play through the Rock Besieged campaign in their Boarding Actions games. Thesc battles have been designed to work best when played in sequence as part of an ongoing narrative for two players, but have also been balanced to be playable as standalone missions, if you so choose.
NARRATIVE MISSIONS
These missions capture some of the more monumental events that have taken place in the void craft warfare of Warhammer 40,000, and feature powerfully evocative rules that ensure no two battles will play the same. If you ever wanted to see what happens to a ship when its Geller field goes down, this is where vou can find out!
BREACHING OPERATION MISSIONS
These missions require the Killzone Upgrade: Soulshackle set to play, and offer a unique experience as units can blow holes in walls, taking the shipboard devastation to a new level as your troops fashion their own doorways and access routes.
DARK DEPTHS MISSION
This mission is specially designed to provide a highly strategic offering for experienced players, with a plethora of potential map layouts based on the army mustering decisions of each player. This allows you to select a board half that best suits your forces style of fighting, lending a new decision-making aspect to the army mustering process.
MULTIPLAYER MISSIONS
These missions are designed for three to four players - but can also be played in two-player mode - featuring both team play and all-against-all mayhem. With many sides constantly jostling for supremacy, frantic and exciting gameplay is guaranteed.
Components
Long Walls
Long Wall


Long Wall with Pillars


Long Wall with Hatchway


Long Wall with Hatchway and Pillars


Short Walls


Short Wall with Hatchway and Pillars


Battlefield Key
|




























Symmetric Missions
A symmetric Boarding Actions mission is waged by following the sequence below.
Muster Boarding Patrol
Players must first muster their Boarding Patrol. Each player must then provide a copy of their Army Roster for their opponent to read through. If, when players compare their points total, one players is at least 30 points less than their opponent’s, then the player with the smaller points total is the Underdog, and they may receive an Underdog Bonus as detailed in the mission they are playing.Determine Mission
Players determine which mission will be used for the battle; they can choose from the Boarding Actions missions in this book, or those found in any other publications. This will determine the deployment map that players use, as well as the specific mission briefing. Players can either simply agree which they will use with their opponent, or they can roll a D33 to randomly select a mission using the table below. To roll a D33, roll two D3s one after the other; the first dice result determines the ‘tens’ and the second determines the ‘units’. For example, if the first result is a 2 and the second is a 1, then the D33 result is a 21.
| ||||||||||||||||||||||
Read Mission Briefing
Each mission has a mission briefing that will detail the aims of the battle. Each mission will also list one or more additional mission rules that will apply for the duration of the battle, and a series of primary objectives that award Victory points to players. Players should read and familiarise themselves with these before proceeding.Create the Battlefield and Place Objective markers
Players now create the battlefield and set up terrain features. Missions are played on Boarding Actions battlefields and the position of all terrain features - Walls and Hatchways - and objective markers that must be placed on the battlefield will be shown on the deployment map of the mission players arc playing. Each mission will also specify which Hatchways start the mission open and which start the mission closed.Form Boarding Squads
Each unit in a player’s Boarding Patrol that has a Starting Strength of 10 must now be split into two units, each containing 5 models. When splitting a unit, players should make a note of which models form each of the two new units. From this point onwards, these split units count as independent units for all rules purposes. The points cost of each split unit is considered to be half that of the original unit (rounding up).Determine Attacker and Defender
Players roll off and the winner decides who will be the Attacker and who will be the Defender. The Attacker’s and Defender’s Entry Zones are labelled on the deployment map.Deploy Armies
Players alternate setting up their units one at a time, starting with the Defender. For each of a player’s Entry Zones (as shown in the mission map), that player sets up one unit within that Entry Zone.If one player finishes deploying all their units, their opponent continues deploying the remainder of their units, until either all players have set up one unit per Entry Zone, or all units have been deployed.
Determine Reserves
Any units in a players army that do not start the battle on the battlefield, will start the battle in Strategic Reserves.In the Reinforcements step of a players Movement phase (starting from the first battle round onwards), that player can select one of their Strategic Reserves units for each of their Entry Zones that has no models within it and set those units up within those Entry Zones.
If one or more of a players Strategic Reserves units has the Deep Strike ability, then in each of that players turns (starting from the second battle round onwards), one of those units can be set up on the battlefield as described by their rule that turn, instead of being set up within an Entry Zone. Any Strategic Reserves units that have not arrived on the battlefield by the end of the third battle round count as having been destroyed (this does not apply to units that are placed into Strategic Reserves, after the first battle round has started).
Determine First Turn
Players roll off and the winner takes the first turn.Begin the Battle
The first battle round begins. Players continue to resolve battle rounds until the battle ends.Ending the Battle
The battle ends after five battle rounds have been completed. If one player has no models remaining in their army at the start of their turn, the other player may continue to play out their turns until the battle ends.Determine Victor
At the end of the battle, the player with the most Victory points is the winner. If players are lied, the battle is a draw.Each player can score a maximum of 90 Victory points from mission objectives (any excess Victory points awarded are discounted). If every model in a players army was painted to a Battle Ready standard, that player is awarded a bonus 10 Victory points. This gives players a maximum total score out of 100 Victory points.
During the battle, players can earn Victory points by achieving mission objectives. There are two types of mission objectives: End Game and Progressive. Progressive mission objectives are scored during the battle (exactly when is detailed on the objective itself), and can be achieved, and hence award Victory points, several times. End Game mission objectives are scored at the end of the battle.
Access Junction Primus 11
11
11Underdog Bonus: If one player is the Underdog, that player starts the battle with 1 additional CP.
This pivotal intersection must be seized and then held until relief forces arrive to secure it against all comers. Even should you be forced to pile the bodies of your own slain to form barricades against the foe, the junction cannot be allowed to fall into enemy hands lest the entire ship follow.
- They control one or more objective markers.
- They control two or more objective markers.
- They control more objective markers than their opponent.
So crucial is this confluence of access corridors that both sides are willing to hurl overwhelming forces in to seize it. Should one side succeed in butchering the enemy’s forces while preserving their own, they will then be in a position to capitalise on their conquest and sweep the vessel clear of foes.
- If the total is 125 points or more.
- If the total is 250 points or more.
- If the total is 375 points or more.
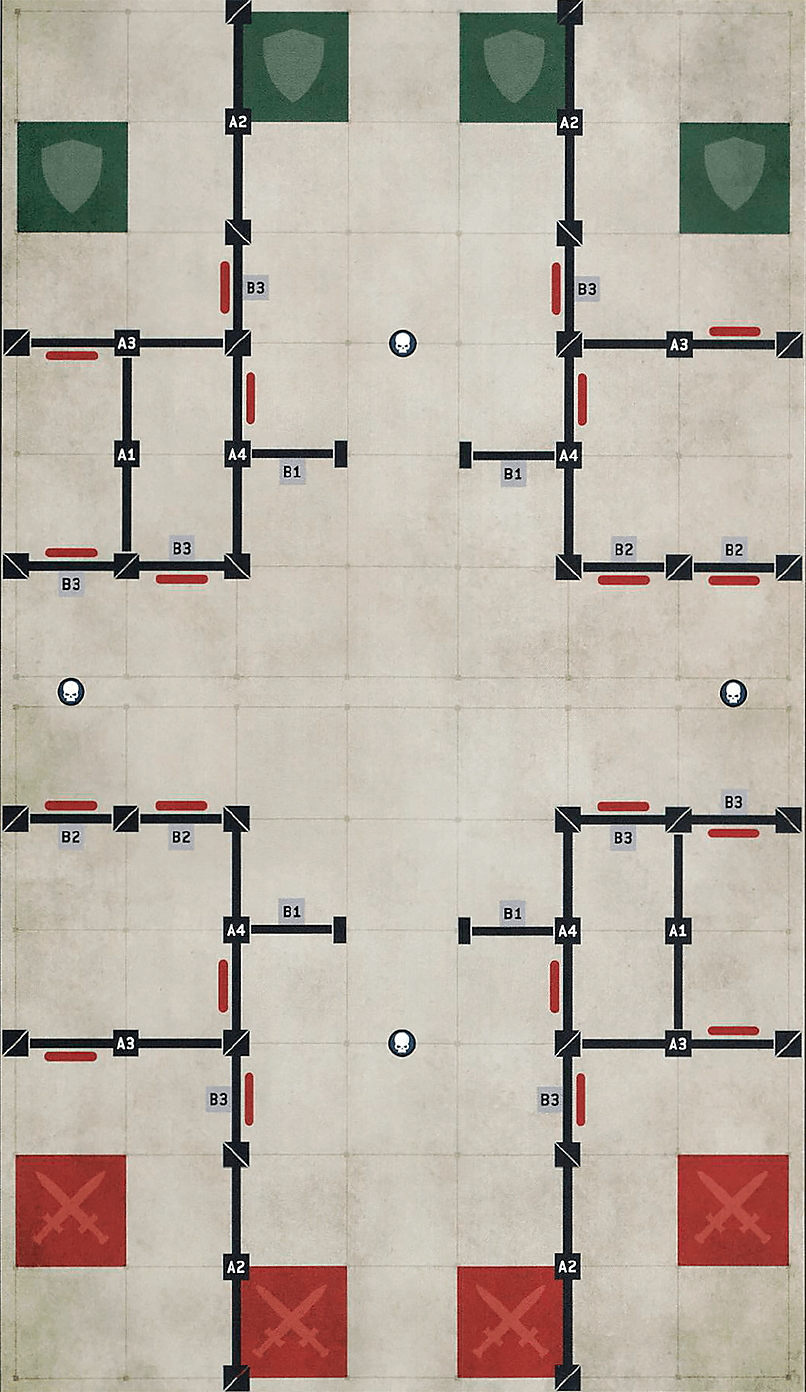
Deck Sweepers 12
12Underdog Bonus: In the Deploy Armies step, if a player receives an Underdog Bonus, they can use the Underdog Entry Zone in addition to the other Entry Zones marked on the mission map when setting up their units. Once the first battle round has started, the Underdog Entry Zone cannot be used when that player sets up any Strategic Reserve units from their army in an Entry Zone.
It is not enough to engage the enemy as you encounter them aboard the derelict. Your purge of their forces must be structured and thorough, seizing each strategic waypoint in turn and ensuring no foe slips through the gaps lest they endanger your salvage and recovery operations, or outflank your forces.
- They control one or more objective markers.
- They control more objective markers than their opponent controls.
- The player who has the first turn scores VP as described above.
- The player who has the second turn scores VP as described above but does so at the end of their turn instead of at the end of their Command phase.
Deep void salvage operations are hazardous affairs, recovery adepts braving zero-gravity infernos, supernatural terrors and sudden depressurisation as they work. Purge any hostile forces from this area, to allow your salvagers to proceed without the additional danger of incoming enemy fire.
Underdog Entry Zone

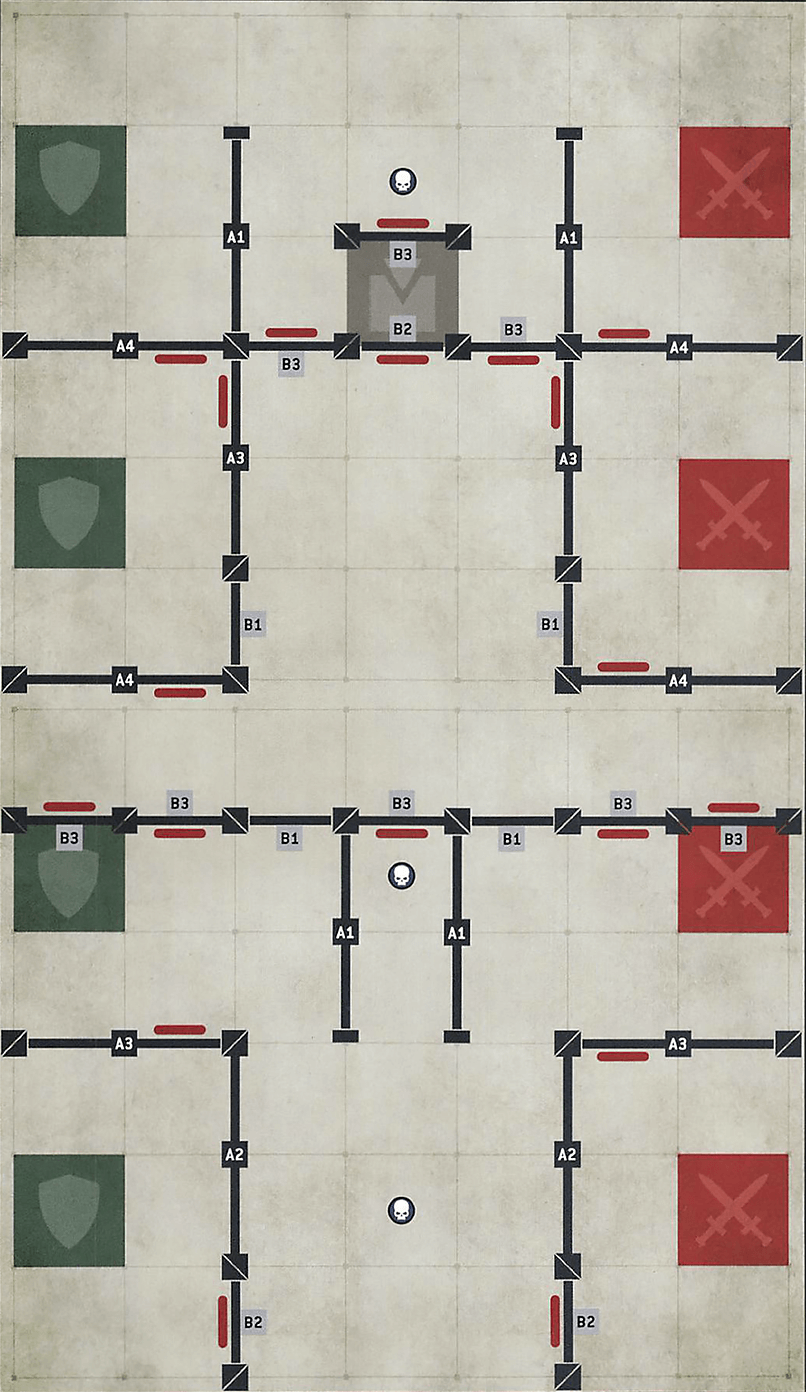
The Pipeline 13
13Underdog Bonus: If one player is the Underdog, that player starts the battle with 1 additional CP.
By securing both the primary control shrine and secondary regulator station for a specific conduit, fuel pipe or the like, your forces can either ensure that the flow stays uninterrupted or choke it off entirely. Such control is vital to victory in this battle, whether you seek to keep your vessel operational or cripple the craft and leave it wide open to attack.
- They control one or more objective markers.
- They control two or more objective markers.
- They control more objective markers than their opponent controls.
- They control both objective markers labelled A.
- They control both objective markers labelled B.
- The player who has the first turn scores VP as described above.
- The player who has the second turn scores VP as described above but does so at the end of their turn instead of at the end of their Command phase.
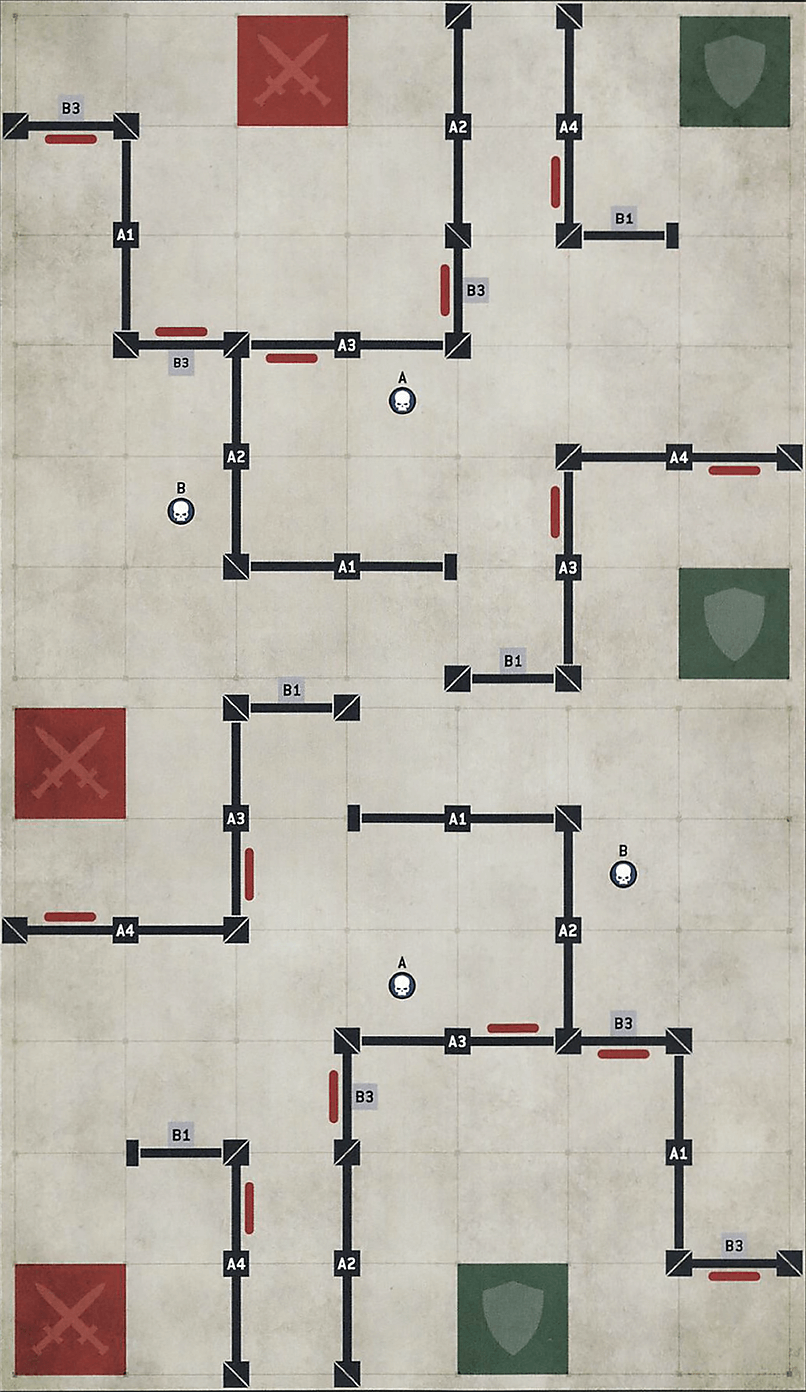
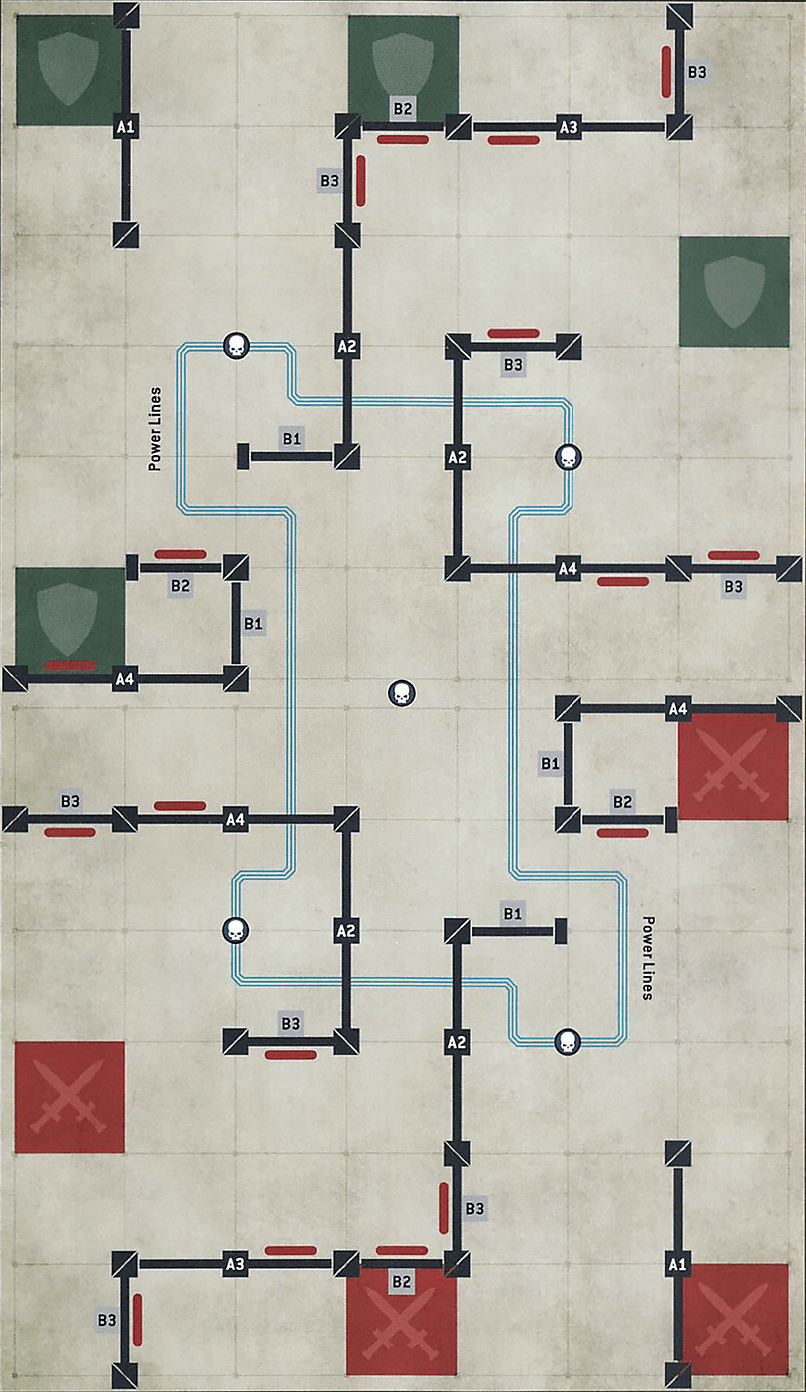
Power Struggle 21
21Underdog Bonus: If one player is the Underdog, that player starts the battle with 1 additional CP.
Gaining control of one node in the localised power network is a victory in itself, but the more sequential systems that can be captured, the more widespread becomes the flow of power you command. You must seize as much of the network as you are able to and then hold it against the foe in order to guarantee victory.
- They control one or more objective markers.
- They control two or more objective markers.
- They control more objective markers than their opponent controls.
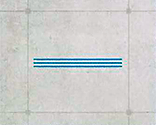
- They control two or more objective markers that are directly linked by the Power Lines (see left).
- The player who has the first turn scores VP as described above.
- The player who has the second turn scores VP as described above but does so at the end of their turn instead of at the end of their Command phase.
You have the opportunity not only to sever the enemy's grasp upon the power flowing through the vessel, but to also sunder their command and control network by slaying their leader. This may be enough to prevent your foe capitalising on what might otherwise be a victory, or to utterly compound their defeat.
Power Lines
Death in the Dark 22
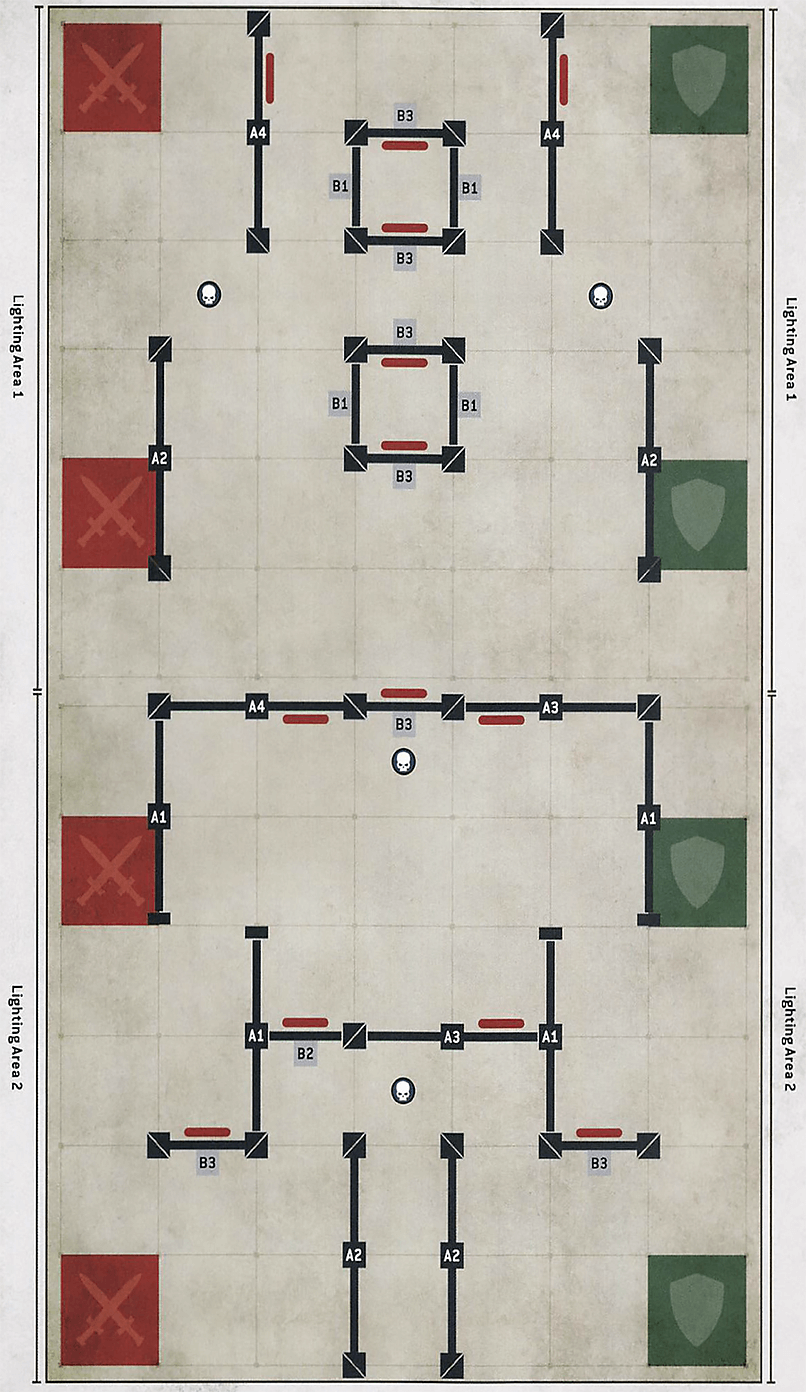
22Lights Out: At the end of each player’s Movement phase, that player rolls one D6 for each Lighting Area: on a 1-3, until the end of the turn, the lights in that area turn off.
When selecting a target for a ranged attack, if the attacking unit or the target are wholly within a Lighting Area that has the lights off:
- If the target is more than 9" away, that attack cannot be made.
- If the target is within 9", subtract 1 from the Hit roll.
- If the potential target is more than 9" away, that unit cannot be a target of that charge.
- If the potential target is within 9", subtract 1 from the Charge roll (to a maximum of -1, regardless of how many target units are in Lighting Areas with the lights off).
Underdog Bonus: If one player is the Underdog, that player starts the battle with 1 additional CP.
When a deck is plunged into darkness or suffers atmospheric or supernatural taint, leaving the situation unchecked can lead to panic or spiralling mayhem. Vie best solution is to seize decisive control of the entire zone before enacting whatever rituals or protocols are required to restore functionality and calm.
- They control one or more objective markers.
- They control two or more objective markers.
- They control more objective markers than their opponent controls.
- The player who has the first turn scores VP as described above.
- The player who has the second turn scores VP as described above but does so at the end of their turn instead of at the end of their Command phase.
Should it prove impossible to fully secure such a compromised area of the ship, it is wise to withdraw to a defensible zone and dig in. Either reinforcements will arrive to allow another forward push, or whatever dangerous fluctuations are occurring will - hopefully - die down.
- They control both objective markers within Lighting Area 1.
- They control both objective markers within Lighting Area 2.
Hull Breach 23
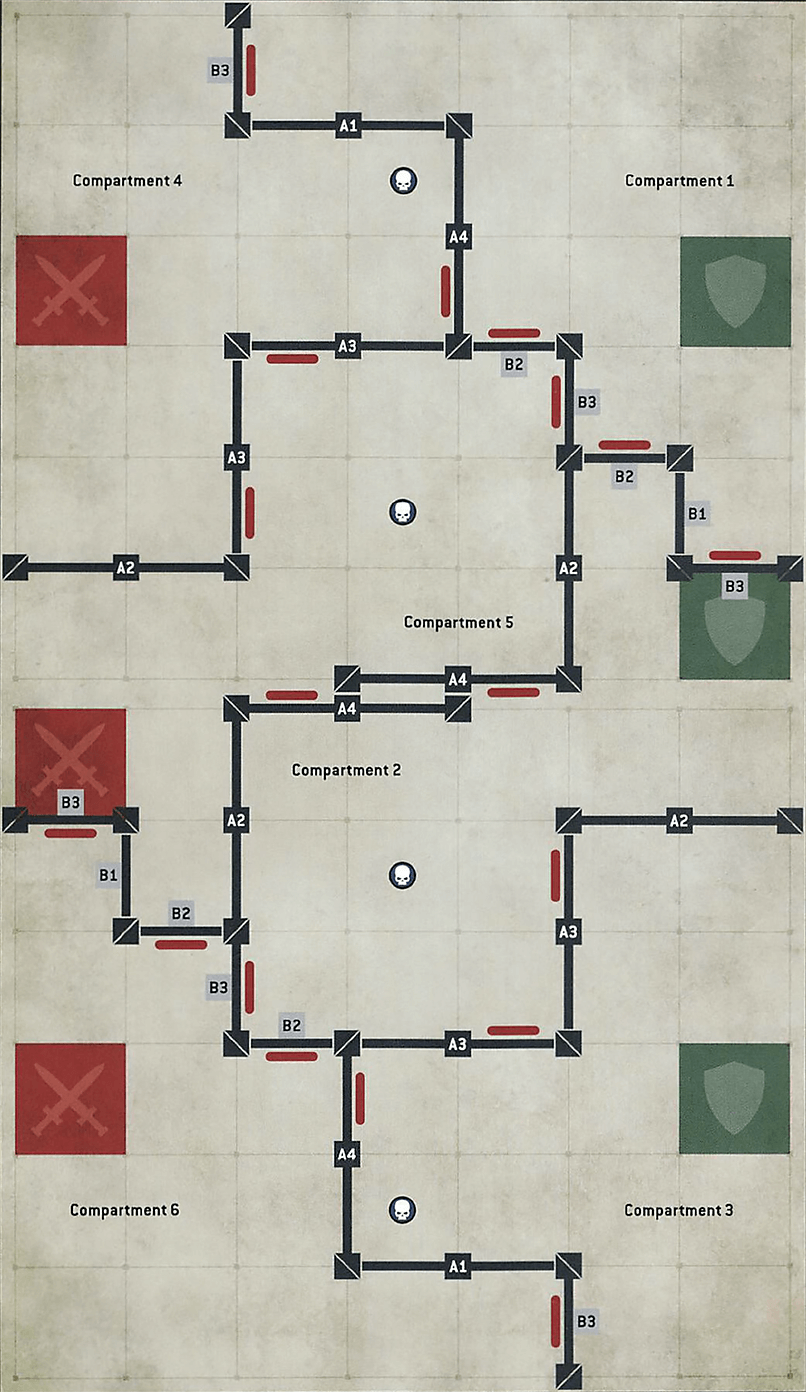
23Deadly Decompression: From the second battle round onwards, at the start of the battle round, the Attacker rolls one D6: on a 3+, until the end of the battle round, one of the Compartments is vented to the void by the space battle going on outside. If a Compartment is vented, the Defender rolls one D6 to determine which one. Close all of the open Hatchways within that Compartment and each unit within it suffers D3 mortal wounds. While a Compartment is vented:
- When a unit within that Compartment is selected to make a Normal or Advance move, until the end of the turn, subtract 1" from the Move characteristic of models in that unit.
- Each time an attack is allocated to a model in that Compartment, improve the Armour Penetration characteristic of that attack by 1.
The Datacores: Once in each player’s turn, one unit from that players army can perform the following Tactical Manoeuvre:
Download Data: Select one objective marker you control that is within range of the unit performing this Tactical Manoeuvre and that you have not downloaded data from (see below). At the start of your next Command phase, provided that unit is not Battle-shocked and is still within range of that objective marker, your army is said to have downloaded data from that objective marker.
Underdog Bonus: If one player is the Underdog, that player starts the battle with 1 additional CP.
Even should it cost the lives of every warrior you lead, the precious data held within the cogitator cores must be extracted and relayed back to your commanders. In such an age of ignorance, no prize can be more valuable than wisdom. At least, so they tell you...
The ship might be disintegrating, but if you can secure key points through this deck it should be possible to lock down hatchways and reroute life support long enough to complete your mission. With luck, you might even hold an extraction route open so that some of your warriors can escape alive.
- They control one or more objective markers.
- They control two or more objective markers.
- They control more objective markers than their opponent controls.
- The player who has the first turn scores VP as described above.
- The player who has the second turn scores VP as described above but does so at the end of their turn instead of at the end of their Command phase.
Control Centre 31
31Unlock Overrides: In each player’s Command phase, if that player controls objective marker B, has one or more units within range of that objective marker (excluding Battle-shocked units), and at least one of those units is not within Engagement Range of one or more enemy models, that player can unlock the door overrides. If they do, open every Hatchway on the battlefield.
Underdog Bonus: If one player is the Underdog, that player starts the battle with 1 additional CP.
Whatever your objective, it is imperative that it be seized swiftly. However, if you are wise you will seek also to secure the key access ways and secondary relay stations that can be reached without risking a direct offensive. Whoever is able to seize control of the wider strategic battle on this deck will doubtless capture the critical objective in the end.
- They control one or more objective markers.
- They control two or more objective markers.
- They control more objective markers than their opponent controls.
- They control objective marker A.
- The player who has the first turn scores VP as described above.
- The player who has the second turn scores VP as described above but does so at the end of their turn instead of at the end of their Command phase.
It is common to find vital leadership personnel either overseeing a strategic target of such value, or leading the assault against it. Ensuring that the enemy commander does not survive this battle, no matter its wider strategic outcome, is a victory in its own right.
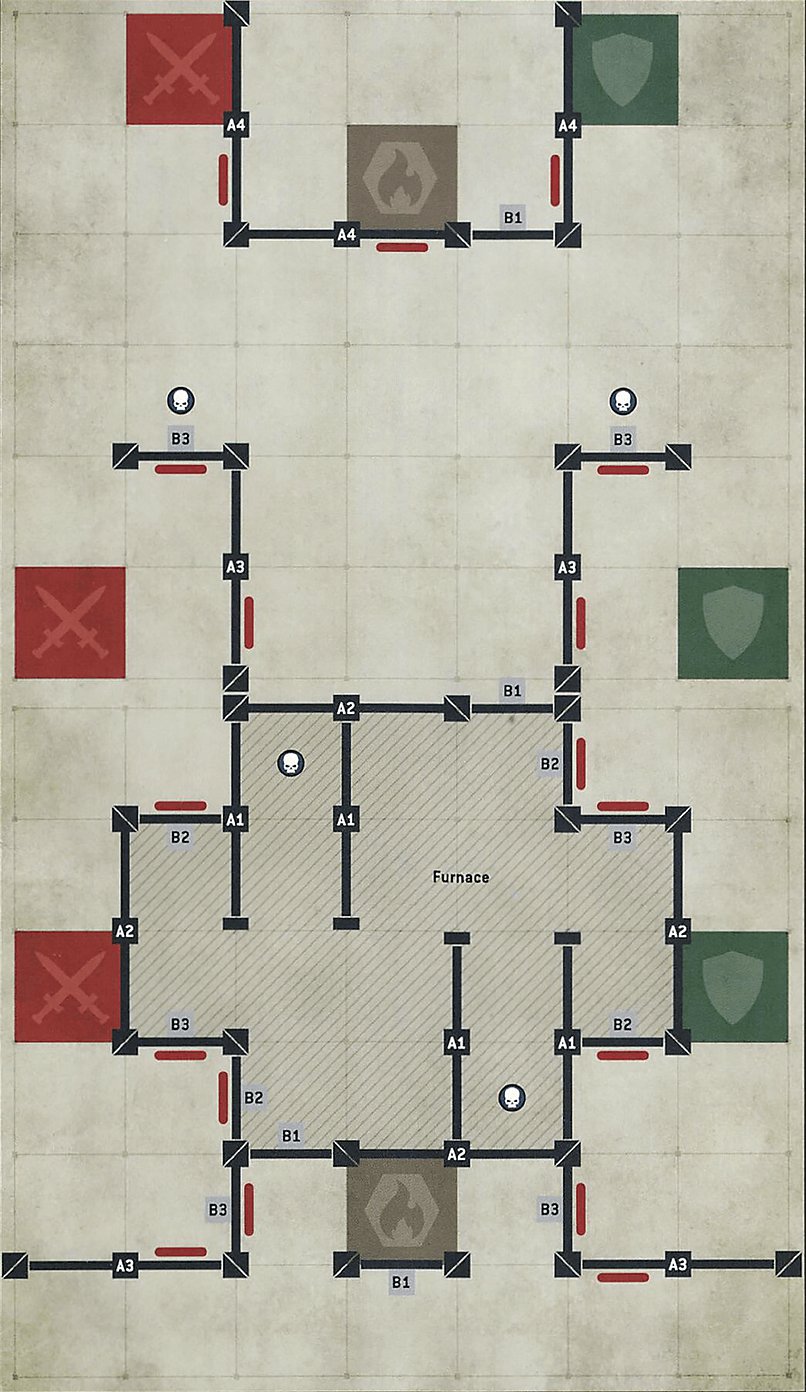
The Furnace 32
32
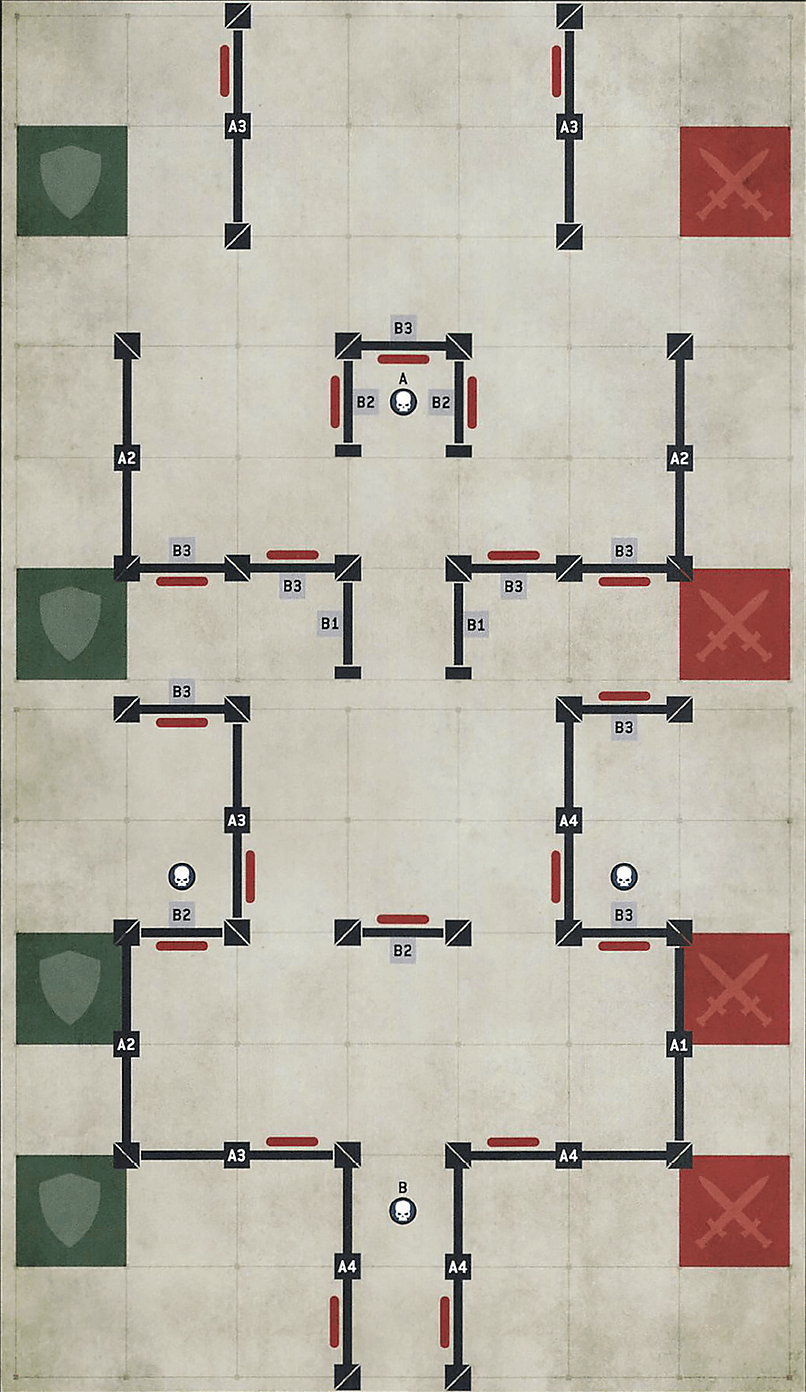
Furnace Control Zone

Rites of Incineration: Once in each players turn, one unit from that player’s army that is within a Furnace Control Zone (see above) can perform the following Tactical Manoeuvre:
Turn on the Burners: At the end of the turn, for each unit within the Furnace, roll one D6 for each model in that unit: for each 4+, that unit suffers 1 mortal wound (to a maximum of 3 mortal wounds per unit per turn).
Worth Dying For: Any unit can perform the Secure Site Tactical Manoeuvre on an objective marker within the Furnace, regardless of whether that unit has the BATTLELINE keyword or not.
Desperate Measures: In each player’s Command phase, if that player controls one or more objective markers within the Furnace, they roll one D6: on a 5+, that player gains 1CP
Underdog Bonus: If one player is the Underdog, that player starts the battle with 1 additional CP
Crucial promethium exchanger shrines are found within this deck. Through them runs the fuel supply required to keep the furnace flames burning. Though it may well be too late to help warriors already battling amidst the hungry flames, securing the exchangers will allow you to either feed the fury of the furnace or starve it into submission by battles end.
- They control one or more objective markers.
- They control two or more objective markers.
- They control more objective markers than their opponent controls.
- They control one or more objective markers within the Furnace.
- The player who has the first turn scores VP as described above.
- The player who has the second turn scores VP as described above but does so at the end of their turn instead of at the end of their Command phase.
Only by your swift actions, and by those of your warriors, can whatever was consigned to the furnace be secured. Whether you choose to save it from the flames or see it all turned to ashes, of course, is up to you.
Rad Leak 33
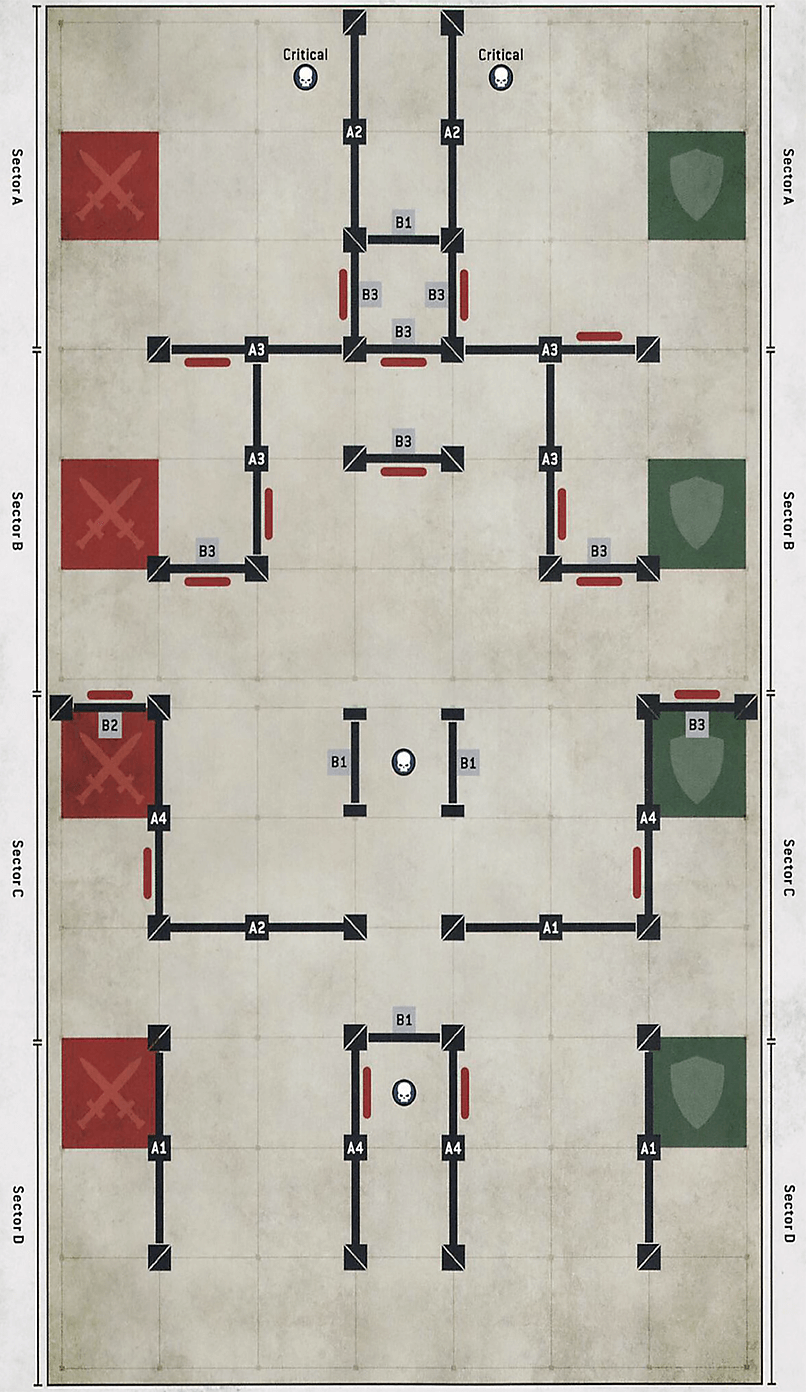
33Rad Exposure: As the battle progresses the radiation fallout from the reactor will spread further across the battlefield and its intensity will grow as it does so. The battlefield is divided up into four Sectors, A through D. Starting with Sector A in battle round 1, the radiation will begin to contaminate the battlefield.
There are three levels of radiation exposure - Mild, High and Extreme - each more severe than the last. At the start of the battle round, depending on which Sectors a unit finds itself within and which battle round it is, that unit will be exposed to different effects (as shown in the table below) until the end of that battle round. If a unit starts the battle round within multiple Sectors, then it suffers from whichever Sector has the most extreme level of radiation.
| |||||||||||||||||||||||||||
The effects of each of these levels are:
- Mild Rad: Worsen the Leadership characteristic of models in this unit by 1.
- High Rad: Subtract 1" from the Move characteristic of models in this unit. This unit also suffers from the effect of Mild Rad.
- Extreme Rad: Subtract 1 from the Toughness characteristic of models in this unit. This unit also suffers from the effect of High Rad and Mild Rad.
The increasingly inimical conditions on this deck do not change the fact that victory is at risk throughout the entire ship. It is imperative that you drive the enemy back and seize all your objectives before conditions become unendurable for your warriors.
- They control one or more objective markers.
- They control two or more objective markers.
- They control more objective markers than their opponent controls.
- The player who has the first turn scores VP as described above.
- The player who has the second turn scores VP as described above but does so at the end of their turn instead of at the end of their Command phase.
The only way to prevent total rad-saturation lies in controlling its salvation shrines. These sacred machineries can reroute plasma flow to isolate the exposed cores and render them quiescent. Of course, sabotaging these shrines would equally doom the enginarium altogether should that be your goal.
Amidst the terror of the rad leak, the opportunity may present itself to strike a deadly blow at the enemy’s command structure.
Asymmetric Missions
An asymmetric Boarding Actions mission is waged by following the sequence below.
Muster Boarding Patrol
Players must first muster their Boarding Patrol. Each player must then provide a copy of their Army Roster for their opponent to read through. If, when players compare their points total, one players is at least 30 points less than their opponents, then the player with the smaller points total is the Underdog, and they may receive an Underdog Bonus as detailed in the mission they are playing.Determine Mission
The players determine which mission to play from the Boarding Actions missions presented in this book. This will determine the deployment map that the players use, as well as the specific mission briefing. You can either simply agree which you will use with your opponent, or you can roll a D6 to randomly select a mission using the table below.
| ||||||||||||||||


Read Mission Briefing
Each mission has a mission briefing that will detail the aims of the battle. Each mission will also list one or more additional mission rules that will apply for the duration of the battle, and a series of objectives that award Victory points to the players. The players should read and familiarise themselves with these before proceeding.Create the Battlefield and Place Objective markers
The players now create the battlefield and set up terrain features. Missions are played on Boarding Actions battlezones and the position of all terrain features - Walls and Hatchways - and objective markers that must be placed on the battlefield will be shown on the deployment map of the mission you are playing. Each mission will also specify which Hatchways start the mission open and which start the battle closed.All of the missions in this book support the additional terrain included in the Killzone: Gallowdark set. If you have the terrain pieces from this set, then you can incorporate them into the battle, and the deployment map will show how to set these up. It is important to note that all of these missions have been designed to offer a fair, balanced and exciting experience, regardless of whether you incorporate these terrain features or not, but they can add an extra level of immersion. The rules for these terrain features can be found in Killzone: Gallowdark.
Form Boarding Squads
Each unit in a player’s Boarding Patrol that has a Starting Strength of 10 must now be split into two units, each containing 5 models. When splitting a unit, players should make a note of which models form each of the two new units. From this point onwards, these split units count as independent units for all rules purposes. The points cost of each split unit is considered to be half that of the original unit (rounding up).Determine Attacker and Defender
Players roll off and the winner decides who will be the Attacker and who will be the Defender. The Attacker’s and Defender’s Entry Zones are labelled on the deployment map.Deploy Armies
Players alternate setting up their units one at a time, starting with the Defender. For each of a player’s Entry Zones (as shown in the mission map), that player sets up one unit within that Entry Zone.If one player finishes deploying all their units, their opponent continues deploying the remainder of their units, until either all players have set up one unit per Entry Zone, or all units have been deployed.
Determine Reserves
Any units in a players army that do not start the battle on the battlefield, will start the battle in Strategic Reserves.In the Reinforcements step of a players Movement phase (starting from the first battle round onwards), that player can select one of their Strategic Reserves units for each of their Entry Zones that has no models within it and set those units up within those Entry Zones.
If one or more of a players Strategic Reserves units has the Deep Strike ability, then in each of that players turns (starting from the second battle round onwards), one of those units can be set up on the battlefield as described by their rule that turn, instead of being set up within an Entry Zone. Any Strategic Reserves units that have not arrived on the battlefield by the end of the third battle round count as having been destroyed (this does not apply to units that are placed into Strategic Reserves, after the first battle round has started).
Determine First Turn
Players roll off and the winner takes the first turn.Begin the Battle
The first battle round begins. Players continue to resolve battle rounds until the battle ends.Ending the Battle
The battle ends after five battle rounds have been completed. If one player has no models remaining in their army at the start of their turn, the other player may continue to play out their turns until the battle ends.Determine Victor
At the end of the battle, the player with the most Victory points is the winner. If players are lied, the battle is a draw.Each player can score a maximum of 90 Victory points from mission objectives (any excess Victory points awarded are discounted). If every model in a players army was painted to a Battle Ready standard, that player is awarded a bonus 10 Victory points. This gives players a maximum total score out of 100 Victory points.
During the battle, players can earn Victory points by achieving mission objectives. There are two types of mission objectives: End Game and Progressive. Progressive mission objectives are scored during the battle (exactly when is detailed on the objective itself), and can be achieved, and hence award Victory points, several times. End Game mission objectives are scored at the end of the battle.
Each player can score a maximum of 90 Victory points from mission objectives (any excess Victory points awarded are discounted). If every model in a players army was painted to a Battle Ready standard, that player is awarded a bonus 10 Victory points. This gives players a maximum total score out of 100 Victory points.
Killzone: Gallowdark
Optional Terrain Features
Terminal

Pipes

Partial Cover: Each time a model makes a ranged attack, if it is not possible to trace straight lines from the attackers base to every part of the targets base without any of those lines passing through this terrain feature, then the target has the Benefit of Cover against that attack.
Collapsed Pipe

Partial Cover: Each time a model makes a ranged attack, if it is not possible to trace straight lines from the attackers base to every part of the targets base without any of those lines passing through this terrain feature, then the target has the Benefit of Cover against that attack.
Electro-nodes

Partial Cover: Each time a model makes a ranged attack, if it is not possible to trace straight lines from the attackers base to every part of the targets base without any of those lines passing through this terrain feature, then the target has the Benefit of Cover against that attack.
Electro-discharge: While a model is within 2" of this terrain feature, each time that model makes a ranged attack, subtract 1 from the Hit roll.
Explosive Canisters

Destructible: This terrain feature counts as a model with the following profile:
|
Any models can make ranged attacks that target this terrain feature and, when it is destroyed, it Explodes (see below). It does not have an Engagement Range, charges cannot be declared against it, and melee attacks cannot be made against it. In each players turn, one or more units from that players army can perform the following Tactical Manoeuvre:
Sabotage: Select one Explosive Canisters terrain feature within 1" of the unit performing this Tactical Manoeuvre. At the end of your next Movement phase, that terrain feature will Explode (see below).
Explodes: When this terrain feature Explodes, roll one D6 for each unit within 3" of it: on a 2-4, that unit suffers 1 mortal wound; on a 5+, that unit suffers 2 mortal wounds. Then remove this terrain feature from the battlefield. This terrain feature can only Explode once.
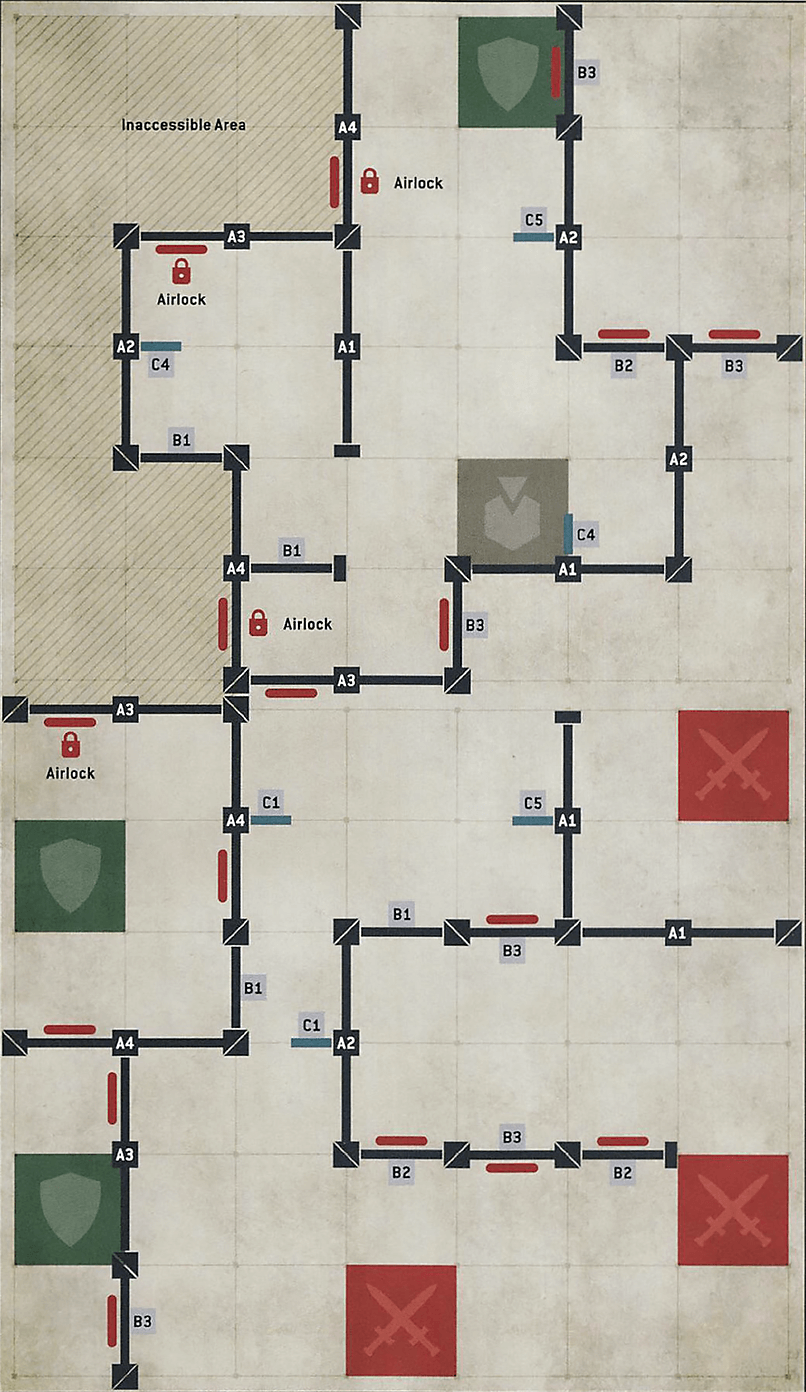
Void the Ship 1
1Security Patrol: The Patrol Entry Zone can only be used by the Defender to set up models from their army in the Deploy Armies step. Once the first battle round has started, that Entry Zone cannot be used when the Defender sets up any Strategic Reserve units from their army in an Entry Zone.
Set Defence: The Defender has the first turn.
Exposed to the Void: Models cannot enter the Inaccessible Area of the battlefield for any reason.
Airlocks: The Hatchways labelled ‘Airlock’ on the map opposite are considered to be Airlocks. Airlocks behave in the same way as normal Hatchways, with the following exceptions:
- An Airlock can only be opened by the Attacker.
- Once opened, an Airlock cannot be closed.
Underdog Bonus: If one player is the Underdog, that player starts the battle with 1 additional 1CP.
Patrol Entry Zone

The defenders strive to maintain the vessels integrity against their assailants’ efforts to expose the ship to the void.
- The Attacker scores 20VP for each of the Airlocks that have been opened.
- The Defender scores 20VP for each of the Airlocks that remain closed.
It is common to find vital leadership personnel either overseeing defence of a ship’s airlocks, or leading the assault against them. Ensuring that the enemy commander does not survive this battle, no matter its wider strategic outcome, is a victory in its own right.
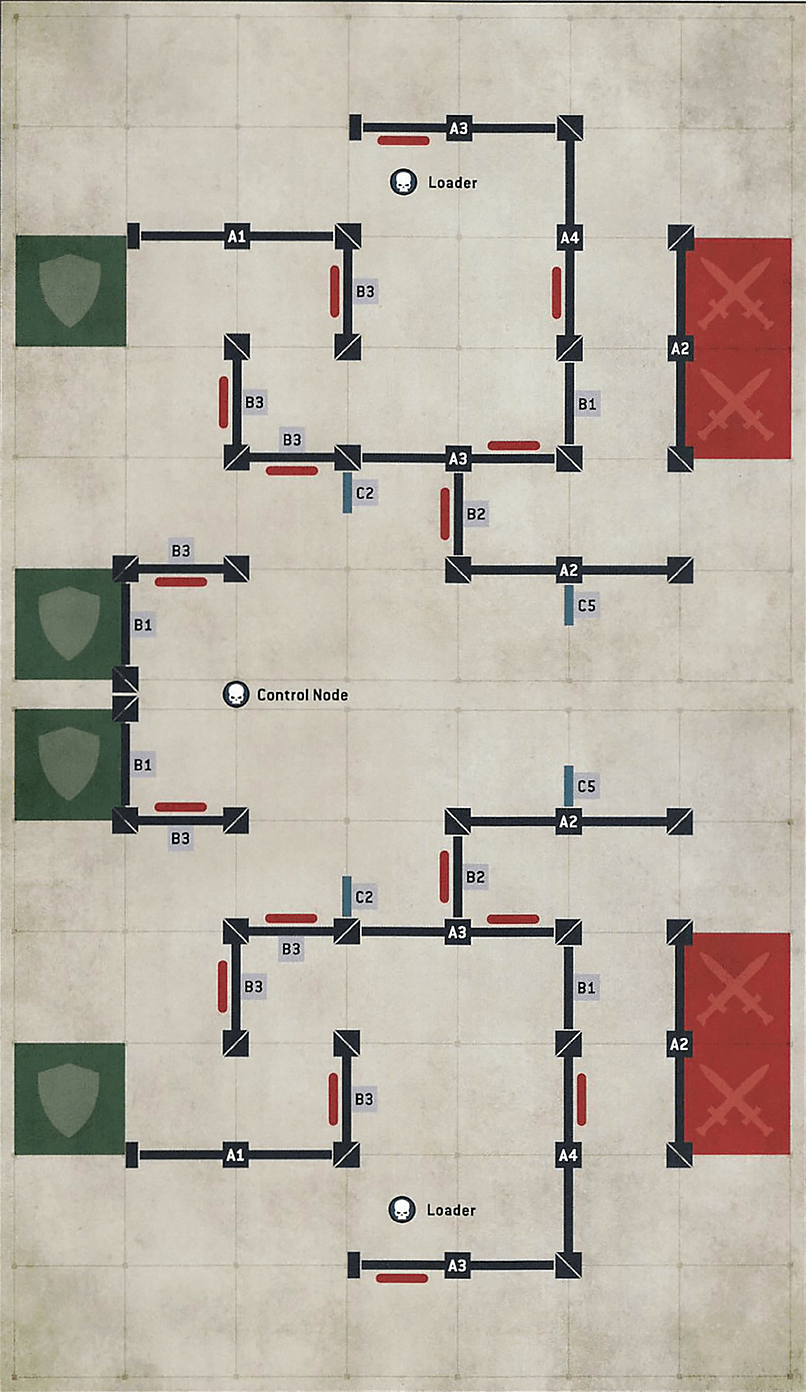
Pull Their Teeth 2
2Rapid Offence: The Attacker has the first turn.
Control Node: The Control Node is the only objective marker that can be Secured by either player’s army. In addition, any unit can perform the Secure Site Tactical Manoeuvre on the Control Node objective marker, regardless of whether that unit has the BATTLELINE keyword or not.
Underdog Bonus: If one player is the Underdog, that player starts the battle with 1 additional CP.
The ship’s weapons batteries depend upon a continuous supply of ammunition to be effective. Should the defenders manage to keep these immense guns firing, the war for the planet below will swing in their favour - all the more so if they can retain control of vital control nodes to ensure deadly accurate fire.
- If the Defender controls the Control Node objective marker, for each Loader objective marker they control, subtract 10VP from the Attacker (to a minimum of 0VP) and the Defender scores 10VP.
- Otherwise, for each Loader objective marker the Defender controls, subtract 5VP from the Attacker (to a minimum of 0VP) and the Defender scores 5VP.
Warship weapons are lethal in the hands of whoever controls them, and the attackers are well aware of this fact. If they can seize the ship’s guns, even if they cannot operate them with the same efficiency as the defenders, they will unleash hell upon their enemies on the ground.
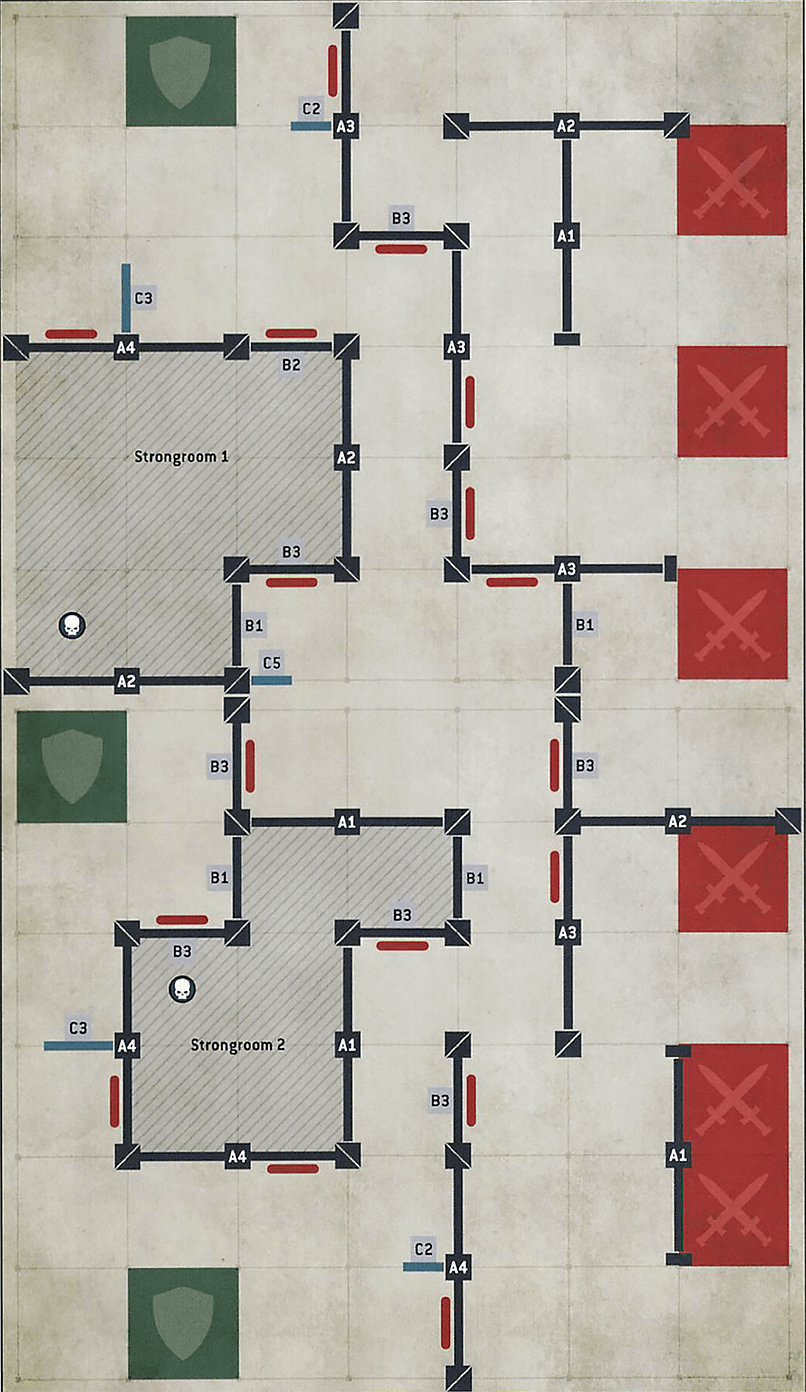
Strongrooms 3
3Rapid Offence: The Attacker has the first turn.
Guard Duty: At the start of the Deploy Armies step, for each Strongroom, the Defender selects one unit from their army and sets that unit up anywhere wholly within that Strongroom.
Underdog Bonus: If one player is the Underdog, that player starts the battle with 1 additional CP.
The capture of each enemy artefact is an impressive feat in itself, showing courage, daring and warrior skill in equal measure. Such deeds are not only short-term victories, however, as word of the attackers’ success will undoubtedly buoy the spirits of their comrades across a multitude of other battlefronts.
For every warrior slain in their foolhardy effort to seize the defenders’ most prized possessions, a warning is sent out to any others who might dare to do the same: to attempt this is to be ruthlessly destroyed.
| ||||||||||
Jailbreak 4
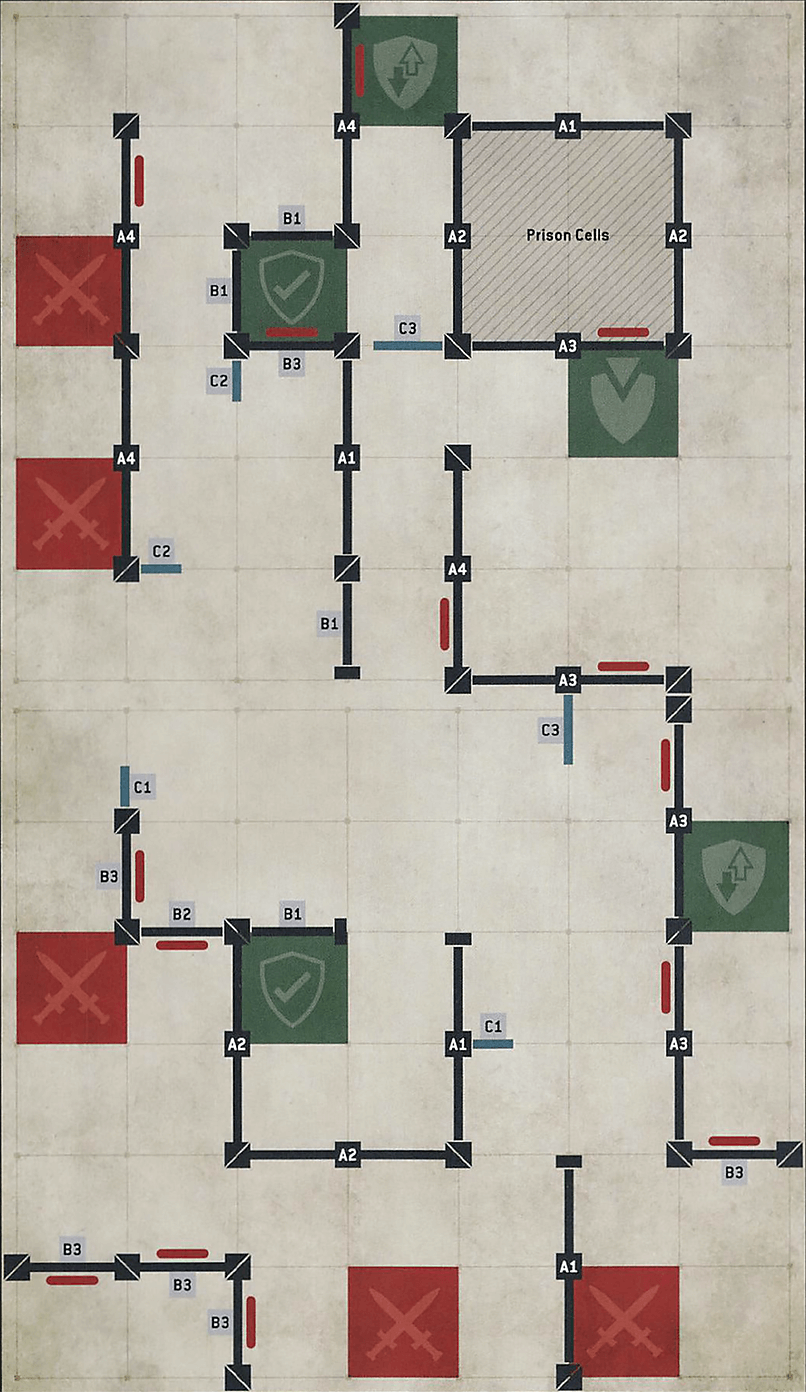
4Imprisoned: At the start of the Deploy Armies step, the Attacker selects one unit from their army with a minimum points cost of 60 points to be imprisoned. That unit is set up within the Prison Cells. The imprisoned unit:
- Cannot be removed from the battlefield at any point, unless destroyed.
- Cannot make use of any rule that would allow it to move through Walls or terrain features while the Prison Cells’ Hatchway is still closed.
- Can only attempt to operate the Prison Cells’ Hatchway while it is closed if there are no units from the Defender’s army wholly within the Guard Entry Zone. If it does, roll one D6: if the result is greater than or equal to its Toughness characteristic, it is unsuccessful and the Hatchway remains closed; otherwise, open the Hatchway as normal.
Prison Guards: In the Deploy Armies step, the Defender can only set up units from their army within the Guard Entry Zone and the Patrol Entry Zones (they cannot use the Backup Entry Zones), and one unit from their army must be set up within the Guard Entry Zone. Once the first battle round has started, they can only use their Backup Entry Zones when setting up any Strategic Reserve units from their army in an Entry Zone.
Rapid Offence: The Attacker has the first turn.
Silent Infiltration: At the start of the first battle round, the Attacker can begin infiltrating units until the alarm is set off. To do so, they select one unit from their army and roll one D6: on a 2+, the alarm is not set off and that unit can make a Normal Move of up to 6". They can then select another unit from their army that has not yet been selected for this rule and roll again, subtracting 1 from the roll. This continues, subtracting 1 from the roll for each successive unit, until either the alarm goes off or the Attacker has no more units to move.
Underdog Bonus: If one player is the Underdog, that player starts the battle with 1 additional CP.
The captors of imprisoned warriors would rather see their prisoners dead than free, and will fight furiously to stop any breakout efforts. For those attempting to free their captured comrades, meanwhile, the fiercest fighting is often in the escape.
|


Defender Guard Entry Zone

Defender Backup Entry Zone

Defender Patrol Entry Zone

Power the Generators 5
5Set Defence: The Defender has the first turn.
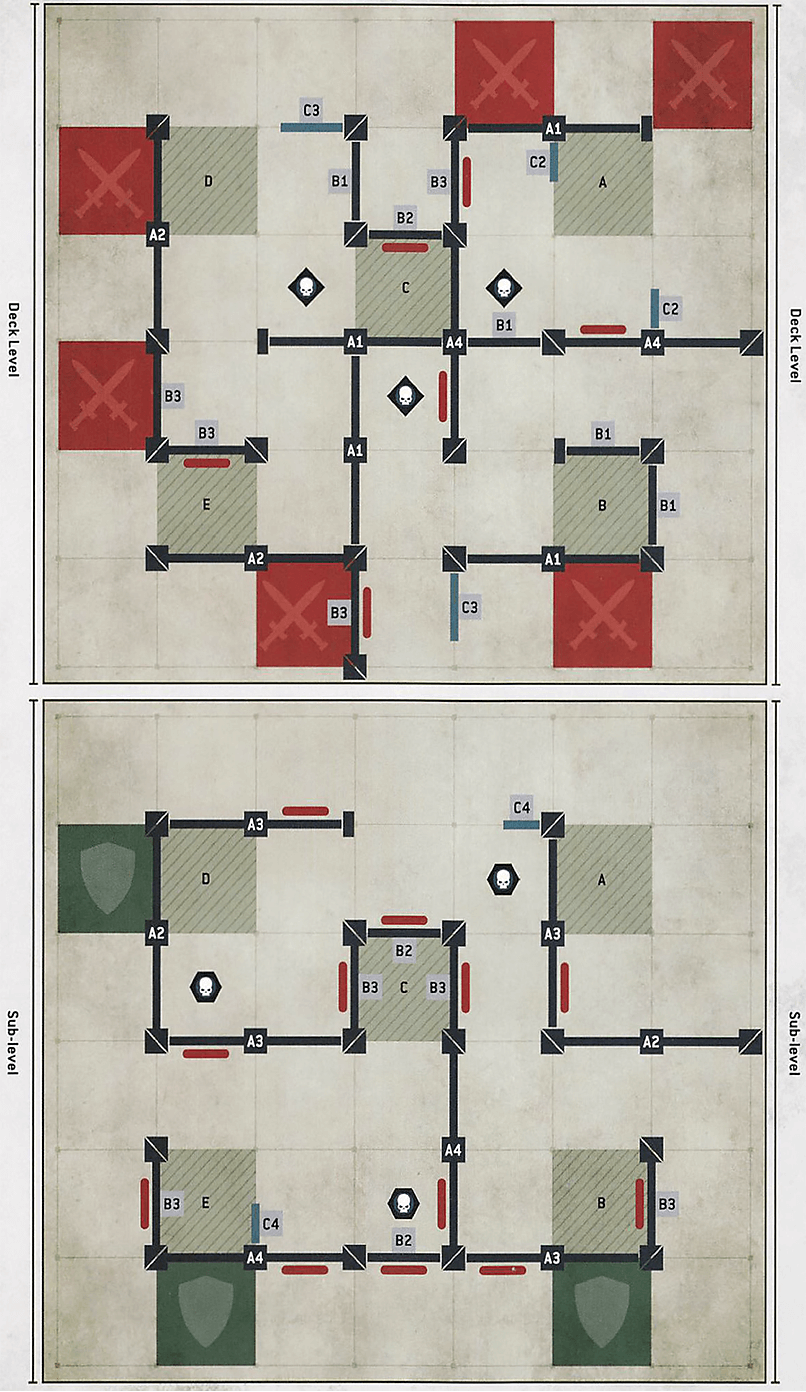
Multi-level: When setting up the battlefield, each game board represents a different level within the ship. It is not possible to move units from one game board to the other unless using the Change Level rule (see below), and units on one game board are not visible to those on the other.
Change Level: At the end of each players Movement phase, one or more units from that players army can, if every model in that unit is within an Access Zone, change level. To do so, remove that unit from the battlefield and set it up with every model within the corresponding Access Zone on the other game board (e.g. if a unit changed level while in Access Zone A on the Deck Level, it would be set up within Access Zone A on the Sub-level). When setting a unit up in this way, it can set it up within Engagement Range of enemy units. If this happens, then those units will be eligible to fight during the subsequent Fight phase, but none of them count as having made a charge move this turn.
Fighting Between Decks: During the Fight phase, while a model is within an Access Zone it counts as being visible to and within Engagement Range of any opposing models that are within the corresponding Access Zone on the other game board. This means that those models’ units are eligible to fight and can %000034338make melee attacks% against one another. Each time a model in such a unit makes a pile-in or consolidation move, that model can move in any direction but must end that move closer to the centre of that Access Zone.
Focused Operatives: Any unit can perform the Secure Site Tactical Manoeuvre on an objective marker, regardless of whether that unit has the BATTLELINE keyword or not.
Underdog Bonus: If one player is the Underdog, that player starts the battle with 1 additional CP.


 Access Zone
For every sub-level generator the attackers succeed in activating, a terminal ripe with vital data becomes available to access. Securing such information will no doubt aid their wider war, earning the assaulting warriors much renown.
In the fifth battle round, the Attacker does this at the end of their turn, instead of at the end of their Command phase.
The thought of the enemy seizing such vital intelligence is a terrible one. Every last one must be routed from the area, hunted down and eliminated, to ensure no data is successfully stolen.
|
In addition, at the end of the battle, the Defender scores 20VP if the Attackers WARLORD is destroyed.
Corrupt the Machine Spirit 6
6Set Defence: The Defender has the first turn.
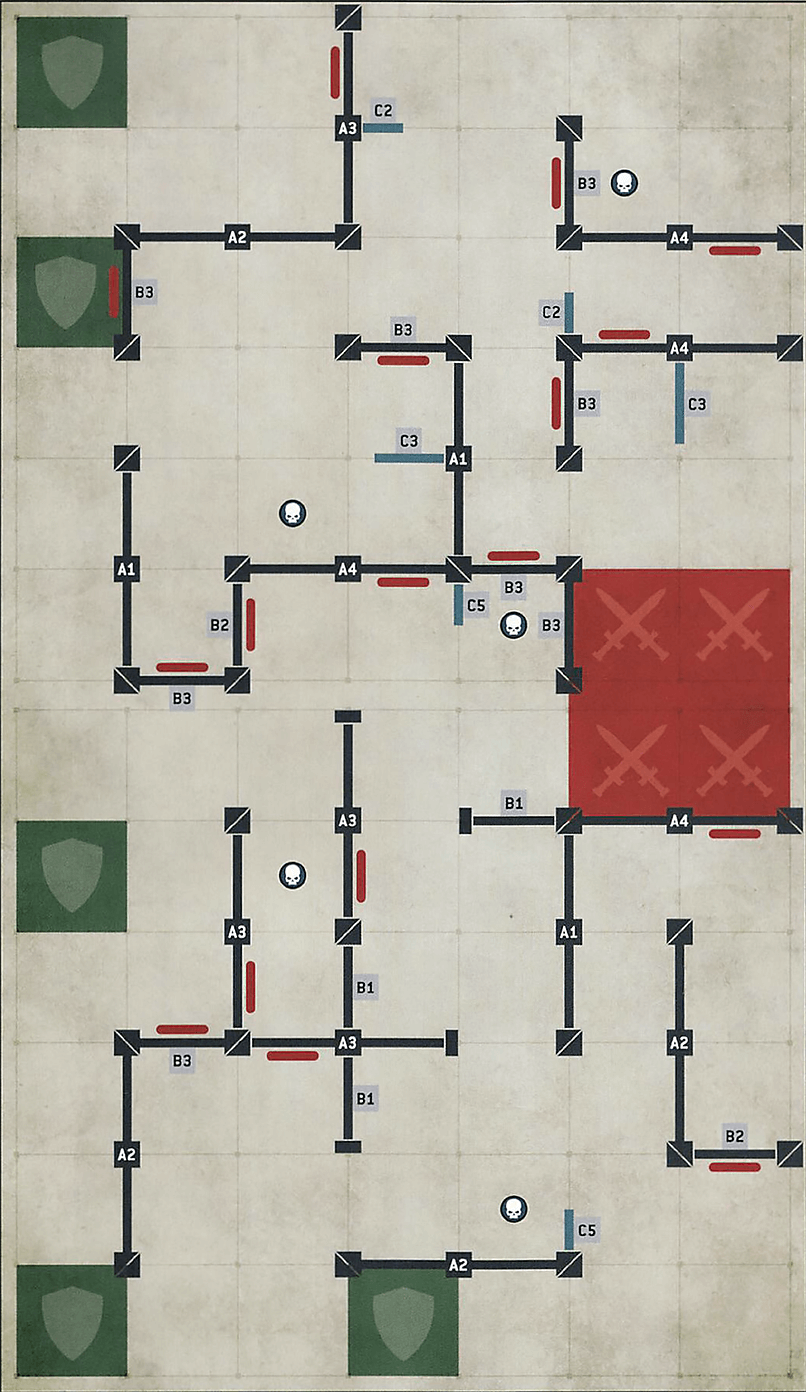
Corrupt the Machine Spirit: At the end of the Attackers Command phase, for each objective marker they control, they can attempt to corrupt that objective marker. If they do, roll one D6: on a 2+, that objective marker is corrupted and removed from the battlefield. Each time an objective marker is corrupted, the Attacker can select one of the following consequences that has not already been selected:
- Door Controls: The Attacker can open or close up to three Hatchways.
- Steam Venting Overrides: Until the start of the Attackers next Command phase, ranged attacks cannot target units more than 6" away from the attacking model.
- Gravitational Systems: Until the start of the Attackers next Command phase, units cannot perform the Set to Defend or Set Overwatch Tactical Manoeuvres. Any units on the battlefield that performed these Tactical Manoeuvres in their last Shooting phase, are no longer considered to have done so.
- Communications Network: Until the end of the Attacker’s next Command phase, the Defender cannot gain CP.
Underdog Bonus: If one player is the Underdog, that player starts the battle with 1 additional CP.
The shutdown of a prized enemy ship, one crucial system at a time, is a wonderful thing for attackers to behold. Beyond that, rendering a mighty vessel inert can tip the scales of battle in their favour and see them win much glory.
Nothing less than fighting tooth and nail will be sufficient to defend the ships machine spirits. Every functioning system ensures the vessel has a greater chance of surviving the coming battles, and denies the foe an advantage.
There are several categories of Battle Honours that can be bestowed upon a unit, such as Battle Traits, Weapon Modifications and Crusade Relics. Other categories of Battle Honour may be found in other publications. Each time a unit gains a Battle Honour, you can select from any category.
- Once a unit gains enough XP it will gain a rank.
- Only CHARACTER units can gain the Heroic or Legendary ranks.
- Each time a unit gains a rank, it can gain a Battle Honour.
- There are several categories of Battle Honours, which include:
- Battle Traits: New skills and abilities.
- Weapon Modifications: Upgrade an item of wargear.
- Crusade Relic: Gain a rare and powerful artefact.
- Each time a unit gains a Battle Honour, increase its Crusade points total by 1 (or by 2 if TITANIC).
When a model is destroyed, first resolve any rules that are triggered when it is destroyed, then it is removed from the battlefield. If any such rules apply, and if the model was destroyed as the result of an attack, unless otherwise stated, those rules are only resolved and that model is only removed after the attacking unit’s attacks have been resolved. Unless otherwise stated, destroyed models and units cannot use abilities or be selected or targeted by rules.
Some rules only trigger if an enemy model or unit was destroyed by you, or by a model or unit from your army. This means that the enemy model or unit was destroyed by an attack made by a model from your army, or by a player rule you have. Enemy models or units that are destroyed by any other means are not destroyed by you, or by a model or unit from your army.
Scouts form the vanguard of many armies. Unnoticed by the enemy, they range ahead of the main force.
This ability always takes the form Scouts X". In the Resolve Pre-battle Abilities step, if every model in a unit has this ability, you can do one of the following:- If that unit is in strategic reserves, you can set up that unit anywhere that is wholly within your deployment zone.
- If that unit is wholly within your deployment zone, it can make a scout move (see below).
- If that unit is embarked within a DEDICATED TRANSPORT that is wholly within your deployment zone, and if every model embarked within that DEDICATED TRANSPORT has the Scouts ability, that DEDICATED TRANSPORT can make a scout move.
EFFECT: Your unit moves as described in Moving (03).
AFTER MOVING: Your unit must be more than 8" horizontally from all enemy units.
Many armies employ reconnaissance units who can sit concealed, waiting for the right moment to strike.
During deployment, if every model in a unit has this ability, it can be set up anywhere on the battlefield that is more than 8" horizontally from your opponent’s deployment zone and all enemy units.EFFECT: Your unit is set up as described in Set Up (03.02).
BEFORE MOVING: Your unit is set up as described in Set Up (03.02).
WHILE MOVING: Set up your unit wholly within the set-up distance of one or more battlefield edges and more than 8" horizontally from all enemy units.
- Before the Third Battle Round: While doing so, no models can be set up within your opponent’s deployment zone.
There are many ways by which to deploy troops to the field of battle including tunnels, teleportation devices and other esoteric means of transportation.
Each time this unit makes an ingress move (20.04), if every model in this unit has this ability, it can be set up anywhere on the battlefield that is more than 8" horizontally from all enemy units, even if that is within your opponent’s deployment zone.The TERMINATOR keyword is used in the following Space Marines datasheets:


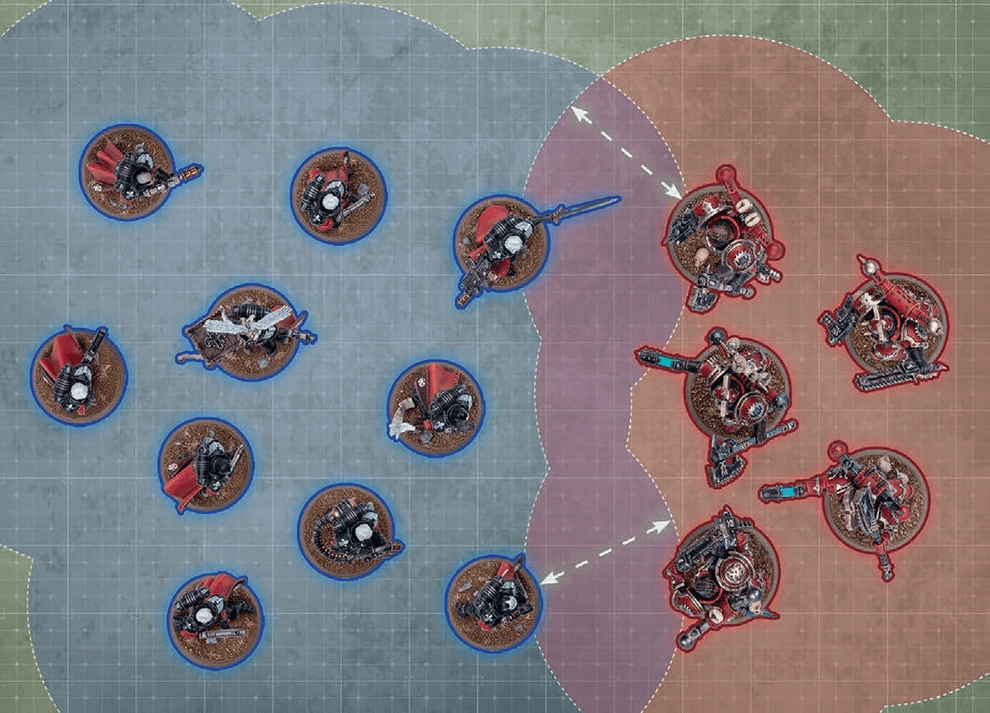
- While a friendly model is within engagement range of one or more enemy models, those models – and the units they belong to – are engaged with each other.
- While a unit contains no engaged models, that unit is unengaged.
FAQ
| Q: | Does my model or unit become engaged while moving through a enemy units engagement range during a move? |
| A: | No |
- To do so, both players roll one D6, and whoever rolls highest wins the roll-off.
- If there is a tie for the highest roll, roll off again.
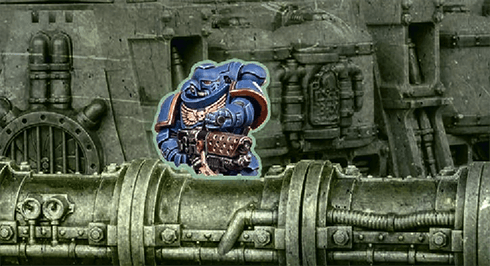
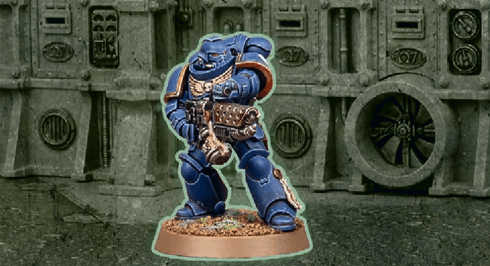
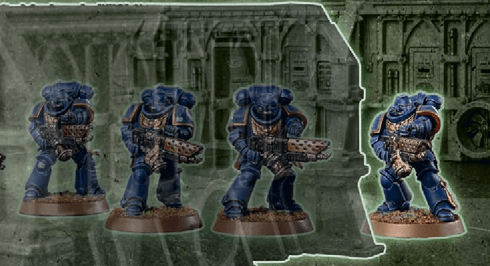
Other models and units can be either visible or fully visible to the observing model, as shown below. Note that terrain applies additional rules to visibility (13.07).
FAQ
| Q: | When checking line of sight from one model to another, is this drawn between the bases of those models, or between any part of them? |
| A: | Line of sight is drawn from any part of the observing model to any part of the model being observed. |
- Place a well-defined boundary (such as a base or mat) in each location you want to furnish with terrain, then place one or more terrain features wholly within that boundary.
- Place one terrain feature directly on the battlefield.
- Place two or more terrain features directly on the battlefield in such a way that together they define the boundary of an area.
In each case, the area of the battlefield occupied by that boundary or terrain feature is known as a terrain area. A mission’s deployment map may define the location and dimensions of each terrain area. Otherwise, players must agree on this before the battle.
FAQ
| Q: | Are models that are within the boundary of a terrain area, but not on the ground floor of a terrain area (e.g. overhanging parts of FRAME VEHICLES or models on terrain features that are within that terrain area) within that terrain area? |
| A: | Yes |
- That model has the INFANTRY/BEASTS/SWARM keyword and is within a terrain area.
- That model is not fully visible to the attacking model due to one or more intervening terrain features and/or one or more intervening obscuring terrain areas (see below).
Each time a ranged attack targets a unit that has the benefit of cover against it, worsen the BS characteristic of that attack by 1.
FAQ
| Q: | When my unit shoots at another unit, how does it work if some models in the target unit are fully visible to some models in my unit, while others are within a terrain area/not fully visible? |
| A: | For each attacking model in your unit, determine whether the target unit has the benefit of cover, as described in Terrain and Visibility. In this scenario, the target unit will likely have the benefit of cover against some of the attacking models, but not all. This means that, in an example unit where all attacking models are using the same weapon, when you get to the Resolve Attacks step of the Attack Sequence, you will collect dice for attacks made by models against which the target unit has the benefit of cover separately from the dice for attacks made by models against which the target unit does not have the benefit of cover. |
EFFECT: Your unit moves as described in Moving (03).
BEFORE MOVING: Make an advance roll by rolling one D6.
AFTER MOVING:
- Your unit must be unengaged.
- Until the end of the turn, unless otherwise stated, your unit is not eligible to declare a charge or start an action.
Many deadly weapons can inflict fatal injuries on any foe, no matter their resilience.
Each time an attack made with a [LETHAL HITS] weapon results in a critical hit, you can choose for that attack to automatically wound the target.EFFECT: Your unit shoots as described in Making Attacks (04).
WHILE SHOOTING:
- You can only target one visible enemy unit within 24" of your unit (and only if it is an eligible target).
- Each attack only hits on an unmodified hit roll of 6 (irrespective of the attacking weapon’s BS characteristic or any modifiers).
- You cannot re-roll hit rolls.
|
FAQ
| Q: | My attack has a rule that means it results in a critical hit on a hit roll of 4+. Does this work when snap shooting? |
| A: | Unless otherwise stated, no: when snap shooting, each attack only hits on a roll of 6. |
| Q: | My attack has a rule that means it results in a critical hit on a hit roll of 4+, and I would otherwise need a 5+ to hit. Does a 4+ hit? |
| A: | Yes, except when snap shooting: when snap shooting, each attack only hits on a roll of 6. |
EFFECT: No models are moved (either in straight lines or rotated). Units that remain stationary do not trigger any rules that are triggered when a unit starts or ends a move.
- Unengaged and did not make an advance move this turn.
- Has one or more [INDIRECT FIRE] weapons.
WHILE SHOOTING:
- [INDIRECT FIRE] weapons in your unit can target units that are not visible to the attacking model.
- Each time an [INDIRECT FIRE] weapon makes an attack:
- The target has the benefit of cover against that attack (13.08).
- You cannot re-roll hit rolls.
- An unmodified hit roll of 1-5 fails, unless your unit remained stationary this turn and the target is visible to one or more friendly units, in which case an unmodified hit roll of 1-3 fails instead.
Indirect fire weapons launch munitions over or around intervening obstacles – nowhere is safe from their fury.
Units containing one or more models with an [INDIRECT FIRE] weapon can shoot using indirect shooting (10.07).High-explosive rounds can fell several warriors in a single blast, but firing them too close to comrades is unwise.
Each time you gather attack dice for a [BLAST] weapon, add one additional attack dice for every five models that were in the target unit in the Select Targets step (rounding down).If this ability takes the form [BLAST X], each time you gather attack dice for such a weapon, add X additional attack dice for every five models that were in the target unit in the Select Targets step (rounding down) instead.
Weapons powered by unstable and dangerous energy sources pose a substantial risk to the wielder and those that stand beside them.
Each time a unit is selected to shoot or selected to fight, after that unit has resolved all of its attacks, make a number of hazard rolls (06.03) for that unit equal to the number of [HAZARDOUS] weapons you selected in the Select Weapons step.- Select Model: Select one model in that unit by following the first instruction below that applies:

If a non-CHARACTER model in that unit has lost one or more wounds, you must select that model. Otherwise, if that unit contains one or more non-CHARACTER models, you must select one of those models. Otherwise, if one or more CHARACTER models in that unit have lost one or more wounds, you must select one of those models. Otherwise, you must select one CHARACTER model in that unit. - Resolve Damage: The selected model loses 1 wound. If this reduces that model’s remaining wounds to 0, it is destroyed.
MORTAL WOUNDS AND NORMAL DAMAGE
When resolving attack dice, if those attacks inflict a mixture of both mortal wounds and normal damage, resolve all of the normal damage first, then resolve all of the mortal wounds.
- Normal Damage 06.02.01
FAQ
| Q: | I have a rule that triggers when a mortal wound is allocated to a model, when does this happen? |
| A: | When you select a model in the Select Model step of Mortal Wounds (06.02). |
FAQ
| Q: | I failed hazard rolls from [Hazardous] weapons, do those mortal wounds have to be allocated to the models with the [HAZARDOUS] weapons? |
| A: | No, you allocate the mortal wounds to the unit as per Mortal Wounds (06.02). (This represents Bob the guardsmen picking up his fallen squad mates plasma gun or that the twisting power of James the Chaos Sorcerer pulling his followers into the warp.) |
| Q: | If a rule says my unit must make a hazard roll does every model in the unit make a hazard roll? |
| A: | No, the unit would make 1 single hazard roll. |
EFFECT: Your unit moves as described in Moving (03).
BEFORE MOVING: Select fall-back mode:
- Ordered Retreat: If your unit is not battle-shocked, you can select this mode.
- Desperate Escape: Otherwise, you must select this mode. Make a hazard roll for each model in your unit (06.03).
- Desperate Escape: Each model that is moved can be moved through enemy models.
- Your unit must be unengaged.
- Until the end of the turn, unless otherwise stated, your unit is not eligible to shoot, declare a charge or start an action.
- Desperate Escape: If your unit is not battle-shocked, you must make a battle-shock roll for your unit (01.07).
The datasheets using BATTLELINE keyword can be found in the following Factions:
Chaos: Chaos Daemons, Chaos Knights, Chaos Space Marines, Death Guard, Emperor’s Children, Thousand Sons, World Eaters.Imperium: Adepta Sororitas, Adeptus Custodes, Adeptus Mechanicus, Astra Militarum, Grey Knights, Imperial Agents, Imperial Knights, Space Marines.
Xenos: Aeldari, Drukhari, Genestealer Cults, Leagues of Votann, Necrons, Orks, T’au Empire, Tyranids.
The BATTLELINE keyword is used in the following datasheets:


EFFECT: Your unit moves as described in Moving (03).
AFTER MOVING: Your unit must be unengaged.
EFFECT: Your unit shoots as described in Making Attacks (04).
WHILE SHOOTING:
- You can only target one visible enemy unit within 24" of your unit (and only if it is an eligible target).
- Each attack only hits on an unmodified hit roll of 6 (irrespective of the attacking weapon’s BS characteristic or any modifiers).
- You cannot re-roll hit rolls.
TARGET: One friendly unengaged unit (excluding TITANIC units).
EFFECT: Your unit shoots using snap shooting.
EFFECT: Your unit moves as described in Moving (03).
BEFORE MOVING: Select consolidation mode:
- Ongoing Consolidation:If your unit is engaged, you must select this mode and select every enemy unit it is engaged with.
- Engaging Consolidation:Otherwise, if your unit is within 3" of one or more enemy units, you must select this mode and select one or more of those enemy units.
- Objective Consolidation:Otherwise, if your unit is within 3" of one or more objectives, you must select this mode and select one of those objectives.
- Ongoing Consolidation:Models in base-contact with one or more enemy models cannot be moved. Each model that is moved must end its move closer to the closest selected enemy unit, and engaged with it if possible.
- Engaging Consolidation:Each model that is moved must end its move closer to the closest selected enemy unit, and engaged with it if possible.
- Objective Consolidation:Each model that is moved must end its move within range of the selected objective if possible, or closer to it if not.
- Ongoing Consolidation:Each model that started this move engaged with an enemy unit must still be engaged with that enemy unit.
- Engaging Consolidation:Your unit must be engaged with all of the selected enemy units. If one or more enemy units engaged with your unit have not been selected to fight this phase, your opponent must select each of those units, one at a time; when each is selected, it becomes eligible to fight and is selected to fight (12.04).
- Objective Consolidation:Your unit must be unengaged and within range of the selected objective.
- Within 2" horizontally and 5" vertically of at least one other model in that unit.
- Within 9" horizontally and 5" vertically of every other model in that unit.
REGAINING COHERENCY
In the End of Turn step of each player’s turn, if one or more units on the battlefield are not in coherency, those units’ controlling players must remove models from them, one at a time, until they are in coherency again. Models removed in this way are destroyed, but they do not trigger rules that apply when a model is destroyed.
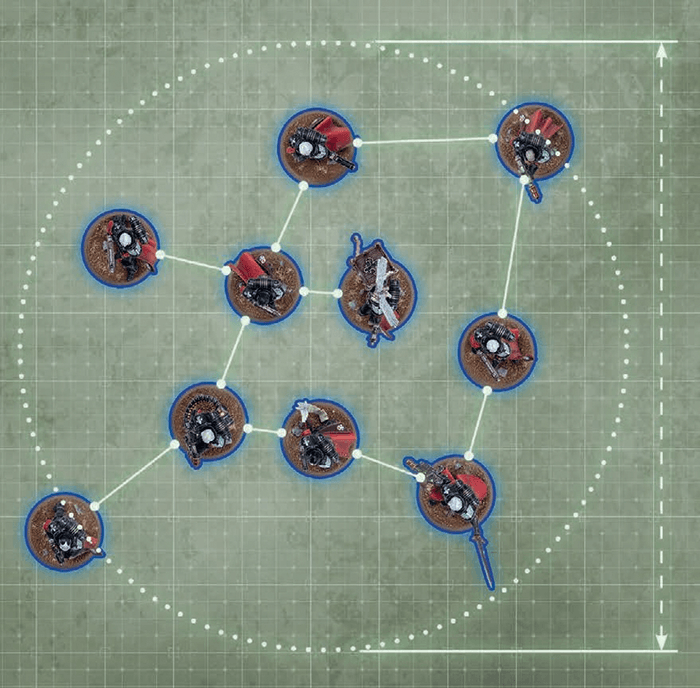
FAQ
| Q: | Do models destroyed when a unit is out of coherency count for mission objectives? |
| A: | Yes. |
| Q: | When checking coherency for my unit can my unit be in multiple groups? |
| A: | No, it must be in a single contiguous group as per Units and Models (01.02) and What is Coherency in the core rules. |
| Q: | When a move says that a model or unit must move in a way if it is able, can that requirement force the unit to end their move not in coherency? |
| A: | No, when a model or unit is making a move it must follow requirements while ending that move in coherency. |
Mighty heroes fight at the forefront of battle.
Before the battle, in the Muster Armies step, for each leader and support unit in your army, you can select one friendly bodyguard unit that unit can lead. That unit will then lead that bodyguard unit for the battle and form an attached unit with it.Unless otherwise stated, each bodyguard unit can only have one leader unit and one support unit attached to it.
TARGET: One Leader unit from your army and one friendly Bodyguard unit within 6" of it that it could normally be attached to.
EFFECT: Select one of your Leader unit’s Leader abilities. Until the start of your next Command phase, that Bodyguard unit is treated as being led by that Leader unit for the purposes of that Leader ability.
RESTRICTIONS: Once you target a unit with this Stratagem, that unit cannot be targeted with it again until your next Command phase.
Some weapons possess a punishing rate of fire, or can land devastating flurries of blows, tearing the foe apart with relentless ferocity.
This ability always takes the form [SUSTAINED HITS X]. Each time an attack made with a [SUSTAINED HITS] weapon results in a critical hit, that attack results in a number of additional hits on the target as denoted by X.The most potent weapons strike with such power that they make a mockery of armour and can cleave through several foes.
Each time an attack made with a [DEVASTATING WOUNDS] weapon results in a critical wound, the attack sequence for that attack ends and the target unit suffers a number of mortal wounds equal to the D characteristic of that weapon. These are inflicted after resolving any normal damage inflicted by those attacks.Mortal wounds inflicted by [DEVASTATING WOUNDS] weapons can damage a maximum of one model for each critical wound; any remaining mortal wounds inflicted by that attack are lost.
- If the target unit is an attached unit, use the highest T characteristic amongst bodyguard models in that unit that are on the battlefield.
- Use the highest T characteristic amongst models in that unit that are on the battlefield.
| ||||||||||||||||||||||||||||||
- Multiple Toughness Characteristics 05.02.01
- Create Groups: Divide all models in the target unit into the following groups, as many times as required:
- One group for each CHARACTER model.
- One group for all other models with the same W, Sv and InSv characteristics.
- Allocation Order: Declare the order in which those groups will have attacks allocated to them, applying all of the following:
- If a non-CHARACTER group contains a model that has lost one or more wounds, that group must be first in the allocation order.
- No CHARACTER group can be earlier in the allocation order than a non-CHARACTER group.
- CHARACTER groups containing a model that has lost one or more wounds must be earlier in the allocation order than CHARACTER groups containing no wounded models.
- Make Save Rolls: The opposing player makes one save roll for each attack that wounded the target by rolling one D6.
FAQ
| Q: | When declaring the allocation order of groups in my unit I have more than one non-CHARACTER groups that contain a model with a missing wound, how must I select the order? |
| A: | Those groups can be selected in an order of your choosing but must be in an order that makes them come before any non-CHARACTER groups that do not contain a model with a missing wound. |
| Q: | I have a unit being attacked with weapons that will modify some of their save rolls to be worse then 6 should I make those save rolls? |
| A: | Yes, because other models in your unit may have Sv’s that are better those models you’ve mentioned, this means that enough save rolls could be allocated to the those models that the rest of the results are not greater then the Sv’s of the other models in your unit. |
| Q: | Can I group or allocate a wound to a destroyed model? |
| A: | No. |
Weapons powered by unstable and dangerous energy sources pose a substantial risk to the wielder and those that stand beside them.
Each time a unit is selected to shoot or selected to fight, after that unit has resolved all of its attacks, make a number of hazard rolls (06.03) for that unit equal to the number of [HAZARDOUS] weapons you selected in the Select Weapons step.- If that roll succeeds, that unit does not become battle-shocked.
- If that roll fails, that unit, and each model in it, is battle-shocked.
While a unit is battle-shocked:
- The Objective Control (OC) characteristic of all of its models is modified to ‘-’ (02.02).
- Its controlling player cannot target that unit with stratagems (15).
- It is not eligible to start an action (16), and any action it has started cannot be completed.
- Battlefield Morale 01.07.01
- Battle-shock Test 01.07.02
FAQ
| Q: | If a unit has a rule that allows it to start an action when it is battle-shocked can it also continue doing that action if it becomes battle-shocked after starting an action? |
| A: | Yes |
| Q: | If a unit becomes battle-shocked after starting an action does it stop performing that action? |
| A: | Yes |
- A unit has all the keywords of all models in that unit. A model only has its own keywords.
- If a rule specifies that it applies to a unit with a keyword, it applies to a unit which includes one or more models with that keyword.
- If a rule specifies that it applies to a model with a keyword, it only applies to a model with that keyword.
- If a rule specifies that it applies to ‘non-KEYWORD’ models/units, it only applies to models/units that do not have that keyword. For example, if a rule applies to non-VEHICLE units, it only applies to units that do not have the VEHICLE keyword.
- Some units can contain models that have different keywords. While this is the case, such a unit is considered to have all of the keywords of all of its models, and so is affected by any rule that applies to units with any of those keywords. Remember that attacks are made against units, not models.
- If a rule only applies to models with a specific keyword, then it instead only applies to models in such a unit that have the correct keyword.
- A rule with a comma-separated list of keywords, or a series of keywords separated by slashes (‘/’), or two keywords separated by the word ‘or’ (e.g. ‘an IMMORTALS, DEATHMARKS or LYCHGUARD unit’) refers to a model/unit that has any one of those keywords.
- A rule with multiple adjacent keywords (e.g. ‘an AELDARI GUARDIANS unit’) only refers to a model/unit that has all of those keywords.
- Some older rules use keywords without specifying model or unit: for example, MONSTER/VEHICLE or TRANSPORT. These rules refer to units with those keywords.
- Singular and plural instances of the same keyword function in the same way.
Some rules are linked to one or more keywords. For example, a rule might say that it applies to INFANTRY units. This means it only applies to units that have the INFANTRY keyword. Singular and plural instances of the same keyword function in the same way.
- Using Keywords & Mixed Keywords in Units 02.05.01
FAQ
| Q: | Do rules that affect a keyword include multi-word keywords that contain that keyword? For example, would rules that affect COMMISSAR units affect a unit that has the COMMISSAR GRAVES keyword? |
| A: | No. |
Torrent weapons project clouds of fire, gas or other lethal substances that few foes can hope to evade.
Each time an attack is made with a [TORRENT] weapon, that attack automatically hits the target.Some rules refer to units being below starting strength, or at – or below – half-strength. The meaning of these terms varies depending on a unit’s starting strength, as shown below.
|