Special Rules
| This section presents a comprehensive listing of all the special rules mentioned in this rulebook or required to play games of the Horus Heresy - Age of Darkness. Other publications may present additional special rules to be used as part of expanded Faction Army Lists or specific units. Whenever a creature or weapon has an ability that breaks or bends one of the main game rules, it is represented by a ‘special rule’. A special rule might improve a model’s chances of causing damage by granting it poisoned weapons or a boost to its strength. Conversely, a special rule may improve a model’s survivability by granting it resistance to pain, or the ability to regrow damaged flesh. Special rules allow snipers to target the most valuable enemies, scouts to range ahead of the army and anti-aircraft guns to blast flyers out of the skies. Unless specifically stated, a model cannot gain the benefit of a special rule more than once. However, the effects of multiple different special rules are cumulative unless noted otherwise in their rules. | ||
Books
| Book | Kind | Edition | Version | Last update |
| | ||||
| | Rulebook | 2 | 1.2 | December 2023 |
What Special Rules do I have?
If a given model or unit has any special rules, they will be listed on its Army List entry or unit profile. It is also possible for a model or unit to acquire further special rules during the course of the game due to the weapon it is using, the result of Psychic Powers, mission special rules or other specific situations. Where this is the case, the rule that governs this situation will make this clear.Most of the more commonly used special rules in Horus Heresy – Age of Darkness are listed here, but this is by no means an exhaustive list. Many troops and weapons have their own unique special rules, which are detailed in their Army List entry, profile or Faction specific book.
Variable Special Rules
Some special rules include a value in brackets as part of their description – for example, Furious Charge (3). This indicates a special rule the effects of which can vary from instance to instance, and in most cases in this compendium will be listed with an X as the value for reference purposes – for example, Furious Charge (X). This X is known as the variable value and each special rule will detail what effect this variable value has for the rule in question.In all cases, each instance of a variable special rule is considered a separate special rule and discrete from all other instances of that special rule. These separate special rules do not stack their effects, unless specifically noted in that special rule.
Adamantium Will (X)
So strong of mind is this warrior that the powers of the Warp have little grasp upon them.
Models with the Adamantium Will special rule gain an Invulnerable Save against any Wound inflicted by a weapon with the Force or Psychic Focus special rules and Wounds inflicted by Perils of the Warp – the value of this Save is indicated in brackets after the rule. For example, a model with Adamantium Will (5+) gains a 5+ Invulnerable Save against any Wound inflicted by a weapon with the Force or Psychic Focus special rules and Wounds inflicted by Perils of the Warp. If, for any reason, the Adamantium Will special rule is presented without a value in brackets then consider the rule to be Adamantium Will (5+).Armourbane (X)
This weapon has been crafted with one aim in mind – to pierce the hides of armoured vehicles.
If a model or weapon has this special rule, it rolls an additional D6 for armour penetration when targeting a Vehicle model, or, when targeting a model with the Automata or Dreadnought Unit Type, re-rolls all failed rolls To Wound instead. These effects apply to both Shooting Attacks and close combat attacks.Some instances of the Armourbane special rule may include a qualifier after the rule in brackets, for example Armourbane (Melta) or Armourbane (Melee). These variant rules are described below:
Armourbane (Melta): A model or weapon with this Armourbane special rule only gains the benefits of the Armourbane special rule when at half range or less. If the attack is more than half its Maximum Range away, it gains no benefit from the Armourbane special rule. If a weapon with this version of Armourbane also has the Blast special rule, measure the distance to the centre of the Blast marker after it has scattered. If this is half the weapon’s range or less, then all Hits are counted as having the Armourbane special rule, otherwise the Hits are resolved as if they did not have the Armourbane special rule.
Armourbane (Melee): A weapon or model with this version of the Armourbane special rule only gains the benefits of the Armourbane special rule when attacking in close combat.
Armourbane (Ranged): A weapon or model with this version of the Armourbane special rule only gains the benefits of the Armourbane special rule when making Shooting Attacks.
Assault Vehicle
This vehicle is specifically designed to disgorge troops into the thick of the action.
Passengers Disembarking from Access Points on a Vehicle with this special rule can Charge on the turn they do so (including when forced to make an Emergency Disembarkation) unless the Vehicle arrived from Reserves that turn.Barrage
Barrage weapons lob shells high into the air, landing them in the midst of the foe.
All Barrage weapons use Blast markers and consequently use the rules for Blast weapons, as indicated by their profile, with the following exceptions:Barrage weapons can fire indirectly. This means they can fire at a target that they do not have line of sight to, as long as the target is beyond their Minimum Range (if applicable). When firing indirectly, the Ballistic Skill of the firer is not subtracted from the scatter distance; unless a Hit is rolled on the Scatter dice, the Blast marker always scatters a full 2D6". If a Barrage weapon has line of sight to its target it can fire directly, even if the target is within its Minimum Range.
Note that any Hits inflicted upon Vehicles by an Attack using the Barrage special rule are always resolved against the Vehicle’s Side Armour Value.
Multiple Barrages
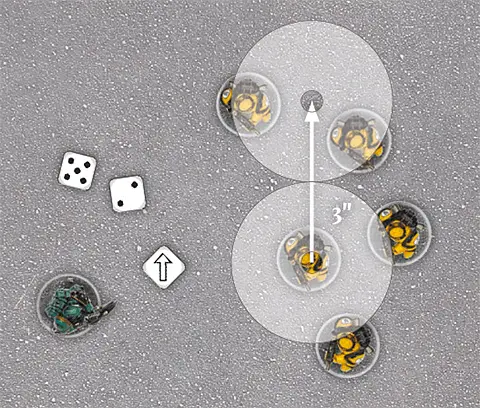
If a unit fires more than one shot with the Barrage special rule, they fire together, as follows:The Barrage weapon closest to the target unit fires first. Place the Blast marker over the target, then roll for scatter as described earlier. Once the first marker is placed, roll a Scatter dice for each other Barrage weapon shot fired by the unit. If an arrow is rolled, place the marker in the direction indicated so that it is next to and touching the edge of the first marker placed (see diagram below). If a Hit is rolled, the firing player places the marker so that it touches any part of any marker in the group that has already been placed. Note that it is perfectly fine if some markers are placed overlapping one another (including being directly over the top of a previous marker).
Once all of the markers are in place, add up the number of Hits and roll To Wound for these Hits. To determine Cover Saves, always assume the shot is coming from the centre of the first Blast marker that was placed in the Multiple Barrage.
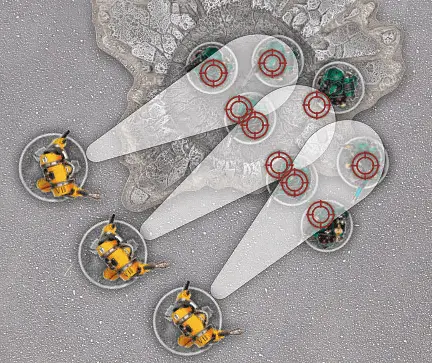
Apocalyptic Barrage
An Apocalyptic Barrage follows all of the rules for a Barrage weapon, but uses the clover-shaped Apocalyptic Barrage marker. Before the marker is placed, the attacker is allowed to rotate the marker about its centre to maximise the number of models that could potentially be hit. Place the marker and roll for scatter in the same way you would for a Barrage. If the marker scatters, be careful to maintain the same orientation as you move it.Once the final position of the marker has been determined, roll a number of dice equal to the number of attacks on the weapon’s profile. So, for example, with a weapon with the type ‘Heavy 4, Apocalyptic Barrage’, you would roll four dice. Each dice roll corresponds to a ‘strike’ on one of the circles on the Apocalyptic Barrage marker. For example, each roll of a 2 indicates a strike on circle number 2. Resolve the strikes as for a Multiple Barrage, as if each were a Barrage attack that had landed on that circle and hit all the models underneath it. To determine Cover Saves, always assume the shot is coming from the centre of the entire Apocalyptic Barrage marker.
Battlesmith (X)
Those versed in the secret arts and teachings of the Mechanicum, whether Techmarine, Forge Lord or Magos, have the skill and ability to reconstruct and effect field repairs to war machinery in the very heat of battle.
If a model with the Battlesmith (X) special rule is in base contact with, or Embarked upon, one or more damaged Vehicles, Dreadnoughts or Automata during the Shooting phase, they can attempt to repair one of them. If they do so, the model that attempted the repair cannot shoot any weapons or use any other abilities that would be used instead of making a Shooting Attack. Roll a D6. If the result is equal to or more than the value listed in brackets as part of this rule then one of the following options may be applied to any one Vehicle, Dreadnought or Automata the model is in base contact with or Embarked upon:- Restore a lost Hull Point.
- Restore a lost Wound.
- Repair a Weapon Destroyed result.
- Repair an Immobilised result.
Battle-hardened (X)
Some warriors, by dint of raw talent, genetic manipulation or long experience of the battlefield’s terrors, are hardened against the rigours of war. Such warriors prove much harder for the foe to bring low.
For the purposes of whether or not attacks of a Strength twice this model’s Toughness value inflict Instant Death, this model’s Toughness is increased by X, where X is the value in brackets after the name of this special rule. If, for any reason, this special rule does not provide a value, then consider the value of X to be 1. This special rule does not alter the scores needed by To Wound rolls or any other Test or Check.BlastBlast weapons fire shells, missiles or packets of energy that explode on impact. When firing a Blast weapon, models do not roll To Hit. Instead, pick one enemy model visible to the firer and place the Blast (3") marker with its hole entirely over the base of the target model, or its hull if the target is a Vehicle. The hole at the centre of the marker must be within the weapon’s Maximum Range. You cannot place the Blast marker so that the base or hull of any friendly model is even partially under it.The large area affected by the blast means it is going to be very hard to miss completely. Nonetheless, the shot might not land exactly where intended. Roll for the Blast marker to scatter and subtract the firer’s Ballistic Skill from the distance (if any) that it scatters, to a minimum of 0". Note that it is possible, and absolutely fine,for a shot to scatter beyond the weapon’s Maximum or Minimum Range and line of sight. This represents the chance of ricochets, the missile blasting through cover and other random events. In these cases, Hits are worked out as normal and can hit and Wound units out of range and line of sight (or even your own units, or models locked in combat). If the shot scatters so that the hole in the centre of the marker is beyond the battlefield’s edge, the shot is a complete miss and is discarded. Once the final position of the Blast marker has been determined, take a good look at it from above – each unit suffers one Hit for each of the models included in that unit that is fully or partially beneath the Blast marker, even if those models are not within the firer’s line of sight. Once the number of Hits inflicted on the unit has been worked out, roll To Wound and Save as normal. Note that, unlike other attacks, Wounds inflicted by an attack with the Blast special rule can be allocated to any models in the target unit, even if they are out of sight of any models from the attacking unit. Multiple BlastsIf a unit is firing more than one shot with the Blast special rule, scatter each shot, one at a time, as described above and determine how many Hits are scored with each individual Blast marker. After the last shot, add up the total number of Hits scored and roll all of the To Wound rolls as normal.Blast Weapons and Re-rollsIf a model has the ability to re-roll its rolls To Hit and chooses to do so after firing a Blast weapon, the player must re-roll both the Scatter dice and the 2D6. Note that this applies only to models able to fully re-roll a To Hit roll, not to models that may re-roll To Hit rolls of a specific value – for example, models that can re-roll To Hit rolls of a ‘1’ cannot re-roll either the Scatter dice or 2D6 unless another rule allows them to do so.Blast Weapons and Snap ShotsBlast weapons cannot be fired as Snap Shots.Large BlastLarge Blast weapons use the 5" Blast marker, but otherwise obey all the rules for Blast weapons.Massive BlastMassive Blast weapons use the 7" Blast marker, but otherwise obey all the rules for Blast weapons.Apocalyptic BlastApocalyptic Blast weapons use the 10" Blast marker, but otherwise obey all the rules for Blast weapons.Apocalyptic Mega-blast (5"/7"/10")Apocalyptic Mega-blast weapons use the Apocalyptic Blast marker. They obey the rules for Blast weapons, with the following exceptions:Apocalyptic Mega-blast weapons have three Strength values and three AP values. Correspondingly, the Apocalyptic Blast marker is divided into three zones, as shown in the diagram below, one for each Strength and AP value. The Strength and AP of any Hits depends on the zone in which the target model is located. The first Strength and AP value are used for the inner zone, the second Strength and AP value are used for the middle zone, and the third Strength and AP value are used for the outer zone. Always use the best Strength and AP if a model straddles two or more zones. If a unit has models in several zones, work out the Hits inflicted for each zone separately. Note that there will be a different Wound Pool for each zone. Hits from Apocalyptic Mega-blast weapons made against Vehicles are always resolved against their Side Armour Value. | ||
Blind
This attack looses a brilliant flare of light, searing the sight of the victim and forcing them to fight blind for a few moments.
Any unit hit by one or more models or weapons with this special rule must take an Initiative test at the end of the current Phase. If the Test is passed, there is no further effect. If the Initiative test is failed, all models in the unit are reduced to Weapon Skill 1 and Ballistic Skill 1 until the end of their next turn. Should the attacking unit hit themselves, they automatically pass the Test. Any model that does not have an Initiative Characteristic (for example, Vehicles, Buildings, etc) is unaffected by this special rule.Bulky (X)
This creature is so massive, it takes up an inordinate amount of space in any vehicle or building it enters.
Bulky models count as a number of models equal to the value X in brackets after the rule’s name for the purposes of Transport Capacity and whether a given unit outnumbers another in combat.For example, a unit comprised of five models all of which have the Bulky (3) special rule, would count as 15 models when attempting to Embark on a Transport Vehicle or when deciding if they outnumber an enemy unit (see, for example, Rampage (X)).
Chosen Warriors
Trusted lieutenants or paragons of martial virtue, these warriors let no challenge go unanswered in the heat of battle.
A model with this special rule may issue and accept Challenges as if it had the Character type. Note that this does not allow a model with this special rule to use any other special rules associated with the Character type.Concussive (X)
Some weapons are designed to leave any foe that manages to survive their strike disoriented and easy to slay.
A unit that suffers one or more Wounds, regardless of whether those Wounds are Saved or otherwise discounted, from a weapon with this special rule must take a Leadership test at the end of the Shooting phase (if the attacks were inflicted as part of a Shooting Attack), or the current combat (if the attacks were inflicted as part of a Melee attack). If the test is failed then that unit’s WS is reduced by the value in brackets listed as part of the special rule until the end of the following Assault phase (if no value is listed then reduce the target unit’s WS by -1).No matter how many times a unit has taken saved or unsaved Wounds from an attack with the Concussive special rule, it may only be forced to take one Leadership test because of it. If a single unit has been the target of several Concussive attacks with different values and fails the Leadership test, then it suffers the effects of the highest single modifier among those attacks – the effects do not stack or otherwise become cumulative.
Counter-attack (X)
Troops with this skill believe attack to be the best form of defence. If assaulted, they spring forward themselves and ferociously counter-attack the charging enemy.
If a unit contains at least one model with this special rule, and that unit is Charged, every model with the Counter-attack special rule gains a number of additional Attacks equal to the value in brackets listed as part of this special rule. If no value is listed then the unit gains +1 Attack.If, when Charged, the unit was already locked in combat or has made the Hold the Line Reaction, the Counter-attack special rule has no effect.
Crawling Fire
Phosphex, sometimes known as the ‘crawling fire’, seeks out and extinguishes life with a terrifying hunger.
After the Blast marker for a weapon with this special rule is placed, the attacking unit’s controlling player may move the marker up to 2" in any direction so long as this would cover more models than it previously would have.Crusader
Bolstered by their ultimate faith in their goal, the crusader is tireless, sweeping from one foe to the next in a battle that never ends.
A unit that contains at least one model with this special rule rolls an extra dice when making Sweeping Advances and discards the lowest scoring dice before determining the result.Cumbersome
Whether due to its inherent weight, shape or because it was never meant for use in combat, this weapon proves difficult to wield even for the most accomplished of warriors.
A model using a close combat weapon with this special rule can only ever make a single attack at WS 1 in an Assault phase, regardless of their profile or any bonus or other special rule.Deadly Cargo
Some payloads pose as much danger to the vehicle carrying them as they do to the enemy.
If a Vehicle with this special rule takes Hull Point damage from any source, including both Penetrating Hits and Glancing Hits, but is not destroyed, roll a D6. On a 6, the Vehicle suffers an Explodes result on the Vehicle Damage table.Deep Strike
Some units make their way to battle via tunnelling, teleportation, flying, or some other extraordinary means which allows them to appear in the thick of the fighting.
A unit made up entirely of models with this special rule may perform a Deep Strike Assault. Certain Faction or unit special rules may present other options for the deployment of units with the Deep Strike special rule.Deflagrate
The ancient volkite weaponry employed by the armies of Terra in the earliest years of the Great Crusade fired arcing blasts of energy rather than solid projectiles.
After normal attacks by this weapon have been resolved, count the number of unsaved Wounds caused on the target unit. Immediately resolve a number of additional automatic Hits on the same unit using the weapon’s profile equal to the number of unsaved Wounds – these can then be saved normally. Models in the targeted unit must still be in range in order for these additional Hits to take effect. These additional Hits do not themselves inflict more Hits and do not benefit from any other special rules possessed by the attacking model, such as Preferred Enemy (X) or Precision Strikes (X).Duellist’s Edge (X)
Some weapons have such a fine balance that they leap and spin in their wielder’s hands like living things, eager to spill the blood of the foe.
When fighting in a Challenge, the user of this weapon gains a bonus to their Initiative value equal to the value in brackets after the rule when making attacks with this weapon. If there is no value in brackets after a given instance of this special rule, then assume the value is 1 (thus adding +1 Initiative to that model).Eternal Warrior
Some heroes refuse to be laid low, even by what would be mortal wounds to lesser warriors.
If a model with this special rule suffers an unsaved Wound from an attack that inflicts Instant Death, it only reduces its Wounds by 1, instead of automatically reducing its Wounds to 0.Exoshock (X)
Each blast from this weapon that pierces its target’s armour sets off a chain reaction of secondary explosions.
If this weapon successfully scores a Penetrating Hit on a target, roll a D6. If the result of that roll is equal to or higher than the value in brackets after the rule, a second automatic Penetrating Hit is inflicted on the same target against which Cover Saves may not be taken. For example, a weapon with the Exoshock (4+) special rule would inflict a second Penetrating Hit on the score of a 4+. This second Penetrating Hit does not gain the effects of any other special rules, and cannot trigger additional Hits.If, for any reason, a given instance of this rule does not have a value in brackets after the special rule, assume the value is 6+.
Fear (X)
Some beings are so monstrous or alien that they can force their foes to recoil in horror.
All enemy models within 12" of a model with this special rule must reduce their Leadership by the value in brackets after the special rule when taking any Morale checks, Regroup or Pinning tests. For example, a unit with the special rule Fear (2) would reduce the Leadership of all enemy models within 12" by 2.Enemy units that are locked in combat are only affected by this modifier if they are locked in combat with the unit that causes Fear. This modifier is not cumulative, and any given unit can only be affected by a single instance of the Fear special rule at a time. This will always be the highest single modifier among those applicable.
A model that causes Fear is not itself immune to Fear, and will still suffer a penalty to its Leadership if within range of an enemy unit that has the Fear special rule.
Fearless
Fearless troops never give up and seldom make full use of cover – even if it would be wiser to do so.
Units with one or more models with the Fearless special rule automatically pass Pinning tests, Regroup tests and Morale checks. In addition, models with the Fearless special rule ignore the effects of the Fear special rule.However, units containing one or more models with the Fearless special rule cannot use any Reactions that grant a Cover Save, Armour Save or Invulnerable Save, and cannot choose to fail a Morale check due to the Our Weapons Are Useless special rule. If a unit has become Pinned and then gains the Fearless special rule, all the effects of being Pinned are immediately cancelled.
Feel No Pain (X)
Whether through force of will, bionic augmentation or foul sorcery, this warrior can still fight despite fearsome wounds.
When a model with this special rule suffers an unsaved Wound, it can make a special Feel No Pain roll to avoid being Wounded (this is a special Saving Throw which is made after unsaved Wounds are suffered).Feel No Pain rolls may not be taken against unsaved Wounds that have the Instant Death special rule.
Roll a D6 each time an unsaved Wound is suffered. On a result that is equal to or greater than the value in brackets, the unsaved Wound is discounted – treat it as having been saved. On any other result the Wound is taken as normal.
For example, a unit with the special rule Feel No Pain (5+) would need to score a 5 or 6 in order to discount a Wound inflicted upon it.
This is a Damage Mitigation roll – any model may make only a single Damage Mitigation roll of any type for any given Wound.
Fleet (X)
Preternaturally agile, these warriors can cover ground more quickly than their plodding foes.
A unit composed entirely of models with this special rule gains a bonus to all Run moves, any distance moved as part of a Reaction and as a modifier to all rolls made to determine Charge Distances equal to the value in brackets listed after the special rule. For example, a unit composed entirely of models with the Fleet (2) special rule would add +2 to all Run moves it makes, +2 to all distances moved as part of a Reaction and add a +2 modifier to any Charge Moves made.If a unit is composed entirely of models with this special rule, but the models have different versions of this special rule, then the unit must use the lowest Fleet value included in the unit (for example, a unit of ten models in which nine models have Fleet (2) and one model has Fleet (4) would use the Fleet (2) special rule).
Fleshbane
Many are the weapons and creatures whose merest caress is fatal.
If a model has this special rule, or is attacking with a Melee weapon that has this special rule, they always Wound on a 2+ in close combat.Similarly, if a model makes a Shooting Attack with a weapon that has this special rule, they always Wound on a 2+.
In either case, this special rule has no effect against Vehicles or Buildings.
Force
Force weapons are charged by the psychic might of the wielder, turning them from mere physical tools to mystical weapons of incredible potency.
Any Psyker with a weapon or ability with this special rule may choose to make a Psychic check before making any attacks with that weapon or resolving the ability. If the Check is successful then the Strength value of any attacks made is doubled. If the Check is failed then Perils of the Warp is resolved targeting the unit containing the model that failed its Check. If the Psyker survives Perils of the Warp then it may attack as normal.Firing Protocols (X)
Those warriors or war engines equipped with multiple weapons often incorporate sophisticated tracking systems, or have received advanced training to allow them to wield them all simultaneously on the battlefield.
When making a Shooting Attack, a model with this special rule may attack with a number of different weapons equal to the value of this special rule. This rule does not allow a single weapon to be attacked with more than once, and only applies if the model is equipped with more than one weapon. For example, as part of a single Shooting Attack, a model with the Firing Protocols (2) special rule may attack with up to two different weapons.Furious Charge (X)
Some warriors use the impetus of the charge to fuel their own fury.
In a turn in which a model with this special rule Charges into combat, it adds a bonus to its Strength Characteristic until the end of the Assault phase. The bonus added to the model’s Strength is equal to the value in brackets after the special rule, for example a model with Furious Charge (2) adds a bonus of +2 to its Strength.A model that has made a Disordered Charge that turn receives no benefit from Furious Charge.
Gets Hot
Some weapons are fuelled by unstable power sources and risk overheating with each shot – often to the detriment of their wielder.
When firing a weapon that Gets Hot, roll To Hit as normal. For each unmodified To Hit roll of 1, the firing model immediately suffers a single Wound with an AP value equal to that of the weapon that was used to attack (Armour Saves, Invulnerable Saves and Feel No Pain rolls can be taken, but not Cover Saves or Shrouded rolls) – this Wound cannot be allocated to any other model in the unit. A Vehicle instead rolls a D6 for each roll of a 1 To Hit. If this roll results in a 1 or 2, the Vehicle suffers a Glancing Hit.Gets Hot and Re-rolls
If a model has the ability to re-roll its rolls To Hit (including because of BS 6+ or the Twin-linked special rule), a Wound is only suffered if the To Hit re-roll is a 1; it may also re-roll Gets Hot results of 1 for weapons that do not roll To Hit.Gets Hot and Weapons that do not Roll To Hit
Weapons that do not roll To Hit (such as Blast weapons) must roll a D6 for each shot immediately before firing. On a 2+, the shot is resolved as normal. For each roll of a 1, the weapon Gets Hot; that shot is not fired and the firing model immediately suffers a single Wound with an AP value equal to that of the weapon that was used to attack (Armour Saves, Invulnerable Saves and Feel No Pain rolls can be taken, but not Cover Saves or Shrouded rolls) – this Wound cannot be allocated to any other model in the unit. A Vehicle instead rolls a D6 for each roll of a 1. If this roll results in a 1 or 2, the Vehicle suffers a Glancing Hit.Graviton Pulse
Some weapons crush their targets, cracking bones and rupturing organs.
Instead of rolling To Wound normally with this weapon, any model without the Vehicle, Dreadnought or Automata Unit Type that suffers a Hit from a weapon with this special rule must instead roll under their Strength on a D6 or suffer a Wound (a roll of a ‘6’ always counts as a failure). If a Graviton Pulse weapon also has the Blast type, then leave the Blast marker in place after resolving all Wounds, or otherwise mark the area. This area now counts as both Difficult Terrain and Dangerous Terrain until the start of the next turn of the player that made the attack.Guided Fire
Whether by advanced technology or arcane influence, some attacks are able to reach their target no matter what obstacles obscure them.
Any attacks made using a weapon with this special rule do not require line of sight, but must still be within range.Hammer of Wrath (X)
Many warriors hurl themselves headlong into combat, seeking to crush or trample the foe.
If a model with this special rule ends its Charge Move in base contact with an enemy model, it makes a number of additional attacks equal to the value in brackets listed as part of this special rule. These attacks hit automatically and are resolved at the model’s unmodified Strength with AP-. These attacks do not benefit from any of the model’s special rules (such as Furious Charge, Rending, etc.). These attacks are resolved during the Fight sub-phase at Initiative step 10, but do not grant the model an additional Pile-in Move.If a model with this special rule Charges a Vehicle of any kind or a Building, the hits are resolved against the Armour Value of the Facing the charging model is touching. If the model is in contact with two or more Facings, the player controlling the target model chooses a Facing upon which the attacks are resolved. If a model with this special rule Charges a Building or Vehicle that is a Transport, the hits are resolved against the Building or Vehicle, not the unit Embarked within the Building or Vehicle.
Hatred (X)
In the far future, hatred is a powerful ally.
This rule is presented as Hatred (X) where X identifies a specific type of foe. If the special rule does not specify a type of foe, then the unit has Hatred against everyone. This can refer to a Faction or a specific unit.For example, Hatred (Mechanicum) means any model of the Mechanicum Faction, whilst Hatred (Thallax) means only Thallax. A model striking a Hated foe in close combat re-rolls all failed To Hit rolls during the first round of each close combat.
The effects of this special rule only apply when a unit that has it begins an Assault phase not locked in combat and then either Charges or is Charged by an enemy unit. If an enemy unit Charges this unit when it is already locked in combat then that does count as a new ‘first’ turn of combat for the effects of Hatred.
Haywire
Haywire weapons send out powerful electromagnetic pulses.
For each Hit inflicted on a unit that contains at least one model with the Vehicle, Dreadnought or Automata Unit Type, roll a D6 to determine the effect rather than rolling To Wound or for armour penetration normally. AP has no effect on this roll:
|
Hit & Run
Some troops employ a flexible battle stance, engaging the foe at close quarters one moment, before peeling off to strike with renewed vigour the next.
A unit that contains at least one model with this special rule that is locked in combat can choose to leave close combat at the end of any Assault phase. If the unit wishes to do so, it must take an Initiative test.If the Test is failed, nothing happens and the models remain locked in the fight.
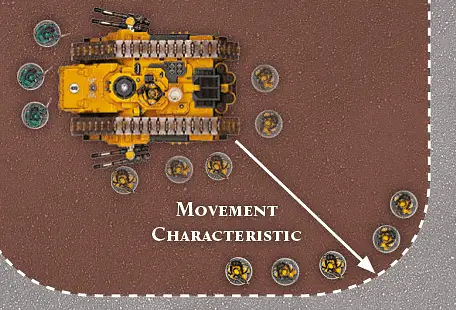
If the Test is passed, choose a direction – then roll 2D6 and add the unit’s Movement Characteristic to the result. As long as the distance rolled, in inches, is sufficient to allow the entire unit to move over 1" away from all of the enemy units they are locked in combat with, the unit breaks away from combat and must immediately move a number of inches in the chosen direction equal to the 2D6 + Movement result, ignoring the models they were locked in combat with. No Sweeping Advance rolls are made. Enemy units that are no longer locked in combat immediately Consolidate a number of inches equal to their Initiative.
A Hit & Run Move is not slowed by Difficult Terrain, but does trigger Dangerous Terrain tests as normal. It may not be used to move into base contact with enemy units, and models instead stop 1" away. If there are units with this rule on both sides who wish to disengage, roll off to determine who goes first and then alternate disengaging them. If the last of these ends up no longer in combat, it Consolidates instead.
Independent Character
Mighty heroes go where they are needed, being at the forefront of the most vital charges and leading their troops to victory.
Independent Characters can join other units. They cannot, however, join units that contain Vehicles, Dreadnoughts, Automata or any model with the Monstrous sub-type (unless the Independent Character also has that Unit Type or sub-type). They can join other Independent Characters though to form a powerful multi-character unit.Joining and Leaving a Unit
An Independent Character can begin the game already with a unit, either by being deployed in unit coherency with it or, if the unit is in Reserve, by you informing your opponent which unit it has joined.In order to join a unit, an Independent Character simply has to move so that they are within unit coherency distance of a friendly unit at the end of their Movement phase. If the Independent Character is within unit coherency of more than one unit at the end of its Movement phase, the player must declare which unit it is joining. If an Independent Character does not intend to, or cannot, join a unit, it must, where possible, remain outside of unit coherency with that unit at the end of the Movement phase. This is to make clear whether they have joined a unit or not. Note that after an Independent Character joins a unit, that unit can Move no further that Movement phase.
An Independent Character can leave a unit during the Movement phase by moving out of unit coherency with it. They cannot join or leave during any other Phase once shots are fired or Charges are declared.
An Independent Character cannot leave a unit while either they or the unit are in Reserve, locked in combat, Falling Back or have been Pinned. They cannot join a unit that is in Reserve, locked in combat or Falling Back. If an Independent Character joins a unit, and all other models in that unit are killed, they again become a unit of one model at the start of the following Phase.
While an Independent Character is part of a unit, they count as part of the unit for all rules purposes, though they still follow the rules for Characters.
Special Rules
When an Independent Character joins a unit, it might have different special rules from those of the unit. Unless specified in the rule itself (as in the Stubborn special rule), the unit’s special rules are not conferred upon the Independent Character, and the Independent Character’s special rules are not conferred upon the unit. Special rules that are conferred to the unit only apply for as long as the Independent Character is with them.Independent Characters and Infiltrate
An Independent Character without the Infiltrate special rule cannot join a unit that is being deployed using the Infiltrate special rule. However, if a unit composed entirely of models with the Infiltrate special rule is deployed without making use of any of the benefits of the Infiltrate special rule, then an Independent Character without the Infiltrate special rule may join that unit during deployment.Independent Characters and Ongoing Effects
Sometimes, a unit that an Independent Character has joined will be the target of a beneficial or harmful effect, such as those bestowed by the Blind special rule, for example. If the Independent Character leaves the unit, both the Independent Character and the unit continue to be affected by the effect, so you’ll need to mark the Independent Character accordingly.Conversely, if an Independent Character joins a unit after that unit has been the target of an ongoing effect (or joins a unit after they themselves have been the target of an ongoing effect), benefits and penalties from that effect are not shared.
Infiltrate
Many armies employ reconnaissance troops who sit concealed for days, just waiting for the right moment in which to strike.
You may choose to deploy units that contain at least one model with this special rule last, after all other units (friend and foe) have been deployed. If both players have such units and choose to do so, the players roll off and the winner decides who goes first,then alternate deploying these units.Units that Infiltrate in this way can be set up anywhere on the battlefield that is more than 9" from any enemy unit, as long as no deployed enemy unit can draw line of sight to them. This includes in a Building, as long as the Building is more than 9" from any enemy unit. Alternatively, they can be set up anywhere on the battlefield more than 12" from any enemy unit, even in plain sight.
If a unit with Infiltrate deploys inside a Dedicated Transport, the same rules apply when deploying their Transport.
A unit that deploys using these rules cannot Charge in their first turn.
Having Infiltrate also confers the Outflank special rule to units of Infiltrators that are kept as Reserves.
Infiltrate and Scout
If a unit has both the Infiltrate and Scout special rule, that unit can deploy as per the Infiltrate special rule and then redeploy as per the Scout special rule.Independent Characters and Infiltrate
An Independent Character without the Infiltrate special rule cannot join a unit of Infiltrators during deployment, and vice versa.Ignores Cover
This weapon fires ammunition that cheats an enemy of their shelter.
Cover Saves and Damage Mitigation rolls granted by the Shrouded special rule cannot be taken against Wounds or Hull Point damage caused by weapons with the Ignores Cover special rule. This includes Cover Saves granted by Reactions and other special rules as well as Cover Saves conferred by terrain.Instant Death
Some blows can slay an enemy outright, no matter how hardy they may be.
If a model suffers an unsaved Wound from an attack with this special rule, it is reduced to 0 Wounds and is removed as a casualty.It Will Not Die (X)
In the dark corners of the galaxy, there are creatures that heal at a terrifying speed.
At the end of each of your turns, roll a D6 for each of your models with this special rule that has less than its starting number of Wounds or Hull Points, but that has not been removed as a casualty or destroyed. On a roll equal to or greater than the number in brackets associated with the special rule, that model regains a Wound, or Hull Point, lost earlier in the game. For example, a model with It Will Not Die (5+) would regain a lost Wound on the roll of a 5 or more.Lance
The terror of tank commanders, a lance weapon fires a concentrated beam of energy that can bore through any armour, regardless of thickness.
Weapons with the Lance special rule count Vehicle Armour Values that are higher than 12 as 12.Legiones Astartes (X)
The Space Marines of the Emperor’s Legions are genetically engineered, psycho-indoctrinated warriors with superhuman abilities, and minds and souls tempered for war. Each of the Legions has its own idiosyncrasies and character – the product of their gene-seed and the unique warrior cultures fostered by their masters.
Any unit with this special rule will have a number of additional special rules and abilities specific to their ‘named’ Legion, all of which will be defined in other Horus Heresy – Age of Darkness publications. A Space Marine unit may only have one such ‘named’ rule, e.g., Legiones Astartes (Sons of Horus). Space Marine units from a different Legion may only be included in an army using an Allied Detachment and in conjunction with the Allies in the Age of Darkness chart.Lingering Death
Many of the terrible weapons unleashed during the Horus Heresy tainted the very worlds they were used to conquer, poisoning the soil and burning the sky, leaving only calamity in their wake.
When a Blast weapon with this rule is used, after the attack is resolved leave the Blast marker in play for the rest of the game and mark it with a counter of some kind. This area is now treated as Dangerous Terrain for all models with a Toughness value.Master-crafted
Some weapons are lovingly maintained artefacts, crafted with skills now lost. Though the exact form of master-crafting varies, it is always considered to be the pinnacle of the weaponsmith’s art.
Weapons with the Master-crafted special rule allow the bearer to re-roll one failed roll To Hit per turn with that weapon.Monster Hunter
The Great Crusade allowed many of the Emperor’s warriors to hone the skills needed to topple mighty monsters and towering automatons.
A unit that contains at least one model with this special rule re-rolls all failed To Wound rolls against Dreadnoughts, Automata and Primarch models as well as any unit with the Monstrous sub-type.Move Through Cover
Some warriors are skilled at moving over broken and tangled terrain.
A unit that contains only models with this special rule suffers no penalty for moving or charging through Difficult Terrain.Murderous Strike (X)
Some weapons are so cruel of form or powerful in aspect that a well-placed strike can slay even the toughest opponent.
Attacks with this special rule cause Instant Death on a To Wound roll equal to or greater than the number listed in brackets associated with the specific rule. Roll any viable Saves against this Instant Death-causing Wound separately and before any other Wounds the attack inflicts.Night Vision
Some warriors can see almost as clearly in the darkness as they can in daylight.
A unit that contains at least one model with this special rule ignores the effects of Night Fighting and no model may make Shrouded rolls to negate Wounds inflicted by their attacks.One Use/One Shot
Certain items can only be used once, so a general must choose wisely when to do so.
A weapon or ability with this special rule can only be used once during the course of a battle. Once a weapon with the One Use or One Shot special rule has been used to attack, it is no longer counted as a weapon and may not be destroyed (for example, by rolls on the Vehicle Damage table) or repaired by any other rule or effect.Outflank
Some units make use of their inherent speed, stealth or other capabilities to launch a surprise assault on the foe from an unexpected direction.
A unit made up entirely of models with this special rule may perform a Flanking Assault. Certain Faction or unit special rules may present other options for the deployment of units with the Outflank special rule.Pathfinder
Some warriors are specially trained to bypass the most dangerous hazards of the battlefield, or adapted to ignore the dangers they present.
A unit with at least one model with this special rule automatically passes Dangerous Terrain tests.Pinning
Coming under fire without knowing where the shots are coming from, or having ordnance rain down from the skies, can shake the resolve of even the bravest warriors, making them dive flat and cling to whatever cover presents itself.
If a non-Vehicle unit suffers one or more unsaved Wounds from a weapon with the Pinning special rule, it must take a Leadership test once the firing unit has finished its Shooting Attacks for that Phase. This is called a Pinning test. If the unit fails the Test, it is Pinned. As long as the Test is passed, a unit can be called upon to take multiple Pinning tests in a single turn, but only once for each unit shooting at them.A unit that is affected by any of the following conditions does not take Pinning tests, and if called upon to do so is considered to automatically pass them:
- The unit is locked in combat.
- The unit is already Pinned (the unit remains Pinned, but takes no further Tests).
- The unit is composed entirely of Vehicle models.
- The unit is Embarked on a Transport Vehicle.
- The target unit is affected by the Fearless special rule.
Poisoned (X)
There are many virulent and lethal poisons in the Age of Darkness. It is simplicity itself to adapt such toxins for battlefield use. It does not matter whether they coat blades or bullets, or are secreted by alien monstrosities – all are lethal.
If a model has the Poisoned special rule, or is attacking with a Melee weapon that has the Poisoned special rule, it always Wounds on a fixed number (generally shown in brackets), unless a lower result would be required, when attacking in close combat. In addition, if the Strength of the wielder (or the Poisoned weapon) is higher than the Toughness of the victim, the wielder must re-roll failed rolls To Wound in close combat.Similarly, if a model makes a Shooting Attack with a weapon that has the Poisoned special rule, it always Wounds on a fixed number (generally shown in brackets), unless a lower result would be required. If no number is shown in brackets, the rule is Poisoned (4+).
Unless otherwise stated, Poisoned weapons are treated as having a Strength of 1. The Poisoned special rule has no effect against Vehicles.
Power of the Machine Spirit
The interface between this vehicle’s advanced machine spirit and its fire control mechanisms allows the crew to target foes with incredible accuracy.
A Vehicle with this special rule may attack different targets with each Ranged weapon it is permitted to fire during any Shooting Attack.Precision Shots (X)
Many of the galaxy’s marksmen are able to single out enemy leaders or soldiers with particularly powerful weapons and snipe them with unerring accuracy.
If a model with this special rule, or attacking with a weapon with this special rule, rolls equal to or higher than the value in brackets when making a To Hit roll as part of a Shooting Attack, that shot is a ‘Precision Shot’. For example, if a model with the Precision Shots (4+) special rule rolls a 4 or higher when making a To Hit roll, then that attack is a Precision Shot.Wounds from Precision Shots are allocated against a model (or models) of the attacking player’s choice in the target unit, as long as the target model is in range and line of sight of the attacking model, rather than following the normal rules for Wound allocation.
Note that Snap Shots and shots from weapons that scatter, or do not roll To Hit, can never be Precision Shots.
Precision Strikes (X)
The galaxy is replete with swordsmen and blade-masters who can pick out an enemy from a crowd and land a blow on them, even amidst the swirling chaos of hand-to-hand combat.
If a model with this special rule, or attacking with a weapon with this special rule, rolls equal to or higher than the value in brackets when making a To Hit roll as part of a melee attack, that hit is a ‘Precision Strike’. For example, if a model with the Precision Strikes (4+) special rule rolls a 4 or higher when making a To Hit roll, then that attack is a Precision Strike.Wounds from Precision Strikes are allocated against a model (or models) of the attacking player’s choice in the target unit, as long as that model is engaged in combat with the attacking model’s unit, rather than following the normal rules for Wound allocation.
Preferred Enemy (X)
Many of the galaxy’s warriors train hard to overcome a particular foe, allowing them to predict the enemy’s battle-stances and thus land a blow or shot with greater ease.
This rule is presented as Preferred Enemy (X) where X identifies a specific type of foe. If the special rule does not specify a type of foe, then everyone is a Preferred Enemy of the unit. A unit that contains at least one model with this special rule re-rolls failed To Hit and To Wound rolls of 1 if attacking its Preferred Enemy. This applies both to Shooting Attacks and close combat attacks.If a model with this rule makes an attack against a mixed unit which has one or more models to which their Preferred Enemy rule pertains, but is not entirely composed of such models, it may still benefit from the effects of Preferred Enemy for all attacks made against that unit. For example, a model with Preferred Enemy (Independent Characters) may re-roll failed To Hit and To Wound rolls of 1 against all of the models in a unit which has been joined by an Independent Character.
Rad-phage
One of the terrors of Old Night, rad-phage weaponry was created to corrupt and poison, to reduce a powerful foe to an impotent and pitiable wreck.
A model which loses one or more Wounds to an attack with this special rule and survives has its Toughness value reduced by -1 for the rest of the battle. This effect is not cumulative with other attacks using the Rad-phage special rule, but can be stacked with other special rules that also reduce the Toughness Characteristic of the target. Note that this special rule can never reduce a model to a Toughness value of less than 1.Rage (X)
Bloodlust is a powerful weapon on the battlefield, spurring a warrior to hack their foes apart in a flurry of mindless carnage.
In a turn in which a model with this special rule Charges into combat, it gains a number of Attacks equal to the value of X for Charging, rather than +1. A model that has made a Disordered Charge that turn receives no benefit from Rage.Rampage (X)
For some warriors, being outnumbered is not a cause for despair, but a call to set about their foes with a berserk counter-attack.
At the start of any Fight sub-phase, models with the Rampage special rule gain a number of Attacks equal to the value listed in brackets if outnumbered by enemy models (including the effects of the Bulky special rule) – count all models locked in the combat, not just those models that are engaged. If the value in brackets is randomly determined by rolling dice, then roll once for each such variant of the Rampage special rule present in the unit to determine the number of Attacks that may be made, applying the result to all models with that variant for the current phase. For example, a model with the Rampage (D3) special rule that is outnumbered by the enemy in close combat receives D3 additional Attacks in that Fight sub-phase.A model that has made a Disordered Charge that turn receives no benefit from Rampage.
Relentless
Relentless warriors are strong of arm – nothing can slow their implacable advance.
Relentless models can shoot with Heavy or Ordnance weapons, counting as Stationary, even if they moved in the previous Movement phase. They are also allowed to Charge in the same turn they fire Heavy, Ordnance, or Rapid Fire weapons.Rending (X)
Some weapons can inflict critical strikes against which no armour can protect.
If a model has the Rending special rule, or is attacking with a Melee weapon that has the Rending special rule, there is a chance that their close combat attacks will strike a critical blow. For each To Wound roll equal to or higher than the value listed, the target automatically suffers a Wound, regardless of its Toughness. The controlling player may choose to resolve these Wounds at AP 2 instead of the weapon’s normal AP value.Similarly, if a model makes a Shooting Attack with a weapon that has the Rending special rule, a To Wound roll of equal to or greater than the listed value wounds automatically, regardless of Toughness, and is resolved at AP 2.
In either case, against Vehicles each Armour Penetration roll of equal to or greater than the listed value allows a further D3 to be rolled, with the result added to the total Strength of the attack. These Hits are not resolved at AP 2, but are instead resolved using the weapon’s AP value.
For example, a model with the Rending (5+) special rule that rolls To Wound against a non-Vehicle model will wound automatically on the roll of a 5+, and the attacking player has the choice of using an AP value of 2 instead of the AP value of their weapon.
Shell Shock (X)
Some weapons produce such a weight of fire that any target pummelled by their attack is left dazed and stunned.
Pinning tests taken due to an attack or weapon with this special rule are made with a penalty to Leadership Characteristic equal to the value listed as part of the special rule.For example, a unit that is forced to take a Pinning test by an attack made using a weapon with the Shell Shock (2) special rule, suffers a penalty of -2 to their Leadership Characteristic when resolving that Test.
Shock Pulse
Some weapons emit such a storm of radiation and electrical impulses that they can temporarily incapacitate even the most well-armoured fighting vehicles.
Any model with the Vehicle, Dreadnought or Automata Unit Type that suffers a Penetrating Hit or unsaved Wound from an attack with this special rule may only make Snap Shots when it next makes a Shooting Attack either as part of a Reaction or during its сontrolling player’s Shooting phase.Shred
Some weapons and warriors strike in a flurry of blows, tearing flesh asunder in a series of brutal strikes.
If a model has the Shred special rule, or is attacking with a Melee weapon that has the Shred rule, it re-rolls failed To Wound rolls in close combat.Similarly, if a model makes a Shooting Attack with a weapon that has the Shred rule, it re-rolls its failed To Wound rolls.
Scout
Scouts are always in the vanguard of the army. Unnoticed by the enemy, they range ahead of the main force.
After both sides have deployed (including Infiltrators), but before the first player begins their first turn, a unit containing at least one model with this special rule can choose to redeploy. If the unit is Infantry, Artillery, Dreadnought or Automata, each model can redeploy anywhere entirely within 6" of its current position. If it is any other Unit Type, each model can instead redeploy anywhere entirely within 12" of its current position. During this redeployment, Scouts can move outside the owning player’s Deployment Zone, but must remain more than 9" away from any enemy unit. A unit that makes a Scout redeployment cannot Charge in the first Game Turn. A unit cannot Embark or Disembark as part of a Scout redeployment.If both sides have Scouts, roll off; the winner decides who redeploys first. Then alternate redeploying Scout units one at a time. If a unit with this special rule is deployed inside a Dedicated Transport, it confers the Scout special rule to the Transport (though a Disembarkation cannot be performed as part of the redeployment). Note that a Transport with this special rule does not lose it if a unit without this special rule is Embarked upon it. Having Scout also confers the Outflank special rule to units of Scouts that are kept as Reserves.
Infiltrate and Scout
If a unit has both the Infiltrate and Scout special rules, that unit can deploy as per the Infiltrate special rule and then redeploy as per the Scout special rule.Shrouded (X)
The source of the darkness around these warriors matters not – only a lucky shot has any chance of piercing the shroud that hides them from view.
When a model with this special rule suffers an unsaved Wound, Glancing Hit or Penetrating Hit, it can make a special Shrouded roll to ignore it (this is not a Saving Throw and so can be used against attacks that state that ‘no Saves of any kind are allowed’). Shrouded rolls may not be taken against Melee Attacks, against attacks with the Ignores Cover special rule or for models (excluding models with the Primarch Unit Type) with the Fearless special rule.Roll a D6 each time an unsaved Wound, Glancing Hit or Penetrating Hit is suffered by a model with this special rule. On a result that is equal to or greater than the value in brackets, that unsaved Wound, Glancing Hit or Penetrating Hit is ignored. On any other result, the Wound, Glancing Hit or Penetrating Hit is applied as normal. For example, a unit with the special rule Shrouded (6+) would need to score a 6 in order to ignore a Wound, Glancing Hit or Penetrating Hit inflicted upon it.
If on any unit this rule is presented simply as Shrouded, without a value in brackets, then count it as Shrouded (6+).
This is a Damage Mitigation roll – any model may make only a single Damage Mitigation roll of any type for any given Wound, Glancing Hit or Penetrating Hit.
Skyfire
Skyfire weapons excel at shooting down enemy aircraft.
A model which has this special rule, or that is firing a weapon with this special rule, fires using its normal Ballistic Skill when shooting at Flyers and Skimmers, but it can only fire Snap Shots against other targets.Slow and Purposeful
Many warriors are steady but sure, slow to advance but no less deadly for it.
A unit that contains at least one model with this special rule cannot Run, perform Sweeping Advances or make Reactions. However, models with this special rule can make Shooting Attacks with Heavy and Ordnance weapons, counting as Stationary, even if they moved in the previous Movement phase. They are also allowed to Charge in the same turn they fire Heavy, Ordnance or Rapid Fire weapons.Sniper
Sniper weapons are precision instruments, used to pick out a target’s weak points.
If a weapon has the Sniper special rule, or is fired by a model with the Sniper special rule, all Wounds inflicted by its attacks are ‘Precision Shots’. Wounds from Precision Shots are allocated against a model (or models) of the attacking player’s choice in the target unit, as long as it is in range and line of sight of the firer, rather than following the normal rules for Wound allocation. Note that Snap Shots can never be Precision Shots and attacks with the Blast or Template rules may never benefit from the effects of the Sniper special rule.Specialist Weapon
The mightiest weapons only reach their full potential when wielded in pairs, as they require an entirely different battle stance from that of more commonplace weapons.
A model fighting with this weapon does not receive +1 Attack for fighting with two weapons unless it is armed with two or more Melee weapons with the Specialist Weapon rule. The additional weapon does not have to be the same weapon as the one used to attack, but it must have the Specialist Weapon rule in order to grant an additional Attack for fighting with two weapons.Split Fire
The most disciplined squads can divide their fire, taking care to place their shots where they can do the most harm.
When a unit that contains at least one model with this special rule makes a Shooting Attack, one model in the unit can shoot at a different target to the rest of their unit. Once this Shooting Attack has been resolved, resolve the Shooting Attacks made by the rest of the unit. These must be at a different target, which cannot be a unit forced to Disembark as a result of the Split Firing unit’s initial Shooting Attack.Sunder
Some weapons strike with enough force to make a mockery of anything except the most reinforced of armoured shells.
Attacks with this special rule may re-roll failed Armour Penetration rolls against Vehicles and Buildings (both with Shooting Attacks and in close combat) and re-roll Glancing Hits, in an attempt to instead get a Penetrating Hit, but the second result must be kept.Strafing Run (X)
This vehicle is designed as a ground attack craft, the spread and convergence distance of its weapons keyed to maximise carnage on the foes below.
When making a Shooting Attack at any unit without the Flyer sub-type, this Vehicle increases its Ballistic Skill by the value indicated as part of the special rule. For example, a Vehicle with the Strafing Run (2) special rule would increase the model’s Ballistic Skill by +2 when making Shooting Attacks targeting any unit without the Flyer sub-type.Stubborn
Many warriors live and die according to the principle of ‘death before dishonour’. Seldom do such warriors take a backward step in the face of danger.
When a unit that contains at least one model with this special rule takes Morale checks or Pinning tests, the unit ignore any negative Leadership modifiers. If a unit is both Fearless and Stubborn, the unit uses the rules for Fearless instead.Support Squad
Though numerous, some formations are intended for specialised tasks on the battlefield and are rarely used for the more routine roles of military life.
A unit with this special rule may not be chosen as a compulsory choice for the army as part of the Force Organisation chart.Swarm
These creatures are so multitudinous that they cannot be picked out individually and must be fought as a group.
If a model with the Swarm special rule suffers an unsaved Wound from a Blast (any size) or Template weapon, unless that Wound has the Instant Death special rule, each unsaved Wound is multiplied to two unsaved Wounds.Template Weapons
Template weapons shoot clouds of fire, gas or other lethal substances, rather than shells or bullets. They are excellent for killing enemy troops in cover, as the payload simply flows over intervening obstacles to assail the foe behind.
Template weapons are indicated by having the word ‘Template’ for their range instead of a number. Instead of rolling To Hit, simply place the template so that its narrow end is touching the base of the firing model, or the end of the firing weapon’s barrel for Vehicle models without bases, and the rest of the template covers as many models in the target unit as possible, without touching any other friendly models (including other models from the firing model’s unit). Any models fully or partially under the template are hit. Against Vehicles, the template must be placed to cover as much of the Vehicle as possible without touching a friendly model. The position of the firer is used to determine which armour Facing is hit. A Template weapon never hits the model firing it.Template weapons have the Ignores Cover and Wall of Death special rules. Wounds inflicted by Template weapons are allocated following the normal rules.
Multiple Templates
If a unit is firing more than one shot with the Template type, resolve each shot, one at a time, as described above, determining and recording how many Hits are scored by each template. Once the number of Hits from all templates has been determined, roll To Wound as normal.Wall of Death
Template weapons can fire Snap Shots at any non-Flyer target. If a Template weapon fires as a Snap Shot, it automatically inflicts D3 Hits on the target unit, resolved at its normal Strength and AP value, as long as the target unit either has at least one model within 8" or if the target unit is resolving a Charge against the unit making the Shooting Attack. If the weapon is also a Hellstorm weapon then it instead inflicts D6 Hits.Hellstorm Weapons
Hellstorm weapons have the word ‘Hellstorm’ instead of a range on their weapon profile. Hellstorm weapons use the Hellstorm template, but otherwise obey the rules for other Template weapons.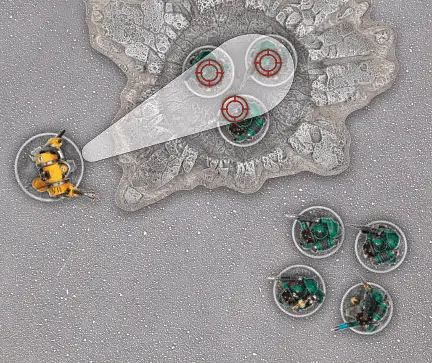
Torrent (X)
This weapon fires massive gouts of flame, gas or lethal fluids across the battlefield.
A weapon with this special rule is treated like any other Template weapon, but when firing it in the Shooting phase, place the template so that the narrow end is placed within a number of inches equal to the value in brackets listed as part of this special rule. The wide end must then be aligned so that it is no closer to the firing model than the narrow end.For example, a weapon with the Torrent (18) special rule must place the narrow end of the template at a point within 18" and the wide end no closer to the firing model than the narrow end.
Twin-linked
These weapons are grafted to the same targeting system for greater accuracy.
When attacking with a weapon that has this special rule, the controlling player may re-roll all failed To Hit rolls.Twin-linked Blast Weapons
If the Scatter dice does not roll a Hit, you can choose to re-roll the dice when making a Shooting Attack with a Twin-linked Blast weapon. If you choose to do so, you must re-roll both the 2D6 and the Scatter dice.Twin-linked Template Weapons
Twin-linked Template weapons are fired just like a single weapon, but must re-roll failed To Wound rolls and Armour Penetration rolls.Two-handed
This weapon is particularly heavy and requires both hands to wield.
A model attacking with this weapon never receives +1 Attack for fighting with two Melee weapons.Unwieldy
This weapon is very large, and more than a little clumsy, making swift blows all but impossible to achieve.
A model attacking with this weapon Piles-in and fights at Initiative step 1, unless it has the Dreadnought Unit Type or Monstrous sub-type.Some warriors use the impetus of the charge to fuel their own fury.
In a turn in which a model with this special rule Charges into combat, it adds a bonus to its Strength Characteristic until the end of the Assault phase. The bonus added to the model’s Strength is equal to the value in brackets after the special rule, for example a model with Furious Charge (2) adds a bonus of +2 to its Strength.A model that has made a Disordered Charge that turn receives no benefit from Furious Charge.
Invulnerable Saves are different to Armour Saves in that they may always be taken whenever the model suffers a Wound, or, in the case of Vehicles, suffers a Penetrating Hit or Glancing Hit – the Armour Piercing value of attacking weapons has no effect on an Invulnerable Save. Even if a Wound, Penetrating Hit or Glancing Hit ignores all Armour Saves, an Invulnerable Saving Throw can still be taken.
Force weapons are charged by the psychic might of the wielder, turning them from mere physical tools to mystical weapons of incredible potency.
Any Psyker with a weapon or ability with this special rule may choose to make a Psychic check before making any attacks with that weapon or resolving the ability. If the Check is successful then the Strength value of any attacks made is doubled. If the Check is failed then Perils of the Warp is resolved targeting the unit containing the model that failed its Check. If the Psyker survives Perils of the Warp then it may attack as normal.Whenever a Psyker or other model/unit suffers Perils of the Warp, apply the rule below:
Perils of the Warp: When a model or unit suffers Perils of the Warp, it receives D3 Wounds against which only Invulnerable Saves may be taken (no Damage Mitigation rolls may be made to negate these Wounds). These Wounds may be allocated to any model in the unit, including models without the Psyker Sub-type, in the same manner as those received during a Shooting Attack. If the Psyker is a Vehicle, it suffers D3 Hull Points of damage against which only Invulnerable Saves may be taken.
These Hull Points of damage may be allocated to other Vehicle models in the same Squadron, in the same manner as a Shooting Attack.
- If the total is less than the Vehicle’s Armour Value, the attack has no effect.
- If the total is equal to the Vehicle’s Armour Value, the attack inflicts a Glancing Hit.
- If the total is greater than the Vehicle’s Armour Value, the attack inflicts a Penetrating Hit.
If you re-roll a 2D6 or 3D6 roll, you must re-roll all of the dice, not just some of them, unless the rules specify otherwise. Any modifiers that applied to the first roll also apply to the re-roll.
If two or more special rules combine to the effect that all failed and all successful dice results would have to be re-rolled, do not re-roll any dice; simply use the original result(s) instead.
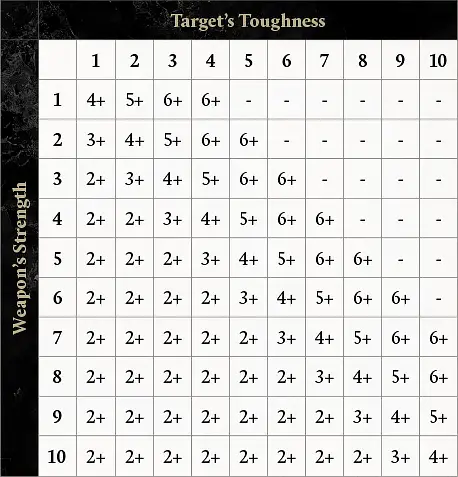
Consult the chart below, cross-referencing the attacker’s Strength Characteristic with the defender’s Toughness Characteristic. The chart indicates the minimum result on a D6 roll required to inflict a Wound, and is the same chart as is used during the Shooting phase. A ‘-’ indicates that the target cannot be wounded by the attack. In most cases, when rolling To Wound in close combat, you use the Strength on the attacker’s profile regardless of what weapon they are using. However, there are some Melee weapons that give the attacker a Strength bonus, and this is explained previously in the Weapons section.
MULTIPLE TOUGHNESS VALUES
Rarely, a unit will contain models that have different Toughness Characteristics. When this occurs, roll To Wound using the Toughness value of the majority of the engaged unit. If two or more Toughness values are tied for majority, use the highest of those tied values.
|
When checking range, simply measure from the attacking model to the nearest model in the target unit that is within Line of Sight of the attacking model. Any weapon that is found to be out of range of all models in the target unit to which line of sight can be drawn may not be used to make attacks.
Blast weapons fire shells, missiles or packets of energy that explode on impact.
When firing a Blast weapon, models do not roll To Hit. Instead, pick one enemy model visible to the firer and place the Blast (3") marker with its hole entirely over the base of the target model, or its hull if the target is a Vehicle. The hole at the centre of the marker must be within the weapon’s Maximum Range. You cannot place the Blast marker so that the base or hull of any friendly model is even partially under it.The large area affected by the blast means it is going to be very hard to miss completely. Nonetheless, the shot might not land exactly where intended. Roll for the Blast marker to scatter and subtract the firer’s Ballistic Skill from the distance (if any) that it scatters, to a minimum of 0". Note that it is possible, and absolutely fine,for a shot to scatter beyond the weapon’s Maximum or Minimum Range and line of sight. This represents the chance of ricochets, the missile blasting through cover and other random events. In these cases, Hits are worked out as normal and can hit and Wound units out of range and line of sight (or even your own units, or models locked in combat). If the shot scatters so that the hole in the centre of the marker is beyond the battlefield’s edge, the shot is a complete miss and is discarded.
Once the final position of the Blast marker has been determined, take a good look at it from above – each unit suffers one Hit for each of the models included in that unit that is fully or partially beneath the Blast marker, even if those models are not within the firer’s line of sight.
Once the number of Hits inflicted on the unit has been worked out, roll To Wound and Save as normal. Note that, unlike other attacks, Wounds inflicted by an attack with the Blast special rule can be allocated to any models in the target unit, even if they are out of sight of any models from the attacking unit.
- A ‘Small’ Blast marker (3" in diameter).
- A ‘Large’ Blast marker (5" in diameter).
- A ‘Template’ (a teardrop-shaped template roughly 8" long).
- A ‘Massive’ Blast marker (7" in diameter).
- An ‘Apocalyptic’ Blast marker (10" in diameter).
- An ‘Apocalyptic Barrage’ marker (a clover-shaped set of five overlapping markers, each 5" in diameter).
- A ‘Hellstorm’ (a teardrop-shaped template roughly 16" long).
The templates and Blast markers are used as a way of determining how many models have been hit by an attack that has an area of effect or a blast radius. When an attack uses a template or Blast marker, it will explain how the template is positioned, including any kind of scatter that might occur (scatter is discussed further later in this section). To work out the number of Hits, you normally need to hold the template or Blast marker with its central hole over an enemy model or a particular point on the battlefield, and then look underneath (or through, if using a transparent template) to see how many models lie partially or completely underneath. Various special rules and weapon effects will provide additional details on the specific use of templates when making attacks with those special rules or weapons.
A unit takes a Hit for each model that is fully, or even partially, underneath the template or Blast marker. Remember that a model’s base is counted as being part of the model itself, so all a template or Blast marker has to do to cause a Hit is to cover any part of the target’s base.
If the Vehicle had not moved before the unit Disembarked, the Vehicle can then move normally. If the Vehicle had already moved before the unit Disembarked, the Vehicle cannot move further that turn (including pivoting on the spot). In addition, a Vehicle cannot Ram on a turn that a unit Disembarks from it.
If a successful Reserve roll is made for a unit, that unit must be moved onto the battlefield this turn. From the start of Game Turn 4 all Reserve rolls are considered to automatically succeed, unless another special rule states otherwise, and all of the Active player’s units that are in Reserve must be moved onto the battlefield or they are considered destroyed.
Some special rules can modify the roll required for a unit to arrive from Reserve. Regardless of the modifier(s), a natural roll of a 1 always means that the unit in question remains in Reserve, and a natural roll of a 6 always means that the unit in question arrives from Reserve.
Any unit for which a successful Reserve roll has been made must move onto the Battlefield at the start of the Controlling player’s Movement phase, before any other models are moved. Select one of the Active player’s arriving units and deploy it, moving it onto the table in the manner described as follows. Then pick another arriving unit and deploy it, and so on until all arriving units are on the table. The Active player can then proceed to move their other units as normal.
For one model to have line of sight to another, you must be able to trace a straight, unblocked line from its body (the head, torso, arms or legs) to any part of the target’s body.
Sometimes, all that will be visible of a model is a weapon, banner, or other ornament they are carrying. In these cases, the model is not visible. Similarly, mechanical appendages such as cables, probes and ammo feeds are ignored, even though they may be part of a model’s body. These rules are intended to ensure that models don’t get penalised for having impressive banners, weaponry, and so on.
In many cases, what a model can ‘see’ will be obvious – if there’s a hill, building or mechanical construct in the way, the enemy might be blatantly out of sight. In other cases, two units will be clearly in view of each other as there is nothing at all in the way.
On those other occasions, where it’s not entirely obvious whether or not one unit can see another, the player will have to stoop over the battlefield and look from behind the model’s head for a ‘model’s eye view’. This means getting down to the level of your models and checking the battlefield from their perspective to ‘see what they can see’. You will find that you can spot lurking enemies through the windows of ruined buildings, catch a glimpse of a model’s legs under tree branches and see that high vantage points become very useful for the increased line of sight that they offer.
- Place the object on the battlefield as instructed by the rule.
- Roll a Scatter dice and 2D6 to determine the direction and distance of scatter in inches.
- If a Hit is rolled on the Scatter dice, the object does not move – leave it in place and resolve the remainder of the rule.
- If an arrow is rolled, move the object the distance shown on the 2D6 in the direction of the arrow. Ignore intervening terrain, units, etc, unless the rule states otherwise.
- Once the object has scattered to its final position, resolve its effects.
Scatter dice and other dice and accessories that you can use in your games of Horus Heresy – Age of Darkness can be purchased from the Games Workshop website.
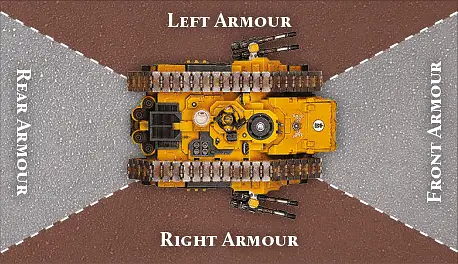
As such, Vehicles have different Armour Values, representing the thickness of their armour. Armour Values for individual Vehicles often vary between its Front, Side and Rear Facings. Attacks are resolved against the Facing of the Vehicle that the attack comes from. To see what Facing an attack is coming from, draw two imaginary lines through the corners of the Vehicle (see diagram below). If a unit has firing models in two or more different Facings of a target Vehicle (some models in the Front and some in the Side, for example), attacks are resolved separately for each Facing. Each individual model may only direct its attacks at a Facing it can draw line of sight to and, in situations where a model can draw line of sight to more than one Facing, the controlling player may choose which Facing will be the target of any attacks.
This may require attacks targeting a Vehicle to be divided into separate pools, each resolved against the appropriate Facing and the Armour Value attached to that Facing. In any situation where a model is hit by a weapon or attack which fires Indirectly or does not otherwise require line of sight to its target, Hits are always resolved against the Side Armour Value. The direction a turret is facing has no bearing on what arc of a Vehicle you are firing at.
Barrage weapons lob shells high into the air, landing them in the midst of the foe.
All Barrage weapons use Blast markers and consequently use the rules for Blast weapons, as indicated by their profile, with the following exceptions:Barrage weapons can fire indirectly. This means they can fire at a target that they do not have line of sight to, as long as the target is beyond their Minimum Range (if applicable). When firing indirectly, the Ballistic Skill of the firer is not subtracted from the scatter distance; unless a Hit is rolled on the Scatter dice, the Blast marker always scatters a full 2D6". If a Barrage weapon has line of sight to its target it can fire directly, even if the target is within its Minimum Range.
Note that any Hits inflicted upon Vehicles by an Attack using the Barrage special rule are always resolved against the Vehicle’s Side Armour Value.
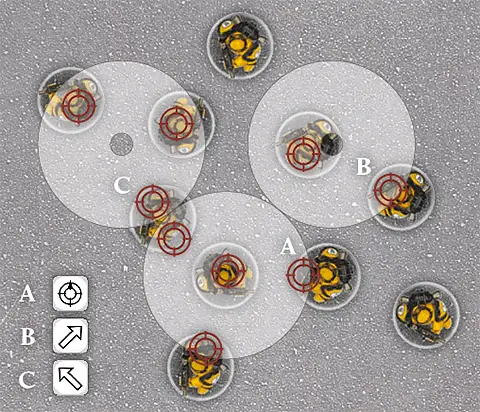
If, for example, a Hit had been rolled for the third marker instead, the player could have placed it anywhere in contact with or over markers A and B.
Note that the minimum roll needed To Wound is always at least 2. When rolling To Wound, there is no such thing as an automatic Wound and a roll of 1 always fails.
Each weapon has its own Strength Characteristic, which is given in its profile or in the description of the weapon. The following are examples of weapons and their Strength Characteristics:
|
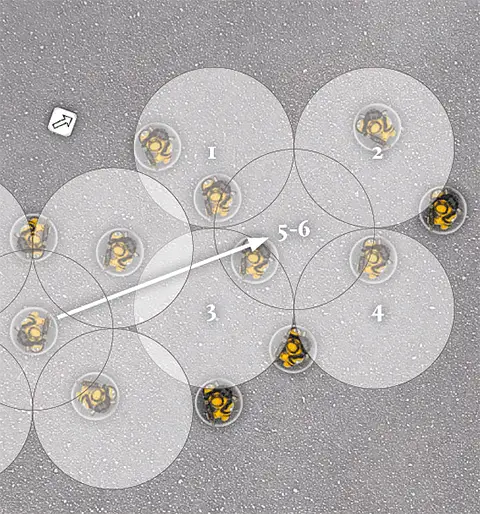
Some weapons can inflict critical strikes against which no armour can protect.
If a model has the Rending special rule, or is attacking with a Melee weapon that has the Rending special rule, there is a chance that their close combat attacks will strike a critical blow. For each To Wound roll equal to or higher than the value listed, the target automatically suffers a Wound, regardless of its Toughness. The controlling player may choose to resolve these Wounds at AP 2 instead of the weapon’s normal AP value.Similarly, if a model makes a Shooting Attack with a weapon that has the Rending special rule, a To Wound roll of equal to or greater than the listed value wounds automatically, regardless of Toughness, and is resolved at AP 2.
In either case, against Vehicles each Armour Penetration roll of equal to or greater than the listed value allows a further D3 to be rolled, with the result added to the total Strength of the attack. These Hits are not resolved at AP 2, but are instead resolved using the weapon’s AP value.
For example, a model with the Rending (5+) special rule that rolls To Wound against a non-Vehicle model will wound automatically on the roll of a 5+, and the attacking player has the choice of using an AP value of 2 instead of the AP value of their weapon.
These weapons are grafted to the same targeting system for greater accuracy.
When attacking with a weapon that has this special rule, the controlling player may re-roll all failed To Hit rolls.These are heavy, man-portable weapons that typically require reloading between each shot or bracing to counter their recoil.
When making a Shooting Attack, a model with a Heavy weapon attacks the number of times indicated. If a model equipped with a Heavy weapon moved in the preceding Movement phase, they can only make Snap Shots with that Heavy weapon during the Shooting phase. Note that weapons with the Blast special rule cannot fire Snap Shots. Models that make Shooting Attacks with Heavy weapons in the Shooting phase cannot Charge in the ensuing Assault phase.
|
Once the final position of the marker has been determined, roll a number of dice equal to the number of attacks on the weapon’s profile. So, for example, with a weapon with the type ‘Heavy 4, Apocalyptic Barrage’, you would roll four dice. Each dice roll corresponds to a ‘strike’ on one of the circles on the Apocalyptic Barrage marker. For example, each roll of a 2 indicates a strike on circle number 2. Resolve the strikes as for a Multiple Barrage, as if each were a Barrage attack that had landed on that circle and hit all the models underneath it. To determine Cover Saves, always assume the shot is coming from the centre of the entire Apocalyptic Barrage marker.
If the Vehicle moved before its passengers got aboard, it cannot move further that turn (including pivoting on the spot). If the Vehicle did not move before its passengers got aboard, it can move as normal after they have Embarked. In either case, a Vehicle cannot Ram in a turn that a unit Embarks upon it.
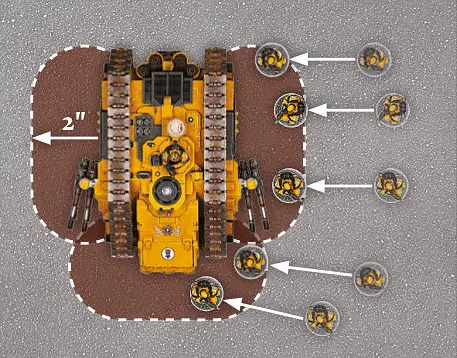
Fall Back Moves are 2D6", unless a rule specifies otherwise. Fall Back Moves are not slowed by Difficult Terrain, but incur Dangerous Terrain tests as normal. Units with models that Fall Back at different speeds always Fall Back at the speed of the slowest model in the unit.
Each model in the unit moves directly towards their own battlefield edge by the shortest possible route.
If playing a mission where there is no ‘own’ battlefield edge, models move towards the closest battlefield edge instead.
If any model from a unit that is Falling Back moves into contact with a battlefield edge, the entire unit is removed from the game as casualties as it scatters and flees the battle.
Instant Death: If a model suffers an unsaved Wound from an attack with this special rule, it is reduced to 0 Wounds and is removed as a casualty.
|
To Hit rolls are easy to remember if you subtract the Ballistic Skill of the attacking model from 7. For example, a model with BS 2 needs to roll a 5 or more (7-2=5).
Note that the minimum roll needed To Hit is always at least 2. When rolling To Hit, there is no such thing as an automatic Hit and a roll of a 1 always misses.
Units that are locked in combat cannot move in any other Phase or make Shooting Attacks for any reason. Similarly, models cannot choose to target units locked in combat with Shooting Attacks for any reason. Blast markers and templates cannot be deliberately placed such that they cover any models locked in combat, but they may end up there after scattering and will then cause Hits on any units or models they contact as normal.
Units that are locked in combat do not take Morale checks or Pinning tests caused by Shooting Attacks, and cannot be Pinned.
The Ballistic Skill of a model making a Snap Shot can only be modified by special rules that specifically state that they affect Snap Shots, along with any other restrictions. If a special rule doesn’t specifically state that it affects Snap Shots, then the Snap Shot is resolved at Ballistic Skill 1.
Some weapon types, such as Ordnance, or those that have certain special rules, such as Blast, cannot be used to make Snap Shots. In addition, any Shooting Attack that does not use Ballistic Skill cannot be made as a Snap Shot. These exceptions aside, Snap Shots are treated in the same manner as any other Shooting Attack made with a Ballistic Skill of 1.
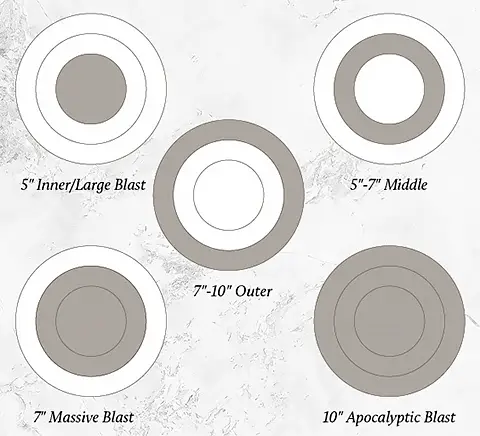
Sometimes an attack will gain a bonus or special rule depending on the results rolled To Hit or To Wound (for example, due to the Rending special rule). If any such Wounds are caused, split them into separate Wound Pools. All Wounds with exactly the same Strength, AP value and special rules must go into the same pool. If all the Wounds are the same, there will only be one Wound Pool.
Models don’t have a choice of what Characteristics to use – the Characteristic to be tested will be specified in the rule.
To make a Characteristic test, follow these steps:
- Roll a D6 and compare the result to the relevant Characteristic in the model’s profile.
- If the result is equal to or less than the number in the profile, the test is passed.
- If the result is greater than the number in the model’s profile,the test has been failed and the model faces the consequences as detailed in the rule that prompted the test.
Only Infantry models can Embark upon Transports unless specifically stated otherwise. Certain special rules, notably the Bulky (X) special rule, may modify the Transport Capacity required for a given model to Embark upon a Transport, and this will be specified in the model’s rules. Sometimes, there will be constraints on which types of models can Embark upon a particular Vehicle, and this will be specified in the unit’s entry. Whilst Embarked upon a Transport, units gain the Fearless special rule and cannot be made to Fall Back or become Pinned while Embarked upon the Transport.
For some warriors, being outnumbered is not a cause for despair, but a call to set about their foes with a berserk counter-attack.
At the start of any Fight sub-phase, models with the Rampage special rule gain a number of Attacks equal to the value listed in brackets if outnumbered by enemy models (including the effects of the Bulky special rule) – count all models locked in the combat, not just those models that are engaged. If the value in brackets is randomly determined by rolling dice, then roll once for each such variant of the Rampage special rule present in the unit to determine the number of Attacks that may be made, applying the result to all models with that variant for the current phase. For example, a model with the Rampage (D3) special rule that is outnumbered by the enemy in close combat receives D3 additional Attacks in that Fight sub-phase.A model that has made a Disordered Charge that turn receives no benefit from Rampage.
To take a Leadership test, use the following procedure:
- Roll 2D6 and compare the result to the model’s Leadership Characteristic.
- If the result is equal to or less than the model’s Leadership Characteristic, then the test has been passed.
- If the result is greater than the model’s Leadership Characteristic, the test has been failed and the model faces the consequences as detailed in the rule that prompted the test.
When a Sweeping Advance is performed, both the unit Falling Back and the winning unit roll a D6 and add their unmodified Initiative to the result. In a unit with mixed Initiative Characteristics, use the highest Characteristic. The units then compare their totals.
If the winner’s total (Initiative + dice roll) is greater than their opponents’, the Falling Back unit is caught by the Sweeping Advance and destroyed. All models in the destroyed unit are immediately removed as casualties. Unless otherwise specified, no Save or other special rule can prevent the unit from being destroyed.
If the Falling Back unit’s total is higher, or the final result is a tie, they break off from the combat successfully. Make a Falls Back move for the losing unit. The winners can then Consolidate.
Glancing Hits – If a Glancing Hit was scored, the Vehicle loses 1 Hull Point.
Penetrating Hits – If a Penetrating Hit was scored, the Vehicle not only loses 1 Hull Point, but also suffers additional damage.
After deducting any Hull Points, roll a D6 for each Penetrating Hit and look up the result using the Vehicle Damage table, applying any appropriate modifiers. All modifiers on the Vehicle Damage table are cumulative. If you inflict a Penetrating Hit, you must roll on the Vehicle Damage table even if the Vehicle loses sufficient Hull Points to be Wrecked, as there is still a chance it might suffer an Explodes result on the Vehicle Damage table.
Many of the galaxy’s warriors train hard to overcome a particular foe, allowing them to predict the enemy’s battle-stances and thus land a blow or shot with greater ease.
This rule is presented as Preferred Enemy (X) where X identifies a specific type of foe. If the special rule does not specify a type of foe, then everyone is a Preferred Enemy of the unit. A unit that contains at least one model with this special rule re-rolls failed To Hit and To Wound rolls of 1 if attacking its Preferred Enemy. This applies both to Shooting Attacks and close combat attacks.If a model with this rule makes an attack against a mixed unit which has one or more models to which their Preferred Enemy rule pertains, but is not entirely composed of such models, it may still benefit from the effects of Preferred Enemy for all attacks made against that unit. For example, a model with Preferred Enemy (Independent Characters) may re-roll failed To Hit and To Wound rolls of 1 against all of the models in a unit which has been joined by an Independent Character.
The galaxy is replete with swordsmen and blade-masters who can pick out an enemy from a crowd and land a blow on them, even amidst the swirling chaos of hand-to-hand combat.
If a model with this special rule, or attacking with a weapon with this special rule, rolls equal to or higher than the value in brackets when making a To Hit roll as part of a melee attack, that hit is a ‘Precision Strike’. For example, if a model with the Precision Strikes (4+) special rule rolls a 4 or higher when making a To Hit roll, then that attack is a Precision Strike.Wounds from Precision Strikes are allocated against a model (or models) of the attacking player’s choice in the target unit, as long as that model is engaged in combat with the attacking model’s unit, rather than following the normal rules for Wound allocation.
Similar to other Leadership-based tests, Morale checks (also sometimes referred to as Morale tests) are taken by rolling 2D6 and comparing the total to the unit’s Leadership value.
If the total is equal to or less than the unit’s Leadership Characteristic, the test is passed and the unit does not suffer any ill effects.
If the total is higher than their Leadership Characteristic, the test is failed and the unit will immediately Fall Back.
Some units have special rules pertaining to Morale checks that are detailed in their Army List or Army List entry. For example, some units might always pass Morale checks, while others might always pass all Leadership tests. This difference is subtle, yet important. A unit that always passes Morale checks still has to test when hit by an attack with the Pinning special rule, while a unit that always passes all Leadership tests wouldn’t.
If the unit fails this test, then it must immediately continue to Fall Back.
If the unit successfully passes the test, it stops Falling Back and can immediately move a number of inches equal to its Initiative. This move is unaffected by Difficult Terrain, but Dangerous Terrain tests must be taken as normal. If the unit is out of coherency when the Regroup test is made, then the move must be used to restore coherency, or as near as possible.
Once a unit has Regrouped, until the end of that player turn it cannot otherwise Move, Run or Charge in the Assault phase. However, it can make Shooting Attacks but until the end of that player turn counts as having moved and can only fire Snap Shots. A unit that has Regrouped may make Reactions as normal in subsequent player turns, including those that allow it to move.
Coming under fire without knowing where the shots are coming from, or having ordnance rain down from the skies, can shake the resolve of even the bravest warriors, making them dive flat and cling to whatever cover presents itself.
If a non-Vehicle unit suffers one or more unsaved Wounds from a weapon with the Pinning special rule, it must take a Leadership test once the firing unit has finished its Shooting Attacks for that Phase. This is called a Pinning test. If the unit fails the Test, it is Pinned. As long as the Test is passed, a unit can be called upon to take multiple Pinning tests in a single turn, but only once for each unit shooting at them.A unit that is affected by any of the following conditions does not take Pinning tests, and if called upon to do so is considered to automatically pass them:
- The unit is locked in combat.
- The unit is already Pinned (the unit remains Pinned, but takes no further Tests).
- The unit is composed entirely of Vehicle models.
- The unit is Embarked on a Transport Vehicle.
- The target unit is affected by the Fearless special rule.
To take an Armour Save, roll a D6 and compare the result to the Armour Save Characteristic of the model that has been allocated the Wound. If the dice result is equal to or higher than the model’s Armour Save Characteristic, the Wound is negated. If the result is lower than the Armour Save Characteristic, the model suffers a Wound. This means that, unlike most Characteristics, an Armour Save is better if it is a lower number.
If the selected model is removed as a casualty and the Wound Pool is not empty, then the player whose unit was the target of the attack selects another model in the target unit that is in line of sight and range of the attacking unit and allocates the next Wound to that model.
Continue allocating Wounds in this fashion, taking Saves and removing casualties until the Wound Pool is empty or all models in the target unit have been removed as casualties.
Some blows can slay an enemy outright, no matter how hardy they may be.
If a model suffers an unsaved Wound from an attack with this special rule, it is reduced to 0 Wounds and is removed as a casualty.However, a unit that Runs may not make Shooting Attacks of any kind during the following Shooting phase, or declare Charges during the Assault phase of the same player turn. If any models in a unit Run, then all models in that unit are counted as having Run, regardless of the distance moved by any individual model.
Units making a Reaction during their opponent’s turn may never choose to Run as part of that Reaction.
Whether through force of will, bionic augmentation or foul sorcery, this warrior can still fight despite fearsome wounds.
When a model with this special rule suffers an unsaved Wound, it can make a special Feel No Pain roll to avoid being Wounded (this is a special Saving Throw which is made after unsaved Wounds are suffered).Feel No Pain rolls may not be taken against unsaved Wounds that have the Instant Death special rule.
Roll a D6 each time an unsaved Wound is suffered. On a result that is equal to or greater than the value in brackets, the unsaved Wound is discounted – treat it as having been saved. On any other result the Wound is taken as normal.
For example, a unit with the special rule Feel No Pain (5+) would need to score a 5 or 6 in order to discount a Wound inflicted upon it.
This is a Damage Mitigation roll – any model may make only a single Damage Mitigation roll of any type for any given Wound.
The source of the darkness around these warriors matters not – only a lucky shot has any chance of piercing the shroud that hides them from view.
When a model with this special rule suffers an unsaved Wound, Glancing Hit or Penetrating Hit, it can make a special Shrouded roll to ignore it (this is not a Saving Throw and so can be used against attacks that state that ‘no Saves of any kind are allowed’). Shrouded rolls may not be taken against Melee Attacks, against attacks with the Ignores Cover special rule or for models (excluding models with the Primarch Unit Type) with the Fearless special rule.Roll a D6 each time an unsaved Wound, Glancing Hit or Penetrating Hit is suffered by a model with this special rule. On a result that is equal to or greater than the value in brackets, that unsaved Wound, Glancing Hit or Penetrating Hit is ignored. On any other result, the Wound, Glancing Hit or Penetrating Hit is applied as normal. For example, a unit with the special rule Shrouded (6+) would need to score a 6 in order to ignore a Wound, Glancing Hit or Penetrating Hit inflicted upon it.
If on any unit this rule is presented simply as Shrouded, without a value in brackets, then count it as Shrouded (6+).
This is a Damage Mitigation roll – any model may make only a single Damage Mitigation roll of any type for any given Wound, Glancing Hit or Penetrating Hit.
Some weapons are fuelled by unstable power sources and risk overheating with each shot – often to the detriment of their wielder.
When firing a weapon that Gets Hot, roll To Hit as normal. For each unmodified To Hit roll of 1, the firing model immediately suffers a single Wound with an AP value equal to that of the weapon that was used to attack (Armour Saves, Invulnerable Saves and Feel No Pain rolls can be taken, but not Cover Saves or Shrouded rolls) – this Wound cannot be allocated to any other model in the unit. A Vehicle instead rolls a D6 for each roll of a 1 To Hit. If this roll results in a 1 or 2, the Vehicle suffers a Glancing Hit.Pile-in Moves follow the same rules as Charge Moves, except that they are not slowed by Difficult Terrain (though Dangerous Terrain will still trigger Dangerous Terrain tests).
In addition, a Pile-in Move cannot be used to move into base contact with any units that are not already involved in the combat.
When making Pile-in Moves, the Active player moves their unit(s) first. If both players’ Pile-in Moves combined would be insufficient to bring any combatants into base contact, the combat is considered to have ended.
To make a To Hit roll, roll a D6 for each attack a model gets to make and compare the WS of the attacking model to the WS of the target unit. Then, consult the To Hit chart below to find the minimum result needed on a D6 To Hit.
As the chart below shows, if the target’s WS is half or less than that of the attacker’s, they are hit on a 2+; lower than the attacker’s but more than half, they are hit on 3+; if the target’s WS is equal to the attacker’s, they are hit on 4+; if it is higher but not twice the attacker’s, they are hit on 5+; and if it is twice or more than the attacker’s, then they are hit only on a 6+.
UNITS WITH MULTIPLE WEAPON SKILLS
Some units contain models with different Weapon Skills. Whilst each model in such a unit rolls To Hit using its own Weapon Skill, Attacks made against such a unit are resolved using the Weapon Skill of the majority of the engaged enemy models. If two or more Weapon Skill values are tied for majority, use the highest of those tied values.
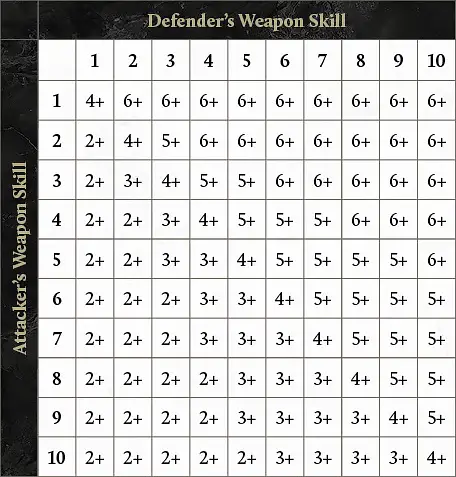
Units making a Consolidation move are not slowed by Difficult Terrain but do trigger Dangerous Terrain tests where appropriate. A Consolidation move cannot be used to move into base contact with any enemy models.
Consolidating models must stop at least 1" away from all enemy models, including any that have just Fallen Back from the combat that the Consolidating unit has fought in.
A model is only required to make a maximum of one Dangerous Terrain test during a Phase. Any subsequent Dangerous Terrain tests it would be required to make during that Phase are assumed to have automatically been passed.
A number of key unit sub-types are presented here – more may be referenced in other Age of Darkness books.

During the course of a game, a unit can get broken up and lose unit coherency, usually because it has sustained casualties from enemy fire. If this happens, in their next Movement phase, the models in the unit must be moved in such a way that they restore unit coherency, or as close to unit coherency as possible. If the unit cannot move in its next turn, or is unable to restore unit coherency in a single turn, then the models must move to restore unit coherency as soon as they have the opportunity, including by Running if they have that option.
Many warriors live and die according to the principle of ‘death before dishonour’. Seldom do such warriors take a backward step in the face of danger.
When a unit that contains at least one model with this special rule takes Morale checks or Pinning tests, the unit ignore any negative Leadership modifiers. If a unit is both Fearless and Stubborn, the unit uses the rules for Fearless instead.Many armies employ reconnaissance troops who sit concealed for days, just waiting for the right moment in which to strike.
You may choose to deploy units that contain at least one model with this special rule last, after all other units (friend and foe) have been deployed. If both players have such units and choose to do so, the players roll off and the winner decides who goes first,then alternate deploying these units.Units that Infiltrate in this way can be set up anywhere on the battlefield that is more than 9" from any enemy unit, as long as no deployed enemy unit can draw line of sight to them. This includes in a Building, as long as the Building is more than 9" from any enemy unit. Alternatively, they can be set up anywhere on the battlefield more than 12" from any enemy unit, even in plain sight.
If a unit with Infiltrate deploys inside a Dedicated Transport, the same rules apply when deploying their Transport.
A unit that deploys using these rules cannot Charge in their first turn.
Having Infiltrate also confers the Outflank special rule to units of Infiltrators that are kept as Reserves.
This attack looses a brilliant flare of light, searing the sight of the victim and forcing them to fight blind for a few moments.
Any unit hit by one or more models or weapons with this special rule must take an Initiative test at the end of the current Phase. If the Test is passed, there is no further effect. If the Initiative test is failed, all models in the unit are reduced to Weapon Skill 1 and Ballistic Skill 1 until the end of their next turn. Should the attacking unit hit themselves, they automatically pass the Test. Any model that does not have an Initiative Characteristic (for example, Vehicles, Buildings, etc) is unaffected by this special rule.Some units make use of their inherent speed, stealth or other capabilities to launch a surprise assault on the foe from an unexpected direction.
A unit made up entirely of models with this special rule may perform a Flanking Assault. Certain Faction or unit special rules may present other options for the deployment of units with the Outflank special rule.Scouts are always in the vanguard of the army. Unnoticed by the enemy, they range ahead of the main force.
After both sides have deployed (including Infiltrators), but before the first player begins their first turn, a unit containing at least one model with this special rule can choose to redeploy. If the unit is Infantry, Artillery, Dreadnought or Automata, each model can redeploy anywhere entirely within 6" of its current position. If it is any other Unit Type, each model can instead redeploy anywhere entirely within 12" of its current position. During this redeployment, Scouts can move outside the owning player’s Deployment Zone, but must remain more than 9" away from any enemy unit. A unit that makes a Scout redeployment cannot Charge in the first Game Turn. A unit cannot Embark or Disembark as part of a Scout redeployment.If both sides have Scouts, roll off; the winner decides who redeploys first. Then alternate redeploying Scout units one at a time. If a unit with this special rule is deployed inside a Dedicated Transport, it confers the Scout special rule to the Transport (though a Disembarkation cannot be performed as part of the redeployment). Note that a Transport with this special rule does not lose it if a unit without this special rule is Embarked upon it. Having Scout also confers the Outflank special rule to units of Scouts that are kept as Reserves.
Fearless troops never give up and seldom make full use of cover – even if it would be wiser to do so.
Units with one or more models with the Fearless special rule automatically pass Pinning tests, Regroup tests and Morale checks. In addition, models with the Fearless special rule ignore the effects of the Fear special rule.However, units containing one or more models with the Fearless special rule cannot use any Reactions that grant a Cover Save, Armour Save or Invulnerable Save, and cannot choose to fail a Morale check due to the Our Weapons Are Useless special rule. If a unit has become Pinned and then gains the Fearless special rule, all the effects of being Pinned are immediately cancelled.
+1 Charge Bonus: Engaged models that Charged this turn get +1 Attack this turn. Models in units that made a Disordered Charge do not get this bonus.
+1 Two Weapons: Engaged models with two single-handed weapons (often a Melee weapon and/or Pistol in each hand) get +1 Attack. Models with more than two weapons gain no additional benefit; you only get one extra attack.
Other Bonuses: Models may have other special rules and Wargear that confer extra attacks.
This creature is so massive, it takes up an inordinate amount of space in any vehicle or building it enters.
Bulky models count as a number of models equal to the value X in brackets after the rule’s name for the purposes of Transport Capacity and whether a given unit outnumbers another in combat.For example, a unit comprised of five models all of which have the Bulky (3) special rule, would count as 15 models when attempting to Embark on a Transport Vehicle or when deciding if they outnumber an enemy unit (see, for example, Rampage (X)).
Ordnance weapons are cannon so vast, they are typically mounted on tanks and artillery.
When making Shooting Attacks, a model equipped with an Ordnance weapon fires the number of times indicated in its profile after its Type. A non-Vehicle model carrying an Ordnance weapon cannot attack with it in the Shooting phase if they moved in the preceding Movement phase. Ordnance weapons cannot make Snap Shots. Furthermore, if a non-Vehicle model attacks with an Ordnance weapon, that model may not make any further Shooting Attacks with any other weapon in the Phase nor will it be able to Charge in the ensuing Assault phase. Vehicle models that fire Ordnance weapons may also suffer some restrictions based upon the distance they have moved that turn.Ordnance weapons hit with such force that when you roll to penetrate a Vehicle’s armour with an Ordnance weapon, roll two dice instead of one and pick the highest result.
|
Rapid Fire weapons are very common and usually come in the form of semi-automatic rifles. Their versatility means they can be fired as effectively when a squad is advancing as when taking single, long-ranged shots.
A model armed with a Rapid Fire weapon can make two attacks at a target up to half the weapon’s Maximum Range away. Alternatively, it can instead make one attack at a target over half the weapon’s range away, up to the weapon’s Maximum Range.If a unit attacking with Rapid Fire weapons is found to be partially within half range of the target, the firing models within half range make two attacks, while those further away make one attack.
Models that attack with Rapid Fire weapons in the Shooting phase cannot Charge in the ensuing Assault phase.
|
This weapon fires ammunition that cheats an enemy of their shelter.
Cover Saves and Damage Mitigation rolls granted by the Shrouded special rule cannot be taken against Wounds or Hull Point damage caused by weapons with the Ignores Cover special rule. This includes Cover Saves granted by Reactions and other special rules as well as Cover Saves conferred by terrain.Many of the galaxy’s marksmen are able to single out enemy leaders or soldiers with particularly powerful weapons and snipe them with unerring accuracy.
If a model with this special rule, or attacking with a weapon with this special rule, rolls equal to or higher than the value in brackets when making a To Hit roll as part of a Shooting Attack, that shot is a ‘Precision Shot’. For example, if a model with the Precision Shots (4+) special rule rolls a 4 or higher when making a To Hit roll, then that attack is a Precision Shot.Wounds from Precision Shots are allocated against a model (or models) of the attacking player’s choice in the target unit, as long as the target model is in range and line of sight of the attacking model, rather than following the normal rules for Wound allocation.
Note that Snap Shots and shots from weapons that scatter, or do not roll To Hit, can never be Precision Shots.
Template weapons shoot clouds of fire, gas or other lethal substances, rather than shells or bullets. They are excellent for killing enemy troops in cover, as the payload simply flows over intervening obstacles to assail the foe behind.
Template weapons are indicated by having the word ‘Template’ for their range instead of a number. Instead of rolling To Hit, simply place the template so that its narrow end is touching the base of the firing model, or the end of the firing weapon’s barrel for Vehicle models without bases, and the rest of the template covers as many models in the target unit as possible, without touching any other friendly models (including other models from the firing model’s unit). Any models fully or partially under the template are hit. Against Vehicles, the template must be placed to cover as much of the Vehicle as possible without touching a friendly model. The position of the firer is used to determine which armour Facing is hit. A Template weapon never hits the model firing it.Template weapons have the Ignores Cover and Wall of Death special rules. Wounds inflicted by Template weapons are allocated following the normal rules.