Core Rules
This section of the rulebook provides you with all the information needed to play a game of Warhammer: The Horus Heresy - Age of Darkness. It is recommended that players take some time to read through and digest these rules before playing their first game, and then dive in to try them out. As with any new game, it will take several games to get the hang of things, but having the rulebook to hand will answer most questions that may arise.
| A note to veteran Horus Heresy players: At first glance, the following rules appear very similar to the previous edition, and this is deliberate - it is an evolution of that edition, intended to be at once familiar and yet new and challenging. However, there are numerous changes that make it an even better game. Some take the form of entirely new rules, such as those for Reactions, while others might be very subtle changes, such as the target numbers on the To Hit chart. It is highly recommended, therefore, that veteran Horus Heresy players read through the entire rules section before playing a game, and never assume that a rule is as they remember it from before! | ||
Books
| Book | Kind | Edition | Version | Last update |
| | ||||
| | Rulebook | 2 | 1.2 | December 2023 |
Models and Units
The Forge World and Citadel models used to play games of Horus Heresy – Age of Darkness are referred to as ‘models’ in the rules that follow. Models represent a huge variety of troops – from the massed forces of the Legiones Astartes to the automata and titanic constructs of the Mechanicum. To reflect all of their differences, each model has its own Characteristics Profile.The Horus Heresy – Age of Darkness uses ten different Characteristics to describe the various attributes of the different models. Most of the Characteristics are represented by a single number, which cannot be less than 0, with higher values indicating greater ability. The exception is Armour Save (Sv), which shows the minimum result needed on a dice and lower numbers are more powerful. Armour Saves can range from 2+ through 6+ to ‘-’ (for models with no Armour Save).
Modifiers
Certain pieces of Wargear or special rules can modify a model’s Characteristics positively or negatively by adding to it (+1, +2, etc), subtracting from it (-1, -2, etc) or even setting its value (1, 8, etc). A model’s Initiative cannot be modified below 1, and no other Characteristic can be modified below 0.Multiple Modifiers
If a model has a combination of rules or Wargear which modify a Characteristic, first apply any multiples, then apply any additions or subtractions. However, any modifier which imposes a set value on a Characteristic supersedes any other modifier that might be applied to it. For example, if a model with Strength 4 has both ‘+1 Strength’ and ‘double Strength’, its final Strength will be 9 (4x2=8, 8+1=9). If a model which has Strength 4 has both ‘+1 Strength’ and ‘Strength 8’, its final Strength is 8 (ignore +1 Strength and set it at 8).Movement (M)
This Characteristic is a measure of a warrior’s ability to move across the battlefield. The higher the Characteristic, the further a model will be able to move in the Movement phase. Most Space Marines have a Movement of 7, but more bulky warriors, such as the Terminator elite of the Legiones Astartes, might move slower and some more fleet troops may move much further.Weapon Skill (WS)
This Characteristic defines the close combat skill a warrior possesses. The higher the Characteristic, the more likely the model is to hit an opponent in close combat. A Mechanicum Tech-Priest has Weapon Skill 3, whilst a genetically engineered Space Marine Legionary might have Weapon Skill 4 or higher.Ballistic Skill (BS)
This shows how accurate a warrior is with ranged weapons of all kinds, from bolt pistols to titanic volcano cannon. The higher this Characteristic is, the easier it is for that unit to hit targets with Shooting Attacks. Trained soldiers, such as Mechanicum Tech-Priests, have a Ballistic Skill of 3, while more elite warriors, such as a Space Marine Legion Veteran, might have a Ballistic Skill of 4 or even higher.Strength (S)
Strength gives a measure of how physically capable a warrior is. Models with a higher Characteristic have a much greater chance of inflicting Wounds upon its enemy.Toughness (T)
This is a measure of a model’s ability to resist physical damage and pain. The tougher a model is, the better it can withstand an enemy’s blows. Models with a higher Characteristic are better able to withstand the rigours of the battlefield.Wounds (W)
This Characteristic represents how much damage a model can take before it dies. Most Infantry models have a Wounds Characteristic of 1, while some characters and larger models may have a Wounds Characteristic of 2 or more.Initiative (I)
This represents the swiftness of a model. Models with a low Initiative Characteristic are slower to react than models with a high Initiative Characteristic. In close combat, Initiative dictates the order in which models strike.Attacks (A)
This shows the number of attacks a model may make during close combat. Most warriors have an Attacks Characteristic of 1, so they will normally make one attack each in close combat, although some elite troops or characters may be able to strike several times and have Attacks 2, Attacks 3, or more.Leadership (Ld)
Leadership reveals how courageous, determined and self-controlled a model is. The higher the value, the more reliable the model is under pressure. When Shooting Attacks or combat inflicts heavy casualties, Leadership is used to decide if the stricken unit flees or stands its ground.Armour Save (Sv)
A warrior’s Armour Save gives it a chance to avoid harm when it is struck or shot. Most models have an Armour Save based on what kind of armour they are wearing, so in some cases, this Characteristic may be improved if they are equipped with better armour. Unlike other Characteristics, the lower an Armour Save is, the better. A model can never have an Armour Save better than 2+.Characteristics Profiles
Every model in Horus Heresy – Age of Darkness has a profile that lists the values of its Characteristics. You can find these profiles in a variety of Age of Darkness publications.
|
In these example profiles, both the Space Marine Legionary and the Tech-Priest have 1 Wound and 1 Attack, which is common among Infantry models.
The Space Marine Legionary has a higher Movement, Weapon Skill, and Ballistic Skill, allowing that model to be moved further on the battlefield and to succeed more often with Shooting and Melee Attacks. Its greater Strength will allow the Space Marine’s successful Melee Attacks to cause Wounds more easily compared to the Tech-Priest, while the higher Initiative Characteristic ensures that those attacks will be resolved before those of the Tech-Priest. Similarly, the Space Marine’s superior Toughness and Armour Save will allow that model to avoid being removed as a casualty more easily than the Tech-Priest. Both models have a Leadership Characteristic of 7, representing the superior discipline and indoctrination of the Space Marine Legions and the augmetic implants and logical conditioning imposed on the Tech adepts of Mars, and have a good chance of passing Leadership Tests imposed on them by the rigours of the battlefield.
Additional Types of Saves and Damage Mitigation RollsIn addition to Armour Saves, many models will also gain access to Cover Saves (which are most commonly granted by Terrain effects) and Invulnerable Saves (which are most commonly granted by Wargear). No matter how many Saves a model has, it may only ever make a single Save against any given Wound inflicted on it. In cases where a model has more than one Save available, the controlling player selects one to use whenever called upon to make a Save.In addition to Saves, models may also gain access to Damage Mitigation rolls (these are most often granted by special rules, such as Shrouded or Feel No Pain). If a Save is failed, a model with a Damage Mitigation roll may attempt to use that roll to negate an unsaved Wound. However, no model may attempt more than a single Damage Mitigation roll against any given unsaved Wound inflicted on it. In cases where a model has more than one Damage Mitigation roll available, the controlling player selects one to use whenever called upon to make a Damage Mitigation roll. | ||
Zero-level Characteristics
Some models have been given a 0 for certain Characteristics, which means that they have no ability whatsoever in that field (the same is also occasionally represented by a ‘-’).A model with a Ballistic Skill of 0 may not make Shooting Attacks. A model with Weapon Skill ‘0’ is incapacitated; they are hit automatically in melee combat and cannot make attacks. A model with no Attacks cannot strike any blows in melee combat. A warrior with an Armour Save of ‘-’ has no Armour Save at all. If at any point a model’s Strength, Toughness or Wounds are reduced to 0, it is removed from play as a casualty.
Other Important Information
In addition to its Characteristics Profile, each model will have a Unit Type, such as Infantry or Vehicle, which will be discussed in more depth here. It might also have an additional Save of some kind, representing any special protection it might have, it could be carrying one or more shooting or Melee weapons (see Weapons section) or might have one or more special rules (see Special Rules page).Vehicle Characteristics
The vast conflict known to history as the Horus Heresy featured a huge number of fearsome war machines, all far sturdier than even the vaunted Legion Space Marines and capable of bearing a far more destructive arsenal of weapons. To reflect this disparity between flesh and blood warriors, lesser automata and the great steel juggernauts that took to the field during this age of war, Vehicles have many different rules and their own set of Characteristics. Vehicle Characteristics are described in the Vehicles section.Forming a Unit
The models that make up your Horus Heresy – Age of Darkness army must be organised into ‘units’.Units
In Horus Heresy – Age of Darkness, warriors are grouped into squads, sections, or other similarly named units. A unit usually consists of several models, but a single, powerful model, such as a character, a tank or a war engine, is also considered to be a unit in its own right.Unit Coherency
Units fight in loose groups with gaps between each model. This gives the warriors of the Imperium or the traitorous followers of Horus freedom to move over Difficult Terrain quickly, and enables them to take advantage of such things as minor folds in the ground, scrub and other small features, to shelter from enemy fire. The different elements of the unit have to stay together to remain an effective fighting force. This is detailed fully in the Movement section.GENERAL PRINCIPLES
Before detailing the turn sequence and main structure of the rules, there are some basic ideas and game mechanics that are worth discussing. These are common principles that often come into question during a game.Measuring Distances
In games of Horus Heresy – Age of Darkness, distances are measured in inches (") with a tape measure or measuring stick. You can always check any distance at any time. This allows you to determine whether your units are in range of their target before they attack.Distances between models and all other objects (which can be other models, terrain features, and so on) are always measured from the closest point on one base to the closest point on the other base. Distances between units are always measured to and from the bases of the closest models in each of the units.
For example, if any part of a model’s base is within 6" of the base of an enemy model, the two models are said to be within 6" of each other.
Sometimes the rules will call upon a unit to move directly towards another unit, or some other feature on the battlefield. Where this is the case, move each model in the unit directly towards its destination a number of inches equal to the distance stated by the shortest available path.
Dice
Throughout a game, you will often need to roll dice to see how the actions of your models turn out – how effective their Shooting Attacks are, what damage they’ve done in melee combat, and so on. Almost all of the dice rolls in Horus Heresy – Age of Darkness games use six-sided dice, also known as D6, but there are some exceptions as follows:Rolling a D3
In some circumstances, you may be instructed to roll a D3. To do this, simply roll a D6 and halve the number, rounding up. Thus 1 or 2 = 1, 3 or 4 = 2, and 5 or 6 = 3.Rolling a D66
In some circumstances, you may be instructed to roll a D66. To do this, roll two D6, one after the other, counting the first dice as ‘tens’ and the second dice as ‘units’. For example, if you roll a 3 on the first dice and a 5 on the second, you would get a D66 result of 35.Scatter Dice
Horus Heresy – Age of Darkness games use a special dice called a Scatter dice (marked with arrows and a Hit symbol). This dice is mostly used to determine a random direction, most often applied when working out the behaviour of Blast weapons, such as cannon and missile launchers (see Scatter).Dividing Results
On occasion, you’ll be called upon to divide the result of a dice roll, a Characteristic or some other value. Where this happens, any fractions should always be rounded up. So a D6 roll of 3, halved, would be a result of 2 (for example, 1.5 rounded up). Similarly, 10% of a unit of 21 models, rounded up, would be three models.Modifying Dice Rolls
Sometimes you may have to modify the number rolled on the dice (or ‘the roll’). This is noted as D6 plus or minus a number, such as D6+1. Roll the dice and add or subtract the number given to or from the roll (as appropriate) to get the final result. For example, D6+2 means roll a dice and add 2 to the number on the dice for a total between 3 and 8.You may also be told to roll a number of dice in one go, which is written as 2D6, 3D6, and so on. Roll the indicated number of dice and add them together, so a 2D6 roll is two dice rolled and added together for a result between 2 and 12.
Another method is to multiply the result of a dice by a certain amount, such as D6x5 to provide a result between 5 and 30.
Modifiers to dice rolls cannot make a roll automatically succeed or fail – a roll of an unmodified ‘1’ will always fail and a roll of an unmodified ‘6’ will always succeed unless another rule states otherwise.
Special rules that only trigger on a certain result on a dice roll, such as Rending or Gets Hot, are not affected by modifiers and still trigger only when the required number is rolled before any modifications are applied. For example, the Gets Hot special rule only applies on the roll of a natural ‘1’, a roll of a ‘2’ cannot be modified negatively to trigger the rule.
Re-roll
In some situations, the rules allow you to re-roll a dice. This is exactly what it sounds like – pick up the dice you wish to re-roll and roll it again. The second roll counts even if it means a worse result than the first, and no single dice can be re-rolled more than once, regardless of the source of the re-roll.If you re-roll a 2D6 or 3D6 roll, you must re-roll all of the dice, not just some of them, unless the rules specify otherwise. Any modifiers that applied to the first roll also apply to the re-roll.
If two or more special rules combine to the effect that all failed and all successful dice results would have to be re-rolled, do not re-roll any dice; simply use the original result(s) instead.
Roll off
If the rules require players to roll off, each player rolls a dice and the player who rolls the highest result wins the roll off. In the result of a tie, roll again until one player wins – any modifiers that applied to the first roll also apply to further rolls.Randomising
Sometimes you’ll be called upon to randomly select something – a model, an item, or similar. Where this is the case, simply assign a D6 result to each of the things the random selection must be made from, and roll the dice to make your random choice. If you have fewer than six items to randomise between, simply roll again until you roll an assigned number.If you have more than six items to randomise between, split them into equal sized groups of six or fewer (or as near to this as you can). Then randomly select one group, further randomising between the items in the group to determine the final selection.
Cocked Dice
Occasionally, a dice will end up in a crevice of your terrain or in the crack between two sections of board and doesn’t lie flat. We call this a ‘cocked dice’. Some players use a house rule that if any dice is not completely flat on the table, it must be re-rolled. More common is for players to re-roll the dice only if they can’t be sure of the result.Of course, if your gaming surface is very textured and results in a lot of cocked dice, you can make all of your rolls in a tray or box lid.
On a similar note, it is generally accepted that if a dice ends up on the floor, the result does not count, and most gamers agree that a fallen dice can be re-rolled.
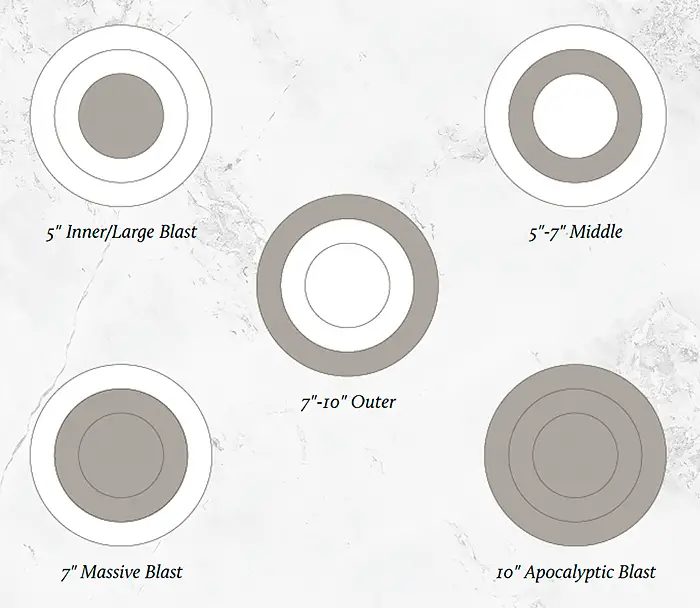
Blast Markers and Templates
Some weapons are so powerful that they don’t just target a single model or unit, but have an ‘area effect’ which might encompass several different models or units. To better represent these circumstances, Horus Heresy – Age of Darkness games use a series of different Blast markers and templates:- A ‘Small’ Blast marker (3" in diameter).
- A ‘Large’ Blast marker (5" in diameter).
- A ‘Template’ (a teardrop-shaped template roughly 8" long).
- A ‘Massive’ Blast marker (7" in diameter).
- An ‘Apocalyptic’ Blast marker (10" in diameter).
- An ‘Apocalyptic Barrage’ marker (a clover-shaped set of five overlapping markers, each 5" in diameter).
- A ‘Hellstorm’ (a teardrop-shaped template roughly 16" long).
The templates and Blast markers are used as a way of determining how many models have been hit by an attack that has an area of effect or a blast radius. When an attack uses a template or Blast marker, it will explain how the template is positioned, including any kind of scatter that might occur (scatter is discussed further later in this section). To work out the number of Hits, you normally need to hold the template or Blast marker with its central hole over an enemy model or a particular point on the battlefield, and then look underneath (or through, if using a transparent template) to see how many models lie partially or completely underneath. Various special rules and weapon effects will provide additional details on the specific use of templates when making attacks with those special rules or weapons.
A unit takes a Hit for each model that is fully, or even partially, underneath the template or Blast marker. Remember that a model’s base is counted as being part of the model itself, so all a template or Blast marker has to do to cause a Hit is to cover any part of the target’s base.
Scatter
Sometimes a rule will call for an object (a template, counter, model or even a whole unit) to be placed on the battlefield and then scattered. When this occurs, follow this procedure:- Place the object on the battlefield as instructed by the rule.
- Roll a Scatter dice and 2D6 to determine the direction and distance of scatter in inches.
- If a Hit is rolled on the Scatter dice, the object does not move – leave it in place and resolve the remainder of the rule.
- If an arrow is rolled, move the object the distance shown on the 2D6 in the direction of the arrow. Ignore intervening terrain, units, etc, unless the rule states otherwise.
- Once the object has scattered to its final position, resolve its effects.
Scatter dice and other dice and accessories that you can use in your games of Horus Heresy – Age of Darkness can be purchased from the Games Workshop website.
Characteristic Tests
A model will sometimes be called upon to take a Characteristic test. Such a test can be applied against any Characteristic that the model has, except for Leadership and Armour Save. A Toughness test is a Characteristic test, as is a Strength test or an Initiative test, a Wounds test, and so on.Models don’t have a choice of what Characteristics to use – the Characteristic to be tested will be specified in the rule.
To make a Characteristic test, follow these steps:
- Roll a D6 and compare the result to the relevant Characteristic in the model’s profile.
- If the result is equal to or less than the number in the profile, the test is passed.
- If the result is greater than the number in the model’s profile,the test has been failed and the model faces the consequences as detailed in the rule that prompted the test.
Models with Multiple Profiles
Where a model has more than one value for the same Characteristic, a Characteristic test is always taken against the highest of the values.Automatic Pass and Fail
If a rule states that a Characteristic test ‘automatically passes’ then no dice roll is needed; the test is passed. Similarly, if a rule states that a Characteristic test ‘automatically fails’, then no dice roll is needed; that test fails. If the model has a Characteristic of ‘-’ or 0, it automatically fails the test.When rolling dice to take a Characteristic test, an unmodified dice roll of 6 is always a failure, and a dice roll of 1 is always a success, regardless of any other modifiers.
Leadership Tests
At certain times, a model or unit might be called upon to take a Leadership test. This usually represents them drawing upon their courage to face disheartening circumstances.To take a Leadership test, use the following procedure:
- Roll 2D6 and compare the result to the model’s Leadership Characteristic.
- If the result is equal to or less than the model’s Leadership Characteristic, then the test has been passed.
- If the result is greater than the model’s Leadership Characteristic, the test has been failed and the model faces the consequences as detailed in the rule that prompted the test.
Automatic Pass and Fail
If a rule states that a Leadership test ‘automatically passes’ then no dice roll is needed; the test is passed. Similarly, if a rule states that a Leadership test ‘automatically fails’, then no dice roll is needed; that test fails.When rolling dice to take a Leadership test, a dice roll of 12 (a double 6) is always a failure, and a dice roll of 2 (a double 1) is always a success, regardless of any other modifiers that apply.
Removed as a Casualty and Completely Destroyed
Models that are removed as casualties are removed from the battlefield and placed to one side. When all of the models in a unit are removed as casualties, the unit is said to have been ‘completely destroyed’.Models that are ‘removed from play’ by special rules or attacks are also considered to have been removed as casualties, as far as the game rules are concerned.
For game purposes, units that are Falling Back at the end of the game or are not on the battlefield at the end of the game, either because they have Fallen Back off a battlefield edge or because they are in Reserve, are also counted as completely destroyed.
Basic vs Advanced
Basic rules apply to all the models in the game, unless stated otherwise. They include the rules for Movement, shooting and close combat as well as the rules for morale.Advanced rules apply to specific types of models, whether because they wield special kinds of weaponry (such as Graviton weapons), have advanced skill sets (such as proficiency when fighting in duels), because they are different to their fellows (such as a unit leader or Character), or because they are not standard Infantry models (such as Cavalry, Dreadnoughts or Vehicles). The advanced rules that apply to a unit are indicated in its Army List entry in the relevant Horus Heresy – Age of Darkness publication.
Where advanced rules apply to a specific model, they always override any contradicting basic rules. For example, the basic rules state that a model must take a Morale check under certain circumstances. If, however, that model has a special rule that makes it immune to Morale checks, then it does not take such checks – the advanced rules take precedence.
On rare occasions, a conflict will arise between a rule in this rulebook, and one printed in another Horus Heresy – Age of Darkness publication, such as in Army Lists or campaign rules. Where this occurs, those rules found in other Horus Heresy – Age of Darkness publications take precedence.
Owning Player, Opposing Player and Controlling Player
Sometimes a rule will ask the owning, opposing or controlling player to make an action or decision of some kind. The owning player is always the player who ‘owns’ the model in question – the one who has the model in their army. The opposing player is always their opponent. The controlling player is always the player in current command of that model – there are some special rules which can force models to switch sides during the course of the game.Active and Reactive player
Other rules, most notably those for the Reactions used by units in certain situations, will specify actions by the ‘Active’ or ‘Reactive’ player. The Active player is always the player whose turn is currently being played, while the Reactive player is always the player whose turn is not currently being played.You and Yours
Some models have abilities which are written as if speaking to the controller of the model. When a model’s rule refers to ‘you’ or ‘yours’, it refers to the player currently controlling the model.Friendly and Enemy Models
All models on the same side are friendly models. Models controlled by the opposing side are enemy models. If an opponent takes control of one of your models or units during play, it becomes an enemy model or unit for as long as it is under your opponent’s command. If you take control of one of your opponent’s models or units, it is friendly for as long as it is under your command.Line of Sight
Line of sight determines what a model can ‘see’. Many situations call for you to determine whether or not a model has line of sight. A model normally needs line of sight whenever it wishes to attack an enemy, whether with a melee attack, or shooting attack. Line of sight literally represents your warriors’ view of the enemy – they must be able to see their foes through, under or over the battlefield terrain and other models (whether friendly or enemy).For one model to have line of sight to another, you must be able to trace a straight, unblocked line from its body (the head, torso, arms or legs) to any part of the target’s body.
Sometimes, all that will be visible of a model is a weapon, banner, or other ornament they are carrying. In these cases, the model is not visible. Similarly, mechanical appendages such as cables, probes and ammo feeds are ignored, even though they may be part of a model’s body. These rules are intended to ensure that models don’t get penalised for having impressive banners, weaponry, and so on.
In many cases, what a model can ‘see’ will be obvious – if there’s a hill, building or mechanical construct in the way, the enemy might be blatantly out of sight. In other cases, two units will be clearly in view of each other as there is nothing at all in the way.
On those other occasions, where it’s not entirely obvious whether or not one unit can see another, the player will have to stoop over the battlefield and look from behind the model’s head for a ‘model’s eye view’. This means getting down to the level of your models and checking the battlefield from their perspective to ‘see what they can see’. You will find that you can spot lurking enemies through the windows of ruined buildings, catch a glimpse of a model’s legs under tree branches and see that high vantage points become very useful for the increased line of sight that they offer.
Own Unit
There is one important exception to the rules for line of sight. Firing models can always draw line of sight through members of their own unit just as if they were not there. This assumes that the models shift their stances to open up firing lanes in order to maximise their own unit’s firepower. This includes Vehicle models that are part of a Squadron. While models can draw line of sight through their own unit without penalty, they may not draw line of sight through friendly models that are not part of the unit, including Dedicated Transports bought alongside a unit.Ranges
Many rules will call for models to be not only in line of sight, but also ‘in range’ of certain effects, or ‘within’ a specified area of the battlefield. To be within range of any given point or model, any part of the base of the model (or hull in the case of models such as Vehicles without a base) must be within a number of inches stated by the rule in question. One example of this is when controlling an Objective marker or more commonly when determining if a Ranged weapon can attack a potential target, as detailed in the Shooting rules. In the case of rules and effects which require a unit to be within a defined area of the table (such as the opposing player’s Deployment Zone), all models in the unit must be within that area.THE TURN
A Horus Heresy – Age of Darkness battle is a chaotic affair. To bring a modicum of order to the anarchy of battle, players alternate moving and fighting with their units in turn. So, one player will take their turn to move and fight with their forces, and then their opponent will move and fight in their own turn. This process is then repeated, with the first player moving and fighting again, and so on, until the game is done.Turn Phases
The three main Phases of an Active player’s turn are: Movement, Shooting and Assault. In the Movement phase the Active player moves any of their units that they wish to move; then in the Shooting phase they make Shooting Attacks with any units capable of doing so; and finally, in the Assault phase all melee combats are resolved. Once all of these Phases are completed, the Active player’s turn ends and their opponent becomes the Active player and begins their turn.This process helps to keep track of what is going on and makes it easier to know when one player’s actions are over and their opponent can start their turn.
Reactions
While the Active player works through each of the three main Phases in sequence, the Reactive player does not sit idle. During each Phase the Reactive player may make a number of Reactions, responses to the Active player’s actions that give that player a chance to counter the strategies of their foe. The full rules for Reactions are found here.Game Turns and Player Turns
In a complete Game Turn, each player gets a player turn, divided into Movement, Shooting and Assault phases. One Game Turn therefore comprises two player turns – one for each player, during which they become the Active player. Whenever a rule refers to ‘a turn’, it always means ‘player turn’ unless it specifically refers to a ‘Game Turn’.The Start and End of a Phase
During your game, you may encounter rules that say an action or event happens at the start of a particular Phase, such as ‘at the start of your Movement phase’ or ‘at the start of your Shooting phase’. These are always resolved before anything else during that Phase. Likewise, any rule that says an action or event happens at the end of a particular Phase is always resolved after all other actions have been performed during that Phase, before the next Phase (if any) starts.The Start and End of a Turn
During your game, you may encounter rules that say an action or an event happens ‘at the start of your turn’. These are always resolved before your Movement phase. Likewise, any rule which says an action or event happens ‘at the end of your turn’ is always resolved after your Assault phase has finished, but before your opponent’s next turn (if any) begins.‘Before the Game Begins’ and ‘At the End of the Game’
During your game, you may encounter rules that say an action or event happens ‘before the game begins’. Examples of such events include generating Warlord Traits. These are always resolved before either player deploys their army.During your game, you may encounter rules that say an action or event happens ‘at the end of the game’. Examples of such events include scoring Victory points for certain missions. The mission you are playing will specify when your game ends; this will normally be after a certain number of Game Turns. Any rule that says an action or event happens ‘at the end of the game’ is always resolved after the last Game Turn has ended.
Sequencing
While playing The Horus Heresy – Age of Darkness, you’ll occasionally find that two or more rules are to be resolved at the same time – normally ‘at the start of the Movement phase’ or similar. When this happens, and the wording is not explicit as to which rule is resolved first, then the Active player chooses the order. If these things occur before or after the game, or at the start or end of a Game Turn, the players roll off and the winner decides in what order the rules are resolved.Turn Summary
| ||
REACTIONS
In the chaos of battle, it is not only the will of generals that decides the outcome, but also the reactions of ordinary warriors. As the tide of combat flows about them, some will be caught off-guard while others rise to the challenge of this dark age and refuse to allow the foe to dictate the course of battle.Reaction Allotments
The Reactive player may attempt a set number of Reactions in each Phase of the Active player’s turn. This set number is referred to as the Reaction Allotment, and always begins at a base value of one. A player must expend one point of their Reaction Allotment in order to have a unit under their control make a Reaction and once the Reaction Allotment for that Phase is reduced to 0, sometimes referred to as being exhausted, then no more Reactions may be made.| Any player, unless a special rule or other effect specifies otherwise, may make one Reaction in each Phase of their opponent’s turn. | ||
The Reaction Allotment of any player may be modified by special rules or other effects, granting that player additional Reactions either in every Phase (an increase of the Reaction Allotment) or in specific Phases. This may either increase the base Reaction Allotment, that is the number of Reactions allowed in every Phase, or only grant a bonus to the Reaction Allotment in specific Phases.
For example, a player might have a special rule that states ‘This special rule increases the Reaction Allotment to two’, which would indicate that the player could make two Reactions in every Phase of their opponent’s turn. However, a special rule that states ‘This special rule increases the number of Reactions that may be made during the Assault phase by +1’ would allow a player with a Reaction Allotment of one to make a single Reaction in the Shooting and Movement phases, but two in the Assault phase.
Regardless of any special rules or other effects, no player may ever increase their base Reaction Allotment above three, nor may any player ever make more than three Reactions in a given Phase unless a special rule specifically allows for a number of Reactions above the normal limit of three.
A Reaction may be made with any unit controlled by the Reactive player, though in a number of situations a special rule or condition may deny a unit the opportunity to react. The most common such conditions where a unit may not make a Reaction are:
- It is Pinned.
- It is Falling Back.
- It is locked in combat.
- It has already made a Reaction in the current Phase.
- The controlling player has exhausted their Reaction Allotment for the current Phase.
- Another special rule, effect or condition specifically states they may not (for example, the Fearless special rule and certain effects caused by weapons and Psychic Powers).
Most Reactions may only be played in a specific Phase, and in opposition to a specific action taken by the Active player. In all cases, the rules for each Reaction will detail when and how they are used. A given Reaction may be used as many times as a player wishes, so long as that player has not exhausted their Reaction Allotment for the Phase – but no individual unit may make more than one Reaction in any one Phase.
When making a Reaction that allows a unit to make a Shooting Attack, that unit cannot use any special rules or abilities which can be used instead of making a Shooting Attack (such as the Battlesmith (X) special rule). Shooting Attacks made as part of a Reaction do not cause Leadership tests due to casualties inflicted upon enemy units, nor do they limit the actions of the Reacting units in future turns or Phases regardless of the weapons used to attack with, although any single use weapons or special abilities that may only be used once are considered to have been expended if used as part of a Reaction. Similarly, units that make moves or undertake other actions as part of a Reaction suffer no penalty or drawback in later Phases or turns for doing so.
Any Reaction that allows a unit to move using its Initiative Characteristic rather than its Movement Characteristic may not be used by units that include any models with either no Initiative Characteristic (such as most Vehicles) or an Initiative Characteristic of 0. In addition, Reactions that allow a Move based on Initiative use the unit’s or model’s unmodified Initiative and are not affected by Difficult Terrain (but must still take Dangerous Terrain tests as normal).
Core ReactionsThe following Reactions are available to all armies regardless of size or Faction.Reactions in the Movement PhaseDuring the Movement phase, the Reactive player may declare a Reaction if an enemy unit ends a move within 12" and in line of sight of a friendly unit. Once the Active player has completely resolved their unit’s movement, the Reactive player may choose to expend one of their Reactions in that Phase in order to have a unit they control that is within 12" and line of sight of the final position of the moving unit either Advance or Withdraw.Advance – The Reacting unit may move a number of inches up to its unmodified Initiative Characteristic directly towards the enemy unit that triggered this Reaction, moving each model in the unit directly towards the enemy unit by the shortest available path. In a unit with mixed Initiative Characteristics, use the highest unmodified Characteristic. Vehicles may pivot once up to 90° and then move up to 6" directly forwards. Withdraw – The Reacting unit may move a number of inches up to its unmodified Initiative Characteristic directly away from the enemy unit that triggered this Reaction, moving each model in the unit directly away from the enemy unit by the shortest available path. In a unit with mixed Initiative Characteristics, use the highest unmodified Characteristic. Vehicles may pivot once up to 90° and then move up to 6" directly backwards. Reactions in the Shooting PhaseDuring the Shooting phase, the Reactive player may react when any enemy unit makes a Shooting Attack targeting a unit they control. Before any To Hit rolls are made, the Reactive player may choose to expend one of their Reactions for that Phase to have the unit targeted by the Shooting Attack either Return Fire or Evade.Return Fire – Wounds, Glancing Hits or Penetrating Hits as a result of Shooting Attacks made by the unit that triggered this Reaction are allocated as normal, however any models in the Reacting unit that are reduced to 0 Wounds or 0 Hull Points are not immediately removed from the battlefield, Wrecked or affected by the result of any rolls on the Vehicle Damage table. However, Wounds or Hull Point damage cannot be allocated to a model that has been reduced to 0 Wounds or 0 Hull Points or has suffered an Explodes result on the Vehicle Damage table. After the Active player has resolved all Shooting Attacks made by all of the weapons the unit making the Shooting Attack has, the Reactive player makes a Shooting Attack with the Reacting unit (including with any models that have been reduced to 0 Wounds and before any Pinning tests or Morale checks are taken) targeting only the unit that triggered this Reaction, following all the usual rules for Shooting Attacks and removing casualties from the Active unit as normal. A unit that makes a Shooting Attack as part of a Return Fire Reaction may not make any attacks indirectly (without line of sight) including weapons with the Barrage special rule or other weapons or special rules that otherwise ignore line of sight, and models with the Vehicle Unit Type may only fire Defensive weapons. Template weapons used as part of a Return Fire Reaction must use the Wall of Death rule instead of firing normally. The Reacting unit is considered to be Stationary, and may fire weapons of any type as though models in that unit had not moved. Once the Reactive player’s Shooting Attack has been resolved, any models from the Reacting unit which were reduced to 0 Wounds are removed as casualties, models that were reduced to 0 Hull Points are Wrecked and all results on the Vehicle Damage table are applied. Any Pinning tests or Morale checks for the Reacting unit are then taken as normal. Evade – All models in the Reacting unit gain the Shrouded (5+) special rule against all Wounds, Glancing Hits or Penetrating Hits inflicted as part of the Shooting Attack that triggered this Reaction – if the Reacting unit already has a version of the Shrouded special rule then this does not stack or increase that rule, and the Reacting player may choose to use any one of the Shrouded rules available to them. A Vehicle that has suffered an Immobilised result on the Vehicle Damage table, any unit that includes one or more models with a Movement Characteristic of 0 or any unit that is not allowed to move in this turn for any reason may not make an Evade Reaction. Reactions in the Assault PhaseDuring the Assault phase, the Reactive player may react when any enemy unit declares a Charge targeting a unit they control. Once the Active player has resolved all Charge rolls for that unit, whether successful or not, but before any models are moved as part of either a Charge Move or Surge Move, the Reactive player may choose to expend one of their Reactions for that Phase to have the unit targeted by the Charge either Overwatch or Hold the Line.Overwatch – The Reacting unit may make a Shooting Attack, targeting only the unit that triggered this Reaction and following all the usual rules for Shooting Attacks. A unit that makes a Shooting Attack as part of an Overwatch Reaction may not make any attacks indirectly (without line of sight) including Barrage weapons or other weapons or special rules that otherwise ignore line of sight, and Vehicles may only fire Defensive weapons. Template weapons used as part of an Overwatch Reaction use the Wall of Death rule instead of firing normally. The unit targeted by the Overwatch attack may not take Cover Saves against Wounds inflicted as part of an Overwatch Reaction. Units making a Shooting Attack as part of this Reaction are considered to be Stationary, and may fire weapons of any type as though they had not moved. Hold the Line – The Reacting unit must make a Morale check, if that check is successful and the enemy unit’s Charge was also successful then that Charge counts as Disordered. If the Morale check is successful, but the enemy unit’s Charge was a failure then any other Charges resolved against that unit by other enemy units in the same Charge sub-phase must be counted as Disordered. | ||
THE MOVEMENT PHASE
Getting models into the right position on the battlefield is often the key to victory. The following rules explain how Infantry units move as they are the most common units in the game. Vehicles, Cavalry and certain other units move in different ways to represent their greater mobility, and these will be discussed in full detail later in the book.Movement Distance
Models move up to a number of inches equal to their Movement Characteristic in the Movement phase. This represents the unit moving at a pace reasonable enough to survey the surrounding terrain for enemies and potential traps, communicate with their commanders and evaluate any further advance.It is perfectly fine to measure a unit’s move in one direction, and then decide to move it somewhere else or not at all. As they are moved the models in a unit can be turned to face in any direction, but if a model does move, no part of its base can finish the move more than the total distance it is allowed to move that turn from the point where it started the Movement phase.
Models cannot voluntarily move off the battlefield, save where special rules make an explicit exception to this rule.
 A common mistake is for the distance to be measured and the model placed on the far side of the tape measure. This is incorrect, as it adds the entire length of the model’s base to the distance moved. For an Infantry model on a relatively small base, this error isn’t grave, but for larger models such as tanks or Knights, it can be game changing. | ||
Moving and Difficult TerrainDifficult Terrain, areas of the board that slow and obstruct those attempting to move through them, are discussed in more detail here. However, for the purposes of ease of use, the rules regarding how Difficult Terrain affects Movement are presented below:If a unit starts its move outside Difficult Terrain, but has a high enough Movement Characteristic to enter Difficult Terrain during the current Movement phase, the player must declare if they want their unit to try to enter it as part of their move. If they choose not to enter any area of Difficult Terrain the unit moves as normal, but may not enter any area of Difficult Terrain. If they choose for a unit to enter any area of Difficult Terrain, that unit applies a modifier of -2 to the distance it moves in that Phase. This modifier is applied to the unit’s Movement Characteristic before it begins its move and continues to apply as long as the unit remains in Difficult Terrain, or until the end of the current Movement phase if it leaves Difficult Terrain as part of its move. If the application of this modifier would leave the unit unable to reach an area of Difficult Terrain it is still applied, even if the controlling player alters the unit’s movement and no longer intends to enter Difficult Terrain. | ||
Which Models are Moving
Whether or not a model moves can change how effective it will be in the Shooting and Assault phase. The Active player may decide that only some of the models in a unit are going to move this turn. If this is the case, they must declare which models are remaining Stationary before moving the other models of that unit, otherwise the entire unit is considered to have moved. Remember that all models in the unit must still maintain unit coherency.Running
In order to maximise their potential movement, models can forego the chance to make a Shooting Attack in the turn’s Shooting phase in order to increase their maximum Movement distance. This can represent infantry sprinting ahead as well as combat bikes going at maximum speed or a Dreadnought breaking into a long-legged lope. Any unit may choose to Run during the Movement phase (except those units whose Type does not allow them to do so, such as Vehicles and Artillery – see Unit Types), but this must be declared before any models in the unit are moved. If the Active player chooses to Run with any of their units, that unit increases their movement by the value of the lowest Initiative Characteristic in the unit for the duration of the Movement phase.However, a unit that Runs may not make Shooting Attacks of any kind during the following Shooting phase, or declare Charges during the Assault phase of the same player turn. If any models in a unit Run, then all models in that unit are counted as having Run, regardless of the distance moved by any individual model.
Units making a Reaction during their opponent’s turn may never choose to Run as part of that Reaction.
Jump Packs and Jet PacksSome units have access to special Wargear intended to grant them the ability to move further and more decisively. Of such Wargear, the Jump Pack and Jet Pack are the most common. Many army lists in Warhammer: The Horus Heresy – Age of Darkness will present Faction-specific versions of this Wargear. Units that are entirely equipped with one of these items of Wargear will have access to additional rules in the Movement (and potentially other) phases. The basic rules for both Jump Packs and Jet Packs are shown below for reference:Jump Pack: A unit composed entirely of models with Jump Packs may set its Movement Characteristic to a value of 12 for the duration of the controlling player’s turn. This allows the unit to move up to 12", regardless of the Movement Characteristic shown on its profile, and gain any other benefits of a Movement Characteristic of 12 (including the bonus to Charge Distance). In addition, if the controlling player chooses to set the unit’s Movement to 12", the unit ignores terrain while Moving and Charging, and may move over friendly and enemy models/units. A unit that ends or begins its Movement or a Charge in Dangerous Terrain will still need to take Dangerous Terrain tests as normal, even when employing Jump Packs, and treats all Difficult Terrain as Dangerous Terrain. Jet Pack: A unit entirely equipped with Jet Packs may choose to increase its Movement Characteristic by +6, move over friendly and enemy models/units, and ignore terrain while moving during the Movement phase. A unit that ends or begins its movement in Dangerous Terrain will still need to take Dangerous Terrain tests as normal, even when employing Jet Packs and treats Difficult Terrain as Dangerous Terrain. In addition to the bonus to move during the Movement phase, a unit equipped entirely with Jet Packs may make an additional move of 6" during the Shooting phase. This move must be taken after the unit has completed any Shooting, is not limited by the weapons fired by that unit during the Shooting phase and ignores terrain and may move over friendly and enemy models/units in the same manner as moves made using a Jet Pack in the Movement phase.Any model equipped with a Jump Pack also gains the Bulky (2) and Deep Strike special rules, or if it already has the Bulky (2) special rule it gains the Bulky (3) special rule instead. A unit equipped with Jump Packs may not Run. During Reactions made in any Phase, a unit equipped with Jump Packs may not activate them to gain any bonus to their Movement Characteristic. Any model equipped with a Jet Pack also gains the Bulky (2) and Deep Strike special rules, or if it already has the Bulky (2) special rule it gains the Bulky (3) special rule instead. During any Reaction that allows a unit equipped entirely with Jet Packs to move, increase the distance of that move by 6. This allows the unit to ignore terrain in the same manner as other Jet Pack moves. | ||
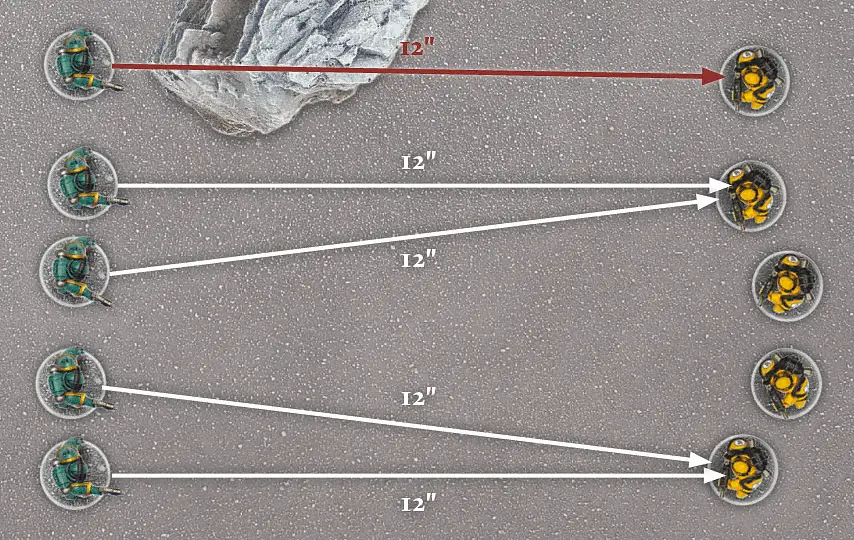
Different Movement Distances within a Unit
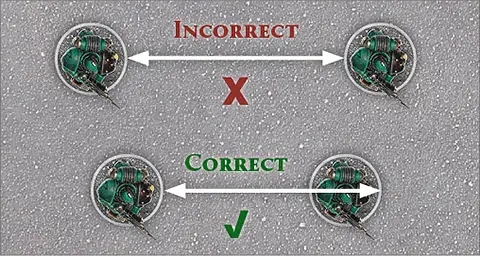
Sometimes, a unit will contain models that move at different speeds. When this is the case, each model can move up to its maximum Movement allowance so long as it remains in unit coherency (see diagram below).Models in the Way
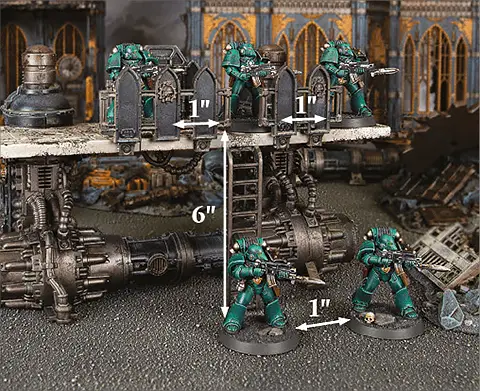
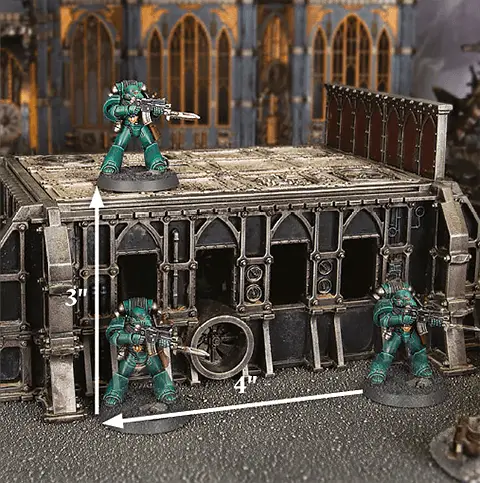
A model cannot move to a position within 1" of an enemy model unless they are charging into combat in the Assault phase, and can never move or pivot through another model (friend or foe) at any time. To move past another model, they must go around.Pivoting on the Spot
If the Active player chooses not to move a model in a unit, they can instead choose to turn it on the spot to face in any direction, provided that the pivot does not bring the model within 1" of an enemy model. A model that only pivots on the spot in the Movement phase counts as being Stationary for all purposes, including subsequent Shooting Attacks.Moving and Close Combat
Units already locked in combat with the enemy cannot move during the Movement phase. Unit CoherencyWhen moving a unit, its individual models must remain in close proximity with each other in order to remain an effective fighting force. Once a unit has finished moving, the models that comprise it must be no more than 2" horizontally and 6" vertically away from at least one other model in the same unit, and all models in the unit must form one single group – with no clusters of models in the unit separated by more than 2". This is referred to as being in ‘Unit Coherency’.During the course of a game, a unit can get broken up and lose unit coherency, usually because it has sustained casualties from enemy fire. If this happens, in their next Movement phase, the models in the unit must be moved in such a way that they restore unit coherency, or as close to unit coherency as possible. If the unit cannot move in its next turn, or is unable to restore unit coherency in a single turn, then the models must move to restore unit coherency as soon as they have the opportunity, including by Running if they have that option. | ||
Moving through Terrain
As part of their move, models can move through, up or over any terrain they encounter, unless the terrain is noted as being impassable.Models can also be moved to ‘climb up’ terrain, as long as the model is able to finish the move on a location on which it can be stood. When measuring a move where a model climbs terrain, add the distance the model moves horizontally to the distance it has moved vertically; the result is considered to be the distance the model has moved.
In addition to the rules presented in this section, certain types of terrain can affect how far your models can move. The rules for how these different types of terrain affect movement are here.
Wobbly Model Syndrome
Sometimes, a particular piece of terrain may make it hard to place a model exactly where you want. In cases like this, it is perfectly acceptable to leave the model in a safer position, as long as both players have agreed and know its ‘actual’ location.If your opponent is considering shooting at the model, you will have to hold it back in the proper place so they can check line of sight and range.
THE SHOOTING PHASE
In a Horus Heresy – Age of Darkness battle, the Active player’s army makes Shooting Attacks in the Shooting phase of their turn. During the Shooting phase, units armed with ranged weapons and Psychic Weapons can use them to inflict casualties upon the enemy. The Active player can choose any order for their units to shoot in, but must complete all the firing by one unit before moving on to the next.The Shooting Sequence
| ||
Nominate a Unit to make Shooting Attacks
During the Shooting phase, a unit containing models armed with weapons whose range is greater than -/Melee can be nominated to make Shooting Attacks.Who can make Shooting Attacks?
Certain situations prevent a model from firing. The most common are:- Their unit is locked in combat.
- Their unit has Run this turn.
Choose a Target
Once a unit has been chosen to make a Shooting Attack, choose a single enemy unit to be the target of that attack. The target unit must be within line of sight and range for at least one model in the attacking unit. Note that the controlling player of the attacking unit may check the range and line of sight to multiple enemy units before deciding which one to shoot at and declaring it to their opponent. A unit that is locked in combat may not be selected as the target of a Shooting Attack, regardless of whether line of sight or range may be drawn to it.Line of Sight
To target an enemy unit, at least one model in the shooting unit must have line of sight to at least one model in the target unit. If no model has line of sight, then a different target must be chosen.Check Range
All weapons have a Maximum Range, which is the furthest distance at which they can be used to make attacks. A weapon must be in range of the target unit to make attacks. The following are examples of weapon ranges:
|
When checking range, simply measure from the attacking model to the nearest model in the target unit that is within Line of Sight of the attacking model. Any weapon that is found to be out of range of all models in the target unit to which line of sight can be drawn may not be used to make attacks.
 | ||
Select a Weapon
Whilst some units are comprised entirely of models with the same weaponry, many units are equipped with a variety of different weapons or contain models that are themselves equipped with more than one weapon. When making Shooting Attacks with a unit, completely resolve all attacks from the same weapons at the same time before moving onto any differently named weapons (see Select Another Weapon).First, select a weapon that one or more models in the attacking unit are equipped with. The selected weapon cannot be one that the unit has already attacked with during this Phase. All models in the unit that are equipped with the selected weapon can now attack the target unit with that weapon.
If a weapon can attack with more than one mode, as represented by multiple profiles for a single weapon, select a single weapon mode/ammo type for this attack – treat weapons firing different modes/ammo as differently named weapons. If a model can attack with more than one weapon in the same Phase and it is equipped with two or more identically named weapons, it shoots with all the same named weapons when that weapon is selected.
A player can choose not to fire with certain models if they prefer. This must be declared before rolling To Hit. If a player chooses not to have a model attack with the currently selected weapon now, it cannot attack with that weapon later during the same Phase (but it can attack with a differently named weapon it is equipped with). All of the models in the unit that are attacking with the selected weapon make their attacks at the same time, regardless of whether or not all of the dice are rolled together.
Which Models can Fire
Any model that has line of sight to at least one enemy model in the target unit and is found to be in range of that model can make Shooting Attacks.All models in the unit must attack the same target unit. If a model cannot attack the same target unit as the other models in its unit then it cannot attack at all in the Shooting phase for that turn.
Typically, a model can only attack with a single Ranged weapon in the same Phase, although some models, such as Vehicles, can attack with more. Once a model has attacked with the maximum number of weapons, it cannot attack again in that Phase.
Roll To Hit
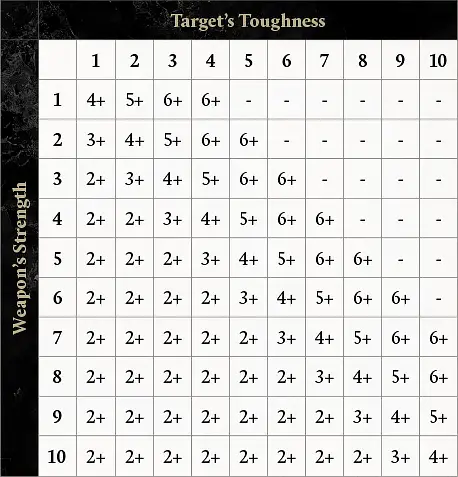
To determine if the attacking model has hit its target, roll a D6 for each attack that is in range. Most models only get to make one attack – however, some weapons are capable of firing more than once, as will be explained in more detail later. The dice roll needed To Hit will depend on the Ballistic Skill (or BS) of the attacking model. The chart below shows the minimum D6 roll needed to score a Hit.
|
To Hit rolls are easy to remember if you subtract the Ballistic Skill of the attacking model from 7. For example, a model with BS 2 needs to roll a 5 or more (7-2=5).
Note that the minimum roll needed To Hit is always at least 2. When rolling To Hit, there is no such thing as an automatic Hit and a roll of a 1 always misses.
Ballistic Skill of 6 or Higher
Very rarely, a model may have a Ballistic Skill of 6 or even more. If a model has BS 6 or higher, it gains a re-roll whenever it rolls a 1 To Hit with Shooting Attacks. The second roll usually has a lower chance of hitting, and the number needed is given in the chart below after the slash.
|
For example, a model with BS 7 fires a shot with its pistol. It rolls a 1, missing, but thanks to its skill with ranged weaponry, it can re-roll the dice. This time, however, it can only hit on a roll of 5 or better.
If a model has a special rule that already gives it a re-roll To Hit (such as Master-crafted), then that re-roll takes precedence and the chart above is not used. Instead, the chance of hitting with the re-roll is the same as the chance of hitting with the first roll, determined by the attacking model’s BS.
Movement and Shooting Attacks
Some weapons may have their ability to attack or the number of attacks they make modified by whether the model equipped with them has moved or not in the preceding Movement phase. This is explained in more detail in the Weapons section. The effect Movement has on making Shooting Attacks is applied on a model-by-model basis.Snap Shots
Under specific circumstances, models must fire Snap Shots. The most common occurrences of Snap Shots are when models with Heavy weapons move and make Shooting Attacks in the same turn. If a model is forced to make Snap Shots rather than attack normally, then its Ballistic Skill is counted as being 1 for the purpose of those attacks, unless it has a Ballistic Skill of 0, in which case it may not shoot.The Ballistic Skill of a model making a Snap Shot can only be modified by special rules that specifically state that they affect Snap Shots, along with any other restrictions. If a special rule doesn’t specifically state that it affects Snap Shots, then the Snap Shot is resolved at Ballistic Skill 1.
Some weapon types, such as Ordnance, or those that have certain special rules, such as Blast, cannot be used to make Snap Shots. In addition, any Shooting Attack that does not use Ballistic Skill cannot be made as a Snap Shot. These exceptions aside, Snap Shots are treated in the same manner as any other Shooting Attack made with a Ballistic Skill of 1.
Roll To Wound
To determine whether a Hit causes damage, compare the weapon’s Strength Characteristic with the target’s Toughness Characteristic using the To Wound chart below. The number indicated on the chart is the minimum result on a D6 needed to convert the Hit into a Wound. A value of ‘-’ indicates that the target cannot be wounded by the attack.Note that the minimum roll needed To Wound is always at least 2. When rolling To Wound, there is no such thing as an automatic Wound and a roll of 1 always fails.
Each weapon has its own Strength Characteristic, which is given in its profile or in the description of the weapon. The following are examples of weapons and their Strength Characteristics:
|
Multiple Toughness Values
Rarely, a unit will contain models with differing Toughness Characteristics. When this occurs, roll To Wound using the Toughness Characteristic that is in the majority in the target unit by counting the number of models with each different value – the Bulky (X) special rule and Unit Type of a model have no effect on whether a Toughness Characteristic is in the majority, it is decided simply by the number of models with a given Toughness Characteristic in the unit. If two or more Toughness Characteristics are tied for majority, use the highest of these tied Characteristics.The Wound Pool
Total up the number of Wounds caused by the attacking unit. Keep the dice that have scored Wounds and create a ‘pool’, where each dice represents a Wound.Sometimes an attack will gain a bonus or special rule depending on the results rolled To Hit or To Wound (for example, due to the Rending special rule). If any such Wounds are caused, split them into separate Wound Pools. All Wounds with exactly the same Strength, AP value and special rules must go into the same pool. If all the Wounds are the same, there will only be one Wound Pool.
Allocate Wounds and Remove Casualties
To determine how many casualties are caused, the Wounds from each Wound Pool must be allocated and any Saving Throws resolved. If several pools of Wounds need to be allocated then the player whose unit receives the attacks decides the order in which they are allocated. All of the Wounds in a given pool must be allocated before moving on to the next.Allocate Wounds
First, the player whose unit is the target of the attack selects any one model in the unit that is within line of sight and range of the attacking unit.If any model in the target unit has already lost one or more Wounds, but has not been removed as a casualty then the Wound must be allocated to such a model, unless that model is out of line of sight of all models in the attacking unit or has the Character sub-type.
Out of Range & Out of Line of Sight
If at any point while allocating Wounds, there is no model in the target unit that is within line of sight or range of the attacking unit then all remaining Wounds in the Wound Pool are lost.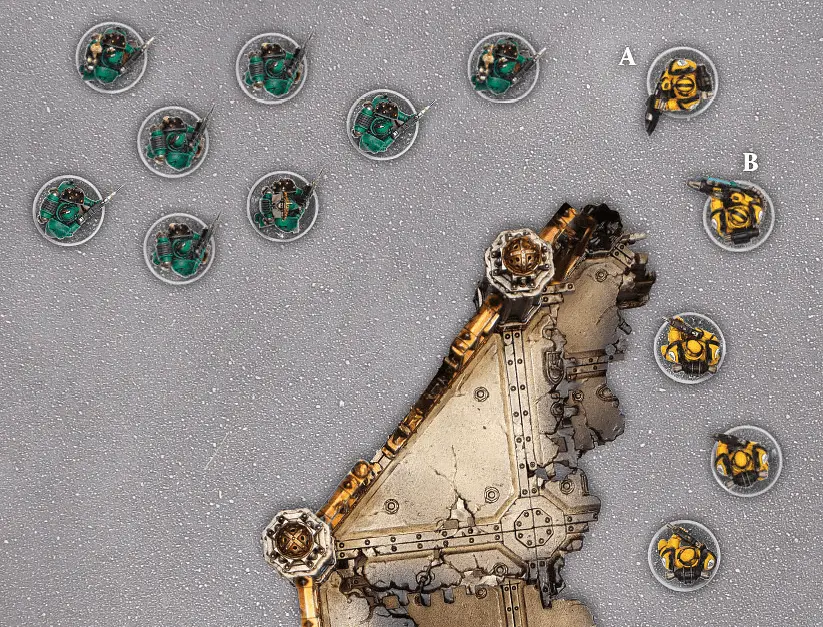 A unit of Sons of Horus Legionaries has made a Shooting Attack targeting a unit of Imperial Fists Legionaries. The attack inflicts a total of seven Wounds on the Imperial Fists unit, all from bolters and forming a single Wound Pool. The Imperial Fists player chooses to allocate the first Wound to Model A, which is within both range and line of sight of the attacking unit of Sons of Horus Space Marines. The first Wound is successfully saved, and the Imperial Fists player must continue to resolve Wounds from the Wound Pool against that model. Another successful save is made, but the third Wound is not saved and Model A is removed as a Casualty. Next, the Imperial Fists player chooses to allocate the fourth Wound to Model B, which is also within range and line of sight of the attacking unit. The next save is also failed and Model B is removed as a Casualty as well. All remaining models in the Imperial Fists unit, while within range of the Sons of Horus, are not in line of sight and so cannot have Wounds allocated to them. As such, the three remaining Wounds in the Wound Pool cannot be allocated and are lost, ending this step of the Shooting Attack. | ||
Take Saves and Remove Casualties
A model that has been Allocated a Wound can make a Saving Throw, if the model has one. If the Save is failed, reduce that model’s Wounds by 1. If the model is reduced to 0 Wounds, it is removed as a casualty; otherwise, continue allocating Wounds to the selected model until it is removed as a casualty or the Wound Pool is empty.If the selected model is removed as a casualty and the Wound Pool is not empty, then the player whose unit was the target of the attack selects another model in the target unit that is in line of sight and range of the attacking unit and allocates the next Wound to that model.
Continue allocating Wounds in this fashion, taking Saves and removing casualties until the Wound Pool is empty or all models in the target unit have been removed as casualties.
Multiple Armour Saves
Rarely, a unit will contain models with differing Armour Save Characteristics. When this occurs, the controlling player uses the Save of the model to which the Wound has been allocated. If the model to which the Wound has been allocated has more than one Save available, the controlling player may select any of these Saves to use.Emptied Wound Pool
When a Wound Pool is empty, select a remaining pool and Allocate Wounds from it. Once all of the Wound Pools for an attack are empty, attacks from the currently selected weapon have been completely resolved.Select another Weapon
After the attacks from the currently selected weapon have been completely resolved, if any models in the firing unit that have not yet made attacks and are equipped with a differently named Ranged weapon, you can now make attacks with those models at the same target unit. This is resolved in exactly the same way as the first weapon selected. Repeat this process until all the weapons in the attacking unit have been used to make Shooting Attacks. If a unit has no differently named weapons, or if it chooses not to attack with any of them, another unit may be selected to make the next Shooting Attack, or the Active player can choose to end the Shooting phase and proceed to the Assault phase.Saving Throws and Damage Mitigation Rolls
Few will take to the battlefield without some form of armour or adequate cover behind defensive lines. All these forms of protection are represented by Saving Throws (or Saves) and Damage Mitigation Rolls as follows:Armour Saves
If a model has an Armour Save Characteristic of 6+ or better on its profile, then a further dice roll may be made to see if the armour prevents the Wound. This is called an Armour Saving throw, or Armour Save.To take an Armour Save, roll a D6 and compare the result to the Armour Save Characteristic of the model that has been allocated the Wound. If the dice result is equal to or higher than the model’s Armour Save Characteristic, the Wound is negated. If the result is lower than the Armour Save Characteristic, the model suffers a Wound. This means that, unlike most Characteristics, an Armour Save is better if it is a lower number.
Armour Piercing Weapons
Some powerful weapons are capable of punching through even the thickest armour plates. This is represented by a weapon having an Armour Piercing Characteristic – usually referred to as AP. A weapon’s AP rating indicates the Armour Save the weapon can ignore, meaning a lower value is more powerful. A weapon shown as ‘AP-’ has no Armour Piercing value and will never ignore a target’s Armour Save.If the weapon’s Armour Piercing value is equal to or lower than the model’s Armour Save, then it is sufficiently powerful enough to punch straight through the armour; the target gets no Armour Save at all. The armour is ineffective against the shot.
If the weapon’s Armour Piercing value is higher than the armour, the target can take its Save as normal.
Invulnerable Saves
Some warriors are protected by more than physical armour. They may be shielded by force fields or have a constitution that can shrug off hits that would destroy a tank. Models with Wargear or abilities like these are allowed an Invulnerable Saving Throw.Invulnerable Saves are different to Armour Saves in that they may always be taken whenever the model suffers a Wound, or, in the case of Vehicles, suffers a Penetrating Hit or Glancing Hit – the Armour Piercing value of attacking weapons has no effect on an Invulnerable Save. Even if a Wound, Penetrating Hit or Glancing Hit ignores all Armour Saves, an Invulnerable Saving Throw can still be taken.
Cover Saves
Enemy models can often be protected by terrain, also known as being ‘in cover’. Where this is the case, the model will be entitled to a Cover Save. Even if a Wound, Penetrating Hit or Glancing Hit ignores all Armour Saves, a Cover Saving Throw can still be taken.Damage Mitigation Rolls
Some models may also have a special rule that grants a Damage Mitigation roll, such as Feel No Pain or Shrouded. These rolls may be made even if a model has already failed a save of any kind, or was unable to make a save due to the AP value of an attack or the effect of another special rule. If a save is failed, a model with a Damage Mitigation roll may attempt to use that roll to negate an unsaved Wound. However, no model may attempt more than a single Damage Mitigation roll against any given unsaved Wound inflicted on it. In cases where a model has more than one Damage Mitigation roll available, the controlling player selects one to use whenever called upon to make a Damage Mitigation roll.Determining Cover Saves
When allocating a Wound, if the target model is at least 25% obscured from the point of view of at least one attacking model, or if the model occupies Area Terrain of certain types, the target model gains a Cover Save against that Wound. Unless stated otherwise, all cover provides a 6+ Save. Some types of terrain provide better or worse Cover Saves; when this is the case, the Cover Save provided will be stated in the rules for the terrain.Pinning and being PinnedIf warriors come under heavy fire, they may decide to keep their heads down. To represent this, certain rules or effects, such as the Pinning special rule, may force units to become Pinned.PinnedA unit that has become Pinned cannot Move, Run or Charge. It can only fire Snap Shots if it attacks during the Shooting phase and cannot make Reactions in any Phase. At the end of its following turn, the unit returns to normal and that unit is free to act as normal from then on. Whilst it is Pinned, a unit is affected normally by enemy actions (for example, it takes Morale checks as normal). If the unit is forced to move, for example, if it has to Fall Back, it returns to normal immediately. If assaulted, the unit will fight as usual, but enemy units do not receive the Initiative penalty for having Charged a unit through Difficult Terrain, even if the Pinned unit is in Difficult Terrain. If a unit becomes Pinned during a Charge, then that Charge automatically fails and the Pinned unit makes neither a Charge or Surge move. Units that are locked in combat cannot be Pinned and do not take Pinning tests. | ||
Intervening Models
If a target is partially obscured from the firer by models from a third unit (e.g, models not from the firer’s unit or from the target unit), it receives a 6+ Cover Save in the same way as if it was in terrain. Similarly, if a model makes a Shooting Attack through the gaps between models in an intervening unit, the target is in cover, even if it is completely visible to the firer. Note that this does not apply if the unit making the Shooting Attack occupies an elevated position, granting it an unobstructed line of sight to the target unit or model, or is firing a Barrage weapon.Note the exception that, in the same way as they can trace line of sight through members of their own unit, models can always shoot through members of their own unit without conferring or receiving a Cover Save.
Models with more than One Save
Sometimes a model will have a normal Armour Save and a separate Invulnerable Save, such as a Legion Cataphractii Terminator Squad, whose armour houses shield generators that project a personal force field. The model could also be in cover as well. In these cases, a model only ever gets to make one Saving Throw and the controlling player selects one Saving Throw from amongst those available to use.Maximum Save
Some models gain additional benefits from rules that may increase any of their Saves by +1, +2 or more. However, no Saving Throw (Armour, Cover or Invulnerable) can ever be improved beyond 2+. Regardless of what is giving the model its Saving Throw, a roll of 1 always fails.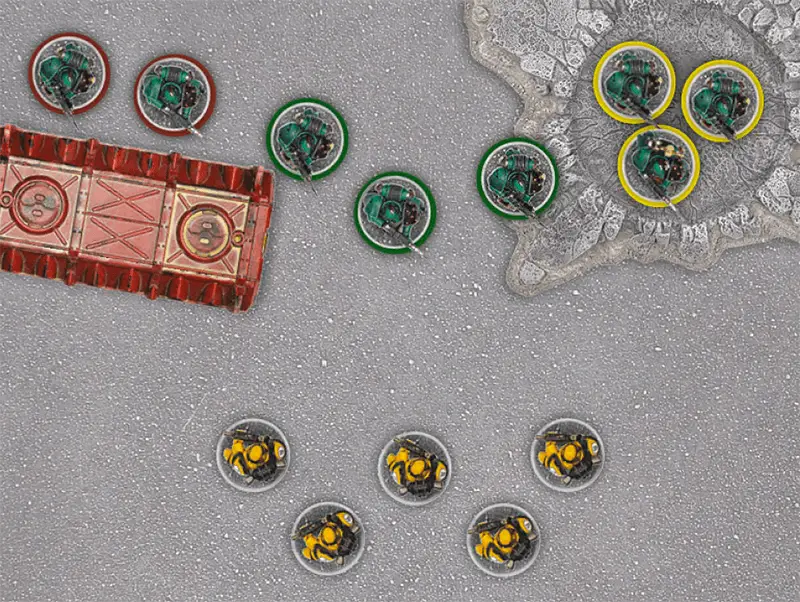 Units in CoverThe Imperial Fists Legion Tactical Squad is making a Shooting Attack targeting the Sons of Horus unit. The Sons of Horus unit is spread out, with some models obscured by a Terrain Piece, some in Area Terrain and others in the open. The two red-circled Sons of Horus are obscured by the piece of terrain in front of them and as such cannot have Wounds allocated to them, the three yellow-circled Sons of Horus are not obscured, but occupy Area Terrain that provides a Cover Save. Finally, the three green-circled Sons of Horus are in the open and receive no protection of any kind from terrain. | ||
Weapons
The Age of Darkness saw the use of a vast arsenal of weapons, from the ubiquitous boltgun to such ancient terrors as phosphex dischargers and even the psychic powers of the few remaining Librarians. This section describes how these various types of weapons work in Horus Heresy – Age of Darkness.Weapon ProfilesEvery weapon has a profile. Below are two examples:
| ||||||||||||||||||
Range
If the weapon’s range contains a ‘-’, it is (unless otherwise stated) a Melee weapon, it may also state ‘Melee’ as its range. If it contains a number, or ‘Template’ or ‘Hellstorm’, it is a Ranged weapon. The number given here is the range measured in inches. If it has two numbers, the first is its Minimum Range and the second is its Maximum Range. If the weapon’s range is given as ‘Template’ or ‘Hellstorm’, then it uses a teardrop-shaped template (see Template Weapons).Strength
If the weapon’s Strength is ‘User’, then attacks made with that weapon are resolved at the wielder’s Strength value.If the weapon has a fixed Strength, i.e., a number between 1 and 10, this is the Strength of attacks made with that weapon.
If the weapon confers a Strength bonus, the Strength of the weapon’s attacks is equal to that of the user after any such modifiers have been applied.
Armour Piercing (AP)
This value represents how effectively the weapon can punch through armour. The lower the number, the better the weapon is at piercing armour, cancelling the target’s Armour Save. See rules for Armour Saves and Armour Piercing Weapons.Type
A Ranged weapon always has one of the following types: Assault, Bomb, Heavy, Ordnance, Pistol, Destroyer, or Rapid Fire. These rules measure a weapon’s portability and affect the way they can be fired, depending on whether or not the model equipped with them moved that turn. A Ranged weapon can only be used to make Shooting Attacks.Melee TypeWeapons with the Melee type can only be used in close combat. | ||
Number of Shots
Some Ranged weapons fire multiple shots. Where this is the case, the number of shots a weapon fires is noted after its type. If a model fires a weapon with multiple shots, it must fire all shots from that weapon – for example, it could not decide to fire only two shots from its Heavy 4 weapon.Some weapons can be used in different ways, representing different power settings or types of ammo. Some weapons can be used in melee combat as well as shooting. Where this is the case, there will be a separate line in the weapon’s profile for each, and you can choose which to use each phase.
If a weapon has D6, D3 or another randomly determined number of shots, roll the appropriate dice to work out how many shots are fired each time the model shoots.
Special Rules
The Type section of a weapon’s profile also includes any special rules that apply to the weapon in question. More information on these can be found either in the Special Rules section or in the Army List or Army List entry the weapon is found in.More than One Weapon
Unless otherwise stated, if a model has more than one Ranged weapon, they must choose which one to shoot – they cannot fire both in the same Shooting phase. If a model has more than one Melee weapon, they must choose which one to attack with in the Assault phase. However, if a model has two or more Melee weapons, they gain +1 Attack when making melee attacks during the Fight sub-phase.Assault Weapons
Assault weapons either fire so rapidly or indiscriminately that they can be fired while a warrior is moving.
A model attacking with an Assault weapon makes the number of Attacks indicated on its profile regardless of whether the bearer has moved or not. A model carrying an Assault weapon can make a Shooting Attack with it in the Shooting phase and still Charge in the Assault phase.
|
Heavy Weapons
These are heavy, man-portable weapons that typically require reloading between each shot or bracing to counter their recoil.
When making a Shooting Attack, a model with a Heavy weapon attacks the number of times indicated. If a model equipped with a Heavy weapon moved in the preceding Movement phase, they can only make Snap Shots with that Heavy weapon during the Shooting phase. Note that weapons with the Blast special rule cannot fire Snap Shots. Models that make Shooting Attacks with Heavy weapons in the Shooting phase cannot Charge in the ensuing Assault phase.
|
Ordnance Weapons
Ordnance weapons are cannon so vast, they are typically mounted on tanks and artillery.
When making Shooting Attacks, a model equipped with an Ordnance weapon fires the number of times indicated in its profile after its Type. A non-Vehicle model carrying an Ordnance weapon cannot attack with it in the Shooting phase if they moved in the preceding Movement phase. Ordnance weapons cannot make Snap Shots. Furthermore, if a non-Vehicle model attacks with an Ordnance weapon, that model may not make any further Shooting Attacks with any other weapon in the Phase nor will it be able to Charge in the ensuing Assault phase. Vehicle models that fire Ordnance weapons may also suffer some restrictions based upon the distance they have moved that turn.Ordnance weapons hit with such force that when you roll to penetrate a Vehicle’s armour with an Ordnance weapon, roll two dice instead of one and pick the highest result.
|
Pistol Weapons
Pistols are light enough to be carried and fired one-handed.
A model attacking with a Pistol weapon makes the number of Attacks indicated on its profile regardless of whether the bearer has moved or not. A model carrying a Pistol weapon can make a Shooting Attack with it in the Shooting phase and still Charge in the Assault phase. A Pistol weapon also counts as a close combat weapon in the Assault phase. In addition, all models with two Pistol type weapons can attack with both in the same Shooting phase. This follows the normal rules for shooting.
|
Rapid Fire Weapons
Rapid Fire weapons are very common and usually come in the form of semi-automatic rifles. Their versatility means they can be fired as effectively when a squad is advancing as when taking single, long-ranged shots.
A model armed with a Rapid Fire weapon can make two attacks at a target up to half the weapon’s Maximum Range away. Alternatively, it can instead make one attack at a target over half the weapon’s range away, up to the weapon’s Maximum Range.If a unit attacking with Rapid Fire weapons is found to be partially within half range of the target, the firing models within half range make two attacks, while those further away make one attack.
Models that attack with Rapid Fire weapons in the Shooting phase cannot Charge in the ensuing Assault phase.
|
Bombs
Bombs are high explosive or incredibly powerful munitions that are dropped by aircraft as they fly over the battlefield.
Bombs are weapon types unique to Flyers. All Bombs have the One Use special rule. Unlike other weapons, Bombs must be used in the Movement phase of their turn in a special kind of attack called a Bombing Run. A model can only attack with one Bomb type weapon in its Movement phase. If a model attacks with a Bomb type weapon, it counts as having already attacked with one weapon in its ensuing Shooting phase. However, any additional weapons it fires that turn can choose a different target to that of the Bomb.Bombing Runs
To make a Bombing Run, a Flyer must be Zooming. Move the model that is making the Bombing Run, and then nominate one model that it passed over. Place the Blast marker for the Bomb so that the central hole on the marker is over the target model, and roll a Scatter dice. If a Hit is rolled, the attack is on target and the marker is not moved. If an arrow is rolled, move the marker D6" in that direction. Once the final position has been determined, resolve the effects as described in the Bomb’s profile.
|
Destroyer
Mounted only on the largest and most fearsome of war machines, Destroyer class weapons are capable of annihilating smaller targets and tearing through even the thickest armour with ease.
A model making a Shooting Attack with a Destroyer weapon attacks the number of times indicated on the weapon’s profile whether or not the bearer has moved. A model carrying a Destroyer weapon can attack with it in the Shooting phase and still Charge in the Assault phase. In addition, when you roll for armour penetration with Hits caused by a Destroyer weapon, roll three dice instead of one and discard the single lowest dice rolled, or any one of the lowest dice in the case of tied results. Use the total of the remaining dice to determine the result.In addition, when a Destroyer weapon inflicts a Glancing Hit or a Penetrating Hit, it inflicts D3 Hull Points of Damage instead of a single Hull Point. When a Destroyer weapon inflicts a Wound on a non-Vehicle model, it inflicts D3 Wounds instead of a single Wound.
|
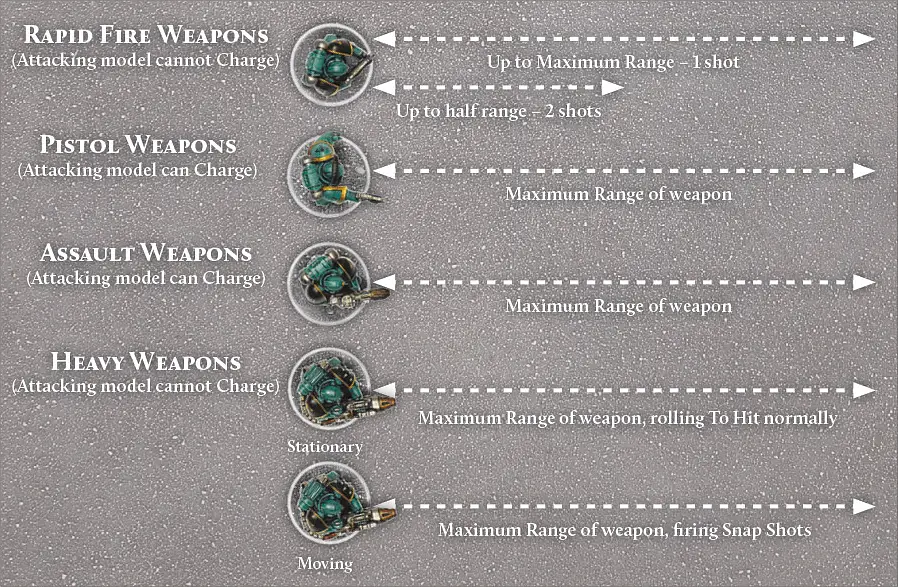 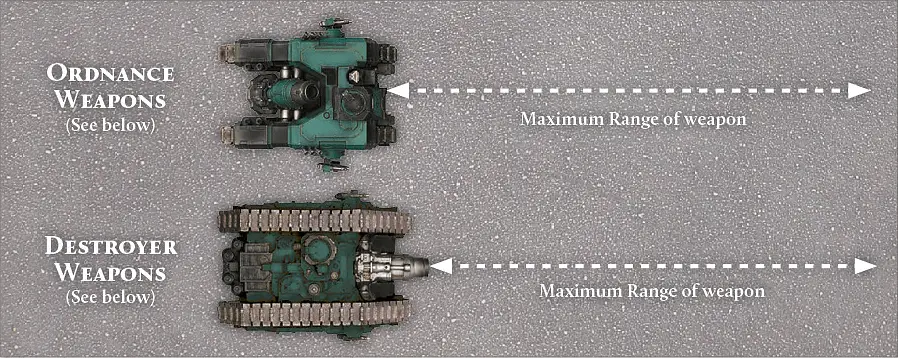 A model using a Rapid Fire weapon can shoot once at Maximum Range. Alternatively, if the target is within half the Maximum Range, it can fire twice. A Pistol weapon can always shoot the number of times indicated and up to its Maximum Range, regardless of whether the firer moved or not. An Assault weapon can always shoot the number of times indicated and up to its Maximum Range, regardless of whether the firer moved or not. If a model with a Heavy weapon remains Stationary, it can fire the number of times indicated (at its normal Ballistic Skill) up to the Maximum Range of the weapon. If the firer moved, it can only fire Snap Shots with its Heavy weapon. If a model with an Ordnance weapon remains stationary, it can make the full number of attacks listed on the weapon profile, up to the maximum range of the weapon. If the attacking model moved, it may not attack with an Ordnance weapon (Models with the Vehicle Unit Type are an exception to this rule). A model making a Shooting Attack with a Destroyer weapon attacks the number of times indicated on the weapon’s profile whether or not the bearer has moved, up to the Maximum Range of the weapon. | ||
THE ASSAULT PHASE
While firepower alone may be enough to drive an enemy back from open ground or lightly-held positions, shifting a determined foe from a fortified bunker or ruined settlement will need more direct measures. In an Assault, troops storm forwards into a furious close combat, screaming their battle cries, eager to strike at their foes with shrieking chainswords and blades wreathed in searing power fields.Assault Phase Summary
The Assault phase is split into two sub-phases: the Charge sub-phase and Fight sub-phase.Charge Sub-phase
In the Charge sub-phase, the Active player declares Charges and moves models under their control into close combat. Close combat is where two units from opposing armies are in base contact with each other. If there are more than two units, it is called a multiple combat.- Declare Charge.
- Roll Charge Distance (2D6" unless otherwise stated).
- Charge Move.
- Declare Next Charge or Finish Charge sub-phase.
Fight Sub-phase
The Fight sub-phase is when models from both sides make their Melee Attacks.- Choose a Combat.
- Fight Close Combat.
- Determine Assault Results.
- Choose Next Combat or Finish Assault phase.
ChallengesDuring the Fight sub-phase, as units resolve their individual combats, Character models can issue Challenges to other Character models. These result in one-on-one duels that are referred to within these rules as Challenges. Full rules for issuing and resolving Challenges can be found here. | ||
Charge Sub-phase
In this sub-phase, warriors hurl themselves into close combat and carry the day through bitter melee. The Active player may declare that any of their units will attempt a Charge if it is within range of an enemy unit.To resolve a Charge, use the following procedure:
- First, pick one of your units and declare which enemy unit that is within its Maximum Charge Distance it wishes to Charge.
- Roll the Charge Distance for the unit and, if it is in range, move it into contact with the enemy unit – this is sometimes called ‘launching an Assault’.
- Once this has been done, you can either choose to declare a Charge with another unit, or make no further Charges this turn and proceed to the Fight sub-phase.
Maximum Charge DistanceA unit’s Maximum Charge Distance is always 12", regardless of the unit’s Movement Characteristic or Unit Type. No unit may declare a Charge against an enemy unit that is at a distance greater than its Maximum Charge Distance. | ||
Declare Charge
Choose a unit in your army that is declaring a Charge and nominate the enemy unit(s) it is attempting to Charge. A unit can never declare a Charge against a unit that is outside of its Maximum Charge Distance, nor can it declare a Charge against a unit it cannot draw a valid line of sight to, though it is allowed to Charge an enemy unit it is impossible for it to harm.Some units may not Charge due to specific circumstances. Common reasons that a unit is not allowed to declare a Charge include:
- The unit has already Charged in this Phase and is now locked in combat.
- The unit has been Pinned.
- The unit attacked with Rapid Fire weapons, Ordnance weapons or Heavy weapons in the Shooting phase. This even applies if Snap Shots were made with these weapons, but not if the unit attacked as part of a Reaction.
- The unit is Falling Back.
- In addition to the list above, a unit that has made a Shooting Attack in the Shooting phase can only Charge a unit that it targeted during that turn’s Shooting phase.
Roll Charge Distance
|
Other factors may also impose a modifier on the Charge Distance of a unit, the most common of these being terrain features and Area Terrain. As an example, units that declare a Charge into, out of or through an area of Difficult Terrain apply a -2 modifier to their Charge Distance.
If any model in the target enemy unit is within the rolled Charge Distance, then the Charge is considered to be successful. The controlling player should now make a Charge Move.
If no model in the target enemy unit is within the Charging unit’s rolled Charge Distance then the Charge is considered to have failed, and a Surge Move is made.
Once the Charge Roll is resolved and the Charge declared a failure or a success, the Active player may choose to attempt a Charge with a different unit or move on to the Fight sub-phase.
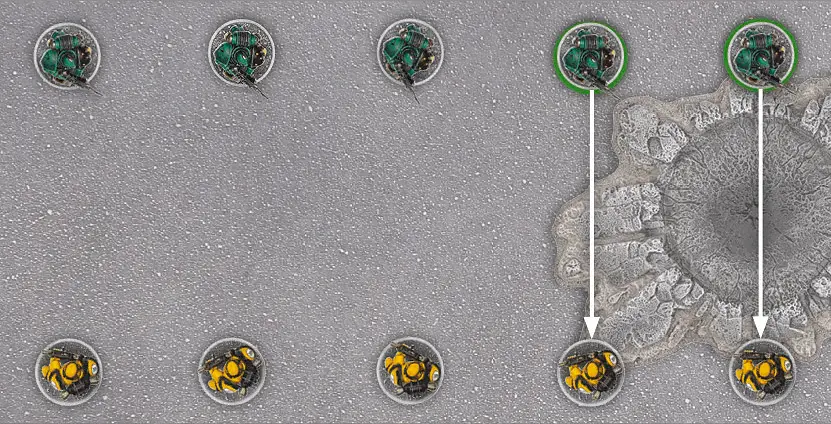 Charging Through Difficult TerrainThe Sons of Horus Legion Tactical Squad has declared a Charge against an Imperial Fists Legion Tactical Squad. The Sons of Horus player chooses to move each of the models under their control into base contact with the enemy model directly in front of them, which means that two of the models, circled in green, will move through the Crater area terrain. This means that the entire unit will be treated as if it had Charged through Difficult Terrain – subtracting -2 from their Charge Distance and reducing their Initiative in the following combat, should the Charge be successful.Depending on the results of the Charge Distance roll, it may be possible for the Sons of Horus player to avoid these penalties by having the models under their control move into base contact with a different enemy model in the same unit, by a longer path that avoids the Area Terrain – as long as all models in the Charging unit end their move as close as possible to an enemy model and within unit coherency. | ||
Charge Move
If the Charging unit’s Charge is considered successful, it must move as many models as possible into contact with the target unit. This is referred to as a Charge Move.Moving Charging Models
Charging units must move at least one model from the Charging unit into base contact with a model from the target unit, with all other models moving as far as possible towards the target unit. All of the models in a Charging unit make their Charge Move – up to the distance determined by the Charge Roll – following the same rules as in the Movement phase, with the exception that they can be moved within 1" of enemy models. Charging models still cannot move through friendly or enemy models, and cannot move into base contact with enemy models from a unit they are not Charging unless doing so is the only way to contact an enemy model in the target unit or maintain coherency with the remainder of their unit.Move Initial Charger
Start each Charge by moving the initial Charger from the Charging unit. The initial Charger is always the model nearest to the enemy (as measured by the shortest possible route, going around Impassable Terrain, friendly models and enemy models in other units).Once the initial Charger has been determined, move that model into contact with the nearest enemy model in the unit being Charged, using the shortest possible route. Roll for Dangerous Terrain if necessary, and if the model is removed as a casualty by a Dangerous Terrain test, choose another initial Charger and try again.
The initial Charger may not move into base contact with an enemy model from a unit other than the one upon which the Charge was declared, unless it is impossible for the initial Charger to contact an enemy model from the target unit without also contacting an enemy model from another unit.
After moving the first model in the unit, you can move the others in any sequence you desire, moving each Charging model as close to an enemy model in the target unit as possible. However, a Charging model must end its Charge Move in unit coherency with another model from the same unit that has already moved. If it is not possible for a Charging model to move and maintain unit coherency, move it as close as possible to another model in its own unit that has already moved instead. No Charging model may move into base contact with an enemy model from a unit other than the one upon which the Charge was declared, unless it is impossible for that model to contact an enemy model from the target unit or retain coherency with its own unit without also contacting an enemy model from another unit.
Following this sequence will bring all the models in the charging units into unit coherency, having engaged as many enemy models as possible with as many Charging models as possible. The two units are now locked in combat.
If, for any reason, no models in the Charging unit end their Charge Move in base contact with an enemy model then the Charge is considered to have failed and the units are not locked in combat.
Charging Units that are Pinned
If all of the enemy units Charged have been Pinned, the Initiative penalty for Charging through Difficult Terrain does not apply, and the unit Charging through Difficult Terrain fights at its normal Initiative. Note that once a Charge has been successfully resolved against a Pinned unit, the Pinned unit is no longer Pinned and fights as normal in the ensuing Fight sub-phase.Declare Next Charge
Once all models in a Charging unit have moved, the Active player can choose another unit and declare another Charge if they wish.Ending the Charge Sub-phase
Once the Active player has launched all of the Charges they wish to, the Charge sub-phase is ended. Move on to the Fight sub-phase.Disordered ChargeIn certain situations, a Charge may be deemed to be Disordered. The most common occurrence of this is when a Charging unit contacts more than one enemy unit, or when a special rule or item of Wargear dictates that a Charge is Disordered. A unit making a Disordered Charge does not gain the +1 Charge Bonus to its number of Attacks usually gained from a Charge, or any other bonus granted by special rules that require the unit or model to have successfully Charged an enemy unit. | ||
Surge Move
If the Charging unit’s Charge is considered to have failed, it must move every model in the Charging unit towards the target of its failed Charge a number of inches equal to half their rolled Charge Distance. This is referred to as a Surge Move. If the Charge has failed because no targets of the Charge remain on the battlefield, no Surge Move is made.Making a Surge Move
All of the models in a unit making a Surge Move must move towards the unit that was the target of the failed Charge. The distance moved is equal to half the value of the Charge Roll (including any modifiers) made for the unit, and is known as the Surge Distance.For example, a unit that rolls a 5 for its Charge Roll, and adds +2 to this as a Charge Distance modifier due to its Movement Characteristic, has a total Charge Distance of 7. In this case, as there is no enemy model from the target unit within this distance, the Charging unit’s Charge fails and a Surge Move must be made. The Surge Distance is half of the rolled Charge Distance, in this case 4 (7 divided by 2 gives a result of 3.5, which is rounded up to 4, as per the standard rules for rounding numbers).
This move follows the same rules as in the Movement phase and models making a Surge Move cannot move through friendly or enemy models, and cannot move into base contact with enemy models.
To conduct a Surge Move, first move the model that is closest to the enemy unit that was the target of the failed Charge. This model must move in a direct line towards the closest model of the target unit, stopping only once it has moved the full Surge Distance or if moving further would bring it within 1" of an enemy model or Impassable Terrain. Roll for Dangerous Terrain if necessary, and if the model is removed as a casualty by a Dangerous Terrain test, choose another model and try again.
After moving the first model in the unit, you can move the others in any sequence you desire. However, each model must end its Surge Move in unit coherency with another model from the same unit that has already moved. If it is not possible for a model making a Surge Move to maintain unit coherency, move it as close as possible to another model from the same unit that has already moved instead. No model making a Surge Move may move within 1" of any enemy model.
Locked in CombatIf a unit has one or more models in base contact with an enemy model (for any reason), then it is locked in combat. The unit is considered to be locked in combat as soon as an enemy model is moved into base contact with any model in that unit and remains locked in combat until there are no enemy models remaining in base contact with any model that is part of that unit. Units that are locked in combat must attack and be attacked in the next Fight sub-phase, resolving the combat as per the standard rules. Units are no longer locked in combat if, at the end of any Phase, they no longer have any models in base contact with an enemy model.Units that are locked in combat cannot move in any other Phase or make Shooting Attacks for any reason. Similarly, models cannot choose to target units locked in combat with Shooting Attacks for any reason. Blast markers and templates cannot be deliberately placed such that they cover any models locked in combat, but they may end up there after scattering and will then cause Hits on any units or models they contact as normal. Units that are locked in combat do not take Morale checks or Pinning tests caused by Shooting Attacks, and cannot be Pinned. | ||
Fight Sub-phase
Once all Charges have been resolved, the Fight sub-phase takes place.Choose a Combat
There may be several separate assaults being fought at the same time in different parts of the battlefield. If this is the case, the Active player chooses the order in which to resolve the combats, completing each combat before moving on to the next one, and so on until all combats are resolved.Fight Close Combat
In close combat, both players’ models fight. Close combat attacks function in the same way as attacks made in the Shooting phase – each attack that hits has a chance to Wound. The Wounded model gets a chance to Save, and if it fails, is generally removed as a casualty. How many attacks are made and which models attack first is detailed later.Initiative Steps
In close combat, slow, lumbering opponents can often be dispatched quickly by faster and more agile warriors. To represent this, a model’s Initiative determines when they attack in close combat. Work through the Initiative values of the models in the combat from high to low. This means each combat will have ten Initiative steps, starting at Initiative 10 and down to Initiative 1. Rarely will all Initiative steps be used, so skip any that do not apply.Models make their attacks when their Initiative step is reached, assuming they haven’t already been removed as a casualty by a model with a higher Initiative. If both sides have models with the same Initiative, their attacks are made simultaneously. Note that certain situations, abilities and weapons can modify a model’s Initiative.
Start of Initiative Step Pile-in
At the start of each Initiative step, any model whose Initiative is equal to the value of the current Initiative step that is not in base contact with an enemy model may make a Pile-in Move.Models that Charged through Difficult Terrain Pile-in at Initiative step 1. In addition, models that are using a weapon which modifies the Initiative step in which they fight will Pile-in at the modified Initiative step. If a model can attack in several Initiative steps, it only Piles-in at the highest of these steps.
Pile-in MovesA Pile-in Move is a 3" move that is made by any models that are not in base contact with one or more enemy models. Models that are Piling-in must attempt to get as close as possible to one or more of the enemy units locked in this combat.Pile-in Moves follow the same rules as Charge Moves, except that they are not slowed by Difficult Terrain (though Dangerous Terrain will still trigger Dangerous Terrain tests). In addition, a Pile-in Move cannot be used to move into base contact with any units that are not already involved in the combat. When making Pile-in Moves, the Active player moves their unit(s) first. If both players’ Pile-in Moves combined would be insufficient to bring any combatants into base contact, the combat is considered to have ended. | ||
Determine who can Fight
Any model whose Initiative is equal to the value of the current Initiative step and who is engaged with an enemy model must fight.A model is engaged in combat if either:
- That model is in base contact with an enemy model.
- That model is in unit coherency with another model from its own unit which is in base contact with an enemy model.
Unengaged Models
Unengaged models cannot attack in close combat.Number of Attacks
Each engaged model makes a number of Attacks (A) as indicated on its Characteristics profile, plus the following bonus attacks:+1 Charge Bonus: Engaged models that Charged this turn get +1 Attack this turn. Models in units that made a Disordered Charge do not get this bonus.
+1 Two Weapons: Engaged models with two single-handed weapons (often a Melee weapon and/or Pistol in each hand) get +1 Attack. Models with more than two weapons gain no additional benefit; you only get one extra attack.
Other Bonuses: Models may have other special rules and Wargear that confer extra attacks.
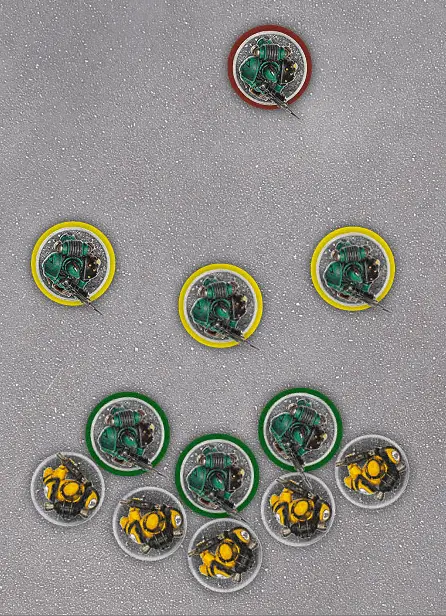 Who Can FightAn Imperial Fists unit is locked in combat with a Sons of Horus unit and the Sons of Horus player must determine which of the models under their control may attack. At this point, there are three Sons of Horus models in base to base contact with an enemy model (circled in green) – these models may attack. There are three Sons of Horus models that are not in base contact, but are in unit coherency with the green-circled models from their unit that are – these models (circled in yellow) may attack. Lastly, there is a single Sons of Horus model that is not in base contact with an enemy model and is also out of coherency with the rest of its unit – this model (circled in red) may not attack. | ||
Roll To HitOnce it has been determined which models must make attacks in a given Initiative step, the controlling player makes To Hit rolls for those models. To make a To Hit roll, roll a D6 for each attack a model gets to make and compare the WS of the attacking model to the WS of the target unit. Then, consult the To Hit chart below to find the minimum result needed on a D6 To Hit. As the chart below shows, if the target’s WS is half or less than that of the attacker’s, they are hit on a 2+; lower than the attacker’s but more than half, they are hit on 3+; if the target’s WS is equal to the attacker’s, they are hit on 4+; if it is higher but not twice the attacker’s, they are hit on 5+; and if it is twice or more than the attacker’s, then they are hit only on a 6+. UNITS WITH MULTIPLE WEAPON SKILLS Some units contain models with different Weapon Skills. Whilst each model in such a unit rolls To Hit using its own Weapon Skill, Attacks made against such a unit are resolved using the Weapon Skill of the majority of the engaged enemy models. If two or more Weapon Skill values are tied for majority, use the highest of those tied values. 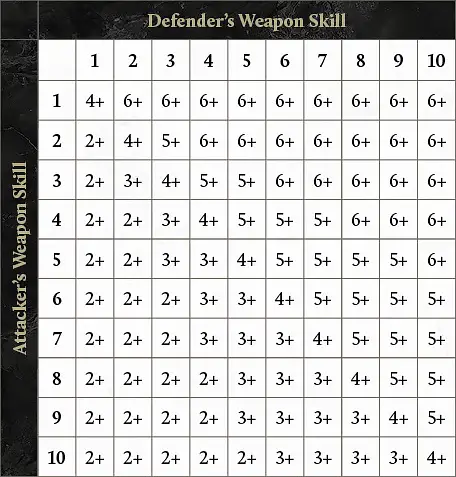 | ||
Roll To WoundOnce all To Hit rolls have been made in a given Initiative Step, the controlling player must roll a D6 for each successful hit to see if the attack causes a Wound. Consult the chart below, cross-referencing the attacker’s Strength Characteristic with the defender’s Toughness Characteristic. The chart indicates the minimum result on a D6 roll required to inflict a Wound, and is the same chart as is used during the Shooting phase. A ‘-’ indicates that the target cannot be wounded by the attack. In most cases, when rolling To Wound in close combat, you use the Strength on the attacker’s profile regardless of what weapon they are using. However, there are some Melee weapons that give the attacker a Strength bonus, and this is explained previously in the Weapons section. MULTIPLE TOUGHNESS VALUES Rarely, a unit will contain models that have different Toughness Characteristics. When this occurs, roll To Wound using the Toughness value of the majority of the engaged unit. If two or more Toughness values are tied for majority, use the highest of those tied values. | ||
The Wound Pool
Finally, total up the number of Wounds you have caused during that Initiative step. Keep the dice that have scored Wounds and create a ‘pool’, where each dice represents a Wound.If there are Wounds with different Strengths, AP values or special rules that affect Saving Throws or the effect of any Wounds they inflict, split them into several pools of Wounds. All Wounds with exactly the same Strength, AP value and special rules must go into the same pool. If all the Wounds are the same, there will be only one Wound Pool.
Allocate Wounds and Remove Casualties
To determine how many casualties are caused at a particular Initiative step, the Wounds caused must be allocated and any Saving Throws taken. If several pools of Wounds need to be allocated, the player controlling the target unit must decide in which order they are allocated. All Wounds from a single pool must be allocated before moving on to the next pool of Wounds using the following procedure.Allocate Wounds
First, the player whose unit is the target of the attack selects any one model in the unit that is engaged with the enemy unit whose attacks are being resolved.If any model in the target unit has already lost one or more Wounds, but has not been removed as a casualty then the Wound must always be allocated to such a model, unless that model also has the Character sub-type.
If, when allocating Wounds to a unit they control, a player has a number of multi-Wound models that have all lost one or more Wounds and could potentially be allocated more Wounds, then any Wounds must be allocated first to the model with the fewest Wounds remaining. If all models have an equal number of Wounds remaining then the controlling player may freely select which eligible model is allocated any further Wounds.
No Models Engaged in CombatIf at any point while allocating Wounds, there is no model in the target unit that is engaged in combat with the attacking unit then all remaining Wounds in the Wound Pool are lost. | ||
Take Saves and Remove Casualties
The selected model can make a Saving Throw and a Damage Mitigation roll – if that model has any available. If the Save is failed, reduce that model’s Wounds by 1. If the model is reduced to 0 Wounds, it is removed as a casualty, otherwise continue allocating Wounds to the selected model until it is removed as a casualty or the Wound Pool is empty.If the selected model is removed as a casualty and the Wound Pool is not empty, then the player whose unit was the target of the attack selects another model in the target unit and allocates the next Wound to that model.
Continue allocating Wounds in this fashion, taking Saves and removing casualties until the Wound Pool is empty or all models in the target unit have been removed as casualties.
Armour Saving Throws
Models can take Armour Saves to prevent Wounds caused in close combat. As in the Shooting phase, if the Wound is caused by a weapon with an AP that ignores the wounded model’s Armour Save, then the Save cannot be taken.Multiple Armour Saves
Rarely, a unit will contain models with differing Armour Save Characteristics. Simply use the Armour Saves of any model to which a Wound is allocated, if that model has more than one Save available, the controlling player may choose to use any one of those Saves.Invulnerable Saves
Some models may have Invulnerable Saves in addition to Armour Saves, and the controlling player may choose to use the Invulnerable Save instead of an Armour Save whenever a Wound is allocated to such a model. It can even be made if a model is not permitted to make an Armour Save (because the AP of the attack negates it or the rules for a weapon or attack state that no Armour Save is allowed).Damage Mitigation Rolls
Some models may also have a special rule that grants a Damage Mitigation roll, such as Feel No Pain or Shrouded. These rolls may be made even if a model has already failed a Save of any kind. If a Save is failed, a model with a Damage Mitigation roll may attempt to use that roll to negate an unsaved Wound. However, no model may attempt more than a single Damage Mitigation roll against any given unsaved Wound inflictedon it. In cases where a model has more than one Damage Mitigation roll available, the controlling player selects one to use whenever called upon to make a Damage Mitigation roll. Note that some types of Damage Mitigation roll may not be taken during an assault, like Shrouded rolls – in all cases the special rule that grants the Damage Mitigation roll will specify when it may be used.Dead before Striking
If a model is removed as a casualty before its Initiative step, it cannot strike back. When striking blows simultaneously, it may be convenient to resolve one side’s attacks and simply turn the dead models around to remind you that they have yet to strike back.Fight next Initiative Step
Fight the next Initiative step as previously described until all of the Initiative steps have been completed. Note that some Initiative steps may be skipped if there are no models to fight at that step.Determine Assault Results
To decide who has won the combat, total up the number of unsaved Wounds inflicted by each side on their opponents. This includes all Wounds caused during the Fight sub-phase, whether from normal attacks, the Hammer of Wrath special rule, or other factors.Do not include Wounds caused in the Charge sub-phase,such as those from Reactions, failed Dangerous Terrain tests, etc.
The side that inflicted the most unsaved Wounds is the winner. The losing unit must make a Morale check and must Fall Back if it fails. If both sides suffer the same number of Wounds, the combat is drawn and continues next turn. If one side destroys the enemy completely, it wins the combat automatically, even if it sustained more casualties than the other unit.
Wounds that have been negated by Saving Throws or special rules do not count towards determining who won the combat. Neither do Wounds in excess of a model’s Wounds Characteristic; only the Wounds actually suffered by enemy models count (including all of the Wounds lost by models that have suffered Instant Death). In rare cases, certain models can cause Wounds on themselves or their allies – these Wounds are added to the other side’s total for working out who has won.
Check Morale
Units that lose a close combat must make a Morale check to hold their ground, with a penalty based on how many Wounds are inflicted upon that unit.If they pass, the unit fights on – the combat is effectively drawn and the unit remains locked in combat.
If the unit fails, they must Fall Back. Morale checks and Falling Back are covered in the Morale section.
Our Weapons are UselessIf a unit is locked in combat with an enemy it cannot hurt, it can choose to automatically fail its Morale check for losing a combat. | ||
Sweeping Advances
When a unit Falls Back from combat, the victors can make a Sweeping Advance, attempting to cut down the enemy as they flee.When a Sweeping Advance is performed, both the unit Falling Back and the winning unit roll a D6 and add their unmodified Initiative to the result. In a unit with mixed Initiative Characteristics, use the highest Characteristic. The units then compare their totals.
If the winner’s total (Initiative + dice roll) is greater than their opponents’, the Falling Back unit is caught by the Sweeping Advance and destroyed. All models in the destroyed unit are immediately removed as casualties. Unless otherwise specified, no Save or other special rule can prevent the unit from being destroyed.
If the Falling Back unit’s total is higher, or the final result is a tie, they break off from the combat successfully. Make a Falls Back move for the losing unit. The winners can then Consolidate.
Disallowed Sweeping Advances
If a victorious unit is still locked in combat with other units that are not Falling Back, it does not get a chance to execute a Sweeping Advance and the retreating enemy automatically makes their Fall Back move safely.Some units, as detailed in their special rules, are not permitted to make Sweeping Advances – when a victorious unit contains one or more models that are not allowed to make a Sweeping Advance, the enemy always manages to disengage safely – there is no need to roll.
End of Combat Pile-in
After the combat has been resolved, it can happen that some models from units that did not Fall Back are not in base contact with an enemy. These models must make a Pile-in Move, starting with the side whose turn it is.Consolidation
At the end of a combat, if a unit’s opponents are all either destroyed or Falling Back, or the end of combat Pile-in was insufficient so that it is no longer locked in combat, that unit may Consolidate. Consolidating units move up to a number of inches equal to their Initiative Characteristic in any direction. In a unit with mixed Initiative Characteristics, use the highest Characteristic.Units making a Consolidation move are not slowed by Difficult Terrain but do trigger Dangerous Terrain tests where appropriate. A Consolidation move cannot be used to move into base contact with any enemy models.
Consolidating models must stop at least 1" away from all enemy models, including any that have just Fallen Back from the combat that the Consolidating unit has fought in.
Multiple Combats
Combats that involve more than two units are called multiple combats. These occur when one unit Charges two or more enemy units, or when a unit Charges into an ongoing combat. Because of the extra complexity, they need some additional rules.Charge Sub-phase
Sometimes it may be advantageous for a unit to Charge two or more enemy units – this works as follows:Declare Charge
A multiple Charge declaration is split into two different categories: the Primary Target and Secondary Targets.
Primary and Secondary Targets
The Primary Target is the charging unit’s main target. If the Charging unit made a Shooting Attack in the Shooting phase, it can only declare a Charge if its Primary Target is the unit it targeted.
Secondary Targets are other targets of opportunity that the charging unit can engage at the same time as the Primary Target. Remember that a unit cannot declare a Charge against a unit it cannot reach or cannot see, and all targets being Charged by the unit must be declared at the same time.
Disordered Charge
If a unit declares that it is charging multiple units, its Charge is disordered. A unit making a disordered Charge does not gain the +1 Charge Bonus to its number of attacks usually gained from a Charge, even if after its Charge Move it has no models in base contact with the Secondary Target.
Determine Charge Distance
Roll your Charge Distance as you would for a normal Charge.
Charge Move
As there are now Primary and Secondary Targets, resolving Charge Moves needs more clarification.
Move Initial Charger
The initial Charger for the Primary Assault (the model in the Charging unit closest to the Primary Target) must attempt to move it into base contact with a model from the Primary Target, just as you would against a single target. If their Charge fails, the Charging unit doesn’t move at all.If the initial Charger successfully moves into base contact with the Primary Target, remaining models can Charge models belonging to either the Primary or Secondary Target units, as long as they follow the rules for moving Charging models. Remember that the Charging unit is not allowed to break its unit coherency, which will limit the potential for this kind of Charge.
Difficult Terrain and Ongoing Combats
If a unit Charges into a multiple combat in which all the enemy units are locked in combat from a previous turn, the Initiative penalty for charging through Difficult Terrain does not apply. In this case, the enemy warriors are not set to receive the Charge, and the unit Charging through Difficult Terrain fights at its normal Initiative.Fight Sub-phase
Resolving the Fight sub-phase of a multiple combat is done just as it is for a combat between two units, except for the following clarifications and adjustments.Multiple Combats and Pile-in Moves
As with regular combats, models make Pile-in Moves at their Initiative Step and at the end of combat. The Active player always makes their Pile-in Moves first, but may move models eligible to Pile-in in an order of their choice, and once all of the Active player’s models from all units involved in the combat have been moved, the Reactive player may make any Pile-in Moves. A unit that has conducted a multiple Charge makes Pile-in Moves towards the nearest enemy model, regardless of whether that model is from the Primary or Secondary Target. If models from multiple units are equidistant, the controlling player chooses which unit the model will Pile-in towards.Directing Attacks
In multiple combats, during a model’s Initiative step, the following extra rules apply:A model that is in base contact with, or engaged with, just one enemy unit when it comes to strike must attack that unit.
A model that is in base contact with, or engaged with, more than one enemy unit when it strikes blows, can split its attacks freely between those units. Declare how each model is splitting its attacks immediately before rolling To Hit. Wounds from attacks that have been directed against a unit in a multiple combat cannot be transferred to another unit, even if the original target unit is completely destroyed (in this case, any excess Wounds are simply discounted and have no further effect).
Assault Results
When determining Assault results in a multiple combat, total the number of Wounds inflicted by all units on each side to see which side is the winner. Every unit on the losing side must make a Morale check – they all use the same penalty.After all of the losing units have taken Morale checks, each winning unit that is free to make a Sweeping Advance rolls a D6, without adding its Initiative score to the result, while each unit that is Falling back rolls a D6 and adds its Initiative to the result as per the normal rules for Sweeping Advances. Compare the result of each winning unit’s roll to that of each unit that is Falling Back. Any that it equals or beats are destroyed. Note that winning units can only make a Sweeping Advance if all of the units they were locked in combat with Fall Back or are wiped out in the fight.
All remaining units – those that fought in the multiple combat but aren’t Falling Back or making a Sweeping Advance – must make Pile-in Moves. If none of the unit’s models are in base contact with enemy models, and the combined Pile-in moves would be insufficient to bring them into contact with an enemy unit that is locked in that combat, it consolidates instead.
Multiple CombatsThe Sons of Horus unit has Charged the Imperial Fists Legion Tactical Squad and Imperial Fists Legion Cataphractii Terminator Squad. The Sons of Horus model labelled C can attack either of the two units it is in base contact with (or split its attacks). The Sons of Horus models labelled G and H can also have their attacks allocated to either enemy unit (or split those attacks) as both are within 2" of a friendly model that is in base contact with both units. The Sons of Horus models labelled A, B, D and E can only attack the unit they are in base contact with. The Sons of Horus model labelled F can only attack the Imperial Fists Legion Tactical Squad (as it is only within 2" of friendly models in base contact with that unit). 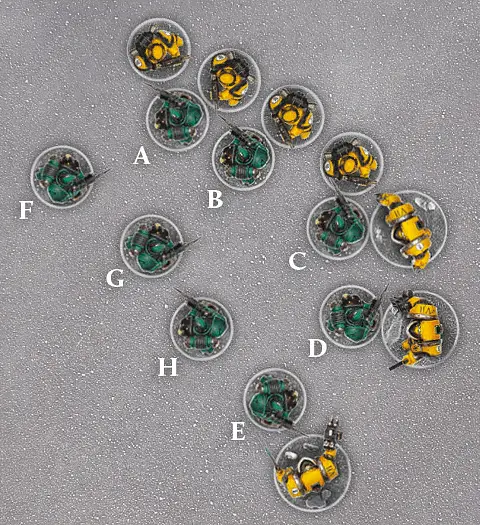 | ||
MORALE
It is a fortunate commander who can always rely on their troops to perform up to and beyond the limits of their courage. In the chaos and confusion of battle, troops can easily become demoralised, disoriented or simply terrified by the violence unleashed against them.Morale Checks
Morale represents the grit and determination of warriors on the battlefield. Morale checks are a specific kind of Leadership test.Similar to other Leadership-based tests, Morale checks (also sometimes referred to as Morale tests) are taken by rolling 2D6 and comparing the total to the unit’s Leadership value.
If the total is equal to or less than the unit’s Leadership Characteristic, the test is passed and the unit does not suffer any ill effects.
If the total is higher than their Leadership Characteristic, the test is failed and the unit will immediately Fall Back.
Some units have special rules pertaining to Morale checks that are detailed in their Army List or Army List entry. For example, some units might always pass Morale checks, while others might always pass all Leadership tests. This difference is subtle, yet important. A unit that always passes Morale checks still has to test when hit by an attack with the Pinning special rule, while a unit that always passes all Leadership tests wouldn’t.
Morale Check Modifiers
Certain circumstances can make Morale checks harder for a unit to pass. This is represented by applying Leadership modifiers to Morale checks, which can modify the unit’s Leadership value by -1, -2, or sometimes even more.Insane HeroismOccasionally, warriors will refuse to retreat even when faced with impossible odds. A roll of double 1 on the 2D6 always passes a Morale check, regardless of any modifiers. | ||
When to Test
The most common reasons a unit must take a Morale check are as follows:Casualties: A unit losing 25% or more of its current models during a single Phase must take a Morale check at the end of that Phase. As exceptions to this rule, units that lose 25% or more of their current models in the Assault phase or from any attack made as part of a Reaction, do not take Morale checks.
Losing an Assault: Units that lose a close combat (usually from suffering more Wounds than they inflicted) must pass a Morale check to hold their ground. If they fail, they must Fall Back. Units taking this Morale check suffer a -1 Ld modifier for each Wound their side has lost the combat by.
Fall Back
Units make a Fall Back Move immediately upon failing a Morale check – the only moves they can make in subsequent Phases are Fall Back Moves until they Regroup. In each subsequent Movement phase, they will make further Fall Back Moves instead of moving normally, until the unit Regroups, is destroyed or leaves the battlefield.Fall Back Moves are 2D6", unless a rule specifies otherwise. Fall Back Moves are not slowed by Difficult Terrain, but incur Dangerous Terrain tests as normal. Units with models that Fall Back at different speeds always Fall Back at the speed of the slowest model in the unit.
Each model in the unit moves directly towards their own battlefield edge by the shortest possible route.
If playing a mission where there is no ‘own’ battlefield edge, models move towards the closest battlefield edge instead.
If any model from a unit that is Falling Back moves into contact with a battlefield edge, the entire unit is removed from the game as casualties as it scatters and flees the battle.
Falling Back from Close Combat
Models Falling Back from a combat can freely move through all enemy models that were involved in that combat. This is an exception to the normal rules for moving that state a model cannot move through a space occupied by another model. If any models would end their move less than 1" from one of these enemy models, extend the Fall Back Move until they are clear.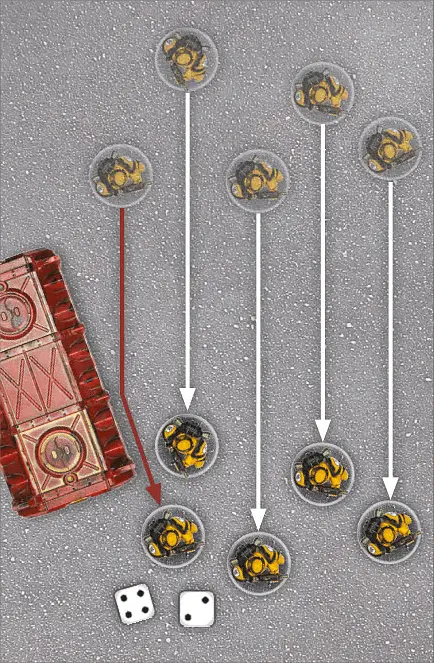 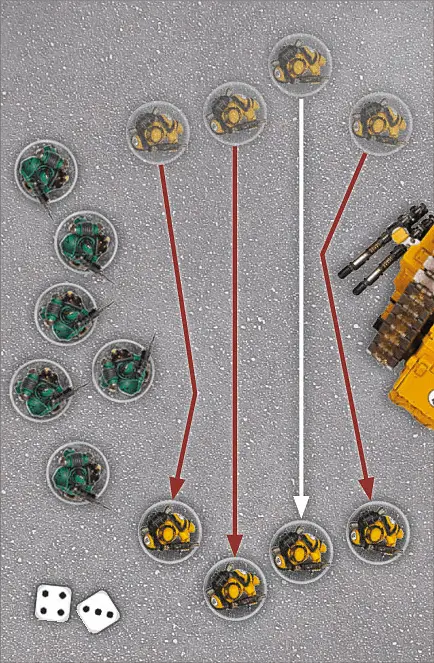 Falling BackThe player rolls a 6 on the 2D6 Fall Back Move, so each model is moved 6" directly towards their battlefield edge. The model on the far left has to go around Impassable Terrain. The Imperial Fists unit must move around the enemy Sons of Horus unit as it Falls Back, even if doing so forces them to end their move further from their battlefield edge than if they had moved directly. | ||
Falling Back and Terrain
Sometimes a unit finds its Fall Back Move blocked by Impassable Terrain, friendly models or enemy models. The unit may move around these obstructions in such a way as to get back to their battlefield edge by the shortest route, maintaining unit coherency, even if this means moving away from their battlefield edge. If the unit cannot perform a full Fall Back Move in any direction without doubling back, it is destroyed. | ||
Restrictions to Units that are Falling Back
- Units which are Falling Back can only fire Snap Shots.
- Units that are Falling Back may not make Reactions in any Phase.
- Units that are Falling Back cannot be Pinned and automatically pass Pinning tests.
- Units that are Falling Back automatically fail all Morale checks, but can Regroup.
- A unit that is Falling Back cannot Charge. If it is Charged, it must test to Regroup (see Regrouping when Assaulted).
Regrouping
A unit that is Falling Back must attempt to Regroup by taking a Leadership test in their Movement phase just before they move.If the unit fails this test, then it must immediately continue to Fall Back.
If the unit successfully passes the test, it stops Falling Back and can immediately move a number of inches equal to its Initiative. This move is unaffected by Difficult Terrain, but Dangerous Terrain tests must be taken as normal. If the unit is out of coherency when the Regroup test is made, then the move must be used to restore coherency, or as near as possible.
Once a unit has Regrouped, until the end of that player turn it cannot otherwise Move, Run or Charge in the Assault phase. However, it can make Shooting Attacks but until the end of that player turn counts as having moved and can only fire Snap Shots. A unit that has Regrouped may make Reactions as normal in subsequent player turns, including those that allow it to move.
Regrouping when Assaulted
Units that have Charges declared against them while Falling Back must always test to Regroup as soon as the enemy is found to be within Charge Distance.If the test is failed, the assaulted unit is removed as a casualty at the end of the Charge sub-phase, after all Charge moves have been completed.
If the test is successful, the unit Regroups without moving, and the Charge is resolved as per the normal rules for Charges. A unit that Regroups after having a Charge declared against them may make Reactions as normal.
Falling Back and Multiple Assaults
Sometimes, as part of a multiple assault, a Charging unit comes into contact with units that are Falling Back as well as one or more units that are not. If any units contacted as part of a Charge are Falling Back, each retreating unit must test to Regroup as soon as any one Charging model comes into contact with a model from that unit.If the test is successful, that unit Regroups (without moving) and the assault continues as normal. If the test is failed, the Falling Back unit is destroyed and the Charging model must continue its Charge Move against the original target of the Charge as if the Falling Back unit was never there.
To make a To Hit roll, roll a D6 for each attack a model gets to make and compare the WS of the attacking model to the WS of the target unit. Then, consult the To Hit chart below to find the minimum result needed on a D6 To Hit.
As the chart below shows, if the target’s WS is half or less than that of the attacker’s, they are hit on a 2+; lower than the attacker’s but more than half, they are hit on 3+; if the target’s WS is equal to the attacker’s, they are hit on 4+; if it is higher but not twice the attacker’s, they are hit on 5+; and if it is twice or more than the attacker’s, then they are hit only on a 6+.
UNITS WITH MULTIPLE WEAPON SKILLS
Some units contain models with different Weapon Skills. Whilst each model in such a unit rolls To Hit using its own Weapon Skill, Attacks made against such a unit are resolved using the Weapon Skill of the majority of the engaged enemy models. If two or more Weapon Skill values are tied for majority, use the highest of those tied values.
+1 Charge Bonus: Engaged models that Charged this turn get +1 Attack this turn. Models in units that made a Disordered Charge do not get this bonus.
+1 Two Weapons: Engaged models with two single-handed weapons (often a Melee weapon and/or Pistol in each hand) get +1 Attack. Models with more than two weapons gain no additional benefit; you only get one extra attack.
Other Bonuses: Models may have other special rules and Wargear that confer extra attacks.
Similar to other Leadership-based tests, Morale checks (also sometimes referred to as Morale tests) are taken by rolling 2D6 and comparing the total to the unit’s Leadership value.
If the total is equal to or less than the unit’s Leadership Characteristic, the test is passed and the unit does not suffer any ill effects.
If the total is higher than their Leadership Characteristic, the test is failed and the unit will immediately Fall Back.
Some units have special rules pertaining to Morale checks that are detailed in their Army List or Army List entry. For example, some units might always pass Morale checks, while others might always pass all Leadership tests. This difference is subtle, yet important. A unit that always passes Morale checks still has to test when hit by an attack with the Pinning special rule, while a unit that always passes all Leadership tests wouldn’t.
To take an Armour Save, roll a D6 and compare the result to the Armour Save Characteristic of the model that has been allocated the Wound. If the dice result is equal to or higher than the model’s Armour Save Characteristic, the Wound is negated. If the result is lower than the Armour Save Characteristic, the model suffers a Wound. This means that, unlike most Characteristics, an Armour Save is better if it is a lower number.
To take a Leadership test, use the following procedure:
- Roll 2D6 and compare the result to the model’s Leadership Characteristic.
- If the result is equal to or less than the model’s Leadership Characteristic, then the test has been passed.
- If the result is greater than the model’s Leadership Characteristic, the test has been failed and the model faces the consequences as detailed in the rule that prompted the test.
Invulnerable Saves are different to Armour Saves in that they may always be taken whenever the model suffers a Wound, or, in the case of Vehicles, suffers a Penetrating Hit or Glancing Hit – the Armour Piercing value of attacking weapons has no effect on an Invulnerable Save. Even if a Wound, Penetrating Hit or Glancing Hit ignores all Armour Saves, an Invulnerable Saving Throw can still be taken.
The source of the darkness around these warriors matters not – only a lucky shot has any chance of piercing the shroud that hides them from view.
When a model with this special rule suffers an unsaved Wound, Glancing Hit or Penetrating Hit, it can make a special Shrouded roll to ignore it (this is not a Saving Throw and so can be used against attacks that state that ‘no Saves of any kind are allowed’). Shrouded rolls may not be taken against Melee Attacks, against attacks with the Ignores Cover special rule or for models (excluding models with the Primarch Unit Type) with the Fearless special rule.Roll a D6 each time an unsaved Wound, Glancing Hit or Penetrating Hit is suffered by a model with this special rule. On a result that is equal to or greater than the value in brackets, that unsaved Wound, Glancing Hit or Penetrating Hit is ignored. On any other result, the Wound, Glancing Hit or Penetrating Hit is applied as normal. For example, a unit with the special rule Shrouded (6+) would need to score a 6 in order to ignore a Wound, Glancing Hit or Penetrating Hit inflicted upon it.
If on any unit this rule is presented simply as Shrouded, without a value in brackets, then count it as Shrouded (6+).
This is a Damage Mitigation roll – any model may make only a single Damage Mitigation roll of any type for any given Wound, Glancing Hit or Penetrating Hit.
Whether through force of will, bionic augmentation or foul sorcery, this warrior can still fight despite fearsome wounds.
When a model with this special rule suffers an unsaved Wound, it can make a special Feel No Pain roll to avoid being Wounded (this is a special Saving Throw which is made after unsaved Wounds are suffered).Feel No Pain rolls may not be taken against unsaved Wounds that have the Instant Death special rule.
Roll a D6 each time an unsaved Wound is suffered. On a result that is equal to or greater than the value in brackets, the unsaved Wound is discounted – treat it as having been saved. On any other result the Wound is taken as normal.
For example, a unit with the special rule Feel No Pain (5+) would need to score a 5 or 6 in order to discount a Wound inflicted upon it.
This is a Damage Mitigation roll – any model may make only a single Damage Mitigation roll of any type for any given Wound.
Blast weapons fire shells, missiles or packets of energy that explode on impact.
When firing a Blast weapon, models do not roll To Hit. Instead, pick one enemy model visible to the firer and place the Blast (3") marker with its hole entirely over the base of the target model, or its hull if the target is a Vehicle. The hole at the centre of the marker must be within the weapon’s Maximum Range. You cannot place the Blast marker so that the base or hull of any friendly model is even partially under it.The large area affected by the blast means it is going to be very hard to miss completely. Nonetheless, the shot might not land exactly where intended. Roll for the Blast marker to scatter and subtract the firer’s Ballistic Skill from the distance (if any) that it scatters, to a minimum of 0". Note that it is possible, and absolutely fine,for a shot to scatter beyond the weapon’s Maximum or Minimum Range and line of sight. This represents the chance of ricochets, the missile blasting through cover and other random events. In these cases, Hits are worked out as normal and can hit and Wound units out of range and line of sight (or even your own units, or models locked in combat). If the shot scatters so that the hole in the centre of the marker is beyond the battlefield’s edge, the shot is a complete miss and is discarded.
Once the final position of the Blast marker has been determined, take a good look at it from above – each unit suffers one Hit for each of the models included in that unit that is fully or partially beneath the Blast marker, even if those models are not within the firer’s line of sight.
Once the number of Hits inflicted on the unit has been worked out, roll To Wound and Save as normal. Note that, unlike other attacks, Wounds inflicted by an attack with the Blast special rule can be allocated to any models in the target unit, even if they are out of sight of any models from the attacking unit.
- Place the object on the battlefield as instructed by the rule.
- Roll a Scatter dice and 2D6 to determine the direction and distance of scatter in inches.
- If a Hit is rolled on the Scatter dice, the object does not move – leave it in place and resolve the remainder of the rule.
- If an arrow is rolled, move the object the distance shown on the 2D6 in the direction of the arrow. Ignore intervening terrain, units, etc, unless the rule states otherwise.
- Once the object has scattered to its final position, resolve its effects.
Scatter dice and other dice and accessories that you can use in your games of Horus Heresy – Age of Darkness can be purchased from the Games Workshop website.
Some weapons can inflict critical strikes against which no armour can protect.
If a model has the Rending special rule, or is attacking with a Melee weapon that has the Rending special rule, there is a chance that their close combat attacks will strike a critical blow. For each To Wound roll equal to or higher than the value listed, the target automatically suffers a Wound, regardless of its Toughness. The controlling player may choose to resolve these Wounds at AP 2 instead of the weapon’s normal AP value.Similarly, if a model makes a Shooting Attack with a weapon that has the Rending special rule, a To Wound roll of equal to or greater than the listed value wounds automatically, regardless of Toughness, and is resolved at AP 2.
In either case, against Vehicles each Armour Penetration roll of equal to or greater than the listed value allows a further D3 to be rolled, with the result added to the total Strength of the attack. These Hits are not resolved at AP 2, but are instead resolved using the weapon’s AP value.
For example, a model with the Rending (5+) special rule that rolls To Wound against a non-Vehicle model will wound automatically on the roll of a 5+, and the attacking player has the choice of using an AP value of 2 instead of the AP value of their weapon.
Some weapons are fuelled by unstable power sources and risk overheating with each shot – often to the detriment of their wielder.
When firing a weapon that Gets Hot, roll To Hit as normal. For each unmodified To Hit roll of 1, the firing model immediately suffers a single Wound with an AP value equal to that of the weapon that was used to attack (Armour Saves, Invulnerable Saves and Feel No Pain rolls can be taken, but not Cover Saves or Shrouded rolls) – this Wound cannot be allocated to any other model in the unit. A Vehicle instead rolls a D6 for each roll of a 1 To Hit. If this roll results in a 1 or 2, the Vehicle suffers a Glancing Hit.Fall Back Moves are 2D6", unless a rule specifies otherwise. Fall Back Moves are not slowed by Difficult Terrain, but incur Dangerous Terrain tests as normal. Units with models that Fall Back at different speeds always Fall Back at the speed of the slowest model in the unit.
Each model in the unit moves directly towards their own battlefield edge by the shortest possible route.
If playing a mission where there is no ‘own’ battlefield edge, models move towards the closest battlefield edge instead.
If any model from a unit that is Falling Back moves into contact with a battlefield edge, the entire unit is removed from the game as casualties as it scatters and flees the battle.
For one model to have line of sight to another, you must be able to trace a straight, unblocked line from its body (the head, torso, arms or legs) to any part of the target’s body.
Sometimes, all that will be visible of a model is a weapon, banner, or other ornament they are carrying. In these cases, the model is not visible. Similarly, mechanical appendages such as cables, probes and ammo feeds are ignored, even though they may be part of a model’s body. These rules are intended to ensure that models don’t get penalised for having impressive banners, weaponry, and so on.
In many cases, what a model can ‘see’ will be obvious – if there’s a hill, building or mechanical construct in the way, the enemy might be blatantly out of sight. In other cases, two units will be clearly in view of each other as there is nothing at all in the way.
On those other occasions, where it’s not entirely obvious whether or not one unit can see another, the player will have to stoop over the battlefield and look from behind the model’s head for a ‘model’s eye view’. This means getting down to the level of your models and checking the battlefield from their perspective to ‘see what they can see’. You will find that you can spot lurking enemies through the windows of ruined buildings, catch a glimpse of a model’s legs under tree branches and see that high vantage points become very useful for the increased line of sight that they offer.
A unit can only control one Objective marker at a time. If a unit moves into a position where it could control two Objective markers, the controlling player must make it clear to their opponent which Objective the unit is controlling.
For some missions, an Objective is defined as a certain area of the battlefield rather than an Objective marker. In these situations, the Objective is considered to be controlled by a player if there is at least one of that player’s Scoring units wholly within the defined zone, and no models from enemy Scoring units wholly within the defined zone. Any unit that is in a Building or Fortification is considered to be wholly within an Objective zone if the Fortification or Building they are embarked in is wholly within that zone. Note that, for controlling Objective zones, enemy Denial units are not counted, only Scoring units can control or contest an enemy’s control of a scoring zone.
Units that are locked in combat cannot move in any other Phase or make Shooting Attacks for any reason. Similarly, models cannot choose to target units locked in combat with Shooting Attacks for any reason. Blast markers and templates cannot be deliberately placed such that they cover any models locked in combat, but they may end up there after scattering and will then cause Hits on any units or models they contact as normal.
Units that are locked in combat do not take Morale checks or Pinning tests caused by Shooting Attacks, and cannot be Pinned.
Fearless troops never give up and seldom make full use of cover – even if it would be wiser to do so.
Units with one or more models with the Fearless special rule automatically pass Pinning tests, Regroup tests and Morale checks. In addition, models with the Fearless special rule ignore the effects of the Fear special rule.However, units containing one or more models with the Fearless special rule cannot use any Reactions that grant a Cover Save, Armour Save or Invulnerable Save, and cannot choose to fail a Morale check due to the Our Weapons Are Useless special rule. If a unit has become Pinned and then gains the Fearless special rule, all the effects of being Pinned are immediately cancelled.
| Any player, unless a special rule or other effect specifies otherwise, may make one Reaction in each Phase of their opponent’s turn. | ||
The Reaction Allotment of any player may be modified by special rules or other effects, granting that player additional Reactions either in every Phase (an increase of the Reaction Allotment) or in specific Phases. This may either increase the base Reaction Allotment, that is the number of Reactions allowed in every Phase, or only grant a bonus to the Reaction Allotment in specific Phases.
For example, a player might have a special rule that states ‘This special rule increases the Reaction Allotment to two’, which would indicate that the player could make two Reactions in every Phase of their opponent’s turn. However, a special rule that states ‘This special rule increases the number of Reactions that may be made during the Assault phase by +1’ would allow a player with a Reaction Allotment of one to make a single Reaction in the Shooting and Movement phases, but two in the Assault phase.
Regardless of any special rules or other effects, no player may ever increase their base Reaction Allotment above three, nor may any player ever make more than three Reactions in a given Phase unless a special rule specifically allows for a number of Reactions above the normal limit of three.
A Reaction may be made with any unit controlled by the Reactive player, though in a number of situations a special rule or condition may deny a unit the opportunity to react. The most common such conditions where a unit may not make a Reaction are:
- It is Pinned.
- It is Falling Back.
- It is locked in combat.
- It has already made a Reaction in the current Phase.
- The controlling player has exhausted their Reaction Allotment for the current Phase.
- Another special rule, effect or condition specifically states they may not (for example, the Fearless special rule and certain effects caused by weapons and Psychic Powers).
Those versed in the secret arts and teachings of the Mechanicum, whether Techmarine, Forge Lord or Magos, have the skill and ability to reconstruct and effect field repairs to war machinery in the very heat of battle.
If a model with the Battlesmith (X) special rule is in base contact with, or Embarked upon, one or more damaged Vehicles, Dreadnoughts or Automata during the Shooting phase, they can attempt to repair one of them. If they do so, the model that attempted the repair cannot shoot any weapons or use any other abilities that would be used instead of making a Shooting Attack. Roll a D6. If the result is equal to or more than the value listed in brackets as part of this rule then one of the following options may be applied to any one Vehicle, Dreadnought or Automata the model is in base contact with or Embarked upon:- Restore a lost Hull Point.
- Restore a lost Wound.
- Repair a Weapon Destroyed result.
- Repair an Immobilised result.
A model is only required to make a maximum of one Dangerous Terrain test during a Phase. Any subsequent Dangerous Terrain tests it would be required to make during that Phase are assumed to have automatically been passed.
|
To Hit rolls are easy to remember if you subtract the Ballistic Skill of the attacking model from 7. For example, a model with BS 2 needs to roll a 5 or more (7-2=5).
Note that the minimum roll needed To Hit is always at least 2. When rolling To Hit, there is no such thing as an automatic Hit and a roll of a 1 always misses.
Glancing Hits – If a Glancing Hit was scored, the Vehicle loses 1 Hull Point.
Penetrating Hits – If a Penetrating Hit was scored, the Vehicle not only loses 1 Hull Point, but also suffers additional damage.
After deducting any Hull Points, roll a D6 for each Penetrating Hit and look up the result using the Vehicle Damage table, applying any appropriate modifiers. All modifiers on the Vehicle Damage table are cumulative. If you inflict a Penetrating Hit, you must roll on the Vehicle Damage table even if the Vehicle loses sufficient Hull Points to be Wrecked, as there is still a chance it might suffer an Explodes result on the Vehicle Damage table.
Coming under fire without knowing where the shots are coming from, or having ordnance rain down from the skies, can shake the resolve of even the bravest warriors, making them dive flat and cling to whatever cover presents itself.
If a non-Vehicle unit suffers one or more unsaved Wounds from a weapon with the Pinning special rule, it must take a Leadership test once the firing unit has finished its Shooting Attacks for that Phase. This is called a Pinning test. If the unit fails the Test, it is Pinned. As long as the Test is passed, a unit can be called upon to take multiple Pinning tests in a single turn, but only once for each unit shooting at them.A unit that is affected by any of the following conditions does not take Pinning tests, and if called upon to do so is considered to automatically pass them:
- The unit is locked in combat.
- The unit is already Pinned (the unit remains Pinned, but takes no further Tests).
- The unit is composed entirely of Vehicle models.
- The unit is Embarked on a Transport Vehicle.
- The target unit is affected by the Fearless special rule.
Template weapons shoot clouds of fire, gas or other lethal substances, rather than shells or bullets. They are excellent for killing enemy troops in cover, as the payload simply flows over intervening obstacles to assail the foe behind.
Template weapons are indicated by having the word ‘Template’ for their range instead of a number. Instead of rolling To Hit, simply place the template so that its narrow end is touching the base of the firing model, or the end of the firing weapon’s barrel for Vehicle models without bases, and the rest of the template covers as many models in the target unit as possible, without touching any other friendly models (including other models from the firing model’s unit). Any models fully or partially under the template are hit. Against Vehicles, the template must be placed to cover as much of the Vehicle as possible without touching a friendly model. The position of the firer is used to determine which armour Facing is hit. A Template weapon never hits the model firing it.Template weapons have the Ignores Cover and Wall of Death special rules. Wounds inflicted by Template weapons are allocated following the normal rules.
Stationary – A Vehicle that remains Stationary will be able to attack with all of its weapons, regardless of type, with no modification to their accuracy.
Combat Speed – A Vehicle that travels equal to or less, than half of its Movement Characteristic is said to be moving at Combat Speed. This represents the Vehicle advancing slowly to keep firing. A Vehicle moving at Combat Speed may attack with all non-Ordnance or non-Destroyer weapons with no modification to their accuracy. A Vehicle moving at Combat Speed may only fire a single Ordnance or Destroyer weapon, and if it does so then all other weapons must be fired as Snap Shots.
Vehicles can turn any number of times as they move, just like any other model. Vehicles turn by pivoting on the spot about their centre point, rather than wheeling round. Pivoting on the spot alone does not count as moving, so a Vehicle that only pivots in the Movement phase counts as Stationary (however, Immobilised Vehicles cannot even pivot on the spot). Pivoting is always done from the centre of a Vehicle to prevent it from accidentally moving further than intended or allowed. Just like other units, Vehicles cannot move over friendly models. A Vehicle may only pivot during the Movement phase, unless another rule specifically allows it to do so at another point. Unlike other models, Vehicles may not move vertically in terrain or on Terrain Pieces in order to ascend levels.
Some Vehicle types, from combat aircraft to lumbering artillery vehicles, as detailed later in this section, can affect both the manner in which a Vehicle moves and the distances it may move.
Barrage weapons lob shells high into the air, landing them in the midst of the foe.
All Barrage weapons use Blast markers and consequently use the rules for Blast weapons, as indicated by their profile, with the following exceptions:Barrage weapons can fire indirectly. This means they can fire at a target that they do not have line of sight to, as long as the target is beyond their Minimum Range (if applicable). When firing indirectly, the Ballistic Skill of the firer is not subtracted from the scatter distance; unless a Hit is rolled on the Scatter dice, the Blast marker always scatters a full 2D6". If a Barrage weapon has line of sight to its target it can fire directly, even if the target is within its Minimum Range.
Note that any Hits inflicted upon Vehicles by an Attack using the Barrage special rule are always resolved against the Vehicle’s Side Armour Value.
During the course of a game, a unit can get broken up and lose unit coherency, usually because it has sustained casualties from enemy fire. If this happens, in their next Movement phase, the models in the unit must be moved in such a way that they restore unit coherency, or as close to unit coherency as possible. If the unit cannot move in its next turn, or is unable to restore unit coherency in a single turn, then the models must move to restore unit coherency as soon as they have the opportunity, including by Running if they have that option.
This creature is so massive, it takes up an inordinate amount of space in any vehicle or building it enters.
Bulky models count as a number of models equal to the value X in brackets after the rule’s name for the purposes of Transport Capacity and whether a given unit outnumbers another in combat.For example, a unit comprised of five models all of which have the Bulky (3) special rule, would count as 15 models when attempting to Embark on a Transport Vehicle or when deciding if they outnumber an enemy unit (see, for example, Rampage (X)).
Some units make their way to battle via tunnelling, teleportation, flying, or some other extraordinary means which allows them to appear in the thick of the fighting.
A unit made up entirely of models with this special rule may perform a Deep Strike Assault. Certain Faction or unit special rules may present other options for the deployment of units with the Deep Strike special rule.However, a unit that Runs may not make Shooting Attacks of any kind during the following Shooting phase, or declare Charges during the Assault phase of the same player turn. If any models in a unit Run, then all models in that unit are counted as having Run, regardless of the distance moved by any individual model.
Units making a Reaction during their opponent’s turn may never choose to Run as part of that Reaction.
Note that the minimum roll needed To Wound is always at least 2. When rolling To Wound, there is no such thing as an automatic Wound and a roll of 1 always fails.
Each weapon has its own Strength Characteristic, which is given in its profile or in the description of the weapon. The following are examples of weapons and their Strength Characteristics:
|
|
When checking range, simply measure from the attacking model to the nearest model in the target unit that is within Line of Sight of the attacking model. Any weapon that is found to be out of range of all models in the target unit to which line of sight can be drawn may not be used to make attacks.
If you re-roll a 2D6 or 3D6 roll, you must re-roll all of the dice, not just some of them, unless the rules specify otherwise. Any modifiers that applied to the first roll also apply to the re-roll.
If two or more special rules combine to the effect that all failed and all successful dice results would have to be re-rolled, do not re-roll any dice; simply use the original result(s) instead.
Some weapons are lovingly maintained artefacts, crafted with skills now lost. Though the exact form of master-crafting varies, it is always considered to be the pinnacle of the weaponsmith’s art.
Weapons with the Master-crafted special rule allow the bearer to re-roll one failed roll To Hit per turn with that weapon.These weapons are grafted to the same targeting system for greater accuracy.
When attacking with a weapon that has this special rule, the controlling player may re-roll all failed To Hit rolls.These are heavy, man-portable weapons that typically require reloading between each shot or bracing to counter their recoil.
When making a Shooting Attack, a model with a Heavy weapon attacks the number of times indicated. If a model equipped with a Heavy weapon moved in the preceding Movement phase, they can only make Snap Shots with that Heavy weapon during the Shooting phase. Note that weapons with the Blast special rule cannot fire Snap Shots. Models that make Shooting Attacks with Heavy weapons in the Shooting phase cannot Charge in the ensuing Assault phase.
|
A model with a Ballistic Skill of 0 may not make Shooting Attacks. A model with Weapon Skill ‘0’ is incapacitated; they are hit automatically in melee combat and cannot make attacks. A model with no Attacks cannot strike any blows in melee combat. A warrior with an Armour Save of ‘-’ has no Armour Save at all. If at any point a model’s Strength, Toughness or Wounds are reduced to 0, it is removed from play as a casualty.
Ordnance weapons are cannon so vast, they are typically mounted on tanks and artillery.
When making Shooting Attacks, a model equipped with an Ordnance weapon fires the number of times indicated in its profile after its Type. A non-Vehicle model carrying an Ordnance weapon cannot attack with it in the Shooting phase if they moved in the preceding Movement phase. Ordnance weapons cannot make Snap Shots. Furthermore, if a non-Vehicle model attacks with an Ordnance weapon, that model may not make any further Shooting Attacks with any other weapon in the Phase nor will it be able to Charge in the ensuing Assault phase. Vehicle models that fire Ordnance weapons may also suffer some restrictions based upon the distance they have moved that turn.Ordnance weapons hit with such force that when you roll to penetrate a Vehicle’s armour with an Ordnance weapon, roll two dice instead of one and pick the highest result.
|
Sometimes an attack will gain a bonus or special rule depending on the results rolled To Hit or To Wound (for example, due to the Rending special rule). If any such Wounds are caused, split them into separate Wound Pools. All Wounds with exactly the same Strength, AP value and special rules must go into the same pool. If all the Wounds are the same, there will only be one Wound Pool.
If the selected model is removed as a casualty and the Wound Pool is not empty, then the player whose unit was the target of the attack selects another model in the target unit that is in line of sight and range of the attacking unit and allocates the next Wound to that model.
Continue allocating Wounds in this fashion, taking Saves and removing casualties until the Wound Pool is empty or all models in the target unit have been removed as casualties.
If any model in the target unit has already lost one or more Wounds, but has not been removed as a casualty then the Wound must be allocated to such a model, unless that model is out of line of sight of all models in the attacking unit or has the Character sub-type.
The Ballistic Skill of a model making a Snap Shot can only be modified by special rules that specifically state that they affect Snap Shots, along with any other restrictions. If a special rule doesn’t specifically state that it affects Snap Shots, then the Snap Shot is resolved at Ballistic Skill 1.
Some weapon types, such as Ordnance, or those that have certain special rules, such as Blast, cannot be used to make Snap Shots. In addition, any Shooting Attack that does not use Ballistic Skill cannot be made as a Snap Shot. These exceptions aside, Snap Shots are treated in the same manner as any other Shooting Attack made with a Ballistic Skill of 1.
Rapid Fire weapons are very common and usually come in the form of semi-automatic rifles. Their versatility means they can be fired as effectively when a squad is advancing as when taking single, long-ranged shots.
A model armed with a Rapid Fire weapon can make two attacks at a target up to half the weapon’s Maximum Range away. Alternatively, it can instead make one attack at a target over half the weapon’s range away, up to the weapon’s Maximum Range.If a unit attacking with Rapid Fire weapons is found to be partially within half range of the target, the firing models within half range make two attacks, while those further away make one attack.
Models that attack with Rapid Fire weapons in the Shooting phase cannot Charge in the ensuing Assault phase.
|
Some weapons and warriors strike in a flurry of blows, tearing flesh asunder in a series of brutal strikes.
If a model has the Shred special rule, or is attacking with a Melee weapon that has the Shred rule, it re-rolls failed To Wound rolls in close combat.Similarly, if a model makes a Shooting Attack with a weapon that has the Shred rule, it re-rolls its failed To Wound rolls.
If the weapon’s Armour Piercing value is equal to or lower than the model’s Armour Save, then it is sufficiently powerful enough to punch straight through the armour; the target gets no Armour Save at all. The armour is ineffective against the shot.
If the weapon’s Armour Piercing value is higher than the armour, the target can take its Save as normal.
Assault weapons either fire so rapidly or indiscriminately that they can be fired while a warrior is moving.
A model attacking with an Assault weapon makes the number of Attacks indicated on its profile regardless of whether the bearer has moved or not. A model carrying an Assault weapon can make a Shooting Attack with it in the Shooting phase and still Charge in the Assault phase.
|
Bombs are high explosive or incredibly powerful munitions that are dropped by aircraft as they fly over the battlefield.
Bombs are weapon types unique to Flyers. All Bombs have the One Use special rule. Unlike other weapons, Bombs must be used in the Movement phase of their turn in a special kind of attack called a Bombing Run. A model can only attack with one Bomb type weapon in its Movement phase. If a model attacks with a Bomb type weapon, it counts as having already attacked with one weapon in its ensuing Shooting phase. However, any additional weapons it fires that turn can choose a different target to that of the Bomb.The ancient volkite weaponry employed by the armies of Terra in the earliest years of the Great Crusade fired arcing blasts of energy rather than solid projectiles.
After normal attacks by this weapon have been resolved, count the number of unsaved Wounds caused on the target unit. Immediately resolve a number of additional automatic Hits on the same unit using the weapon’s profile equal to the number of unsaved Wounds – these can then be saved normally. Models in the targeted unit must still be in range in order for these additional Hits to take effect. These additional Hits do not themselves inflict more Hits and do not benefit from any other special rules possessed by the attacking model, such as Preferred Enemy (X) or Precision Strikes (X).Pistols are light enough to be carried and fired one-handed.
A model attacking with a Pistol weapon makes the number of Attacks indicated on its profile regardless of whether the bearer has moved or not. A model carrying a Pistol weapon can make a Shooting Attack with it in the Shooting phase and still Charge in the Assault phase. A Pistol weapon also counts as a close combat weapon in the Assault phase. In addition, all models with two Pistol type weapons can attack with both in the same Shooting phase. This follows the normal rules for shooting.
|
Mounted only on the largest and most fearsome of war machines, Destroyer class weapons are capable of annihilating smaller targets and tearing through even the thickest armour with ease.
A model making a Shooting Attack with a Destroyer weapon attacks the number of times indicated on the weapon’s profile whether or not the bearer has moved. A model carrying a Destroyer weapon can attack with it in the Shooting phase and still Charge in the Assault phase. In addition, when you roll for armour penetration with Hits caused by a Destroyer weapon, roll three dice instead of one and discard the single lowest dice rolled, or any one of the lowest dice in the case of tied results. Use the total of the remaining dice to determine the result.In addition, when a Destroyer weapon inflicts a Glancing Hit or a Penetrating Hit, it inflicts D3 Hull Points of Damage instead of a single Hull Point. When a Destroyer weapon inflicts a Wound on a non-Vehicle model, it inflicts D3 Wounds instead of a single Wound.
|
Stationary – A Vehicle that remains Stationary will be able to attack with all weapons regardless of type with no modification to their accuracy.
Combat Speed – A Vehicle that travels no more than half of its Movement Characteristic is said to be moving at Combat Speed. This represents the Vehicle advancing slowly to keep firing. A Vehicle moving at Combat Speed may attack with all non-Ordnance or non-Destroyer weapons with no modification to their accuracy. A Vehicle moving at Combat Speed may only fire a single Ordnance or Destroyer weapon, and if it does so then all other weapons must be fired as Snap Shots.
Cruising Speed – A Vehicle that travels more than half of its Movement Characteristic is said to be moving at Cruising Speed. This represents the Vehicle diverting power to keep it moving as fast as possible, making all of its firepower wildly inaccurate. A Vehicle moving at Cruising Speed may firea single weapon without modificationto its BS and any other weapons as Snap Shots. However, a Vehicle moving at Cruising Speed may not fire Ordnance or Destroyer weapons.
Certain items can only be used once, so a general must choose wisely when to do so.
A weapon or ability with this special rule can only be used once during the course of a battle. Once a weapon with the One Use or One Shot special rule has been used to attack, it is no longer counted as a weapon and may not be destroyed (for example, by rolls on the Vehicle Damage table) or repaired by any other rule or effect.Once the final position of the marker has been determined, roll a number of dice equal to the number of attacks on the weapon’s profile. So, for example, with a weapon with the type ‘Heavy 4, Apocalyptic Barrage’, you would roll four dice. Each dice roll corresponds to a ‘strike’ on one of the circles on the Apocalyptic Barrage marker. For example, each roll of a 2 indicates a strike on circle number 2. Resolve the strikes as for a Multiple Barrage, as if each were a Barrage attack that had landed on that circle and hit all the models underneath it. To determine Cover Saves, always assume the shot is coming from the centre of the entire Apocalyptic Barrage marker.
|
- A ‘Small’ Blast marker (3" in diameter).
- A ‘Large’ Blast marker (5" in diameter).
- A ‘Template’ (a teardrop-shaped template roughly 8" long).
- A ‘Massive’ Blast marker (7" in diameter).
- An ‘Apocalyptic’ Blast marker (10" in diameter).
- An ‘Apocalyptic Barrage’ marker (a clover-shaped set of five overlapping markers, each 5" in diameter).
- A ‘Hellstorm’ (a teardrop-shaped template roughly 16" long).
The templates and Blast markers are used as a way of determining how many models have been hit by an attack that has an area of effect or a blast radius. When an attack uses a template or Blast marker, it will explain how the template is positioned, including any kind of scatter that might occur (scatter is discussed further later in this section). To work out the number of Hits, you normally need to hold the template or Blast marker with its central hole over an enemy model or a particular point on the battlefield, and then look underneath (or through, if using a transparent template) to see how many models lie partially or completely underneath. Various special rules and weapon effects will provide additional details on the specific use of templates when making attacks with those special rules or weapons.
A unit takes a Hit for each model that is fully, or even partially, underneath the template or Blast marker. Remember that a model’s base is counted as being part of the model itself, so all a template or Blast marker has to do to cause a Hit is to cover any part of the target’s base.
Do not include Wounds caused in the Charge sub-phase,such as those from Reactions, failed Dangerous Terrain tests, etc.
The side that inflicted the most unsaved Wounds is the winner. The losing unit must make a Morale check and must Fall Back if it fails. If both sides suffer the same number of Wounds, the combat is drawn and continues next turn. If one side destroys the enemy completely, it wins the combat automatically, even if it sustained more casualties than the other unit.
Wounds that have been negated by Saving Throws or special rules do not count towards determining who won the combat. Neither do Wounds in excess of a model’s Wounds Characteristic; only the Wounds actually suffered by enemy models count (including all of the Wounds lost by models that have suffered Instant Death). In rare cases, certain models can cause Wounds on themselves or their allies – these Wounds are added to the other side’s total for working out who has won.
The aftermath of heavy shelling and orbital bombardments, impact craters provide protection for those sensible enough to seek it.
Areas of terrain designated as Craters confer a 6+ Cover Save on models within their bounds. If a unit is Pinned while within a Crater then that area of terrain instead confers a 4+ Cover Save on all models in the Pinned unit that are within its bounds. Craters are always counted as Difficult Terrain.Pile-in Moves follow the same rules as Charge Moves, except that they are not slowed by Difficult Terrain (though Dangerous Terrain will still trigger Dangerous Terrain tests).
In addition, a Pile-in Move cannot be used to move into base contact with any units that are not already involved in the combat.
When making Pile-in Moves, the Active player moves their unit(s) first. If both players’ Pile-in Moves combined would be insufficient to bring any combatants into base contact, the combat is considered to have ended.
If the selected model is removed as a casualty and the Wound Pool is not empty, then the player whose unit was the target of the attack selects another model in the target unit and allocates the next Wound to that model.
Continue allocating Wounds in this fashion, taking Saves and removing casualties until the Wound Pool is empty or all models in the target unit have been removed as casualties.
If there are Wounds with different Strengths, AP values or special rules that affect Saving Throws or the effect of any Wounds they inflict, split them into several pools of Wounds. All Wounds with exactly the same Strength, AP value and special rules must go into the same pool. If all the Wounds are the same, there will be only one Wound Pool.
Many warriors hurl themselves headlong into combat, seeking to crush or trample the foe.
If a model with this special rule ends its Charge Move in base contact with an enemy model, it makes a number of additional attacks equal to the value in brackets listed as part of this special rule. These attacks hit automatically and are resolved at the model’s unmodified Strength with AP-. These attacks do not benefit from any of the model’s special rules (such as Furious Charge, Rending, etc.). These attacks are resolved during the Fight sub-phase at Initiative step 10, but do not grant the model an additional Pile-in Move.If a model with this special rule Charges a Vehicle of any kind or a Building, the hits are resolved against the Armour Value of the Facing the charging model is touching. If the model is in contact with two or more Facings, the player controlling the target model chooses a Facing upon which the attacks are resolved. If a model with this special rule Charges a Building or Vehicle that is a Transport, the hits are resolved against the Building or Vehicle, not the unit Embarked within the Building or Vehicle.
Some blows can slay an enemy outright, no matter how hardy they may be.
If a model suffers an unsaved Wound from an attack with this special rule, it is reduced to 0 Wounds and is removed as a casualty.Units making a Consolidation move are not slowed by Difficult Terrain but do trigger Dangerous Terrain tests where appropriate. A Consolidation move cannot be used to move into base contact with any enemy models.
Consolidating models must stop at least 1" away from all enemy models, including any that have just Fallen Back from the combat that the Consolidating unit has fought in.
When a Sweeping Advance is performed, both the unit Falling Back and the winning unit roll a D6 and add their unmodified Initiative to the result. In a unit with mixed Initiative Characteristics, use the highest Characteristic. The units then compare their totals.
If the winner’s total (Initiative + dice roll) is greater than their opponents’, the Falling Back unit is caught by the Sweeping Advance and destroyed. All models in the destroyed unit are immediately removed as casualties. Unless otherwise specified, no Save or other special rule can prevent the unit from being destroyed.
If the Falling Back unit’s total is higher, or the final result is a tie, they break off from the combat successfully. Make a Falls Back move for the losing unit. The winners can then Consolidate.
If the unit fails this test, then it must immediately continue to Fall Back.
If the unit successfully passes the test, it stops Falling Back and can immediately move a number of inches equal to its Initiative. This move is unaffected by Difficult Terrain, but Dangerous Terrain tests must be taken as normal. If the unit is out of coherency when the Regroup test is made, then the move must be used to restore coherency, or as near as possible.
Once a unit has Regrouped, until the end of that player turn it cannot otherwise Move, Run or Charge in the Assault phase. However, it can make Shooting Attacks but until the end of that player turn counts as having moved and can only fire Snap Shots. A unit that has Regrouped may make Reactions as normal in subsequent player turns, including those that allow it to move.
If the test is failed, the assaulted unit is removed as a casualty at the end of the Charge sub-phase, after all Charge moves have been completed.
If the test is successful, the unit Regroups without moving, and the Charge is resolved as per the normal rules for Charges. A unit that Regroups after having a Charge declared against them may make Reactions as normal.