General’s Handbook 2024-25
Contents | ||
")
Books
| Book | Kind | Edition | Last update | |
| | ||||
| | Expansion | 4 | July 2024 | |
| | ||||
| | Rulebook | 4 | February 2026 | |
Matched Play Battlepack
General’s Handbook 2024-25
1. Pick Your Armies
Each player picks an army using the rules in Army Composition.ADVANCED RULES In addition to the Core Rules, Matched Play: First Blood uses the following Advanced Rules: | ||
2. Determine the Battleplan
One player rolls a dice to determine which battleplan table to use. On a 1-3, use battleplan table 1. On a 4-6, use battleplan table 2. The other player then rolls a dice to determine the battleplan. Alternatively, feel free to pick the battleplan you wish to play.
|
3. Set Up the Battlefield
The players roll off. The winner chooses which player is the attacker and which is the defender.Next, the defender sets up objectives in the locations indicated by gold circles on the battlefield map
 . Then, the defender sets up terrain features. We recommend 4 small and 4 medium terrain features. Each terrain feature must be set up more than 3" from the battlefield edge, more than 3" from all objectives and more than 6" from all other terrain features. Alternatively, the battlefield can be set up as shown on the corresponding battlefield terrain layout map while maintaining the distance restrictions between the battlefield edge, objectives and other terrain features as detailed above.
After objectives and terrain have been set up, the attacker picks which territory is their territory. The other territory is the defender’s territory. The players then resolve the deployment phase. The attacker begins deployment (Core Rules, 10.0).
Battle Length
Battles that use this battlepack last for 5 battle rounds.Glorious Victory
Each battleplan will describe how to score victory points. At the end of the battle, if one player has at least 5 victory points more than their opponent, they win a major victory. If one player has fewer than 5 more victory points than their opponent, they win a minor victory. If the players are tied on victory points, the player who completed the most battle tactics wins a minor victory. If the players are tied on victory points and completed the same number of battle tactics, the battle is a draw.Battle Tactics
If you are using this battlepack, when picking battle tactics to attempt, you must pick from the battle tactics in this battlepack (can be found here).When you pick a battle tactic, you must reveal your choice to your opponent. If the battle tactic instructs you to pick something, you must tell your opponent what you pick. You cannot pick the same battle tactic more than once per battle.
If a battle tactic has a Grand Alliance keyword (ORDER, CHAOS, DEATH, DESTRUCTION), you cannot pick that battle tactic unless your general has that keyword.
Matched Play Publications 2024-25
As Warhammer Age of Sigmar continues to grow, naturally, we will continue to write rules for the game. However, when you are playing competitively, sometimes it’s hard to know which of these rules are ‘legal’ – in other words, which rules you can use in Matched Play battles. On this page, we’ve provided a handy at-a-glance list that shows you all the publications whose rules you are allowed to use in Matched Play battles.CORE
- Warhammer Age of Sigmar Core Book
- General’s Handbook 2024-25
- Warhammer Age of Sigmar Faction Packs
- Battle Profiles 2024-25
BATTLETOMES
Throughout this edition of Warhammer Age of Sigmar, we will be releasing battletomes for each faction. Battletomes contain additional and/or updated faction rules, which include battle traits, battle formations and enhancements. When a battletome is released, it will supersede the rules set out in the Faction Pack for that faction.Occasionally, we release a battletome in a box with a selection of new and existing miniatures from that faction. We call these boxes ‘army sets’, and these can be available to purchase before the battletome and the new miniatures go on sale separately. To ensure a level playing field, a battletome released in an army set will not be legal to use in Warhammer Age of Sigmar Matched Play battles until that battletome is on general sale. This also means that the single-use code found in the battletome that grants access to the faction’s data on the Warhammer Age of Sigmar App will not work until the battletome is on general sale.
Season Rules 2024-25
TAKING A DOUBLE TURN
If the player who went second in the previous battle round wins the priority roll and chooses to go first, this is called ‘taking a double turn’.SEIZING THE INITIATIVE
When a player takes a double turn and they are not behind by 6 or more victory points, this is called ‘seizing the initiative’. The first time in a battle that a player seizes the initiative, the rules for determining the underdog change: for the rest of the battle, the underdog is always the opponent of the player who most recently seized the initiative.BATTLE TACTICS
Players who take a double turn while they are behind by 6 or more victory points can still use the ‘Tactical Gambit’ ability to pick a battle tactic.HONOUR GUARD
Each player can use one of the following HONOUR GUARD abilities in each battle. When using that ability, they must pick a unit in their general’s regiment to be the honour guard.REGIMENTED FORCES
If a player has more regiments than their opponent, they can use a second, different HONOUR GUARD ability, but they must pick a unit that is in a different regiment that is not led by the general to be the honour guard for that ability. You cannot pick units in a Regiment of Renown to be an honour guard. If you chose not to pick an honour guard unit in your general’s regiment, you can still pick an honour guard unit for a different regiment as described above.Honour Guard
A wise general surrounds themselves with trusted veterans, warriors whose battlefield exploits are renowned amongst their peers. Your army can use 1 of the following abilities: Once Per Battle, Deployment Phase Once Per Battle, Deployment Phase |
SPECIAL ASSIGNMENT: The honour guard are tasked with focusing their efforts on a specific element of the enemy’s forces.
Declare: Pick a friendly unit in, but not leading, a regiment to be that regiment’s honour guard. You can pick a unit in reserve.
Effect: Pick 1 of the following weapon abilities:
Effect: Pick 1 of the following weapon abilities:
- Anti-INFANTRY (+1 Rend)
- Anti-CAVALRY (+1 Rend)
- Anti-MONSTER (+1 Rend)
- Anti-WAR MACHINE (+1 Rend)
- Anti-BEAST (+1 Rend)
| KEYWORDS | HONOUR GUARD |
 Once Per Battle, Deployment Phase Once Per Battle, Deployment Phase |
BODYGUARD: The honour guard stay by their general’s side to protect them from harm.
Declare: Pick a friendly unit in, but not leading, a regiment to be that regiment’s honour guard. You can pick a unit in reserve.
Effect: Subtract 1 from the Attacks characteristic of enemy units’ melee weapons while they are in combat with the unit leading that regiment if both of the following are true:
Effect: Subtract 1 from the Attacks characteristic of enemy units’ melee weapons while they are in combat with the unit leading that regiment if both of the following are true:
- That regiment’s honour guard is wholly within 6" of the leader of that regiment.
- Neither that regiment’s honour guard nor the regiment’s leader charged this turn.
| KEYWORDS | HONOUR GUARD |
 Once Per Battle, Deployment Phase Once Per Battle, Deployment Phase |
PRIORITY TARGET: The general deploys their honour guard to eliminate the enemy commander.
Declare: Pick a friendly unit in, but not leading, a regiment to be that regiment’s honour guard. You can pick a unit in reserve.
Effect: Add 1 to hit rolls and wound rolls for attacks made by that honour guard unit that target the enemy general, or the enemy honour guard if it is in the enemy general’s regiment, if the target of the attack is within 12".
Effect: Add 1 to hit rolls and wound rolls for attacks made by that honour guard unit that target the enemy general, or the enemy honour guard if it is in the enemy general’s regiment, if the target of the attack is within 12".
| KEYWORDS | HONOUR GUARD |
 Once Per Battle, Deployment Phase Once Per Battle, Deployment Phase |
FIELD SERGEANT: This notable individual knows precisely how to complement the general’s style of leadership, ensuring the efficient manoeuvring of their ground forces.
Declare: Pick a friendly non-FLY INFANTRY HERO in, but not leading, a regiment to be that regiment’s honour guard. You can pick a unit in reserve.
Effect: Add 2" to the Move characteristic of friendly non-FLY INFANTRY units while they are wholly within 12" of the honour guard.
Effect: Add 2" to the Move characteristic of friendly non-FLY INFANTRY units while they are wholly within 12" of the honour guard.
| KEYWORDS | HONOUR GUARD |
| Once Per Battle, Deployment Phase |
PRIZED BEAST: Whether feared or favoured by the troops that accompany it into battle, this mighty creature stands apart from its peers.
Declare: Pick a friendly non-UNIQUE MONSTER unit that has not been reinforced, and which is in, but not leading, a regiment to be that regiment’s honour guard. You can pick a unit in reserve.
Effect: That unit can ignore the effects of the ‘Battle Damaged’ ability. In addition, add 1 to hit rolls for combat attacks made by the honour guard. is ability also affects Companion weapons.
Effect: That unit can ignore the effects of the ‘Battle Damaged’ ability. In addition, add 1 to hit rolls for combat attacks made by the honour guard. is ability also affects Companion weapons.
| KEYWORDS | HONOUR GUARD |
Universal Battle Tactics
|
Order Battle Tactics
| ||||
| ||||
Chaos Battle Tactics
| ||||
| ||||
Death Battle Tactics
| ||||
| ||||
Destruction Battle Tactics
| ||||
| ||||
Scoring Sheet
At the conclusion of a Matched Play battle, the player who has scored the most victory points is declared the winner.
Victory points can be scored in a variety of different ways, so it is vital to be able to track the methods by which victory points are scored and the number of victory points that have been scored by each player. We have provided a scoring sheet template opposite so that you can track the progress of your battles. You can find a scoring sheet printable copy below:

On the scoring sheet, there’s space at the top to record the battleplan being played and the points limit for the battle. Beneath that are two sections: one for the attacker’s information and one for the defender’s information.
After determining who will be the attacker and who will be the defender, write each player’s name and their army’s faction in the appropriate sections. There are spaces in both the attacker and the defender sections to record the battle tactics picked and the number of victory points scored in each battle round.
In addition, there are tick boxes to track whether a battle tactic has been completed and which player had priority in each battle round.
At the end of the battle, both players can mark the result of the battle in the section at the bottom of the sheet.
Victory points can be scored in a variety of different ways, so it is vital to be able to track the methods by which victory points are scored and the number of victory points that have been scored by each player. We have provided a scoring sheet template opposite so that you can track the progress of your battles. You can find a scoring sheet printable copy below:
On the scoring sheet, there’s space at the top to record the battleplan being played and the points limit for the battle. Beneath that are two sections: one for the attacker’s information and one for the defender’s information.
After determining who will be the attacker and who will be the defender, write each player’s name and their army’s faction in the appropriate sections. There are spaces in both the attacker and the defender sections to record the battle tactics picked and the number of victory points scored in each battle round.
In addition, there are tick boxes to track whether a battle tactic has been completed and which player had priority in each battle round.
At the end of the battle, both players can mark the result of the battle in the section at the bottom of the sheet.


Battleplan 2 (Table 1) Focal PointsTWIST: At the start of each battle round, after determining which player is the underdog and before players use any Each player scores victory points at the end of each of their turns as follows:Start of Battle Round abilities, the underdog can change the central objective to be a home objective or flank objective until the start of the next battle round.
 This map layout can also be used for Border War, Shifting Objectives, The Jaws of Gallet, Battle for the Pass and The Vice. AREA TERRAIN Examples: Hills, StormvaultTerrain Abilities: Cover OBSTACLES Examples: Ruins, debris, statues, barricadesTerrain Abilities: Cover, Unstable OBSCURING TERRAIN Examples: Wyldwood, fortress wallTerrain Abilities: Cover, Obscuring, Unstable PLACES OF POWER Examples: Realmgate, Cleansing Aqualith, Nexus SyphonTerrain Abilities: Cover, Place of Power, Unstable KEY
 | |||||||||||||||||||||||
Battleplan 3 (Table 1) StarstrikeTWIST: At the start of the first battle round, after determining the active player, the active player must set up 1 objective on the boundary between both players’ territories. At the start of the third battle round, after determining the active player, the active player must set up 1 objective on each of the long parallel lines in each player’s territories. To determine the location of each objective, roll 2D6 and refer to the map below. Roll separately for each objective. If an objective would be set up wholly or partially on a faction terrain feature, that terrain feature and any units on it are destroyed, then the objective is set up normally. If the objective would be set up wholly or partially on other terrain features, do not do so. Instead, inflict D6 mortal damage on each unit wholly or partially on that terrain feature. (roll separately for each unit). The underdog can make the active player re-roll the dice when the mortal damage inflicted on each of the underdog’s units is being determined. Then, that terrain feature becomes an impact site. Control of an impact site terrain feature (Core Rules, 32.3) counts as control of an objective for the purposes of scoring victory points. Each player scores victory points at the end of each of their turns as follows:
 This map layout can also be used for Border War, Shifting Objectives, The Jaws of Gallet, Battle for the Pass and The Vice. AREA TERRAIN Examples: Hills, StormvaultTerrain Abilities: Cover OBSTACLES Examples: Ruins, debris, statues, barricadesTerrain Abilities: Cover, Unstable OBSCURING TERRAIN Examples: Wyldwood, fortress wallTerrain Abilities: Cover, Obscuring, Unstable PLACES OF POWER Examples: Realmgate, Cleansing Aqualith, Nexus SyphonTerrain Abilities: Cover, Place of Power, Unstable KEY
 PUSH BACK THE VERMIN | |||||||||||||||||||||||
Battleplan 4 (Table 1) Shifting ObjectivesTWIST: At the start of each battle round, after determining the active player, the active player must roll a D3 to determine which objective is the primary objective for that battle round. The other 2 objectives are the secondary objectives for that battle round. The underdog can make the active player re-roll the dice to determine which objective is the primary objective. Each player scores victory points at the end of each of their turns as follows:
 This map layout can also be used for Border War, Focal Points, The Jaws of Gallet, Battle for the Pass and The Vice. AREA TERRAIN Examples: Hills, StormvaultTerrain Abilities: Cover OBSTACLES Examples: Ruins, debris, statues, barricadesTerrain Abilities: Cover, Unstable OBSCURING TERRAIN Examples: Wyldwood, fortress wallTerrain Abilities: Cover, Obscuring, Unstable PLACES OF POWER Examples: Realmgate, Cleansing Aqualith, Nexus SyphonTerrain Abilities: Cover, Place of Power, Unstable KEY
 | |||||||||||||||||||||||
Battleplan 5 (Table 1) Feral ForayTWIST: At the start of the battle round, each player can raid 1 objective they control in enemy territory. An objective that has been raided cannot be contested or controlled this battle round. The underdog can raid an objective in enemy territory that they contest but do not control. Each player scores victory points at the end of each of their turns as follows:
 This map layout can also be used for The Better Part of Valour and Close to the Chest. AREA TERRAIN Examples: Hills, StormvaultTerrain Abilities: Cover OBSTACLES Examples: Ruins, debris, statues, barricadesTerrain Abilities: Cover, Unstable OBSCURING TERRAIN Examples: Wyldwood, fortress wallTerrain Abilities: Cover, Obscuring, Unstable PLACES OF POWER Examples: Realmgate, Cleansing Aqualith, Nexus SyphonTerrain Abilities: Cover, Place of Power, Unstable KEY
 | |||||||||||||||||||||||
Battleplan 6 (Table 1) The Jaws of GalletTWIST: From the second battle round, at the end of their turn, after scoring victory points, the underdog can pick 1 objective. That objective is removed from play. If there is no underdog, no objective is removed. Each player scores victory points at the end of each of their turns as follows:
 This map layout can also be used for Border War, Focal Points, Shifting Objectives, Battle for the Pass and The Vice. AREA TERRAIN Examples: Hills, StormvaultTerrain Abilities: Cover OBSTACLES Examples: Ruins, debris, statues, barricadesTerrain Abilities: Cover, Unstable OBSCURING TERRAIN Examples: Wyldwood, fortress wallTerrain Abilities: Cover, Obscuring, Unstable PLACES OF POWER Examples: Realmgate, Cleansing Aqualith, Nexus SyphonTerrain Abilities: Cover, Place of Power, Unstable KEY
| |||||||||||||||||||||||
Battleplan 1 (Table 2) Battle for the PassTWIST: Victory points scored by each player from controlling objectives are capped at a maximum of 6 per turn. Each player scores victory points at the end of each of their turns as follows:The underdog can add 2 to the control scores of friendly non-HERO units.
 This map layout can also be used for Border War, Focal Points, Shifting Objectives, The Jaws of Gallet and The Vice. AREA TERRAIN Examples: Hills, StormvaultTerrain Abilities: Cover OBSTACLES Examples: Ruins, debris, statues, barricadesTerrain Abilities: Cover, Unstable OBSCURING TERRAIN Examples: Wyldwood, fortress wallTerrain Abilities: Cover, Obscuring, Unstable PLACES OF POWER Examples: Realmgate, Cleansing Aqualith, Nexus SyphonTerrain Abilities: Cover, Place of Power, Unstable KEY
 HEED NOT THE WHISPERS OF CHAOS | |||||||||||||||||||||||
Battleplan 2 (Table 2) Scorched EarthTWIST: From the second battle round, at the end of their turn, after scoring victory points, the active player can pick 1 objective that is wholly within enemy territory, that they control and that is being contested by any of their units. That objective is removed from play. At the start of each battle round, the underdog can pick 1 objective in their territory that they control. Until the end of that battle round, they can subtract 5 from the control scores of enemy units contesting that objective, to a minimum of 1. Each player scores victory points at the end of each of their turns as follows:
 AREA TERRAIN Examples: Hills, StormvaultTerrain Abilities: Cover OBSTACLES Examples: Ruins, debris, statues, barricadesTerrain Abilities: Cover, Unstable OBSCURING TERRAIN Examples: Wyldwood, fortress wallTerrain Abilities: Cover, Obscuring, Unstable PLACES OF POWER Examples: Realmgate, Cleansing Aqualith, Nexus SyphonTerrain Abilities: Cover, Place of Power, Unstable KEY
 | |||||||||||||||||||||||
Battleplan 3 (Table 2) The Better Part of ValourTWIST: Each time an enemy unit contesting an objective is destroyed by a FIGHT ability used by a friendly non-HERO unit contesting the same objective, that friendly unit gains the DOMINANT keyword. If that friendly unit stops contesting that objective, it is no longer DOMINANT. Add 10 to the control scores of DOMINANT units. Add 1 to hit rolls for combat attacks made by units in the underdog’s army that target a DOMINANT unit. Each player scores victory points at the end of each of their turns as follows:
 This map layout can also be used for Feral Foray and Close to the Chest. AREA TERRAIN Examples: Hills, StormvaultTerrain Abilities: Cover OBSTACLES Examples: Ruins, debris, statues, barricadesTerrain Abilities: Cover, Unstable OBSCURING TERRAIN Examples: Wyldwood, fortress wallTerrain Abilities: Cover, Obscuring, Unstable PLACES OF POWER Examples: Realmgate, Cleansing Aqualith, Nexus SyphonTerrain Abilities: Cover, Place of Power, Unstable KEY
 | |||||||||||||||||||||||
Battleplan 4 (Table 2) The ViceTWIST: At the start of the second battle round, after determining which player is the active player, the active player must remove the 4 starting objectives and set up a new objective at each of the next locations shown on the map. At the start of the fourth battle round, after determining which player is the active player, the active player must remove the 4 objectives and set up 1 new objective in the location shown in the centre of the map. At the end of their turn, the underdog can pick 1 objective. Inflict D3 mortal damage on each unit contesting that objective (roll separately for each unit). Each player scores victory points at the end of each of their turns as follows:
 This map layout can also be used for Border War, Focal Points, Shifting Objectives, The Jaws of Gallet and Battle for the Pass. AREA TERRAIN Examples: Hills, StormvaultTerrain Abilities: Cover OBSTACLES Examples: Ruins, debris, statues, barricadesTerrain Abilities: Cover, Unstable OBSCURING TERRAIN Examples: Wyldwood, fortress wallTerrain Abilities: Cover, Obscuring, Unstable PLACES OF POWER Examples: Realmgate, Cleansing Aqualith, Nexus SyphonTerrain Abilities: Cover, Place of Power, Unstable KEY
 | |||||||||||||||||||||||
Battleplan 5 (Table 2) Close to the ChestTWIST: At the start of each turn, the player who is not the active player must pick 1 objective in their territory to be the primary objective until the start of the next turn. At the start of their turn, after their opponent has picked the primary objective, the underdog can roll a dice. On a 5+, their opponent must pick a different objective to be the primary objective for that turn. Each player scores victory points at the end of each of their turns as follows:
 This map layout can also be used for Feral Foray and The Better Part of Valour. AREA TERRAIN Examples: Hills, StormvaultTerrain Abilities: Cover OBSTACLES Examples: Ruins, debris, statues, barricadesTerrain Abilities: Cover, Unstable OBSCURING TERRAIN Examples: Wyldwood, fortress wallTerrain Abilities: Cover, Obscuring, Unstable PLACES OF POWER Examples: Realmgate, Cleansing Aqualith, Nexus SyphonTerrain Abilities: Cover, Place of Power, Unstable KEY
 | |||||||||||||||||||||||
Battleplan 6 (Table 2) Limited ResourcesTWIST: When a player gains control of an objective, they start to extract resources from it. After scoring victory points, if the active player controls an objective that they controlled at the end of their previous turn, they have extracted all the resources from that objective. For the rest of the battle, that player cannot control that objective. Once a player has extracted all of the resources from an objective, they can still contest it to prevent their opponent from controlling it, but they do not and cannot control it themselves. The underdog can add 3 to the control scores of friendly units that are contesting an objective from which they are extracting resources. Each player scores victory points at the end of each of their turns as follows:
 AREA TERRAIN Examples: Hills, StormvaultTerrain Abilities: Cover OBSTACLES Examples: Ruins, debris, statues, barricadesTerrain Abilities: Cover, Unstable OBSCURING TERRAIN Examples: Wyldwood, fortress wallTerrain Abilities: Cover, Obscuring, Unstable PLACES OF POWER Examples: Realmgate, Cleansing Aqualith, Nexus SyphonTerrain Abilities: Cover, Place of Power, Unstable KEY
 | |||||||||||||||||||||||
Tournament Organiser Pack
Why Run a Warhammer Age of Sigmar Event?
Organised events are a hugely enjoyable and exciting way to play Warhammer Age of Sigmar, but without tournament organisers (TOs), no one would get to experience them. Running an event is not only fun for the TO, it is also a different way to enjoy the hobby. There are few things as rewarding as watching over a group of enthusiastic hobbyists playing competitive Warhammer Age of Sigmar at an event that you have organised. Moreover, it’s a well-known fact that TOs are the true heroes of the Mortal Realms!But what does it mean to be a TO? Ultimately, a TO is in charge of setting up and running an event. This includes organising the venue, preparing a ‘pack’ that sets out everything players need to know to prepare for and attend the event, welcoming players to the venue, making decisions on rules queries (or bringing in an appointed judge) and compèring the closing ceremony while the awards are being handed out.
This section of the General’s Handbook provides you with all the information you need to be a TO for your own event. It contains lots of hints and tips on how you can customise the event to your own preferences as well as an example tournament pack.
We have split the information into two main categories: what a TO needs to consider when planning an event and what a TO will need to do during the event. Remember, though, these are simply guidelines intended to assist you in planning and running your event; they are not hard and fast rules.
Planning Your Event
There is a saying that TOs in the Warhammer Age of Sigmar event community often use: ‘Run the event that you would like to play in’.The Pack
Every event should have a document called a ‘pack’. The pack provides the players with all the details about the event, such as where it is, what battlepack will be played and what awards can be won. You can find a example pack printable copy below:The Battlepack
One of your first decisions should be what battlepack you want to use for your event – and there are many different battlepacks published by Games Workshop for you to choose from! We also periodically publish new battlepacks in White&Dwarf or on warhammer-community.com.The General’s Handbook 2024-25 battlepack is designed for Matched Play events; however, there are multiple ways to play Warhammer Age of Sigmar, and you should pick a battlepack that reflects the type of event you wish to run. For example, the Spearhead battlepack Fire and Jade is fantastic for small, quick games of Warhammer Age of Sigmar using fixed army rosters, the Matched Play battlepack First Blood is excellent for introducing players to competitive play, while the Path to Glory battlepack Ascension provides a jumping-off point for narrative play.
Battlepack PrepIt’s worth having a good read of each battlepack to make sure that it fits your vision for your event. Not only will this ensure that you understand the rules of the battlepack, it will also give you an indication of how much pre-event preparation is required. For instance, creating the opening narrative of a Path to Glory event will take a little more effort to prepare than an off-the-shelf First Blood event, but it will be no less exciting or rewarding. | ||
Maximum Points Limit
The maximum points limit will determine how large each player’s army can be. The higher you set the maximum points limit, the longer it will take players to finish their games.The most common points limit for Matched Play events is 2000 points; however, feel free to set a higher or lower points limit if it would better suit your event.
Army Rosters
With regard to army rosters, it is worth bearing in mind that new rules can change the points of existing units or otherwise change army composition options. As both events and new miniature and battletome releases often take place on a weekend, this means that new rules can come into effect after the first round of an event has started. Therefore, many TOs will specify a ‘cut-off date’ for rules – any rules introduced after this date cannot be used at the event. The timing of the cut-off date is entirely at your discretion, but we suggest either the same day as the pre-event list submission deadline (see below) or 1-2 weeks before the event to give players time to adjust their lists.As TO, you might be happy for players to bring their army rosters to their event and show them to their opponents before each game, or you might prefer players to submit their army rosters a week or so prior to the event. Having a pre-event list submission deadline means that you have time to independently check army rosters for mistakes and allows you to share the lists among all the players, should you wish. This kind of event is often called an ‘open-list event’.
One advantage of open-list events is that the players also get a chance to look over and discuss their potential opponents’ lists, so they can help to identify any inconsistencies that might need to be fixed before the event.
Whichever option you decide is best for your event, we recommend that you ask players to use the Warhammer Age of Sigmar App to build their army roster so that the rosters are clear and all follow the same format.
Number of Rounds
You will need to choose how many rounds you want to have at your event. Each player will play 1 game of Warhammer Age of Sigmar per round, so at a three-round event, each player will play 3 games. The table below gives an indication of how long a typical 2000-point event will take depending on the number of rounds.
|
Round Timings
You will need to decide how much time will be allotted for each round. For a 2000-point game, we suggest allowing 2 to 3 hours per round. If your players are relatively experienced at playing Matched Play games, they should be able to finish more quickly and you can have shorter round times.Players will need a break between each round and you, as the TO, will need enough time after all the games have finished to collate the results and work out the pairings for the next round. We suggest a minimum of 30 minutes between rounds.
Battleplans
You can pick battleplans before your event or randomly determine them before each round. If you pick them before the event and make them public, players can tailor their lists to be the most efficient for those battleplans. Conversely, using ‘secret’ or randomly determined battleplans will mean that players will likely need to bring ‘all-rounder’ army rosters in order to do well.You will also need to consider terrain placement. The General’s Handbook 2024-25 battlepack contains 2 rules sets for terrain placement: in the first, placement is determined by the attacker/defender roll-off, while the second uses preset terrain layouts.
For larger events using preset terrain layouts, it may be more convenient to leave the same terrain set up over multiple battles. In order to facilitate this, each preset terrain layout lists at the top of the page which other battleplans are compatible with that terrain layout.
Pairing Players
While the first round of most tournaments is randomly paired, subsequent round pairing can be done in a number of ways. The first pairing metric will almost always be player record, i.e. pairing a 3-1 player with another 3-1 player, and so on. Given that most rounds will include numerous players with the same record, however, deciding pairings beyond this metric can be quite nuanced, and the different methods available can have significant impacts on the experience of players at an event. We recommend pairing players by the following criteria:- First – by record (i.e. the number of wins, losses and draws)
- Second – by win path (i.e. the timing of the rounds in which a player won or lost their games)
- Third – randomly within players of the same ranking
Win PathA player’s ‘win path’ refers not to their number of wins and losses but to the timing of those wins and losses. While pairing by win path has an incidental tendency to pair people by strength of schedule, its greatest impact is on the overall enjoyment experienced by all players, as it tends to pair players based upon shared experience.For example, let’s take two 3-1 players. One of them lost their first game; they likely lowered their expectations for winning the whole event after this but are probably in a great mood after three consecutive victories. The other won their first three games then lost their fourth – a sharp disappointment after a 3-0 start. Should these players face off, their shared enjoyment may be at odds as they are in very different emotional places. Win path ensures players enter their match with recent common experiences upon which to build a friendship during their next game of Warhammer. | ||
Ranking Players
You will need a scoring system so that you can both rank your players and work out which player is the champion!The simplest scoring system is a win/loss/draw ranking system where the player who wins the most games is the champion. However, Matched Play battleplans also further categorise the result of a game into a major victory, a minor victory or a draw (with major losses and minor losses implied rather than called out). Therefore, we recommend a scoring system that ranks players according to the number of major victories they have achieved, then the number of minor victories, draws, minor losses and major losses.
With any system, even small events can end up having players with the same scores, and so it is important to have a tie-breaker system in place. We recommend using the following as tie-breakers:
1. Their opponents’ win records (i.e. a player with more wins against opponents with better win records would place higher).
2. Total number of victory points scored
3. Total number of battle tactics completed
4. Total number of battle tactics that their opponents failed to complete
5. Total victory point differential
Awards
In addition to calling out the player with the highest score, events typically have one or more painting awards, with categories including ‘best painted’ (where the technical quality of the army’s paint scheme is judged) and ‘favourite army’ (where the theme of the army is judged). The winners of such awards can be determined either by tallying player votes using a blind ballot or by an independent judge or panel of judges making the decision. You can choose whether you want to include any painting awards and if you do, how you will judge them. You should also ensure you have an appropriate system in place to record the voting. For player-voted awards, we recommend 1 vote per player.The battles set in the Mortal Realms are fast, furious and sometimes unforgiving, but they present an incredible opportunity for fun and friendship! The excitement of doing battle on the tabletop combined with a community of passionate players help make every game of Age of Sigmar memorable. Players making the game better for their opponents should be encouraged and rewarded.
As a result, many events also have a ‘best sportsperson’ award, often considered to be the most prestigious award at a Warhammer Age of Sigmar event. At the end of the event, players vote for their favourite opponent; the winner is the player who receives the most votes. Again, if you decide that you would like to have a sportspersonship award, you will need to have a system to record the voting. We recommend 1 vote per player.
Logistical Decisions
There are a number of logistical decisions that you will need to consider when you are planning your event.Venue
You will need a venue for your event. If your event is too big to host in your house, garden or hobby room, consider speaking to local halls or your friendly local gaming store (FLGS) to see if you can use their space.Number of Players/Tables
You will need to decide how many players you want to host at your event. This might be restricted by physical factors such as the size of your venue or the amount of terrain you have available. Most importantly, make sure you choose an even number so that everyone has an opponent in each round!Terrain
You will need to either provide enough appropriate terrain for each table or ask your players to bring terrain with them. Be aware that if you choose the latter option, you will have little control over the type of terrain that will be used at your event.Food
Your venue may be able to provide food for your players or you could arrange for some form of catering. If you decide to go down this route, make sure you inform your players of their options and find out if there are any allergies or specific dietary requirements that will need to be catered for. Alternatively, you may decide not to provide food, in which case you will need to allow enough time in your schedule for players to and somewhere to buy food if they have not brought any with them. Either way, make sure that your players are aware of your decision prior to the event so that they can prepare accordingly.Tickets (Price, Method of Purchase,Refund Policy)
You will need to set the ticket price, tell your players how they can purchase a ticket and clarify your refund policy. We suggest including a cut-off date after which refunds will not be provided – this means you will not end up out of pocket if several players are unexpectedly unable to attend your event.Judges
If possible, you should have a judge – someone who can mediate any disputes that may arise. Be clear to your players that judges have final say on rules disputes on a game-by-game basis. To avoid conflicts of interest, we recommend having a player who is not participating in the event to be your judge.The first port of call for judges should always be to double-check the exact wording of the rules in question (whether in the Core Rules, a battletome or another supplement). We regularly answer additional rules queries and address any errata on warhammer-community.com. In the event that they cannot find clear guidance, the judge should make what they feel is the most reasonable and fair ruling to allow the game to progress.
Recording Scores
You will need to record scores during your event. You could use a custom-built spreadsheet or, alternatively, there are several websites and apps that can record scores for you.Pre- and Post-Gaming
You will need to allow time in your schedule for a welcome briefing (which should include health and safety information, such as the locations of fire exits and welfare facilities) and an award ceremony after the games have all finished.Permissible Models
Players will need to know what models will be permissible at your event and to what standard they must be painted. We recommend that all models should be fully assembled and painted to at least a Games Workshop Battle Ready standard. You can find further information at warhammercommunity.com.Prizes
If you decide to give out awards at your event, you will need to determine what the prizes will be. We recommend at least 1 prize for gaming, 1 prize for painting and 1 prize for sportspersonship. If you have sufficient prize support, you could award first, second and third places. Common prizes include trophies, certificates and boxes of Citadel Miniatures. Downloadable certificates can be found on warhammer-community.com.Spare Player
Sometimes, real life gets in the way of Warhammer and players have to drop out of an event unexpectedly. This could leave you with an uneven number of players, meaning that each round, one player would not have an opponent. Given that players will have come to your event to play Warhammer Age of Sigmar, the best option is to make sure you have a spare player, such as a friend or a clubmate, who can step in and play if needed. If this is not possible, you could award maximum points to the player who did not have an opponent that round.Contact Details (Event-Specific Email Address/Phone Number)
Your players may need to get in touch with you to clarify some details about the event, so we recommend providing them with an email address and/or telephone number that they can contact you on.Game Speed Milestones
To help your players finish their games within the allotted timeframe, periodic milestone call-outs indicating approximately which point in the battle the players should have reached are really useful. Here is an example of the milestones you could use for a round lasting 2 hours and 45 minutes:- 2 hours and 45 minutes remaining. Start round
- 2 hours and 40 minutes remaining. Complete pregame discussions and decisions.
- 2 hours and 30 remaining. Deployment complete. Begin round 1.
- 1 hour and 50 minutes remaining. First battle round complete. Begin round 2.
- 1 hour and 14 minutes remaining. Second battle round complete. Begin round 3.
- 44 minutes remaining. Third battle round complete. Begin round 4.
- 24 minutes remaining. Fourth battle round complete. Begin round 5.
- 4 minutes remaining. Do not begin a new battle round without the judge’s permission.
What to do With Overruns
Despite a TO’s best efforts, games will sometimes overrun the time allotted for a round. You will need to decide how you will deal with these situations. If the game is almost at an end, you could let the players continue playing the game to its natural conclusion, provided that to do so would not impact the start of the next round.If there is not enough time to allow the battle to finish without impacting the start of the next round, we recommend encouraging the players to talk through the most likely outcome of the remaining battle round(s), facilitated by a judge if necessary. These instances should be a rarity, as the best situation is to ensure that there is sufficient time and that milestones are clearly communicated so that all games reach their natural conclusion.
Dropped Players
Sometimes, in exceptional circumstances, a player might need to leave an event and are unable to complete their remaining games. To make sure that all remaining players can be paired with an opponent, we recommend that you have a spare player available to step in.If a player has to leave mid-game, we recommend that they receive a major loss and their opponent wins a major victory. Their opponent scores maximum victory points for each remaining round and the player who had to leave scores no further victory points.
Example Event Pack
On the following page is an example event pack that you can use to run your event. Feel free to photocopy and use the parts of the pack that are relevant to your event. A digital copy of this pack can be downloaded from warhammer-community.com.ADVANCED RULES 2024-25
Each Advanced Rules section is designed to be modular, allowing each battlepack to specify which Advanced Rules to use with that battlepack. This book contains the following Advanced Rules sections:
COMMANDS
These rules explain how you can earn command points to use powerful commands that allow you to react to abilities and interact in your opponent’s turn. If you are not using the Commands rules, ignore any abilities that have the command point symbol in the corner.TERRAIN
These rules go into more detail about how your models interact with terrain features, such as how they can take cover or even draw power from arcane nexuses.MAGIC
If you’d like to wield unlimited mystical power by including WIZARDS, PRIESTS and manifestations in your battles, see Magic.ARMY COMPOSITION
If you’re ready to build your own army roster and customise your army with regiments, battle formations and enhancements, see Army Composition.COMMAND MODELS
Here you will find rules for special models called champions, standard bearers and musicians, which are found in many Warhammer Age of Sigmar units.BATTLE TACTICS
Add an additional tactical challenge to your games by including secondary objectives called Battle Tactics.BUILD YOUR OWN BATTLEPACK There are many, many ways to play Warhammer Age of Sigmar, from Path to Glory battlepacks, which focus on narrative-driven battles linked in an ongoing campaign, to Spearhead and Matched Play battlepacks, in which the emphasis is on balance and competitive play.In addition to using official battlepacks, we’d encourage you to use the rules in this section as a toolbox, mixing and matching the elements within to build your own battleplan or battlepack to play with your friends. Are you excited to field your entire collection against your friends or to see which monster reigns supreme? Maybe you want to design your own battleplans and special rules, or perhaps you want to keep things simple in order to teach a younger sibling how to play. These rules provide an open framework that makes each of these things possible. Here are some ideas to get you started:
| ||
Commands
| ||
1.0 Commands Overview
Some abilities, called commands, require that you spend one or more command points ( ) to use that ability. Any ability that has a command point cost (indicated in the top right corner of the ability) is a command.
1.1 Earning Command Points
At the start of each battle round, after determining the underdog, each player gains 4 command points. If there is an underdog, they gain 1 extra command point. At the end of the battle round, the players’ command points are reset to 0 (any that have not been used are lost).2.0 Hero Phase Commands
 Any Hero Phase Any Hero Phase | 1 |
RALLY: With an inspiring call to action, wounded soldiers get a second wind and fresh troops take the field to replace their fallen comrades.
Declare: Pick a friendly unit that is not in combat to use this ability.
Effect: Make 6 rally rolls of D6. For each 4+, you receive 1 rally point. Rally points can be spent in the following ways:
Effect: Make 6 rally rolls of D6. For each 4+, you receive 1 rally point. Rally points can be spent in the following ways:
- For each rally point spent, Heal (1) that unit.
- You can spend a number of rally points equal to the Health characteristic of that unit to return a slain model to that unit.
| Enemy Hero Phase | 1 |
MAGICAL INTERVENTION: A warrior learned in the mystic arts utters a rapid incantation to disrupt the enemy’s plans.
Declare: Pick a friendly WIZARD or PRIEST to use this ability.
Effect: That friendly unit can use a SPELL or PRAYER ability (as appropriate) as if it were your hero phase. If you do so, subtract 1 from casting rolls or chanting rolls made as part of that ability.
Effect: That friendly unit can use a SPELL or PRAYER ability (as appropriate) as if it were your hero phase. If you do so, subtract 1 from casting rolls or chanting rolls made as part of that ability.
3.0 Movement Phase Commands
| Enemy Movement Phase | 1 |
REDEPLOY: Taking initiative, the warriors hastily reposition to respond to enemy movements.
Declare: Pick a friendly unit that is not in combat to use this ability.
Effect: Each model in that unit can move up to D6". That move cannot pass through or end within the combat range of an enemy unit.
Effect: Each model in that unit can move up to D6". That move cannot pass through or end within the combat range of an enemy unit.
| KEYWORDS | MOVE, RUN |
| Reaction: You declared a RUN ability | 1 |
AT THE DOUBLE: At a command from their general, the warriors sprint to a key position on the battlefield.
Used By: The unit using that RUN ability.
Effect: Do not make a run roll as part of that RUN ability. Instead, add 6" to that unit’s Move characteristic to determine the distance each model in that unit can move as part of that RUN ability.
Effect: Do not make a run roll as part of that RUN ability. Instead, add 6" to that unit’s Move characteristic to determine the distance each model in that unit can move as part of that RUN ability.
4.0 Shooting Phase Commands
 Enemy Shooting Phase Enemy Shooting Phase | 1 |
COVERING FIRE: The warriors unleash a quick volley at a nearby enemy unit before it charges into combat.
Declare: Pick a friendly unit that did not use a RUN ability this turn and that is not in combat to use this ability, then pick the closest enemy unit (to that unit) that can be picked as the target of shooting attacks to be the target. You cannot pick MANIFESTATIONS or faction terrain features as the target of this ability.
Effect: Resolve shooting attacks for the unit using this ability against the target. You must subtract 1 from the hit rolls for those attacks.
Designer’s Note: This change allows reactions such as ‘All-out Defence’ to be used in response to ‘Covering Fire’.
Effect: Resolve shooting attacks for the unit using this ability against the target. You must subtract 1 from the hit rolls for those attacks.
Designer’s Note: This change allows reactions such as ‘All-out Defence’ to be used in response to ‘Covering Fire’.
| KEYWORDS | SHOOT, ATTACK |
5.0 Charge Phase Commands
| Enemy Charge Phase | 2 |
COUNTER-CHARGE: Seeing the need for decisive action, the warriors charge forth to stall the enemy’s advance or enact a bold interception.
Declare: Pick a friendly unit that is not in combat to use this ability.
Effect: That unit can use a CHARGE ability as if it were your charge phase.
Effect: That unit can use a CHARGE ability as if it were your charge phase.
| Reaction: You declared a CHARGE ability | 1 |
FORWARD TO VICTORY: With their charge faltering, a rousing command gives the unit renewed energy to reach their foes.
Used By: The unit using that CHARGE ability.
Effect: You can re-roll the charge roll.
Effect: You can re-roll the charge roll.
6.0 Attacking (Shooting and Combat) Commands
| Reaction: You declared an ATTACK ability | 1 |
ALL-OUT ATTACK: The warriors fight with a frenzied vigour.
Used By: The unit using that ATTACK ability.
Effect: Add 1 to hit rolls for attacks made as part of that ATTACK ability. This also affects weapons that have the Companion weapon ability.
Effect: Add 1 to hit rolls for attacks made as part of that ATTACK ability. This also affects weapons that have the Companion weapon ability.
7.0 Defensive Commands
| Reaction: Opponent declared an ATTACK ability | 1 |
ALL-OUT DEFENCE: The soldiers close ranks to hold off an incoming attack.
Used By: A unit targeted by that ATTACK ability.
Effect: Add 1 to save rolls for that unit in this phase.
Effect: Add 1 to save rolls for that unit in this phase.
8.0 End of Turn Commands
| End of Any Turn | 1 |
POWER THROUGH: The warriors use their sheer mass or resilience to drive through a group of weaker foes, leaving broken bodies in their wake.
Declare: Pick a friendly unit that charged this turn to use this ability, then you must pick an enemy unit in combat with it to be the target. The target must have a lower Health characteristic than the unit using this ability.
Effect: Inflict D3 mortal damage on the target. Then, the unit using this ability can move a distance up to its Move characteristic. It can pass through and end that move within the combat ranges of enemy units that were in combat with it at the start of the move, but not those of other enemy units. It does not have to end the move in combat.
Effect: Inflict D3 mortal damage on the target. Then, the unit using this ability can move a distance up to its Move characteristic. It can pass through and end that move within the combat ranges of enemy units that were in combat with it at the start of the move, but not those of other enemy units. It does not have to end the move in combat.
| KEYWORDS | MOVE |
Terrain
1.0 Terrain Overview
Terrain features add interest and tactical challenges to the battlefield. The battleplan or battlepack you are using will explain how to set up terrain.| The Citadel Terrain List includes a list of Warhammer Age of Sigmar terrain features and tells you which terrain abilities each of them has. | ||
1.1 Wholly on Terrain and Behind Terrain
A model is wholly on a terrain feature if its base is on that terrain feature and no part of its base extends past the edge of that terrain feature. A unit is wholly on a terrain feature if every model in that unit is wholly on that terrain feature.When a unit is targeted by an attack, the unit is considered to be behind a terrain feature if it is impossible to draw a straight line from a model in the attacking unit to a model in the target unit without that line passing across that terrain feature. Ignore parts of the terrain feature within the attacking model’s combat range for the purposes of determining if the target is behind that terrain feature.
1.2 Universal Terrain Abilities
Each terrain feature has one or more of the following passive abilities:
|
| Start of Any Turn |
ACTIVATE PLACE OF POWER: The hero draws on the power of a nearby mythical landmark.
Declare: Pick a friendly HERO within 3" of any Places of Power to use this ability.
Effect: Roll a dice. On a 1, inflict D3 mortal damage on that HERO. On a 2+:
Effect: Roll a dice. On a 1, inflict D3 mortal damage on that HERO. On a 2+:
- If that HERO is a WIZARD or PRIEST, add 1 to casting rolls or chanting rolls for that HERO this turn.
- If that HERO is not a WIZARD or PRIEST, they can use the ‘Unbind’ or ‘Banish Manifestation’ ability this turn as if they had WIZARD (1).
| KEYWORDS | CORE |
1.3 Terrain Sizes
- Terrain that fits into an area no larger than 7" x 7" is small.
- Terrain that is not small and fits into an area no larger than 7" x 12" is medium.
- Terrain that is too big to fit into an area 7" x 12" is large.
1.4 Terrain Types
Each terrain feature in Warhammer Age of Sigmar is one of the following types:- Obstacle
- Obscuring Terrain
- Area Terrain
- Place of Power
- Faction Terrain
Before the battle begins, players must agree on which type applies to each terrain feature.
1.5 Faction Terrain
Some factions have special terrain features called faction terrain features. Faction terrain features have their own warscrolls. They are not considered to be units, with the following exceptions:- In the combat phase, they are treated as if they were units for the purposes of movement, combat range and being in combat. Units can finish a charge move within 1/2" of an enemy faction terrain feature as if it were a unit.
- They can be picked as targets of enemy abilities as if they were units. They are not affected by enemy abilities that do not involve picking targets.
- Damage points can be inflicted on them as if they were units and they can be destroyed.
- If a terrain feature has any melee or ranged weapons, it can use the ‘Fight’ and ‘Shoot’ Core abilities as if it were a unit.
- Terrain features that have a Move characteristic of 0" (‘-’) cannot move (note that pile-in moves are a type of move).
- Faction terrain features with a Move characteristic greater than ‘-’ are treated as if they were units in all phases for the purposes of movement, combat range, being in combat and setting up terrain features, other manifestations and other units.
Some faction terrain features allow you to place a unit on them (this will be clearly specified in that terrain feature’s rules). When doing so, instead of measuring range or visibility to and from the unit that is on that terrain feature, measure to and from the terrain feature instead. Unless otherwise specified, units on a faction terrain feature cannot use FIGHT abilities.
If a unit placed on a terrain feature is removed from it (e.g. if an ability removes them from the battlefield), that unit counts as having left that terrain feature and loses any special role or benefits it had as a result of being placed on it.
| The Citadel Terrain List shows the number of scenery pieces each terrain feature can consist of. If you are using terrain features that are not included on that list, agree with your opponent before setting up the battlefield how many scenery pieces make up each terrain feature. | ||
1.6 Charging Units on Terrain
In some cases, it is not possible to reach an enemy unit using a CHARGE ability when they are wholly on a terrain feature (e.g. a unit on top of a tower) because the charging unit is unable to end their move mid-way up the terrain feature and there is not enough room for the models to be placed at the top. In these cases, the charging unit can end their charge within 1/2" of that terrain feature instead if this would result in the charging unit ending their move in combat with any enemy units wholly on a terrain feature.1.7 Scenery Pieces
Some terrain features, such as wyldwoods or collections of smaller timeworn ruins, are made up of multiple scenery pieces. Each scenery piece that makes up a part of the same terrain feature must be set up so that all of the scenery pieces fit into the area that corresponds to the terrain feature’s size (see 1.3). The full collection of scenery pieces is considered to be a single terrain feature.
| This battlefield uses Citadel terrain, so the players were able to simply look up the terrain type of each terrain feature in the Citadel Terrain List. 1 Ruined Domicile (Obstacle)2 Domicile Shell (Obstacle)3 Guardian Idol (Obstacle)4 Cleansing Aqualith (Place of Power)5 Nexus Syphon (Place of Power) 6 Wyldwood (Obscuring Terrain) | ||

| The second battlefield uses scratch-built terrain. Before setting up the terrain, both players discussed and agreed on the terrain type of each terrain feature they were using, as shown below. 1 Place of Power2 Area Terrain3 Obstacle4 Obscuring Terrain | ||
Citadel Terrain List
This list shows you which terrain types apply to which sets of Citadel Terrain and the number of scenery pieces (Terrain, 1.7) that make up each terrain feature. New terrain will be added to this list as it is released. Note that not all of this terrain is currently available, but it is included here for players who have those terrain features in their collections. If a terrain feature lists multiple options for its number of scenery pieces and size, pick which apply to it before setting it up.
|
Magic
| ||
1.0 Wizards and Priests
WIZARDS are special units that can cast spells, and PRIESTS are special units that can chant prayers. Spells and prayers are powerful abilities that can have a dramatic impact on the battle.1.1 Power Level
Each WIZARD and PRIEST has a power level, shown in brackets after the keyword, e.g. WIZARD (2). A WIZARD or PRIEST’s power level determines the number of SPELL, PRAYER or BANISH abilities they can use per phase, in any combination. For example, a WIZARD (2) unit could use 1 SPELL and 1 BANISH ability in their commander’s hero phase.2.0 Spells
The declare step of each spell will tell you to make a casting roll of 2D6. If the roll does not equal or exceed the spell’s casting value (at the top-right corner of the spell), the spell fails and its effect is not resolved.If the unmodified casting roll includes 2 or more rolls of 1, the spell is miscast: the spell fails, its effect is not resolved, D3 mortal damage is inflicted on the WIZARD that used it, and that WIZARD cannot use any more spells in that phase.
Enemy reactions can only be used if the casting roll equals or exceeds the spell’s casting value. So long as the spell is not unbound (see 4.0), then it is successfully cast: resolve its effect.
EXAMPLE SPELL
| Your Hero Phase | 6 |
MYSTIC SHIELD: The caster's allies are bathed in an unearthly glow that protects them from harm.
Declare: Pick a visible friendly unit wholly within 12" of this WIZARD to be the target. Then, make a casting roll of 2D6.
Effect: The target has WARD (6+) this turn.
Effect: The target has WARD (6+) this turn.
| KEYWORDS | SPELL |
3.0 Prayers
The declare step of each prayer will tell you to make a chanting roll of D6. On an unmodified chanting roll of 1, the prayer fails, its effect is not resolved and you must remove D3 ritual points from the PRIEST using the prayer.On an unmodified chanting roll of 2 or more, pick one of the following:
- Give a number of ritual points to the PRIEST equal to the chanting roll (ritual points can be accumulated over multiple turns).
- Add the PRIEST’s ritual points to the chanting roll. If the chanting roll equals or exceeds the prayer’s chanting value (at the top-right corner of the prayer), it is answered: resolve the effect of the prayer, then reset the PRIEST’s ritual points total to 0.
EXAMPLE PRAYER
| Once Per Battle, Your Hero Phase | 7 |
RESURRECTION: A fallen hero is brought back from death, their vitality fully restored.
Declare: Make a chanting roll of D6.
Effect: Pick a friendly INFANTRY HERO that has been slain and return them to the battlefield. Set up that HERO wholly within 3" of this PRIEST.
Effect: Pick a friendly INFANTRY HERO that has been slain and return them to the battlefield. Set up that HERO wholly within 3" of this PRIEST.
| KEYWORDS | PRAYER |
4.0 Unbinding Spells
Each WIZARD can use the ‘Unbind’ reaction a number of times per phase equal to their power level. Th is is an exception to The Rules of One (Core Rules, 5.3).$000001376
5.0 Jealous Mages and Fickle Gods
No more than 1 friendly WIZARD can cast the same spell per turn, unless that spell has the UNLIMITED keyword. Likewise, no more than 1 friendly PRIEST can chant the same prayer per turn, unless that prayer has the UNLIMITED keyword. Keep in mind that each unit can still only use any given spell or prayer ability once per phase (see The Rules of One, Core Rules, 5.3).But Khorne Hates Sorcery!Even though wizards and priests draw upon very different sources of power in the lore, the former harnessing the motes of magic that permeate the realms and the latter calling upon the divine might of the gods themselves, such nuances are lost on the average person in the realms! For rules purposes, the miraculous abilities of both wizards and priests are dealt with in the Magic module. | ||
6.0 Known Spells and Prayers
WIZARDS and PRIESTS can only use spells or prayers that they know. Each WIZARD and PRIEST knows any spells or prayers on its warscroll, plus all of the spells and prayers in the spell lores, manifestation lores and prayer lores you take for your army, as appropriate (see the Army Composition module).7.0 Manifestations
There are two types of manifestation: endless spells, which can be summoned by WIZARDS, and invocations, which can be summoned by PRIESTS. Each manifestation has its own warscroll, and the spell or prayer that allows that manifestation to be summoned will be found in the appropriate manifestation lore. No more than 1 friendly WIZARD or PRIEST can attempt to summon the same manifestation per turn, and a friendly WIZARD or PRIEST cannot attempt to summon a friendly manifestation that was removed from play in the same turn. Manifestations are not considered to be units, with the following exceptions:- They are treated as if they were units for the purposes of movement, combat range, being in combat and setting up other units. Units can finish a charge move within 1/2" of an enemy manifestation as if it were a unit.
- If they have any melee or ranged weapons, they can use the ‘Fight’ and ‘Shoot’ CORE abilities as if they were units.
- If they have a Move characteristic greater than 0" (‘-’), they can use CORE MOVE abilities as if they were units.
- They can be picked as targets of enemy abilities as if they were units. They are not affected by enemy abilities that do not involve picking targets.
- Damage points can be inflicted on them as if they were units and they can be destroyed.
- Manifestations that have a Move characteristic of 0" (‘-’) cannot move. For the purposes of movement, combat range, being in combat and setting up other units, they are only treated as if they were units in the combat phase. Units can finish a charge move within 1/2" of an enemy manifestation that has a Move characteristic of 0" (‘-’) instead of within 1/2" of an enemy unit.
- Models can move through manifestations but cannot end a move on them.
7.1 Severed Connection
If the WIZARD or PRIEST that summoned a manifestation is slain, that manifestation is removed from the battlefield.7.2 Banishing Manifestations
All WIZARDS and PRIESTS can use the ‘Banish Manifestation’ ability:| Your Hero Phase |
BANISH MANIFESTATION: The wizard or priest disrupts the arcane forces sustaining a manifestation, wiping it from existence.
Declare: Pick a friendly WIZARD or PRIEST to use this ability, pick a manifestation within 30" of them to be the target, then make a banishment roll of 2D6. Add 1 to the banishment roll for each additional enemy manifestation on the battlefield after the first.
Effect: If the banishment roll equals or exceeds the banishment value listed on the manifestation’s warscroll, it is banished and removed from play. You cannot pick the same manifestation as the target of this ability more than once per turn.
Effect: If the banishment roll equals or exceeds the banishment value listed on the manifestation’s warscroll, it is banished and removed from play. You cannot pick the same manifestation as the target of this ability more than once per turn.
| KEYWORDS | BANISH |
Army Composition
| ||
1.0 Getting Started
1.1 Army Roster
These rules will explain how to create an army roster to prepare for a battle. You can find a blank army roster printable copy below:1.2 Points Limit
Before you start filling your roster, you and your opponent must agree on a points limit for the battle. You can agree on any points limit, but most players use a limit of 1000 points, 2000 points or somewhere in between. No more than half of your points can be spent on a single unit.1.2.1 Underspending
In many cases, the total points cost of the units in your army will not add up to the exact points limit, but you might not have enough points left to add another unit. If the points cost of your army is 50 or more points lower than the points limit of the battle, you gain 1 extra command point at the start of the first battle round.1.3 Battle Profiles
The information you’ll need when building your army roster is found in each unit’s battle profile. The battle profile for a unit will be in the same publication as its warscroll (usually a battletome).| Battle profiles are regularly updated to improve balance. When we republish them, the new version takes precedence over versions with an earlier publication date or no publication date. | ||
2.0 Factions
The first thing you need to do when building your army roster is to pick your faction (e.g. Stormcast Eternals or Skaven).Each faction has its own warscrolls, battle profiles and faction rules. These can be found in various publications but most commonly in the faction’s battletome.
3.0 Adding Units
3.1 Regiments
Armies are made up of one or more regiments, each of which is led by a HERO. You must have at least 1 regiment in your army, and you can include a maximum of 5 regiments. To add a regiment, pick 1 HERO from your faction, then pick up to 3 non-HERO units to accompany them.Each HERO’s battle profile lists which units can be added to their regiment, and each non-HERO unit’s battle profile lists any relevant keywords it has. The battle profiles of some HEROES (such as named characters) may say that they can be added to the regiment of another HERO.
3.2 The General
You must pick 1 HERO in your army that is leading a regiment to be your general. If any units in your army have the WARMASTER keyword, you must pick one of those units to be your general. Your general’s regiment can include up to 4 non-HERO units in addition to your general.3.3 Reinforced Units
When you add a unit to your army roster, you can add it as a reinforced unit. A reinforced unit has twice as many models as its minimum unit size and costs twice as many points. If a unit has a minimum unit size of 1, it cannot be reinforced.3.4 Unique Units
You cannot include the same UNIQUE unit more than once in your army. UNIQUE units cannot be reinforced.3.5 Regiments of Renown
In addition to creating your own regiments, you can also spend points to include 1 Regiment of Renown. Regiments of Renown are pre-built regiments, each with their own special abilities. The rules for each Regiment of Renown will specify which factions can include it. A unit in a Regiment of Renown cannot be your general even if it is a WARMASTER.- You cannot include more than 1 Regiment of Renown in your army unless otherwise specified in the notes column of that regiment’s battle profile.
- Units in a Regiment of Renown cannot use (but can be picked as the target of, if otherwise eligible) any faction rules from the faction they are allied into, including enhancements and lores, unless they have a keyword that matches that faction’s name.
- If an ability allows you to set up a replacement unit (Core Rules, 24.2) for a unit in a Regiment of Renown, that unit also counts as being part of that Regiment of Renown.
3.6 Auxiliary Units
Auxiliary units allow you to take any units from your faction without the constraints of regiments, at the cost of potentially giving your opponent an advantage. You can add any number of units to the auxiliary units section of your army roster. However, the player with the fewest auxiliary units on their roster gains 1 extra command point at the start of each battle round (if the players have the same number of auxiliary units, neither player receives an extra command point). HEROES that have compulsory regiment options cannot be taken as auxiliary units.3.7 Faction Terrain Features
If your faction has a faction terrain feature, or a set of faction terrain features, you can pick 1 to include on your army roster. Faction terrain features do not cost any points.4.0 Finishing Touches
4.1 Enhancements
Each set of faction rules include a number of enhancements that can be given to units, e.g. heroic traits, mount traits and artefacts of power. You can take 1 enhancement from each enhancement table in your faction rules. Each enhancement table lists which units are eligible to be given that enhancement. UNIQUE units cannot be given enhancements.While some abilities allow you to take extra enhancements, the same unit can never have more than 1 enhancement of the same type, and you can never include the same enhancement in your army more than once.
4.2 Lores
You can pick 1 spell lore available to your faction. If you do, all WIZARDS in your army know all spells from that lore.You can pick 1 prayer lore available to your faction. If you do, all PRIESTS in your army know all prayers from that lore.
You can pick 1 manifestation lore available to your faction. If you do, all WIZARDS in your army know all spells from that lore, and all PRIESTS know all prayers from that lore.
Command Models
1.0 Champions
Units with the CHAMPION keyword have one or more champion models. If there is a number after the CHAMPION keyword, that number indicates the proportion of models in that unit that can be champions. In any other case, 1 model in the unit can be a champion. Units with the CHAMPION keyword have the following passive ability:| Passive |
CHAMPION: A veteran fighter leads the charge.
Effect: Add 1 to the Attacks characteristic of weapons used by champions in this unit.
| If a unit had CHAMPION (1/10) on its keywords bar, then 1 model in that unit could be a champion for every 10 models in the unit. | ||
2.0 Musicians
Units with the MUSICIAN keyword have one or more musician models. The number after the MUSICIAN keyword indicates the proportion of models in that unit that can be musicians. Units with the MUSICIAN keyword have the following passive ability:| Passive |
MUSICIAN: The beat of a drum or the blast of a horn drives the soldiers ever onward.
Effect: While this unit contains any musicians, if it uses the ‘Rally’ command, you can make one additional rally roll of D6.
3.0 Standard Bearers
Units with the STANDARD BEARER keyword have one or more standard bearer models. The number after the STANDARD BEARER keyword indicates the proportion of models in that unit that can be standard bearers. Units with the STANDARD BEARER keyword have the following passive ability: Passive Passive |
STANDARD BEARER: The unit’s standard provides a rallying point in the chaos of battle.
Effect: While this unit contains any standard bearers, add 1 to this unit’s control score.
| Let your opponent know which models in a unit are champions, musicians and standard bearers if it’s not already clear from the miniatures. | ||
Battle Tactics
| ||
1.0 Battle Tactics Overview
During a battle, each player can score extra victory points by completing battle tactics.2.0 Picking Battle Tactics
Battle tactics are picked by using the ‘Tactical Gambit’ ability, below.| Once Per Battle Round, Start of Your Turn |
TACTICAL GAMBIT: You order your troops to seize an opportunity that has arisen amidst the flow of battle.
You cannot use this ability if you went second in the previous battle round and chose to go first in the current battle round.
Effect: Pick 1 battle tactic that you have not yet attempted. You can attempt to complete that battle tactic this turn.
Effect: Pick 1 battle tactic that you have not yet attempted. You can attempt to complete that battle tactic this turn.
2.1 Completing Battle Tactics
If, at the end of your turn, you have completed the battle tactic you chose to attempt this turn, you score 4 victory points.3.0 Universal Battle Tactics
|
Roll-off
If you are instructed to roll off, each player should roll a dice. Whichever player has a higher roll wins the roll-off. If the result is a tie, each player should roll off again until there is a clear winner, unless otherwise specified.32.0 Objectives
Many battleplans award victory points for controlling objectives, which are represented by objective markers. Unless otherwise specified, objective markers are round and 40mm wide. Models can move over and end their moves on objective markers. If an objective marker is on the border between territories, it is within all those territories but wholly within none of them. Objective markers don’t block visibility.
Determine the Underdog
Whichever player has the fewest victory points is the underdog for the battle round. If the players are tied (e.g. in the first battle round), then there is no underdog, unless otherwise specified.| Once Per Battle Round, Start of Your Turn |
TACTICAL GAMBIT: You order your troops to seize an opportunity that has arisen amidst the flow of battle.
You cannot use this ability if you went second in the previous battle round and chose to go first in the current battle round.
Effect: Pick 1 battle tactic that you have not yet attempted. You can attempt to complete that battle tactic this turn.
Effect: Pick 1 battle tactic that you have not yet attempted. You can attempt to complete that battle tactic this turn.
Anti-X (+1 Rend)
Add 1 to this weapon’s Rend characteristic if the target has the keyword after ‘Anti-’ or fulfils the condition after ‘Anti-’. Multiples of this ability are cumulative. For example, if a weapon has both Anti-charge (+1 Rend) and Anti-HERO (+1 Rend), then add 2 to the Rend characteristic of the weapon for attacks that target a HERO that charged in the same turn.3.1 Regiments
Armies are made up of one or more regiments, each of which is led by a Hero. You must have at least 1 regiment in your army, and you can include a maximum of 5 regiments. To add a regiment, pick 1 HERO from your faction, then pick up to 3 non‑HERO units to accompany them.Each HERO’s battle profile lists which units can be added to their regiment, and each non-HERO unit’s battle profile lists any relevant keywords it has. The battle profiles of some HEROES may say that they can be added to the regiment of another HERO in place of a non-HERO unit in that regiment.
Universal Core Abilities - Charge Phase
| Your Charge Phase |
CHARGE: With a mighty battle cry, the warriors charge into combat with the enemy.
Declare: Pick a friendly unit that is not in combat and has not used a RUN or RETREAT ability this turn to use this ability. Then, make a charge roll of 2D6.
Effect: That unit can move a distance up to the value of the charge roll. That unit can move through the combat ranges of any enemy units and must end that move within 1/2" of a visible enemy unit. If it does so, the unit using this ability has charged.
Effect: That unit can move a distance up to the value of the charge roll. That unit can move through the combat ranges of any enemy units and must end that move within 1/2" of a visible enemy unit. If it does so, the unit using this ability has charged.
| KEYWORDS | CORE, MOVE, CHARGE |
Hit Roll
Roll a dice. If the roll equals or exceeds the attacking weapon’s Hit characteristic, the attack scores a successful hit: move on to the next step. If not, the attack fails and the attack sequence ends. Unmodified hit rolls of 1 always fail. If an unmodified hit roll for an attack made with a weapon is a 6, that attack is a critical hit.| Critical hits have no effect on their own but often trigger additional effects (see 20.0 Weapon Abilities). | ||
Wound Roll
Roll a dice. If the roll equals or exceeds the attacking weapon’s Wound characteristic, the attack successfully wounds: move on to the next step. If not, the attack fails and the attack sequence ends. Unmodified wound rolls of 1 always fail.3.2 The General
You must pick 1 HERO in your army that is leading a regiment to be your general. If any units in your army have the WARMASTER keyword, you must pick one of those units to be your general. Your general’s regiment can include up to 4 non-HERO units in addition to your general.
3.3 Reinforced Units
When you add a unit to your army roster, you can add it as a reinforced unit. A reinforced unit has twice as many models as its minimum unit size and costs twice as many points. If a unit has a minimum unit size of 1, it cannot be reinforced. In addition, some units with a unit size of more than 1 can not be reinforced. This will be noted on their battle profile.
Combat attacks
Combat attacks are made with melee weapons. The target unit(s) must be within the combat range of the attacking model and visible to it. The model must attack with all of the melee weapons it is armed with.Companion
Unless otherwise specified, attacks made by this weapon are not affected by friendly abilities that modify hit rolls, wound rolls or weapon characteristics, except for those that apply negative modifiers (e.g. ‘Covering Fire’).2.1.1 Within and Wholly Within
A model is within a certain distance of something (e.g. another unit, a territory or an objective) if any part of its base is within that distance. A model is wholly within a certain distance of something if every part of its base is within that distance.A unit is within a certain distance of something if any part of the base of any model in the unit is within that distance. A unit is wholly within a certain distance of something if every part of the bases of all of the models in the unit is within that distance.
32.1 Contesting Objectives
Unless otherwise specified, if an objective is within a model’s combat range, that model is contesting that objective. If any models in a unit are contesting an objective, that unit is contesting that objective.Each unit can only count as contesting a single objective for the purposes of determining objective control (see 32.2). Before determining objective control, for each of their units contesting two or more objectives, the active player must pick one of those objectives for it to contest. Then, their opponent does the same.
Designer’s Note: For purposes other than determining objective control, a unit can contest more than one objective.
13.1 Fight Abilities
Abilities with the FIGHT keyword follow a different sequence to other abilities. When the players are using Combat Phase
abilities as described in 13.0, they cannot use FIGHT abilities.After the players have finished using
Combat Phase
abilities that are not FIGHT abilities, they must alternate picking 1 eligible unit to use a FIGHT ability, starting with the active player. Each unit in combat must use a FIGHT ability if it is able to.Once a player has no more units that are eligible to use a FIGHT ability, the other player continues to pick units that are eligible to use a FIGHT ability, one after another, until there are no more units that are eligible to use a FIGHT ability.
| ||
32.2 Objective Control
In the deployment phase after all Deployment Phase abilities have been used and at the end of each turn, follow this sequence for each objective in an order chosen by the active player:- Starting with the active player, each player determines the control score of each of their units that is contesting that objective. A unit’s control score is the combined Control characteristics of all the models in that unit that are contesting the objective. Some abilities modify a unit’s control score, but it cannot be reduced to less than 1.
- Each player adds up the control scores of all of their units contesting that objective. This is their army control score for that objective.
- The players compare their army control scores for that objective. If one player’s score is higher, that player gains control of that objective. Once a player gains control of an objective, it remains under their control until their opponent gains control of it.
| Sometimes objective markers get accidentally nudged while you are moving models around. This is perfectly fine - just remember to put them back in their proper positions when determining objective control. | ||
Cover
Subtract 1 from hit rolls for attacks that target a unit that is behind or wholly on this terrain feature, unless that unit charged this turn or has the FLY keyword.Unstable
Models can move across but cannot be set up on or end any type of move on any part of this terrain feature that is more than 1" tall.Obscuring
While every model in a non-MONSTER non‐WAR MACHINE unit that does not have the FLY keyword is within 1" of this terrain feature, the following apply:- That unit is only visible to enemy units that are within its combat range.
- The Range characteristic of that unit’s ranged weapons is halved (rounding down to the nearest inch).
Place of Power
HEROES within 3" of this terrain feature can use the ‘Activate Place of Power’ ability.17.2 Mortal Damage
Some abilities inflict mortal damage. If an ability inflicts mortal damage on a unit, add that number of damage points to the unit’s damage pool for that ability (see 18.2 Allocating Damage).
1.1 Army Roster
These rules will explain how to create an army roster to prepare for a battle. You can find a blank army roster printable copy below:
Save Roll
The commander of the target unit rolls a dice, subtracting the attacking weapon’s Rend characteristic from the roll. Unmodified save rolls of 1 always fail. If the roll equals or exceeds the Save characteristic of the target unit, the attack fails and the attack sequence ends. If not, it is a successful attack: move on to the next step.18.3 Slain Models
The commander of a unit must pick which model(s) in the unit are slain. However, after each slain model is removed, the unit must be in a single coherent group (see 15.1). If this is not possible, continue to remove models, one at a time, until the unit is in a single coherent group. You must remove the fewest models possible to make the unit a single coherent group.
1.0 Champions
Units with the CHAMPION keyword have one or more champion models. If there is a number after the CHAMPION keyword, that number indicates the proportion of models in that unit that can be champions. In any other case, 1 model in the unit can be a champion. Units with the CHAMPION keyword have the following passive ability:| Passive |
CHAMPION: A veteran fighter leads the charge.
Effect: Add 1 to the Attacks characteristic of weapons used by champions in this unit.
3.0 Standard Bearers
Units with the STANDARD BEARER keyword have one or more standard bearer models. The number after the STANDARD BEARER keyword indicates the proportion of models in that unit that can be standard bearers. Units with the STANDARD BEARER keyword have the following passive ability:| Passive |
STANDARD BEARER: The unit’s standard provides a rallying point in the chaos of battle.
Effect: While this unit contains any standard bearers, add 1 to this unit’s control score.
21.0 Healing
Some abilities allow you to heal a unit. To heal a unit, remove a number of damage points from the unit equal to the number in brackets after ‘Heal’, e.g. Heal (2).
| Any Hero Phase | 1 |
RALLY: With an inspiring call to action, wounded soldiers get a second wind and fresh troops take the field to replace their fallen comrades.
Declare: Pick a friendly unit that is not in combat to use this ability.
Effect: Make 6 rally rolls of D6. For each 4+, you receive 1 rally point. Rally points can be spent in the following ways:
Effect: Make 6 rally rolls of D6. For each 4+, you receive 1 rally point. Rally points can be spent in the following ways:
- For each rally point spent, Heal (1) that unit.
- You can spend a number of rally points equal to the Health characteristic of that unit to return a slain model to that unit.
2.0 Musicians
Units with the MUSICIAN keyword have one or more musician models. The number after the MUSICIAN keyword indicates the proportion of models in that unit that can be musicians. Units with the MUSICIAN keyword have the following passive ability:| Passive |
MUSICIAN: The beat of a drum or the blast of a horn drives the soldiers ever onward.
Effect: While this unit contains any musicians, if it uses the ‘Rally’ command, you can make one additional rally roll of D6.
1.0 Wizards and Priests
WIZARDS are special units that can cast spells, and PRIESTS are special units that can chant prayers. Spells and prayers are powerful abilities that can have a dramatic impact on the battle.
7.0 Combat Range
Each model has a combat range that extends 3" horizontally from its base and any distance vertically from that circle to form a cylinder. The combat range of a unit extends 3" horizontally and any distance vertically from every model in that unit. Units from opposing armies that are within each other’s combat range and that are visible to each other are in combat with each other. When a unit that is not in combat enters the combat range of a visible enemy unit, it moves into combat.
A model is considered to be in combat with an enemy unit if that unit is within the model’s combat range and visible to it’
A model is considered to be in combat with an enemy unit if that unit is within the model’s combat range and visible to it’
| ||
Shooting attacks
Shooting attacks are made with ranged weapons. The target unit(s) must be within a distance equal to the Range characteristic of the weapon being used and visible to the attacking model. Models cannot make shooting attacks if their unit is in combat, unless otherwise specified (see 20.0 Weapon Abilities).18.4 Destroyed Units
When the last model in a unit is slain, the unit is destroyed and all remaining damage points inflicted on that unit have no effect. Similarly, if something causes a unit to be destroyed, all models in the unit are slain and removed from play.
6.0 Visibility
A target model is visible to another model (which we’ll call the ‘observing model’) if you can draw a straight line through the air (whether horizontal, diagonal or vertical) from any point on the observing model to any point on the target model that does not intersect any objects except for other models in the observing model’s unit. A target unit is visible to an observing unit if at least 1 model in the target unit is visible to at least 1 model in the observing unit. A model is always considered to be visible to itself.If a rule or ability requires a target to be both within a given range of and visible to the unit using that ability, or to a model in that unit, both conditions must be met by the same model in the target. You could not, for instance, target a unit where one model is within range but not visible and another model is not in range but is visible.
| ||
| In some cases, it might not be immediately clear whether a model is visible. If so, stoop down to get a look from behind the observing model. If any part of the other model is visible, even if it is just the tip of a spear, then that model is visible for rules purposes. | ||
16.0 Picking Targets
When declaring an ATTACK ability for a unit, you must pick the target unit(s) for its attacks. The number of attacks each model can make is equal to the Attacks characteristic of the weapons it is using. In most cases, models attack with every weapon on their warscroll (melee weapons for combat attacks, ranged weapons for shooting attacks), though some warscrolls specify that certain models in the unit are armed with special weapons or that the unit must pick between multiple weapons when it attacks.If the unit is in combat, it can only target units that are in combat with it. If a model has more than one attack, you can split the attacks between eligible targets as you wish.
- Combat attacks are made with melee weapons. The target unit(s) must be within the combat range of the attacking model and visible to it. The model must attack with all of the melee weapons it is armed with.
- Shooting attacks are made with ranged weapons. The target unit(s) must be within a distance equal to the Range characteristic of the weapon being used and visible to the attacking model. Models cannot make shooting attacks if their unit is in combat, unless otherwise specified (see 20.0 Weapon Abilities).
| Your Shooting Phase |
SHOOT: The warriors take aim and unleash a deadly volley.
Declare: Pick a friendly unit that has not used a RUN or RETREAT ability this turn to use this ability. Then, pick one or more enemy units as the target(s) of that unit’s attacks (see 16.0).
Effect: Resolve shooting attacks against the target unit(s).
Effect: Resolve shooting attacks against the target unit(s).
| KEYWORDS | CORE, ATTACK, SHOOT |
| Any Combat Phase |
FIGHT: Locked in a deadly melee, the fighters strike out at their foes.
Declare: Pick a friendly unit that is in combat or that charged this turn to use this ability. That unit can make a pile-in move. Then, if that unit is in combat, you must pick one or more enemy units as the target(s) of that unit’s attacks.
Effect: Resolve combat attacks against the target unit(s).
Effect: Resolve combat attacks against the target unit(s).
| KEYWORDS | CORE, ATTACK, FIGHT |
7.0 Manifestations
There are two types of manifestation: endless spells, which can be summoned by WIZARDS, and invocations, which can be summoned by PRIESTS. Each manifestation has its own warscroll, and the spell or prayer that allows that manifestation to be summoned will be found in the appropriate manifestation lore. No more than 1 friendly WIZARD or PRIEST can attempt to summon the same manifestation per turn, and a friendly WIZARD or PRIEST cannot attempt to summon a friendly manifestation that was removed from play in the same turn.
|
|
|
1.5 Faction Terrain
Some factions have special terrain features called faction terrain features. Faction terrain features have their own warscrolls. They are not considered to be units, with the following exceptions:- In the combat phase, they are treated as if they were units for the purposes of movement, combat range and being in combat. Units can finish a charge move within ½" of an enemy faction terrain feature as if it were a unit.
- They are affected by all enemy abilities as if they were units.
- They can be damaged in the same manner as units. However, when they are removed from play, they count as being demolished instead of slain or destroyed (this means that they do not count as destroyed units for the purposes of abilities, scoring battle tactics etc.).
- Faction terrain features cannot contest objectives even while they are garrisoned.
- If a terrain feature has any melee or ranged weapons, it can use the ‘Fight’ and ‘Shoot’ CORE abilities as if it were a unit.
- Terrain features that have a Move characteristic of 0" (‘-’) cannot move (note that pile-in moves are a type of move).
- Faction terrain features with a Move characteristic greater than ‘-’ are treated as if they were units in all phases for the purposes of movement, combat range, being in combat and setting up terrain features, other manifestations and other units.
Some faction terrain features allow you to place a unit on them (this will be clearly specified in that terrain feature’s rules). When doing so, instead of measuring range or visibility to and from the unit that is on that terrain feature, measure to and from the terrain feature instead. Unless otherwise specified, units on a faction terrain feature cannot use FIGHT abilities.
If a unit placed on a terrain feature is removed from it (e.g. if an ability removes them from the battlefield), that unit counts as having left that terrain feature and loses any special role or benefits it had as a result of being placed on it.
| The Citadel Terrain List shows the number of scenery pieces each terrain feature can consist of. If you are using terrain features that are not included on that list, agree with your opponent before setting up the battlefield how many scenery pieces make up each terrain feature. | ||
| Reaction: Opponent declared an ATTACK ability | 1 |
ALL-OUT DEFENCE: The soldiers close ranks to hold off an incoming attack.
Used By: A unit targeted by that ATTACK ability.
Effect: Add 1 to save rolls for that unit until that ATTACK ability has been resolved.
Effect: Add 1 to save rolls for that unit until that ATTACK ability has been resolved.
9.1.1 Setting Up Objectives and Terrain Features
Many battlefields have key locations called objectives, and almost all battlefields have terrain features such as buildings, ruins and woods. Unless otherwise specified, players should first set up objective markers at the locations indicated by a gold circles ( ) on the deployment map, then set up terrain features in a mutually agreeable manner. Many battlepacks and battleplans include further instructions for setting up terrain.
5.4 Passive Abilities
Abilities that have the Passive timing are called passive abilities. Passive abilities are not declared. The effects of passive abilities always apply if the conditions of the ability are met, and they must be applied if it is possible to do so.
1.1 Wholly on Terrain and Behind Terrain
A model is wholly on a terrain feature if its base is on that terrain feature and no part of its base extends past the edge of that terrain feature. A unit is wholly on a terrain feature if every model in that unit is wholly on that terrain feature.When a unit is targeted by an attack, if it is impossible to draw a straight line from the closest point on the attacking model’s base to the closest point on the base of a model in the target unit that is in range without that line passing over that terrain feature, the target unit is considered to be behind a terrain feature for the attack made by that attacking model. Ignore parts of the terrain feature within the attacking model’s combat range for the purposes of determining if the target is behind that terrain feature.
| Passive |
FLY: Soaring above the battlefield, this unit can reach destinations that are inaccessible to other troops.
Effect: As this unit moves, it ignores other models, terrain features and the combat ranges of enemy units. It cannot end its move in combat unless specified in the ability that allowed it to move. Ignore any vertical distance moved for this unit.
1.4.4 Places of Power
Examples: Realmgate, Cleansing Aqualith, Nexus SyphonTerrain Abilities: Cover, Place of Power, Unstable, Obscuring
18.1 Ward Saves
Units with the WARD keyword have the ‘Ward Save’ passive ability. The number after the WARD keyword indicates the ward value for the ward save. If a unit had WARD (5+), for example, its ward value would be 5. If a unit has more than one ward save, only the ward save with the lowest value applies to it; the other has no effect.| Passive |
WARD SAVE: Whether through their uncanny reflexes, unnatural toughness or a source of mystical protection, these warriors can avoid otherwise lethal attacks.
Effect: In step 1 of the damage sequence (see 18.0), make a ward roll of D6 for each damage point in this unit’s damage pool. If the roll equals or exceeds this unit’s ward value, remove that damage point from the damage pool.
2.0 Spells
The declare step of each spell will tell you to make a casting roll of 2D6. If the roll does not equal or exceed the spell’s casting value (at the top-right corner of the spell), the spell fails and its effect is not resolved.If the unmodified casting roll includes 2 or more rolls of 1, the spell is miscast: the spell fails, its effect is not resolved, D3 mortal damage is inflicted on the WIZARD that used it, and that WIZARD cannot use any more spells in that phase.
Enemy reactions can only be used if the casting roll equals or exceeds the spell’s casting value. So long as the spell is not unbound (see 4.0), then it is successfully cast: resolve its effect.
EXAMPLE SPELL
| Your Hero Phase | 6 |
MYSTIC SHIELD: The caster's allies are bathed in an unearthly glow that protects them from harm.
Declare: Pick a visible friendly unit wholly within 12" of this WIZARD to be the target. Then, make a casting roll of 2D6.
Effect: The target has WARD (6+) this turn.
Effect: The target has WARD (6+) this turn.
| KEYWORDS | SPELL |
Unbind
| Reaction: Opponent declared a SPELL ability |
UNBIND: The wizard saps the energy from an enemy’s spell, nullifying its effects.
Used By: A friendly WIZARD within 30" of the enemy WIZARD casting the spell.
Effect: Make an unbinding roll of 2D6. If the roll exceeds the casting roll tor the spell, then the spell is unbound and its effect is not resolved. This reaction cannot be used more than once per casting roll.
Effect: Make an unbinding roll of 2D6. If the roll exceeds the casting roll tor the spell, then the spell is unbound and its effect is not resolved. This reaction cannot be used more than once per casting roll.
| KEYWORDS | UNBIND |
Banish Manifestation
| Your Hero Phase |
BANISH MANIFESTATION: The wizard or priest disrupts the arcane forces sustaining a manifestation, wiping it from existence.
Declare: Pick a friendly WIZARD or PRIEST to use this ability, pick a MANIFESTATION within 30" of them that was not summoned this turn to be the target, then make a banishment roll of 2D6. Add 1 to the banishment roll for each additional enemy MANIFESTATION on the battlefield after the first. You cannot pick the same MANIFESTATION to be the target of this ability more than once per turn.
Effect: If the banishment roll equals or exceeds the banishment value listed on the MANIFESTATION’s warscroll, it is banished and removed from play.
Effect: If the banishment roll equals or exceeds the banishment value listed on the MANIFESTATION’s warscroll, it is banished and removed from play.
| KEYWORDS | BANISH |
1.1 Power Level
Each WIZARD and PRIEST has a power level shown after the keyword, e.g. WIZARD (2). A WIZARD’s casting power level determines how many Spell abilities they can use per phase. A PRIEST’s chanting power level determines how many PRAYER abilities they can use per phase.MULTIPLE POWER LEVELS
- If an ability references a unit’s power level and that unit has more than one power level, use whichever power level is higher.
- If an ability modifies a unit’s power level and that unit has more than one power level, it modifies both.
| Once Per Turn (Army), Start of Any Turn |
ACTIVATE PLACE OF POWER: The hero draws on the power of a nearby mythical landmark.
Declare: Pick a friendly HERO within 3" of a Place of Power to use this ability, then pick that Place of Power to be the target.
Effect: Pick 1 of the following effects:
Effect: Pick 1 of the following effects:
- Cauterising Pollen: Roll a dice. On a 1, inflict 1 mortal damage on each unit (friendly and enemy) within 6" of any Places of Power. On a 3+, Heal (2) each unit (friendly and enemy) wholly within 6" of the target.
- Rapid Sprouting: Pick a Ghyranite objective or visible non-FACTION TERRAIN terrain feature within 12" of that HERO and roll a dice. On a 3+, that objective or terrain feature has the ‘Obscuring’ ability (see 1.2) for the rest of the battle.
- Tap the Ley Lines: For the rest of the turn, if that HERO is not a WIZARD or PRIEST, they can use the ‘Unbind’ or ‘Banish Manifestation’ ability as if they had WIZARD (1).
| KEYWORDS | CORE |
1.4.2 Obscuring Terrain
Examples: Wyldwood, fortress wallTerrain Abilities: Cover, Obscuring, Unstable
Universal Core Abilities - Movement Phase
| Your Movement Phase |
NORMAL MOVE: The warriors advance across the battlefield.
Declare: Pick a friendly unit that is not in combat to use this ability.
Effect: That unit can move a distance up to its Move characteristic. That unit cannot move into combat during any part of that move.
Effect: That unit can move a distance up to its Move characteristic. That unit cannot move into combat during any part of that move.
| KEYWORDS | CORE, MOVE |
| Your Movement Phase |
RUN: The unit rushes into position.
Declare: Pick a friendly unit that is not in combat to use this ability.
Effect: Make a run roll of D6. That unit can move a distance up to its Move characteristic added to the run roll. That unit cannot move into combat during any part of that move.
Effect: Make a run roll of D6. That unit can move a distance up to its Move characteristic added to the run roll. That unit cannot move into combat during any part of that move.
| KEYWORDS | CORE, MOVE, RUN |
| Your Movement Phase |
RETREAT: The fighters disengage from combat, though at the cost of lowering their defences.
Declare: Pick a friendly unit that is in combat to use this ability.
Effect: Inflict D3 mortal damage on that unit. That unit can move a distance up to its Move characteristic. That unit can move through the combat ranges of any enemy units but cannot end that move within an enemy unit’s combat range.
Effect: Inflict D3 mortal damage on that unit. That unit can move a distance up to its Move characteristic. That unit can move through the combat ranges of any enemy units but cannot end that move within an enemy unit’s combat range.
| KEYWORDS | CORE, MOVE, RETREAT |
15.1 Coherency
Any time a unit is set up or ends a move, it must be in a single group. A unit is considered to be in a coherent group if each model in that unit is within coherency range, measured horizontally, of at least 1 other model in that unit (ignore differences in height between the two models).For the majority of units, coherency range is 1/2", though some units (particularly those with large models with overhanging parts) have a longer coherency range noted on their warscroll for ease of play. While there are 7 or more models in a unit, that unit is considered to be in a coherent group if each model in that unit is within coherency range of at least 2 other models in that unit.
If it is not possible for a unit to end a move in a single coherent group, that move cannot be made.
| ||
15.0 Movement
Some abilities allow a unit to move. When a unit moves, each model in that unit can move, one at a time, in the order chosen by that unit’s commander.When a model moves, it can pivot and change direction as often as you like, but no part of that model’s base can move a greater total distance than the maximum allowed by the ability used. Models cannot move beyond the edge of the battlefield or through other models, and they can never end a move standing on top of another model (the base counts as part of the model).
A model’s base is assumed to remain parallel with the battlefield as it moves. If a model ends its move on an uneven surface, it must be able to stand up by itself with its base as close to parallel with the battlefield as possible (in other words, models cannot lie flat on the battlefield or lean against terrain to stop them from falling over).

| ||
15.3 Pile-in Moves
Some abilities, such as FIGHT abilities, allow a unit to make a short move called a pile-in move to get into a better position for combat. To do so:If your unit is in combat: Pick an enemy unit your unit is in combat with to be the target of the pile-in move. Each model in your unit can move up to 3". That move can pass through the combat ranges of any enemy units, but each model must end that move no further from the target unit. At the end of the move, your unit must still be in combat with all units that it was in combat with at the start of the move.
If your unit is not in combat: Each model in your unit can move 3" in any direction. That move can pass through and end within the combat ranges of any enemy units.
| ||
| Any Combat Phase |
FIGHT: Locked in a deadly melee, the fighters strike out at their foes.
Declare: Pick a friendly unit that is in combat or that charged this turn to use this ability. That unit can make a pile-in move (see 15.3). Then, if that unit is in combat, you must pick one or more enemy units as the target(s) of that unit’s attacks (see 16.0).
Effect: Resolve combat attacks against the target unit(s).
Effect: Resolve combat attacks against the target unit(s).
| KEYWORDS | CORE, ATTACK, FIGHT |
1.4 Terrain Types
Each terrain feature in Warhammer Age of Sigmar is one of the following types:- Obstacle
- Obscuring Terrain
- Area Terrain
- Place of Power
- Faction Terrain
Before the battle begins, players must agree on which type applies to each terrain feature.
3.0 Prayers
The declare step of each prayer will tell you to make a chanting roll of D6. On an unmodified chanting roll of 1, the prayer fails, its effect is not resolved and you must remove D3 ritual points from the PRIEST using the prayer.Otherwise, pick one of the following
- Give a number of ritual points to the PRIEST equal to the chanting roll (ritual points can be accumulated over multiple turns).
- Add the PRIEST’s ritual points to the chanting roll. If the chanting roll equals or exceeds the prayer’s chanting value (at the top-right corner of the prayer), it is answered: resolve the effect of the prayer, then reset the PRIEST’s ritual points total to 0.
All PRIESTS know the following prayer:
| Your Hero Phase |
SACRED RITES: The priest focuses on safely setting their ritual into motion.
Declare: Pick a friendly PRIEST to use this ability, then make a chanting roll of D6. On an unmodified chanting roll of 1, remove 1 ritual point from that PRIEST instead of D3.
Effect: Give a number to ritual points to the PRIEST equal to the unmodified chanting roll and do not reset the PRIEST’s ritual points to 0.
Effect: Give a number to ritual points to the PRIEST equal to the unmodified chanting roll and do not reset the PRIEST’s ritual points to 0.
| KEYWORDS | PRAYER, UNLIMITED |
EXAMPLE PRAYER
| Once Per Battle, Your Hero Phase | 7 |
RESURRECTION: A fallen hero is brought back from death, their vitality fully restored.
Declare: Make a chanting roll of D6.
Effect: Pick a friendly INFANTRY HERO that has been slain and return them to the battlefield. Set up that HERO wholly within 3" of this PRIEST.
Effect: Pick a friendly INFANTRY HERO that has been slain and return them to the battlefield. Set up that HERO wholly within 3" of this PRIEST.
| KEYWORDS | PRAYER |
5.0 Abilities
The vast majority of things that units can do in Warhammer Age of Sigmar are called abilities. This is an example of an ability: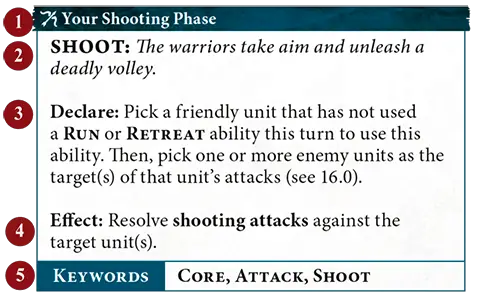
1
Timing2
Name and description3
Declare instructions4
Effect5
Keywords| Ability icons give you an idea what kind of effect the ability has at a glance.Movement AbilityOffensive AbilityDefensive AbilityShooting AbilityRallying AbilitySpecial AbilityControl Ability | ||
4.0 Unbinding Spells
Each WIZARD can use the ‘Unbind’ reaction a number of times per phase equal to their power level. Th is is an exception to The Rules of One (Core Rules, 5.3).| Reaction: Opponent declared a SPELL ability |
UNBIND: The wizard saps the energy from an enemy’s spell, nullifying its effects.
Used By: A friendly WIZARD within 30" of the enemy WIZARD casting the spell.
Effect: Make an unbinding roll of 2D6. If the roll exceeds the casting roll tor the spell, then the spell is unbound and its effect is not resolved. This reaction cannot be used more than once per casting roll.
Effect: Make an unbinding roll of 2D6. If the roll exceeds the casting roll tor the spell, then the spell is unbound and its effect is not resolved. This reaction cannot be used more than once per casting roll.
| KEYWORDS | UNBIND |
5.3 The Rules of One
- A unit cannot use more than 1 CORE ability per phase (see 14.0).
- A unit cannot use the same ability more than once per phase, unless specified otherwise.
- A unit cannot be affected by the same passive ability more than once at the same time. For example, if a unit is within range of two different terrain features that have the ‘Cover’ passive ability, the effect only applies to it once.
2.1 Battle Formations
Many factions contain one or more battle formations. Each battle formation grants unique benefits to your army. The faction rules for your faction will explain any battle formation options.
3.6 Auxiliary Units
Auxiliary units allow you to take any units from your faction without the constraints of regiments, at the cost of potentially giving your opponent an advantage. You can add any number of units to the auxiliary units section of your army roster. However, the player with the fewest auxiliary units on their roster gains 1 extra command point at the start of each battle round (if the players have the same number of auxiliary units, neither player receives an extra command point). HEROES that have compulsory regiment options cannot be taken as auxiliary units.
4.1 Enhancements
Each set of faction rules include a number of enhancements that can be given to units, e.g. heroic traits and artefacts of power. You can take 1 enhancement from each enhancement table in your faction rules. Each enhancement table lists which units are eligible to be given that enhancement. UNIQUE units cannot be given enhancements.While some abilities allow you to take extra enhancements, the same unit can never have more than 1 enhancement of the same type, and you can never include the same enhancement in your army more than once. Enhancements cannot be given to Regiment of Renown units unless they have a keyword that matches that faction’s name.
1.3 Battle Profiles
The information you’ll need when building your army roster is found in each unit’s battle profile. The battle profile for a unit will be in the same publication as its warscroll (usually a battletome).| Battle profiles are regularly updated to improve balance. When we republish them, the new version takes precedence over versions with an earlier publication date or no publication date. | ||
5.1 Keywords
Some abilities have one or more keywords listed at the bottom of the ability on their keywords bar, e.g. the ‘Shoot’ ability shown above has the CORE, ATTACK and SHOOT keywords. Units also have a keywords bar on their warscroll.Keywords let you know which abilities can be used or which units can be picked as targets for an ability. For example, the ‘Charge’ ability can only be used by a unit if it did not use an ability with the RUN or RETREAT keyword earlier in the turn. The singular and plural forms of a keyword are synonymous for rules purposes.
24.2 Replacement Units
Some abilities allow you to set up a replacement unit. When setting up that unit, it should have the same warscroll type, weapon options and number of models as the original unit, unless otherwise specified in the ability. Many of these abilities specify the proportion of models in the replacement unit (e.g. half the number of models from the original unit). In these cases, you can pick which models from the original unit are set up.The replacement unit is otherwise treated as a new unit; any keywords or abilities the original unit gained during the battle, and any persisting effects that applied to it, do not apply to the replacement unit. Each unit can only be replaced once, and you cannot replace replacement units.
| Because a replacement unit is treated as a completely new unit, it could, for instance, use a Once Per Battle ability on its warscroll even if the unit it replaced used that ability earlier in the battle. | ||
3.4 Unique Units
You cannot include the same UNIQUE unit more than once in your army. UNIQUE units cannot be reinforced.
Contents | ||