Nachmund Gauntlet

Books
| Book | Kind | Edition | Version | Last update |
 Crusade: Nachmund Gauntlet Crusade: Nachmund Gauntlet | ||||
| Crusade: Nachmund Gauntlet | Expansion | 10 | February 2025 | |
Introduction
In this section you will find a number of new Battle Honours you can give to your warriors as they fight their way through the Nachmund Gauntlet, as well as a swathe of new missions and unique Crusade Blessings that can come into effect in your games. Additionally, you’ll find rules for using Tactical Reserves and Surgical Deep Strikes in your games, as well as rules for running a Nachmund Gauntlet campaign.
NACHMUND GAUNTLET CAMPAIGN
These rules allow you and your friends to play through a combined Crusade experience across a campaign, working together in your alliances to take the fight to the enemy.
MIGHTY CHAMPIONS
These rules describe how the most famed heroes of the 41st Millennium can enhance your Crusade force with new strategic abilities, giving you more reasons than ever before to include them in your Nachmund Gauntlet campaigns.
CRUSADE BADGES
Here you will find Crusade Badges representing goals you can set yourself depending on the alliance you decide to fight for.
BATTLE TRAITS
These rules cover all of the skills and new capabilities your forces can learn from fighting in this specific theatre of war as they gain experience and achieve new ranks.
CRUSADE RELICS
Many powerful artefacts, found here, can be recovered from the battle-scarred landscapes of the Nachmund Gauntlet.
NACHMUND GAUNTLET CRUSADE BATTLES
The rules presented here outline the sequence to follow when playing Nachmund Gauntlet missions, and walk you through all of the steps to get you up and running.
TACTICAL RESERVES
When you are playing a Nachmund Gauntlet mission, you will use Tactical Reserves to achieve success. As you muster a Crusade army, it will be split into several groups of units called waves. You will start the battle with one of these waves - typically your Primary wave, which is the largest. Your remaining waves will arrive later during the battle as Reinforcements and it will be your decision, as the commander of your Crusade army, to decide from turn to turn which forces to commit to the battle.
USING TACTICAL RESERVES AND SURGICAL DEEP STRIKE
In Nachmund Gauntlet missions, your units have the option to perform daring Surgical Deep Strikes from Tactical Reserves, executing pin-point teleportations, precision orbital landings or bursting forth from underground tunnels in order to get even closer to enemy positions, but doing so comes with an elevated risk to your warriors. The rules in this section detail some rules adaptations when playing Nachmund Gauntlet Crusade missions, and how you can perform these daring deep strike manoeuvres.
CRUSADE BLESSINGS
This section provides a range of new Crusade Blessings that can be used by an Underdog to get a leg-up on their more experienced opponent, ensuring every Crusade game provides a fair battle.
AGENDAS
When playing one of the Crusade missions presented in this book, you can choose from these Agendas, which provide unique ways for your units to gain experience on the battlefield.
CRUSADE MISSIONS
This section includes a variety of missions of all game sizes, allowing you to play your own battles set in the Nachmund Gauntlet.
Nachmund Gauntlet Campaign
Crusade offers a fantastic narrative experience to the Warhammer 40,000 player, letting you take your collection on its own unique journey. But you might also want to share that journey with other players, weaving combined tales of heroism and victory as you fight both with and against each other in a multi-game campaign. The rules below provide a framework that you can use to take your Crusade forces on just such a path, scaling the experience to whatever duration you and your friends desire.
Introduction
A Nachmund Gauntlet campaign allows a group of players to get together, form alliances and play a series of games. It is split into three campaign phases, each of which consists of numerous battles between the alliances. At the end of each campaign phase, each alliance earns a number of rewards based upon how many victories they earned during that phase, before moving onto the next phase. These rewards include increasing the Control Level an alliance has over four key strategic sites on Sangua Terra. This is the key to winning the Nachmund Gauntlet campaign, as it is by securing control over these strategic sites that an alliance earns Campaign Victory points (CVP). At the end of the campaign, it is the alliance with the most CVP that conquers Sangua Terra’s capital city and is crowned the victor!Nachmund Gauntlet Crusade Badges
At the end of any Nachmund Gauntlet campaign battle you may earn a Crusade Badge relevant to the alliance you are a part of.This Crusade Badge can be noted on your Order of Battle and any units included in your Crusade force may be bestowed with the same Crusade Badge. This honorific will be a permanent reminder of your units’ valiant efforts in this campaign!
Campaign Master
A Nachmund Gauntlet campaign is best run with a Campaign Master. They will take on the mobilisation and organisation of the campaign so that the other players can focus on playing games. A Campaign Master can indeed play in the campaign, but their primary role is to facilitate a smooth and enjoyable experience for all players involved.Reinforcement Waves
When playing a Nachmund Gauntlet campaign, players will have the opportunity to utilise a new way to play - Reinforcement Waves - and information on how to use these will be explained in more detail here. When starting a new Crusade force within a Nachmund Gauntlet campaign, we suggest the starting Supply Limit for players should be increased so that they can make use of the Tactical Reserves rules from their first game, with three Reinforcement Waves.Forming Alliances
Once a Campaign Master has stepped forward, their first task is to gather the players and sort them into alliances. The system can support anything from just two players, up to dozens of players. The campaign works particularly well with a small group of like-minded and enthusiastic players who can meet on a regular basis.Alliances should be organised as evenly as possible, and when feasible, based on the Factions being played. Once players are assigned to an alliance, a Warmaster should be elected to represent them and will be responsible for making decisions for their alliance. The alliances are as follows:
Allies of Convenience
Note that these are guidelines on how to organise players into an alliance, rather than a requirement. If it suits the group better to organise the alliances differently, the Campaign Master should feel free to do so.For example, if many of the players in the group have Crusade forces associated with a single alliance, to make the alliances more evenly numbered some of them may have to fight for a different alliance than what we have recommended. You could always create some interesting narrative to explain why one side fights for another.
Campaign Length
A Nachmund Gauntlet campaign is split into three phases, each of which involves battling in a different stage of the war. Before the campaign begins, the Campaign Master should determine the length of time allocated to each campaign phase and the total number of games that can be played in that phase. Once either of those conditions have been met, that campaign phase ends and each alliances progress towards campaign victory in that phase is determined. Once the third campaign phase ends, the campaign ends and the overall winning alliance is determined.A campaign can be a long and expansive experience where each campaign phase takes place over a month, with many battles fought and mighty heroes lost to the fires of war. Equally, it can be a short and focused campaign played over a weekend, with each campaign phase consisting of just one battle representing the key moments of the conflict.
As a guide, if each member of your campaign group will play one game a week, we recommend each phase of the campaign lasts as follows:
- Length of Time: 2 weeks
- Total Number of Games: Equal to the number of players
Once you have gathered the players into alliances, established the way to play and determined the length of the campaign, it’s time for the battle for control of the Nachmund Gauntlet to begin!
Sangua Terra Strategic Sites
Four strategic sites and their surrounding districts are being fought over across Sangua Terra’s capital, Urbanosprawl Alpha. If an alliance controls a strategic site at the start of a campaign phase, that alliance has a bonus associated with that strategic site and will benefit from it during that phase.
Praefectus Bastion
A mighty stronghold blending military and Ecclesiarchal structures, from which the entire planet’s defence efforts are coordinated.
Emperor’s Voice Grand Battery
This sprawling battery of enormous artillery pieces is crucial to the ongoing defence of Urbanosprawl Alpha, as well as a potent strategic asset for any who control it.
Tower of Murmuration
Rising high over the maze-like districts that surround it, this structure houses the most potent Astropathic choir on Sangua Terra.
Accrandor Spaceport
Whoever controls this fortified orbital transport hub gains a chokehold over material and reinforcements moving in and out of the city sprawl theatre.
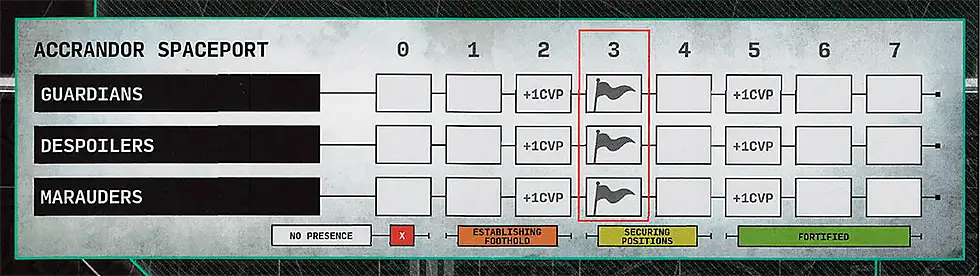
The first alliance who reaches level 3 (Securing Position) takes control of that district. That district remains under that alliance’s control until another alliance has a greater Control Level over that district, at which point they control that district. At the end of the campaign, an alliance earns +1CVP for each district it controls.
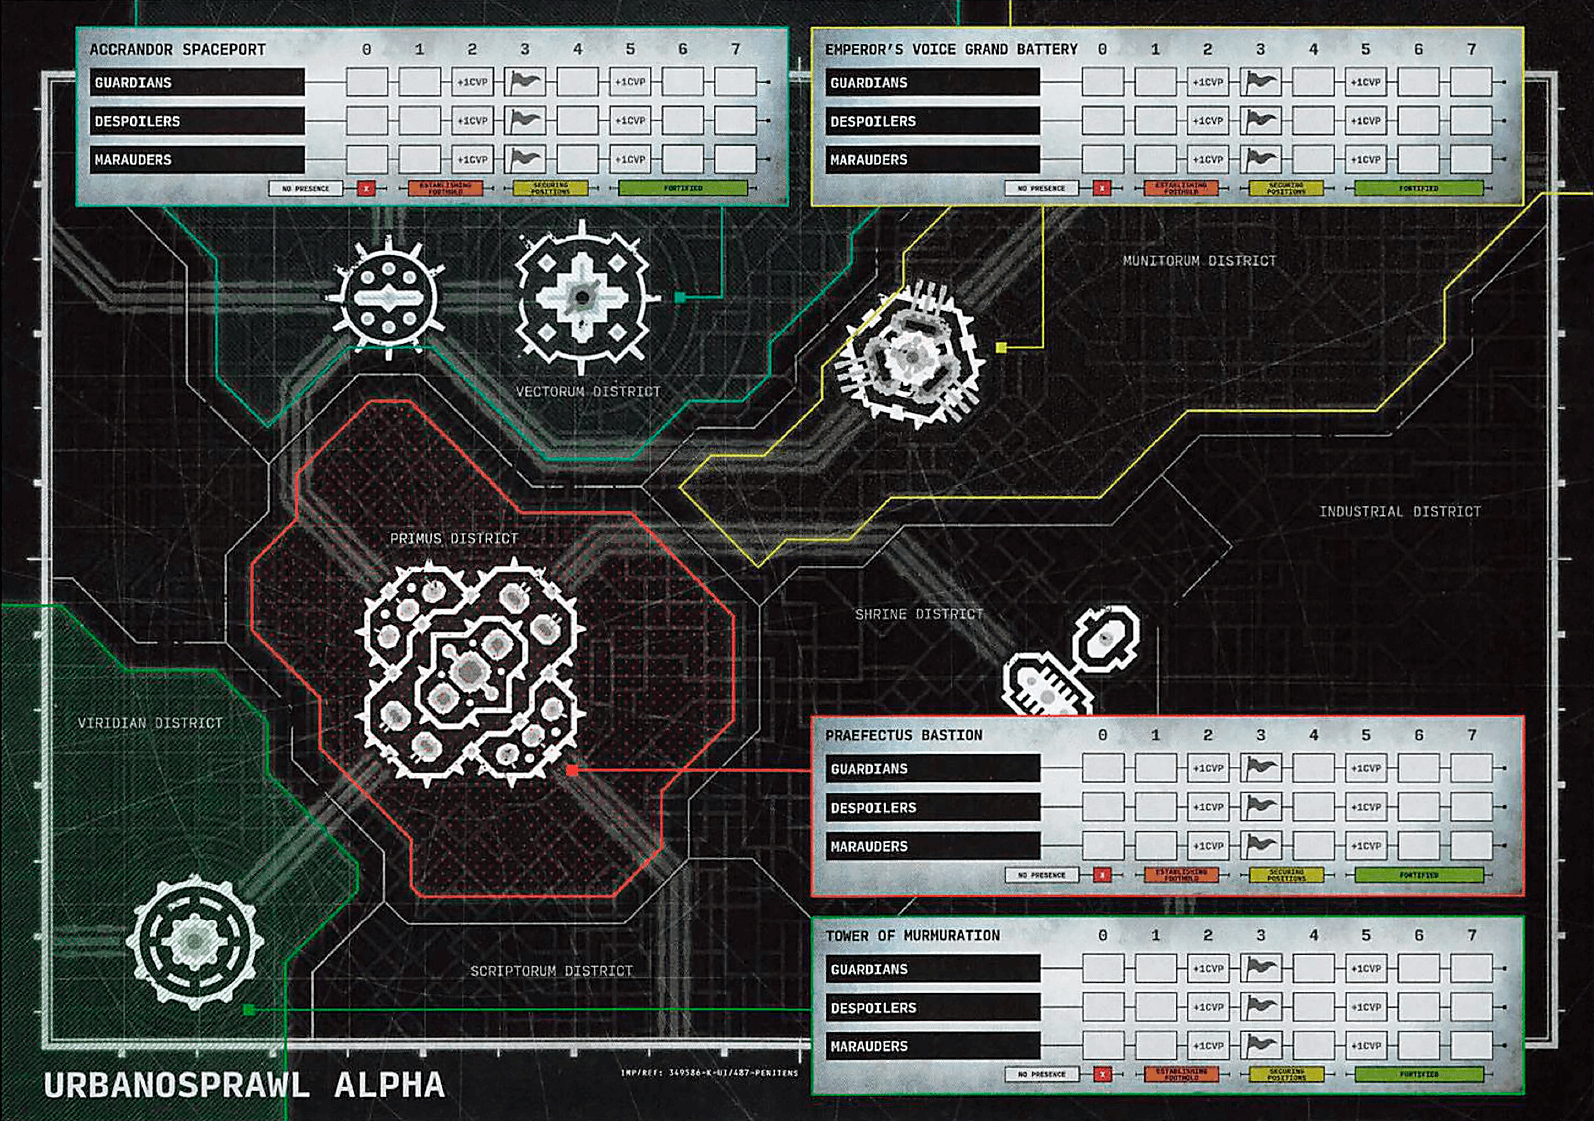
Controlling Strategic Sites
An alliances Control Level over a strategic site can be increased by rewards awarded at the end of each campaign phase. When a rule instructs you to increase your Control Level at a particular strategic site, modify that alliances Control Level by the amount specified. If a rule instructs an alliance to change its Control Level at any strategic site then that alliance must decide which of the four strategic sites to change its Control Level at. Control Level at a strategic site cannot go below 0 or higher than 7.
While an alliance has a Control Level of 2 or more at a strategic site, that alliance earns +1CVP, and while it has a Control Level of 5 or more at a strategic site, that alliance earns an additional +1CVP.
- Control Level 1-2 is ‘Establishing Foothold’.
- Control Level 3-4 is ‘Securing Positions’.
- Control Level 5 or more is ‘Fortified’.
Campaign Phases
Strategic Goals
Strategic Goals represent a variety of ploys, intrigues and gambits that your alliance can attempt to achieve in addition to military victory, and in doing so gain a number of strategic advantages and rewards during each phase of the campaign, by assigning Strategic Asset points (SAP) in an attempt to achieve victory.Some Agendas in this publication provide players with opportunities to gain Strategic Asset points (SAP), which represent the allocation of an alliance’s resources in their attempt to achieve control over the strategic sites of Sangua Terra.
At the start of each campaign phase, each alliance must select one Strategic Goal that applies to the entire alliance for that phase. For this process, we recommend electing a Warmaster to coordinate each alliance, especially in larger campaigns. Once each alliance has selected its Strategic Goal, they should inform the Campaign Master of their choice. These choices are kept secret - each alliances choice is known only to the Campaign Master and the other members of your own alliance.
Each Strategic Goal has a set of requirements; these will require the players in your alliance to gain SAP during their battles, which can be accomplished in various ways. After each battle, each player must assign all the SAP they have gained from that battle to one of the four strategic sites of Sangua Terra, and inform the Campaign Master of this decision.
At the end of each campaign phase when the alliances are receiving their rewards, the Campaign Master will reveal the total number of SAP each alliance has assigned to each of the four strategic sites of Sangua Terra, and check to see if that alliance has met the requirements listed on their Strategic Goal; if they have, they will also receive the associated Strategic Goal Bonus.
Battle Points
Each time a battle is fought, your alliance gains a number of Battle points based on the size of the battle and what the outcome was, as shown on the table below.
| ||||||||||||||||||||
After each battle, each player must assign all the Battle points they have gained from that battle to one of the four strategic sites of Sangua Terra; each player must inform the Campaign Master of their choice of strategic site and how many Battle points they are assigning to it.
End of Phase and Rewards
Once the campaign phase comes to an end, alliances will receive rewards depending on the combined number of Battle points they have assigned to each strategic site over that phase, as shown in the table below:
| ||||||||||||||||||||
For each strategic site, the alliance with the most Battle points assigned to that strategic site comes first and receives the first place reward, the alliance with the second most Battle points assigned to that strategic site comes second will receive the 2nd place reward, and - if your campaign has three alliances - the alliance with the third most Battle points assigned to that strategic site receives the 3rd place reward. Repeat this for all four strategic sites of Sangua Terra.
In the case of a tie for 1st place, all the tied alliances receive the 2nd place reward and any non-tied alliance receives the 3rd place reward. In the case for a tie for 2nd place, the tied alliances receive the 3rd place reward. As the campaign phases progress, the rewards for each increase, ensuring that the ultimate victors are not decided right up until the end of the campaign.
Unless explicitly stated otherwise, the order in which the alliances receive their Control Level rewards begins with the alliance who has the most overall Battle points, followed by the alliance with the second most overall Battle points, then finally the alliance with the fewest overall Battle points. When collecting their rewards from Battle points, that alliance resolves all awards the same time, before the next alliance resolves their rewards.
After all alliances Control Level rewards have been awarded, all alliances that have achieved the Strategic Goal they selected at the start of the campaign phase will receive their completed goals’ additional rewards.
Unless explicitly stated otherwise, the order in which the alliances receive their Strategic Goals rewards begins with the alliance who has the most overall SAP, followed by the alliance with the second most overall SAP, then finally the alliance with the fewest overall SAP. When collecting their rewards from SAP, that alliance resolves all rewards at the same time, before the next alliance resolves their rewards.
In either case, in the case of a tie or rewards that would resolve at the same time, the Campaign Master must randomly determine which alliance resolves their rewards first. Sometimes alliances will have to make decisions when resolving their rewards - most often when selecting which strategic sites to increase their Control Level over. For this process, we recommend electing a Warmaster to coordinate each alliance, especially in larger campaigns.
When the next campaign phase begins, each alliance’s Battle points and Strategic Asset points are reset to 0, putting alliances on an equal footing for the next phase of the campaign.
End of Campaign
After all alliances have received their rewards at the end of campaign phase 3, the campaign is over. The alliance with the most CVP takes control of Sangua Terra’s capital city and is crowned the victor. If there is a tie for most CVP, and one of the tied alliances controls more strategic sites than the other tied alliances, then that alliance wrests control of Urbanosprawl Alpha and is the victor. If this is also a tie, then the alliance with the most SAP at the end of phase 3 is the victor. If even this is a tie, then the campaign ends in a bloody draw, and the battle for Sangua Terra rages on...Strategic Goals
The Strategic Goals that alliances can choose at the start of each phase can be found here. Each Strategic Goal will explain what requirements must be met for your alliance to earn the associated rewards, alongside any alliance restrictions. If the requirements of the selected Strategic Goal are not met, then that reward is not resolved.
Phase 1
Apply pressure wherever the foe shows their hand.
Drive the enemy from your chosen territories and festoon the battlefield with gory trophies.
While your enemies battle one another elsewhere, further your own insidious goals in the shadows.
A swift and decisive strike achieves dominance.
Broad intelligence gathering allows for more informed strategic decisions as the war rages on.
Phase 2
Build on your successes by fortifying the ground you have already taken.
That which your foes prize must be torn from their grasp without mercy.
Striking and fading, you must harry your enemies to pillage their supplies and weaken their morale.
For example, if your alliance had three players, your alliance would need to assign at least three Strategic Asset points to at least three different strategic sites to achieve this Strategic Goal.
Sever the foe’s lines of supply, reinforcement and communication to disrupt their plans.
Draw the enemy in then pivot swiftly to a new disposition, seizing vital territory in the process.
Phase 3
If this grand gamble pays off it will strengthen your position across the city sprawl.
A precisely measured application of force will set you ahead of your foes at the crucial moment.
Transform hastily seized and bolstered portions of the cityscape into veritable fortresses.
Shatter the enemy’s strongpoints and cast their banners into the dirt.
With the enemy convinced of your strategic goals, it is time to strike at your true target.
Mighty Champions
As war spills from the Nachmund Gauntlet to engulf the worlds of the Sanctus Wall, so the scale of the conflict draws some of the galaxy’s greatest champions to join the fighting. The presence of even one such potent exemplar can inspire their followers to great deeds, while the personal intervention of such individuals can change the shape of entire battles.
If you are recreating the conflict in this very book, then Haarken Worldclaimer would be a Front-line Champion, Junith Eruita would be a Strategic Champion and Saint Celestine would be an Inspirational Champion.
These warriors are found where the fighting is thickest, using their hard-won experience to lead their troops to victory.
Individuals of this sort employ their vast and sweeping strategic insights to stack the odds in their armies’ favour.
- If you are the Underdog, you can select one additional Crusade Blessing.
- If you are not the Underdog, you can select one Crusade Blessing, instead.
Whether by the subtle arts of assassination or overt and spectacular duels, warriors such as this excel in felling the enemy’s leaders.
The mere presence of such iconic figures as these inspires incredible courage - or else terrified obedience - in their followers.
Whether through medical expertise, battlefield repairs or some more esoteric talents, these individuals bolster their armies’ ranks.
By cunning sorcery, guileful shadow operations or other devious means, these warriors subtly influence the strategic picture.
Focusing on the mechanisms and grand logistics of war, these individuals ensure excellent support for their armies.
Crusade Badges
Guardians Alliance
If you participate in a Nachmund Gauntlet campaign as a member of the Guardians alliance, you can earn the Crusade Badges below.
- Gained five or more SAP during a Nachmund Gauntlet campaign.
- End a Nachmund Gauntlet campaign where your alliance has the Fortified Control Level on one or more districts of Sangua Terra.

- Gained ten or more SAP during a Nachmund Gauntlet campaign.
- End a Nachmund Gauntlet campaign where your alliance has the Fortified Control Level on two or more districts of Sangua Terra.
- Gained 15 or more SAP during a Nachmund Gauntlet campaign.
- End a Nachmund Gauntlet campaign where your alliance has the Fortified Control Level on three or more districts of Sangua Terra, and your alliance controls the Emperor’s Voice Grand Battery.
Despoilers Alliance
If you participate in a Nachmund Gauntlet campaign as a member of the Despoilers alliance, you can earn the Crusade Badges below.
- Gained five or more SAP during a Nachmund Gauntlet campaign.
- End a Nachmund Gauntlet campaign where your alliance controls one or more districts of Sangua Terra.

- Gained ten or more SAP during a Nachmund Gauntlet campaign.
- End a Nachmund Gauntlet campaign where your alliance controls two or more districts of Sangua Terra.
- Gained 15 or more SAP during a Nachmund Gauntlet campaign.
- End a Nachmund Gauntlet campaign where your alliance controls three or more districts of Sangua Terra, including the Praefectus Bastion and the Accrandor Spaceport.
Marauders Alliance
If you participate in a Nachmund Gauntlet campaign as a member of the Marauders alliance, you can earn the Crusade Badges below.
- Gained five or more SAP during a Nachmund Gauntlet campaign.
- End a Nachmund Gauntlet campaign where your alliance has the Establishing Foothold Control Level (or better) on three districts of Sangua Terra.
- Gained ten or more SAP during a Nachmund Gauntlet campaign.
- End a Nachmund Gauntlet campaign where your alliance has the Establishing Foothold Control Level (or better) on four districts of Sangua Terra.

- Gained 15 or more SAP during a Nachmund Gauntlet campaign.
- End a Nachmund Gauntlet campaign where your alliance has the Establishing Foothold Control Level (or better) on four districts of Sangua Terra, and your alliance controls the Tower of Murmuration.
Battle Traits
Each time you give a unit a Battle Trait, make a note of it on its Crusade card and increase its Crusade points total accordingly.
|


|
| ||||||||||||
| ||||||||||||
| ||||||||||||
| ||||||||||||
Crusade Relics
When fighting in the Nachmund Gauntlet, units from your Crusade army can gain the following Crusade Relics.Artificer Relics
Incorporating tactica-inload neurocircuitry and a complex data-web sensory shunt, these decorative honours further augment the bearers already shrewd grasp of grand strategy.
At the start of your first Command phase, if the bearer is on the battlefield, you gain 1CP. At the end of the battle, if the bearer is on the battlefield, you gain 1 Strategic Asset point (SAP).Generated by an artificer-crafted micro-emitter, this protective energy field is invisible until it intercepts incoming enemy fire. In the instant of impact, however, the conversion field blazes with light as it disperses the force of the projectiles, sometimes searing and blinding the attacker.
Models in the bearer’s unit have a 5+ invulnerable save against ranged attacks and each time a ranged attack is allocated to a model in the bearer’s unit, on an unmodified saving throw of 6, the attacking unit suffers 1 mortal wound after it has finished making its attacks.Reputedly fashioned by the master poisoners of the Officio Assassinorum, when incorporated into a weapon’s hilt or mechanisms, this device begins its sinister work. It fabricates incredibly lethal genetic toxins, using a suite of inbuilt biosamplers to tailor the resultant brew to the wielder’s enemies even before combat begins. Once the autofont infuses the weapon, the slightest contact with the victim is enough to trigger their slow, agonising, but ultimately inevitable demise.
Select one melee weapon equipped by the bearer (excluding a weapon that has been replaced by an Enhancement or Crusade Relic, or upgraded with any Battle Traits). That weapon is now a Crusade Relic and, in your Fight phase, after the bearer has fought, select one enemy unit hit by one or more of those attacks made with this weapon. Until the end of the battle, that enemy unit is poisoned. At the start of each player’s Command phase, roll one D6 for each poisoned enemy unit on the battlefield: on a 1, the poison wears off and the unit is no longer poisoned; on a 2-3, that enemy unit suffers 1 mortal wound; on a 4+, that enemy unit suffers D3 mortal wounds.Hailing from the earliest days of the Imperium - or perhaps even before - this device bonds with its host like a mechanical symbiote. Once attached, it repairs physical and mental hurts at a nigh-supernatural rate.
The bearer has the Feel No Pain 5+ ability.Antiquity Relics
This potent device emits command override data-choristry that can stretch into the void and summon orbital weapons strikes to precise coordinates. The resulting firestorms are as spectacular as they are devastating.
Once per battle, in your Command phase, if the bearer is on the battlefield, you can use this ability. Select one point on the battlefield and place a marker on that point. At the start of your next Command phase, roll six D6 for each unit within 6" of the centre of that marker, adding 2 to the roll for each unit within 3" of the centre of that marker: for each 4+, that unit suffers 1 mortal wound. The marker is then removed.Cluttering with overlapping screeds of disruptive data, this sinister talismans inbuilt technologies scramble teleport locks and drop beacons within a broad radius.
Enemy units that are set up on the battlefield as Reinforcements cannot be set up within 12" of the bearer.Displacer field technologies trigger micro warp jumps that physically remove the bearer from harm’s way before dropping them back into reality nearby.
Once per battle, at the end of your opponents Shooting phase, if the bearer’s unit is not within Engagement Range of one or more enemy units, and if it was targeted by one or more attacks during that phase, you can remove the bearer’s unit from the battlefield and place it into Strategic Reserves. If you do, when you next set up the bearer’s unit from Strategic Reserves, models in that unit have the Deep Strike ability until the end of that phase.Etched from circuit-laced noctilith polarised to amplify empyric energies, this talisman burns with cold fire as it boosts the warpcraft of its bearer.
PSYKER model only. Add 6" to the Range characteristic of the bearer’s ranged [psychic] weapons. If the bearer has a Psychic ability that instructs you to select one or more units within a specified range, you can increase the range of that ability by 6". If the bearer has a Psychic Aura ability, increase the range of that ability by an additional 3".Legendary Relics
This sinister device was discovered on the warp-touched world of Limina, deep in the Nachmund Gauntlet. While its provenance is mysterious, its ability to hide the bearer from physical, technological and even psychic senses is almost supernatural.
The bearer has the Lone Operative and Stealth abilities. While the bearer is leading a unit, models in that unit have the Stealth ability and that unit can only be selected as the target of a ranged attack if the attacking model is within 18".It is said this shard of crystal is the last remnant of the great Harekalian seeing glass. Rescued by the seer Lyreth, it has changed hands many times but retained its power to show glimpses of impending peril.
At the end of your opponents Movement phase, you can select one enemy unit that was set up on the battlefield within 12" of the bearer’s unit during this phase; the bearer’s unit can then either:- Shoot, but when resolving those attacks the bearer’s unit can only target that enemy unit (and only if it is an eligible target).
- Declare a charge against that unit (note that even if this charge is successful, the bearer’s unit does not receive any Charge bonus this turn).
An implement of destiny and a destroyer of the great and powerful, this malevolent weapon has laid heroes, monsters and generals low.
Select one melee weapon equipped by the bearer (excluding a weapon that has been replaced by an Enhancement or Crusade Relic, or upgraded with any Battle Traits). That weapon is now a Crusade Relic and:- Each time an attack is made with it, you can re-roll the Wound roll.
- Once per battle, at the start of the Fight phase, the bearer can unleash the power stored in that weapon. When they do, until the end of the turn, that weapon has the [devastating wounds] ability and its Strength and Attacks characteristics are increased by a number equal to the current battle round number.
Nachmund Gauntlet Crusade Battles
A Nachmund Gauntlet Crusade battle is waged by following the sequence below.
Select Battle Size
Players must first select the battle size they wish to play: Incursion, Strike Force or Onslaught.
| |||||||||||||||
Muster Crusade Armies
Each player must then muster a Crusade army and provide a copy of their Army Roster for their opponent to read through. The players must use the Tactical Reserves rules when doing so, selecting a Formation Stance for their Crusade army and organising their units into one Primary wave and 3 Reinforcement waves, your Army Roster should make note of which unit is in which wave.Determine Mission
Next, players determine which mission will be used for the battle; they can choose from the missions presented in the tables (see below) for their chosen battle size. This will determine the deployment map that is used, as well as the specific mission briefing. Players can either simply agree which they will use with their opponent, or they can roll a dice to randomly select a mission.When rolling to determine an Incursion or Strike Force mission, first roll one D6 to determine which table to use: on a 1-3, use the Incursion/Strike Force A table (the missions on this table are designed to be symmetric, with the Attacker and Defender vying to achieve the same mission objectives); on a 4-6, use the Incursion/Strike Force B table (the missions on this table are designed to be asymmetric, with the Attacker and Defender having different rules and/or mission objectives). Then roll one D6 to determine which mission to play. For Onslaught missions, roll one D6 to determine which mission to play on the Onslaught table.
| ||||||||||||||||
| ||||||||||||||||
|
Determine Attacker and Defender
Players roll off and the winner decides who will be the Attacker and who will be the Defender.Read Mission
Each mission has a mission briefing that will detail the aims of the battle. Each mission will also list one or more additional mission rules that will apply for the duration of the battle and a series of mission objectives, which may be different for the Attacker and the Defender. Players should read and familiarise themselves with these before proceeding.Place Objective Markers
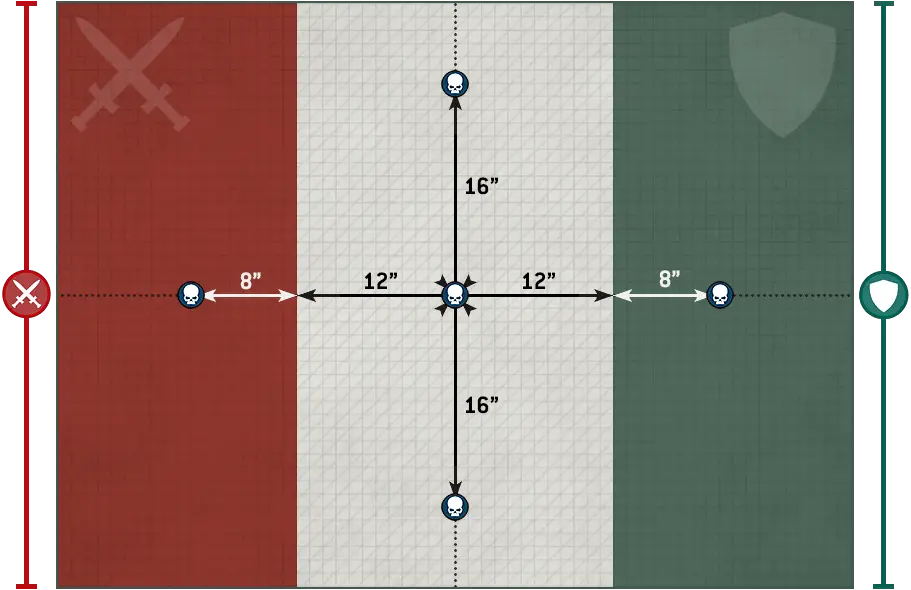
Players now set objective markers up on the battlefield. Each mission’s deployment map will show the players how many to set up and where each should be placed.Mission Objectives
During the battle, players can gain Victory points (VP) by achieving mission objectives. Mission objectives can either be ‘Progressive’ or ‘End Game’. Progressive mission objectives are scored during the battle (detailed on the mission objective) and can be achieved several times. End Game mission objectives are scored at the end of the battle.Some Progressive objectives will award Victory points each time an enemy model or unit is destroyed. A model or unit can, if it is resurrected for any reason (i.e. it was destroyed and subsequently returned to the battlefield), potentially contribute several VP due to these types of mission objectives (assuming it is resurrected and subsequently destroyed several times over).
Create The Battlefield
Next players create the battlefield and set up terrain features. The size of the battlefield depends on the battle size selected, as shown in the table below (the table shows the minimum size of battlefields).
| ||||||||
Unless otherwise stated, when setting up terrain features, use the guidelines detailed in the Core Rules. Players must use the rules presented in the Core Rules for terrain features.
Purchase Requisitions
If you have access to any Requisitions that are used before a battle, you can spend RP to use them now. If any of these upgrade one or more of your units for the coming battle, make a note of that upgrade on your Army Roster.Select Agendas
Each player then secretly selects two Agendas for the battle and writes them down. Each can award XP to certain units in that player’s Crusade army, as described on the Agenda itself. The Agendas that players can choose from can be found here. Once both players have selected their Agendas, they reveal their selections to their opponent.
Actions
Some Agendas and some missions feature Actions that certain units can perform. Each Action states which units can perform it, when it is started and completed, and what the effects of completing it are.A unit cannot start to perform an Action if one or more of the following apply to that unit:
- It is an Aircraft unit.
- It is Battle-shocked.
- It has an Objective Control characteristic of 0.
- It is within Engagement Range of one or more enemy units (unless it is a TITANIC CHARACTER unit).
- It Advanced or Fell Back this turn.
- It is not eligible to shoot this phase (including units that have already been selected to shoot this phase).
If a unit starts to perform an Action, until the end of the turn, that unit is not eligible to shoot or declare a charge, unless it is a TITANIC CHARACTER unit, in which case, until the end of the turn, that unit cannot start to perform another Action and is not eligible to declare a charge. If a unit performing an Action makes a move (excluding Pile-in and Consolidation moves) or leaves the battlefield, that Action cannot be completed.
Select Crusade Blessings
When two Crusade armies battle each other, it is likely that one or the other will be more experienced. To determine this, both players should compare the combined Crusade points total of all the units that are on their Army Rosters.If there is a difference of at least 5 between the players’ Crusade points totals, the player whose Army Roster has the lower total number of Crusade points is the Underdog and gains a number of Crusade Blessings to use in that battle, depending on the difference. This represents high command funnelling additional resources to the Underdog to help them combat a more experienced foe.
Declare Battle Formations
In the following order, both players now secretly note down:- Which of their Leader units will start the battle attached (they must specify which Leader unit is attached to which Bodyguard unit). Leader units can only be attached to units that are in their own wave.
- Which of their units will start the battle embarked within TRANSPORT models (they must specify which units are embarked within which models). Units can only start the battle embarked within TRANSPORTS that are in their own wave.
When both players have done so, they declare their selections to their opponent.
In Nachmund Gauntlet Crusade missions units in players’ Primary waves cannot start the battle in Reserves, and all units in each player’s Reinforcement waves will arrive on the battlefield as described in the Tactical Reserves rules. Any Reserves unit that has not arrived on the battlefield by the end of the third battle round counts as having been destroyed, as do any units embarked within them (this does not apply to units that are placed into Strategic Reserves after the first battle round has started).
Deploy Crusade Armies
Players take it in turns to set up the units of their Primary wave, one at a time, starting with the Defender. A player’s models must be set up wholly within their deployment zone. If a player sets up a TITANIC unit when it is their turn to set up a unit, they skip their next turn to set up a unit. If one player finishes deploying all of the units in their Primary wave, their opponent then deploys the remainder of the units in their Primary wave. Units in players Reinforcement waves are not set up on the battlefield now - they will arrive later during the battle as detailed here.Redeploy Armies
Some rules allow players to redeploy certain units after both armies are deployed. Unless otherwise stated, such rules are resolved in this step, they can only affect units in a player’s Primary wave. Players alternate resolving any such rules, starting with the Attacker.Determine First Turn
Unless the mission briefing says otherwise, players roll off and the winner takes the first turn.Resolve Pre-battle Rules
Players alternate resolving any pre-battle rules units from their army may have, starting with the player who will take the first turn.Begin The Battle
The first battle round begins. Players continue to resolve battle rounds until the battle ends. Nachmund Gauntlet missions use the Tactical Reserves and Surgical Deep Strike rules), meaning your Reinforcement waves will arrive as your game unfolds and some of your units can perform Surgical Deep Strikes during battle.During the battle, the first player whose score reaches 10 or more VP is said to have gained a strategic advantage in that battle. Note that only VP scored from progressive objectives are counted towards determining this; VP scored from End Game mission objectives and from having a Battle Ready army (see below) do not count towards gaining a strategic advantage.
Battle Ready
Playing games of Warhammer is a shared experience that we all want to look and feel great. To reflect this, Nachmund Gauntlet games reward you for having a fully painted ‘Battle Ready’ army. Here we explain what that means, and where to find achievable online tutorials and painting guides to get your army ready for action!
When you play a Nachmund Gauntlet game, there are 1 victory point available if every model in your army is painted to a Battle Ready standard. Battle Ready means your models are fully painted with a detailed or textured base.
This is considered to be the minimum standard of miniature painting for a Nachmund Gauntlet mission, as well as a guaranteed method of scoring some victory points before the dice even start rolling.
The Citadel Colour range includes all the paints and hobby supplies you’ll need to paint your miniatures quickly and efficiently, In fact, Contrast paints were created especially to help you get your armies Battle Ready in no time — just one coat of Contrast paint lays down both a base colour and a bit of shade — while Technical paints give you a textured base with one application. It’s never been easier to get your army ready for a tournament.
End The Battle
The battle ends at the end of any battle round where a player has gained a strategic advantage, otherwise the battle ends after five battle rounds have been completed.If one player has no models remaining in their Crusade army at the start of their turn, the other player may continue to play out their turns until the battle ends.
At the end of the battle, if every model in a player’s Crusade army is painted to a Battle Ready standard, then at the end of the battle, that player scores a bonus 1VP.
Determine The Victor
The player with the most VP is the victor. If players are tied for VP, and one of the players has a strategic advantage in that battle, then that player is the victor; otherwise, the battle is a draw.The victor of a mission can then claim the Victor bonus listed on that mission. If the game is a draw, neither player can claim the bonus.
If you are playing a Nachmund Gauntlet mission, you should inform the Campaign Master of the result of the battle so that your alliance can be awarded the appropriate number of Battle points and Strategic Asset points, remembering that the players must also inform the Campaign Master which of the four districts of Sangua Terra their Battle points and Strategic Asset points will be assigned to: Praefectus Bastion; Emperor’s Voice Grand Battery; Tower of Murmuration; Accrandor Spaceport.
Update Crusade Cards
The players must now update their Crusade cards for all the units they used in the battle by taking Out of Action tests for any that were destroyed, and selecting a unit to be Marked for Greatness. If this results in any units gaining a rank, before the next battle they can gain Battle Honours.Update Order of Battle
Increase your Battle tally and Requisition points by 1, and make any notes that you wish to record following your battle. If you wish to add any units to your Crusade force or spend any Requisition points, do so and update your Order of Battle accordingly before your next battle.Tactical Reserves
In order to play a Crusade game of Warhammer 40,000, you will need to muster a Crusade army. To do so, follow the sequence below.
1. Select Battle Size
Select one of the following battle sizes; this will determine the total number of points each player will have to spend to build their Crusade army and as a result, how long the battle will last. You will have to select units from your Crusade force when mustering your Crusade army, therefore it must contain sufficient units for the points specified for your selected battle size.Each player must choose a formation stance for their Crusade army before they add units to their Crusade army; this will determine the maximum number of points they will have in their Primary wave, and how many points they will have for each of their Reinforcement waves.
When mustering your Primary wave the combined points values of units in your Primary wave cannot exceed the points limit shown for your chosen formation stance. If a unit has an ability that means it must start the game in Reserves, that unit cannot be part of your Primary wave.
After you have mustered your Primary wave, you muster your Reinforcement waves. You will have a minimum of two Reinforcement waves, and a maximum of 3 Reinforcement waves. When mustering your Reinforcement waves the combined points values of units in each Reinforcement wave cannot exceed the points limit shown for your chosen formation stance.
You can find more information for using Tactical Reserves during Nachmund Gauntlet battles here.
| ||||||||||||||||||||||||
| ||||||||||||||||||||||||
| ||||||||||||||||||||||||
2. Start Your Army Roster
The details of your Crusade army must be recorded on an Army Roster; this can be recorded on the Warhammer 40,000 app, a blank Army Roster or a piece of paper. Players must show their finished Army Roster to their opponent before battle commences.You can download blank Army Roster following this link.
4. Select Detachment Rules
Note on your Army Roster one set of Detachment rules for your Crusade army. Some Detachment rules list units that you either must or cannot include in your Crusade army; you must conform to all such rules when building your Crusade army.5. Select Units
Select all the units from your Crusade force that you want to include in your Crusade army. Subtract each unit’s points value from the total permitted for your battle size.You can only include a unit in your Crusade army if:
- That unit has the Faction keyword you chose for your Crusade army in step 3.
- You have enough points remaining.
- Your Crusade army does not already contain three units with the same datasheet name as that unit - or six units with the same datasheet name as that unit if it is a BATTLELINE or DEDICATED TRANSPORT* unit.
Your Crusade army must include at least one CHARACTER unit. Your Crusade army cannot include the same EPIC HERO more than once.
* Every DEDICATED TRANSPORT unit in your Crusade army will need to start the battle with at least one unit embarked inside it, or it will not be able to be deployed for that battle and will instead count as having been destroyed during the first battle round.
6. Select Warlord
Select one CHARACTER model from your Crusade army to be your Warlord - this will be the leader of your Crusade army - and make a note of this on your Army Roster. Your Warlord gains the WARLORD keyword.Mission Record
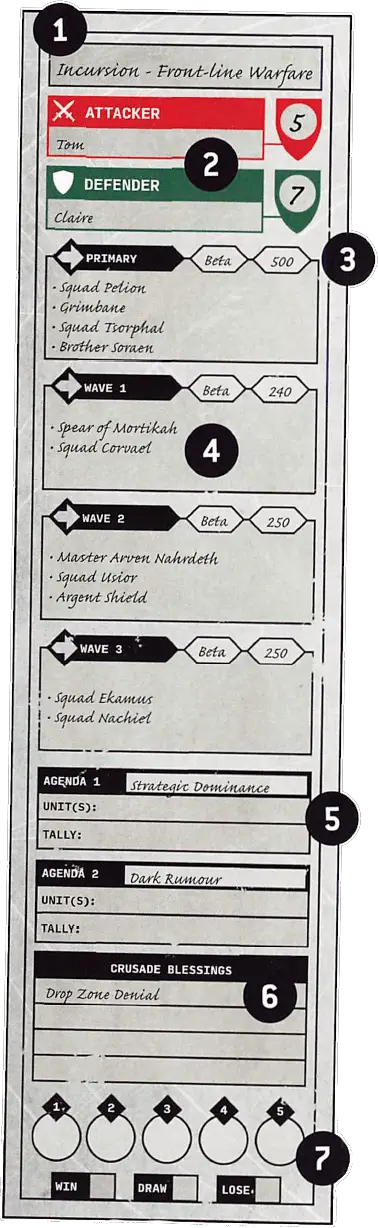
- When selecting the mission, make a note of the mission name and the battle size.
- Record who is the Attacker and Defender and how many Crusade points each player has.
- Nachmund Gauntlet Crusade games use Tactical Reserves; make a note of your chosen formation stance and the points limit of each wave.
- Record a list of units contained within each wave.
- Select Agendas, note the unit(s) that are trying to achieve them, and keep a tally if required.
- Compare both players’ Crusade point totals and record any Crusade Blessings selected.
- Record your total Victory points for each battle round and whether you won, drew or lost the mission.
Using Tactical Reserves
When you deploy your Crusade army, you will only deploy the units in your Primary wave - these units must start the battle on the battlefield or embarked within a TRANSPORT model that starts the battle on the battlefield. Your Reinforcement waves will arrive later during the battle as follows:
- At the start of the Reinforcements step of your Movement phase in the second battle round, you must select one of your Reinforcement waves; all of the units in that Reinforcement wave will arrive on the battlefield as Strategic Reserves.
- At the start of the Reinforcements step of your Movement phase in the third battle round, you must select one of your remaining Reinforcement waves; all the units from that wave arrive on the battlefield as Strategic Reserves.
- The units in your remaining Reinforcement wave take no part in this battle. They are no longer considered to be part of your Crusade army and will not gain any XP this battle. If your WARLORD is part of this wave, then for all mission purposes they count as having been destroyed (your opponent can select one unit from their Crusade army; that unit counts as having destroyed your WARLORD), though your WARLORD will not have to take an Out of Action test after the battle.
In Nachmund Gauntlet battles the following adaptations apply:
- Players cannot use the Rapid Ingress Stratagem.
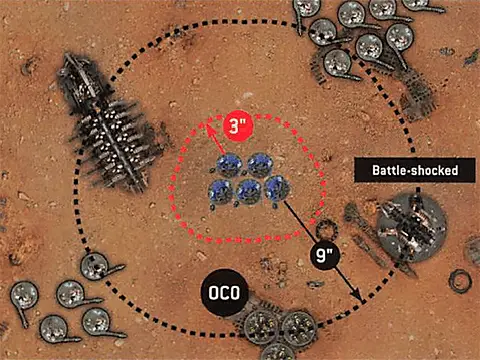
- Each time you set up a unit that is arriving from Reserves, unless that unit is performing a Surgical Deep Strike, you can set that unit up within 1" of your own battlefield edge (each model from that unit must be set up within 1" of your battlefield edge) even if enemy units are within 9" of that unit (but not within Engagement Range of any enemy units); a unit set up on the battlefield in this way is automatically Battle-shocked.
Surgical Deep Strike
When a unit performs a Surgical Deep Strike, set it up anywhere on the battlefield that is more than 3" horizontally away from all enemy models. That unit must then take a Deep Strike test. To do so, roll 2D6, subtracting 1 from the result for each enemy model that is within 9" of your unit (excluding models in Battle-shocked units and models with an Objective Control characteristic of 0), before consulting the table below.
AND RULES THAT PREVENT UNITS SETTING UP
Several units in Warhammer 40,000 have abilities that state that ‘Enemy units that are set up on the battlefield as Reinforcements cannot be set up within 12" of this unit’. Such rules apply whether the unit is arriving using the normal rules for Deep Strike or is performing a Surgical Deep Strike.
|
|
Crusade Blessings
An Underdog in a Nachmund Gauntlet battle can select one or more Crusade Blessings from those presented here. The number they can select depends on the difference in Crusade points between the armies, as shown in the table below. The same Crusade Blessing cannot be selected more than once.
| ||||||||||||
HIGH STRATEGY Well-laid plans and an ironclad grasp of the most pressing strategic goals go a long way to overcoming an enemy’s superiority in numbers and firepower. You start the battle with 2CP. |
ASTROPATHIC COMMUNIQUÉ Hurled through the maelstrom of the Warp by a determined and powerful mind, this vital psychic warning races ahead of the incoming foe and provides crucial tactical insight. Select one additional Agenda this battle. |
SCARS OF EXPERIENCE To fight and endure despite casualties and hardship teaches bloody lessons all of its own. At the end of the battle, every unit from your Crusade army that is not destroyed gains 1XP. |
TACTICAL GAINS There is more than one path to victory. By driving multiple plans forward even amidst the mayhem of battle, additional tactical gains can be made before the foe even realises the danger. At the end of the battle, roll one D6, adding 3 to the result if you were the victor: on a 4+, you gain 1 Strategic Asset point (pg 72). |
STALWARTS Knowing the calibre of foes bearing upon your forces, sector command has dispatched some of their most reliable and determined warriors to bolster your ranks. BATTLELINE units from your Crusade army that perform an Action are still eligible to shoot in that turn, and BATTLELINE units from your Crusade army can perform Actions while within Engagement Range of one or more enemy units. |
TELEPORTARIUM A powerful and arcane teleportation asset has been made available to you. Employ this device to its full potential to outmanoeuvre and defeat the foe. During the Declare Battle-formations step, you can select two BATTLELINE units from your Reinforcement waves, or one other unit. The selected units have the Deep Strike ability. |

Faction Crusade Blessings
You can select one of the following Crusade Blessings if every model from your Crusade army meets the keyword restrictions indicated below.Whether by jamming teleportation signals, intercepting drop craft or unleashing overlapping automated defences, you hold back crucial enemy reinforcements.
At the start of the battle, select one of your opponent’s Reinforcement waves. That wave cannot be selected to arrive during the second battle round.There are many dark and forbidden means by which sufficiently determined - or insane - warriors can attack through the Warp. Erupting through the veil of reality, the shock and horror of their emergence sets unsuspecting foes reeling.
Each time a unit from your Crusade army performs a Surgical Deep Strike, before any Deep Strike tests are made, select one enemy unit within 6" of your unit; that unit must take a Battle-shock test.If the foe does not truly understand your enigmatic plans, they have little chance of preventing their fulfilment.
At the start of the battle, select one objective marker on the battlefield. While a model from your Crusade army is within range of that objective marker, unless that model’s unit is Battle-shocked, add 1 to that model’s Objective Control characteristic.Attacker and Defender Crusade Blessings
You can select one of the following Crusade Blessings if you are either the Attacker or the Defender in the forthcoming battle.Blasted out of ferrocrete or dug into bedrock, these temporary entrenchments protect defenders.
These carefully wrought sigils disrupt incoming enemy forces, drawing ill fortune upon them and rendering their arrival more perilous.
Called into immediate action, this band of warriors surges ahead of their comrades to strike as and where they are needed most.
A preparatory bombardment can open vital cracks in the enemy defences before the strike is launched.
Infiltration teams have triangulated your forces’ best routes to the battlefield.
Catching the foe unprepared in the earliest hours of the dawn, your warriors make the most of the element of surprise.
Agendas
Some Agendas will award XP or tally marks ‘each time’ an enemy model or unit is destroyed. A model or unit can, if it is resurrected for any reason (i.e. it was destroyed and subsequently returned to the battlefield), potentially contribute several Experience points or tally marks to these types of Agendas (assuming it is resurrected and subsequently destroyed several times over).
Cut down the enemy’s champions, their warlords and spiritual leaders. Make trophies of their butchered remains, and in doing so, inspire your warriors even as you shatter the foe’s morale.
At the end of the battle, if the enemy WARLORD model is destroyed, you gain 1SAP.
Cut through the enemy defence lines, drive your forces into their back lines, and wreak bloody havoc. With their communications disrupted and lines of retreat perilous, they will be forced to give ground before your triumphant warriors.
At the end of the battle, if three or more units from your Crusade army (excluding AIRCRAFT) are wholly within your opponent’s deployment zone, you gain 1SAP.
Scattered across this battlefield are valuable prizes, be they caches of intel, hidden resources or some other asset that must be found and seized.
UNITS: One unit from your Crusade army within range of an unsearched objective marker.
COMPLETES: End of your turn, if you control that objective marker.
IF COMPLETED: That objective marker is searched and the unit that completed this Action gains 3XP.
At the end of the battle, if three or more objective markers on the battlefield have been searched by units from your Crusade army, you gain 1SAP.
Swiftly strike the enemy, maximise the element of surprise, and seize ultimate victory.
At the end of the battle, if four or more enemy units were destroyed by units from your Crusade army with the Deep Strike ability during the battle, you gain 1SAP.
You will further your faction’s goals in this region by laying claim to the vital ground at the battlefield’s heart and denying it to the foe.
At the end of the battle, if units from your Crusade army gained 4 or more XP as a result of this Agenda, you gain 1SAP.
Attacker and Defender Agendas
You can select one of the following Agendas if you are either the Attacker or the Defender in the forthcoming battle.Many defence systems have been emplaced to help defend the Sandus Wall and await only the waking of their machine spirits to spring to life and do their duty.
UNITS: One INFANTRY or MOUNTED unit from your Crusade army that is wholly within your deployment zone.
COMPLETES: End of your opponent’s next turn or the end of the battle (whichever comes first).
IF COMPLETED: Place one Shield Node marker within 1" of your unit, provided it is wholly within your deployment zone and not within 16" of any other Shield Node marker (you can use spare objective markers to denote these, but they do not count as objective markers for any rules purposes other than this Agenda); if you do, your unit gains 1XP.
At the end of the battle, if there are 4 or more Shield Node markers on the battlefield, you gain 1SAP.
You must hold off each fresh enemy attack wave, driving them back one after another with resolute defiance.
At the end of the battle, if all the units in at least one of your opponents Reinforcement waves have been destroyed, you gain 1SAP.
Stand fast and endure until relieved, no matter what the enemy throws into the fight.
- If that unit is not destroyed, it gains 2XP.
- If that unit is not Below Half-strength, it gains 1XP.
At the end of the battle, if one or more of these units is at its Starting Strength, you gain 1SAP.
This attack is about not just conquest but also propaganda. Seize these vital sites, and you will shatter the spirits of the foe, possibly beyond recovery.
At the end of the battle, if you control all of the selected objective markers, you gain 1SAP.
Potent super weapons have been left in this area, deployed but quiescent. Awakening them ready for use will benefit your faction to the terrible detriment of the foe.
UNITS: One INFANTRY or MOUNTED unit from your Crusade army that is wholly within your opponent’s deployment zone.
COMPLETES: End of your opponent’s next turn or the end of the battle (whichever comes first).
IF COMPLETED: Your unit gains 2XP (a unit cannot gain more than 3XP per battle from this Agenda).
At the end of the battle, if this Action was completed by units from your Crusade army two or more times during the battle, you gain 1SAP.
This is a campaign of annihilation and extermination. Leave no stone atop another, no foe still breathing, no feature of this battlefield untouched by scourging fire and complete devastation.
At the end of the battle, if you control all objective markers in your opponent’s deployment zone, you gain 1SAP.
Strategic Strike 1
1
1Drop Site Secure: Each time a unit performs a Surgical Deep Strike, if that unit is set up wholly within its own Deployment Zone, add 2 to that unit’s Deep Strike test.
VICTOR BONUS
The victor can select one unit from their Crusade army that is wholly within their opponent’s deployment zone at the end of the battle; that unit gains 5XP.
Strike swiftly, seize the drop zone and stave off enemy counterattacks to secure victory.
In the fifth battle round, the player who has the second turn scores VP as described above, but does so at the end of the turn instead of at the end of their Command phase.
Drive deep into enemy territory and plant your flags.
Stranglehold 2
2Staging Post: Players only gain 1CP during their turn if they control the objective marker within their deployment zone.
VICTOR BONUS
The victor can select one additional unit from their Crusade army to be Marked for Greatness.
There is no time for complacency in this fight. Do not give the foe an inch!
Establish swift strategic dominance to deny your foes the chance to consolidate their position.
- If they control one or more objective markers, they score 1VP.
- If they control more objective markers than their opponent, they score 2VP.
In the fifth battle round, the player who has the second turn scores VP as described above, but does so at the end of the turn instead of at the end of their Command phase.
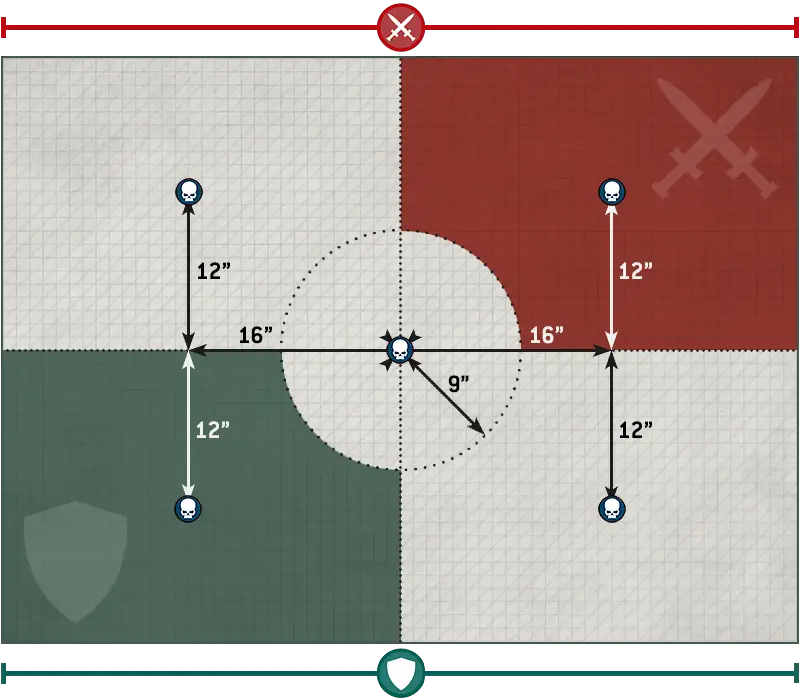
Supply Raid 3
3Drop Zone Depleted: At the start of the first battle round, the players randomly select three different objective markers in No Man’s Land. The first objective marker selected is the Alpha objective, the second is the Beta objective, and the third is the Gamma objective. Throughout the battle:
- At the start of the third battle round, the Alpha objective is removed from the battlefield.
- At the start of the fourth battle round, the Beta objective is removed from the battlefield.
- At the start of the fifth battle round, the Gamma objective is removed from the battlefield.
VICTOR BONUS
The victor can increase their Crusade force’s supply limit by 250 points.
The more supplies that can be extracted safely from this site, the greater a success you will be credited with.
- During the second and third battle rounds, the player whose turn it is scores 1VP for each objective marker they control.
- During the fourth battle round, the player whose turn it is scores 2VP for each objective marker they control.
- During the fifth battle round, the player whose turn it is scores 4VP for each objective marker they control.
In the fifth battle round, the player who has the second turn scores VP as described above, but does so at the end of the turn instead of at the end of their Command phase.
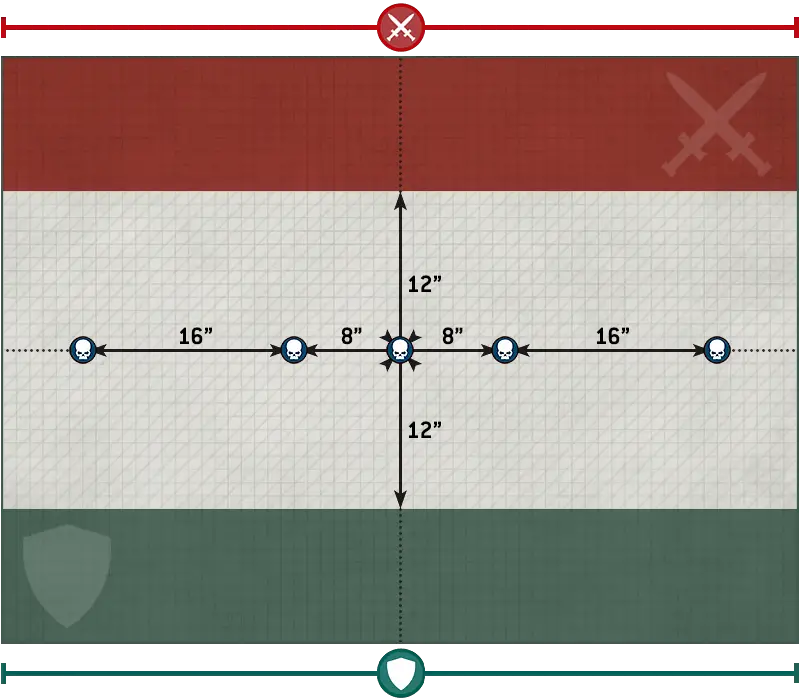
Purge After Inload 4
4UNITS: One unit from your Crusade army that is within range of an objective marker that is not within your own Deployment Zone.
COMPLETES: End of your opponent’s next turn or the end of the battle (whichever comes first), if you control that objective marker.
IF COMPLETED: That objective marker is purged and removed from the battlefield.
VICTOR BONUS
The victor can select one unit from their Crusade army that purged one or more objective markers during the battle to gain a Battle Trait. This must be a unit that can gain a Battle Trait. In addition, if the victor purged the objective marker within their opponent’s deployment zone, they gain 1SAP.
As long as the info-shrines can be held, more intelligence can be gathered.
In the fifth battle round, the player who has the second turn scores VP as described above, but does so at the end of the turn instead of at the end of their Command phase.
Keep the foe ignorant, even at the expense of your enlightenment.
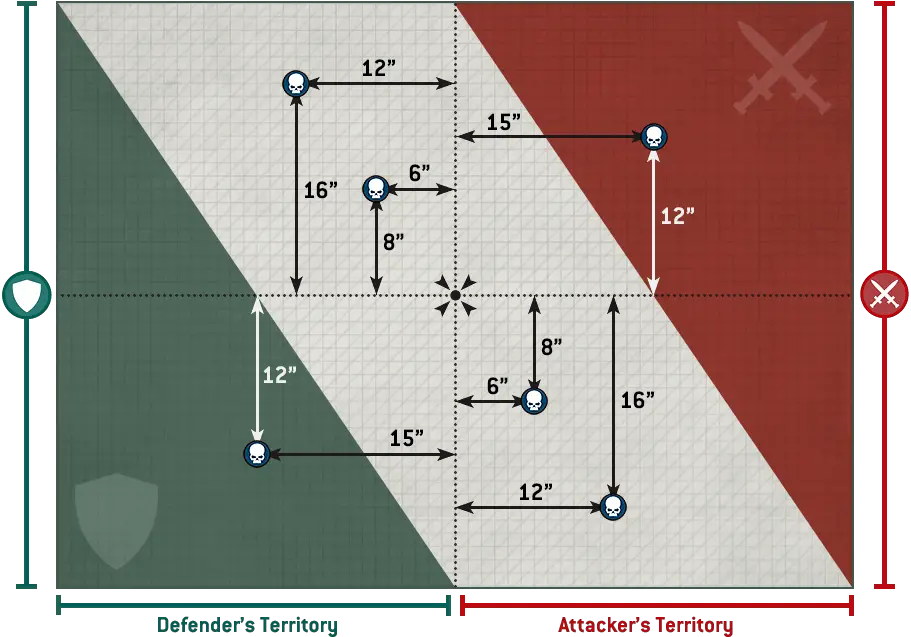
Front-line Warfare 5
5Chosen Battlefield: Starting with the Defender, players alternate setting up six objective markers on the battlefield. One objective marker must be set up wholly within each deployment zone, and the rest set up wholly within No Man’s Land. Objective markers cannot be set up within 6" of one or more other objective markers and/or one or more battlefield edges. If it is not possible to set up an objective marker as described above, it is not set up.
VICTOR BONUS
Each unit from the victor’s Crusade army that ended the battle within range of an objective marker the victor controls gains 1XP.
Opening and holding a path into the enemy’s back lines allows the push to gather pace.
To maximise hopes of breaking the enemy line, you must ensure your own holds firm.
- For each objective marker they control in No Man’s Land, they score 1VP.
- If they control the objective marker in their opponent’s deployment zone, they score 2VP.
In the fifth battle round, the player who has the second turn scores VP as described above, but does so at the end of the turn instead of at the end of their Command phase.
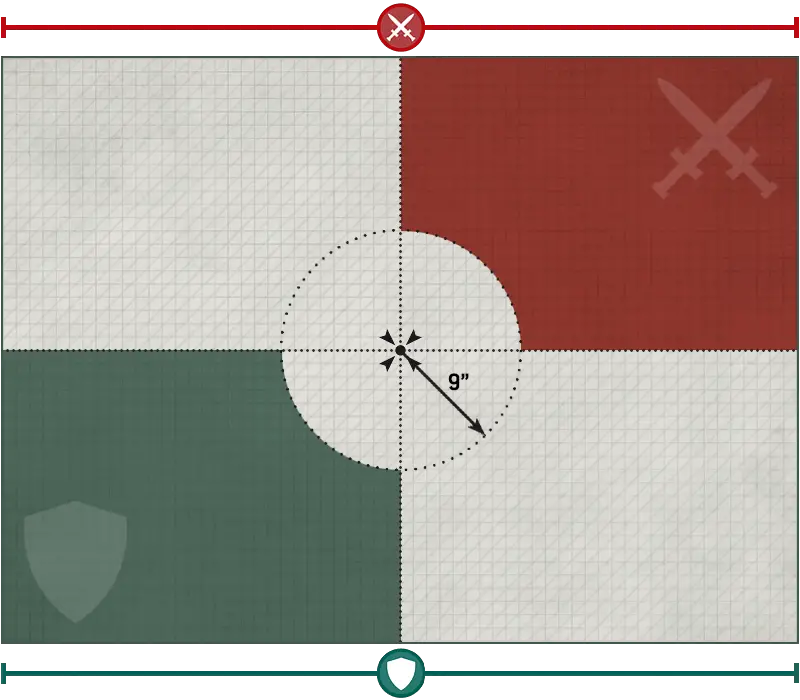
Heralds of Vengeance 6
6UNITS: One or more units from your Crusade army, each within range of a different objective marker that you control.
COMPLETES: End of your turn.
IF COMPLETED: For each unit that completes this Action, you can move the objective marker that unit is within range of up to 6". When doing so, that objective marker cannot end that move on top of any other objective marker or model.
The more strike beacons guided firmly upon enemy-held territory, the more decisively the vengeful blow will land upon your foes.
- 3VP for each objective marker that is wholly within their opponent’s deployment zone.
- 2VP for each objective marker that is wholly within 6" of their opponent’s deployment zone.
- 1VP for each objective marker that is wholly within 12" of their opponent’s deployment zone.
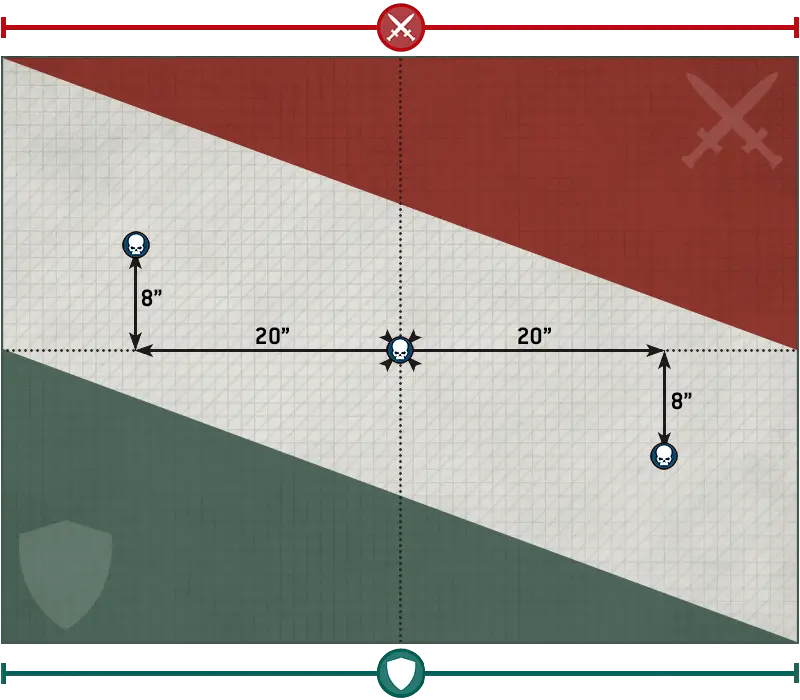
Final Stand 1
1Strategic Offensive: The Attacker decides which player has the first turn.
Delayed Reserves: The Defender’s Reinforcement waves will arrive in the Reinforcement step of their Movement phase in the third and fourth battle round, instead of in the Reinforcement step of their Movement phase in the second and third battle round.
VICTOR BONUS
Each unit from the victor’s Crusade army that ended the battle wholly within the Defender’s deployment zone gains 1XP. In addition, if the victor controls the objective marker in the Defender’s deployment zone at the end of the battle, they gain 1SAP.
The longer the defenders can hold their ground, the more hope they have of enduring this onslaught.
- At the end of each player’s turn, the player who controls the objective marker in the Defender’s deployment zone scores 1VP.
- At the end of the Attacker’s turn, if the Attacker controls the objective in No Man’s Land, the Attacker scores 1VP.
Both commanders are determined to see the others forces annihilated in this merciless clash.
- At the end of the battle round, the Defender scores 1VP if one or more of the Attacker’s units were destroyed during this battle round.
- At the end of the battle round, the Attacker scores 1VP if more of the Defender’s units than the Attacker’s units were destroyed during this battle round.
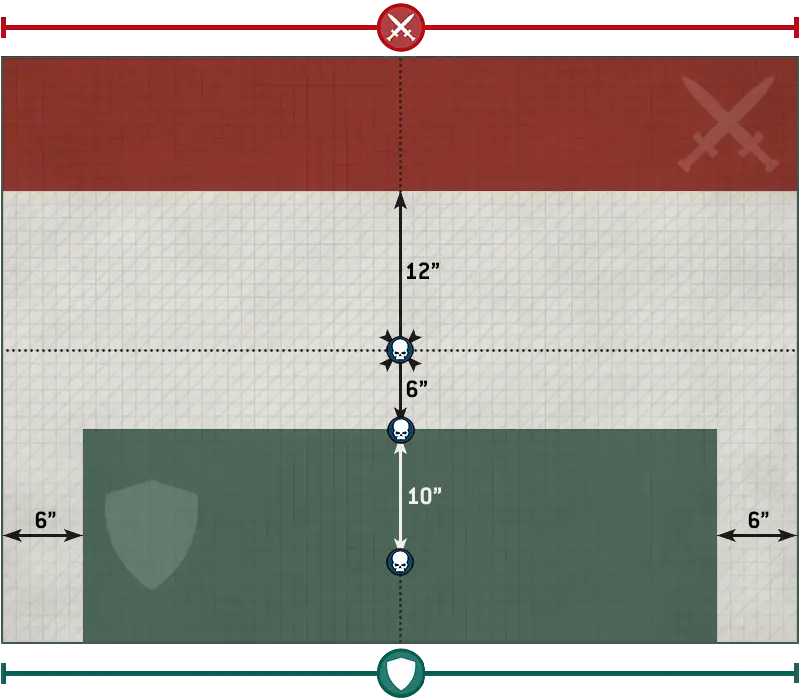
Saboteurs 2
2Strategic Offensive: The Attacker decides which player has the first turn.
Supply Sabotage: The Attacker can perform the following Action:
UNITS: One or more units from your Crusade army, each of which is within range of a different objective marker.
COMPLETES: End of your opponent’s next turn or the end of the battle (whichever comes first), if you control that objective marker
IF COMPLETED: That objective marker is sabotaged and removed from the battlefield.
The vital equipment stored in this base must be protected if its usefulness is to be maintained.
- If they control one objective marker, they score 1VP.
- If they control two or three objective markers, they score 2VP.
- If they control four or five objective markers, they score 3VP.
With each strategic cache and asset destroyed, the attackers’ mission comes closer to fruition.
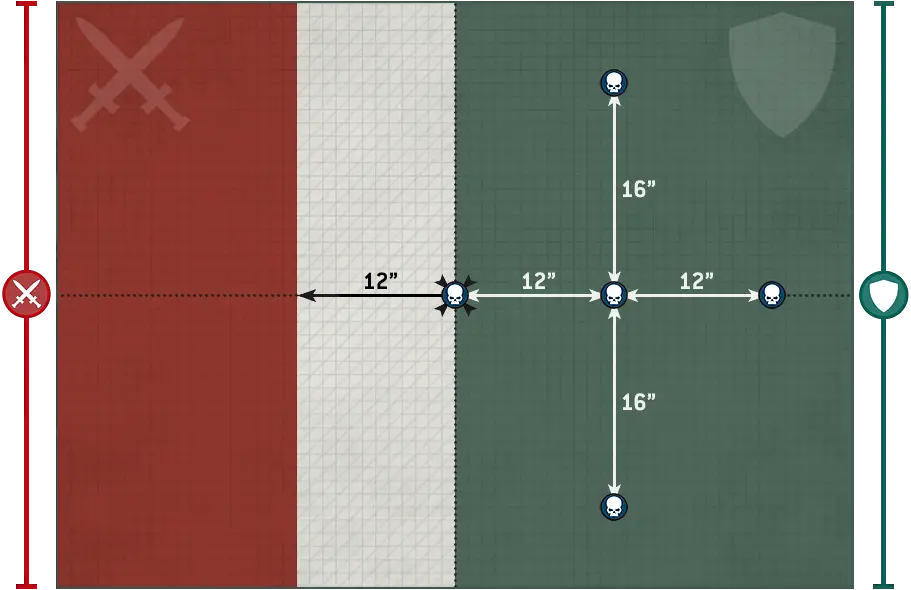
Retrieval 3
3UNITS: One unit from your Crusade army that is within range of an objective marker.
COMPLETES: End of your turn, if you control that objective marker.
IF COMPLETED: Roll one 06, adding 1 to the result if you are the Defender, and adding an additional 1 to the result for every other Search Site action that has been completed during this battle (by either player). On a 6+, you have discovered the location of the courier; remove all other objective markers from the battlefield. Otherwise, remove that objective marker from the battlefield.
The victor can select one unit from their Crusade army that completed the Search Site action in the battle; that unit gains 3XP (if that unit discovered the location of the courier, it instead gains 5XP). In addition, the victor gains 1 Strategic Asset Point.
With each set of coordinates searched, the remaining grid shrinks and success comes closer.
- Each time a player completes the Search Site action, that player scores 1VP.
- If a player discovers the location of the courier, that player scores 1VP.
Once the hidden messenger has been located they must be defended until extraction can be arranged.
- If the location of the courier has been discovered, at the end of the Command phase, the player who controls the objective marker scores 3VP.
- In the fifth battle round, if the location of the courier has been discovered, the player who has the second turn scores 3VP as described above, but does so at the end of the turn instead of at the end of their Command phase.
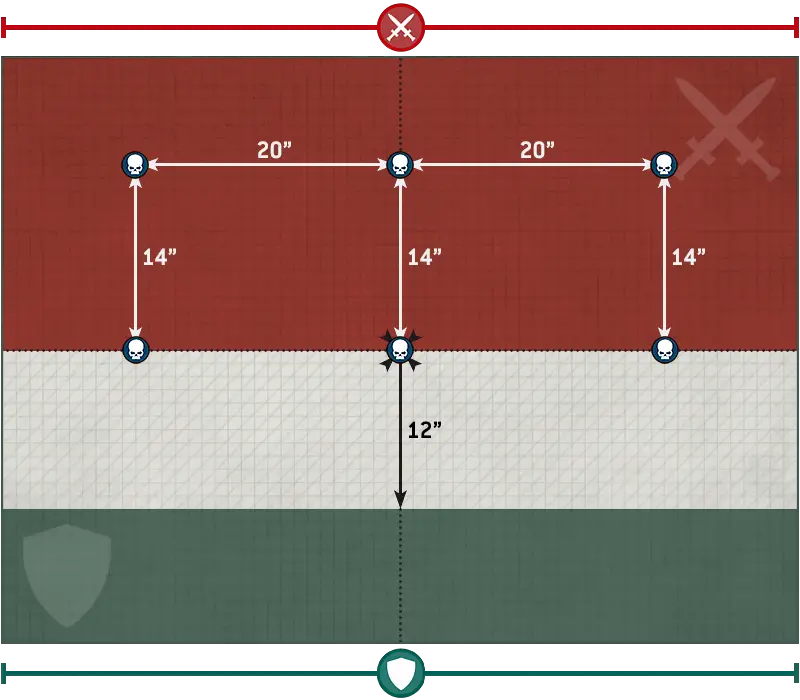
Beachhead Offensive 4
4Beachhead: In the Deploy Crusade Armies step, instead of the players alternating setting up their units, first the Attacker deploys all the units in their Primary Wave wholly within their deployment zone, and then the Defender sets up all of the units in their Primary Wave wholly within their deployment zone.
Strategic Offensive: The Attacker decides which player has the first turn.
The victor can select one additional unit from their Crusade army to be Marked for Greatness.
With every yard advanced into enemy territory, the invaders come closer to securing their beachhead.
- For each objective marker that the player controls, they score 1VP.
- If it is the Attackers turn, and the Attacker controls the objective marker in their own deployment zone, then for each other objective marker they control, the Attacker scores an additional 1VP.
In the fifth battle round, the player who has the second turn scores VP as described above, but does so at the end of the turn instead of at the end of their Command phase.
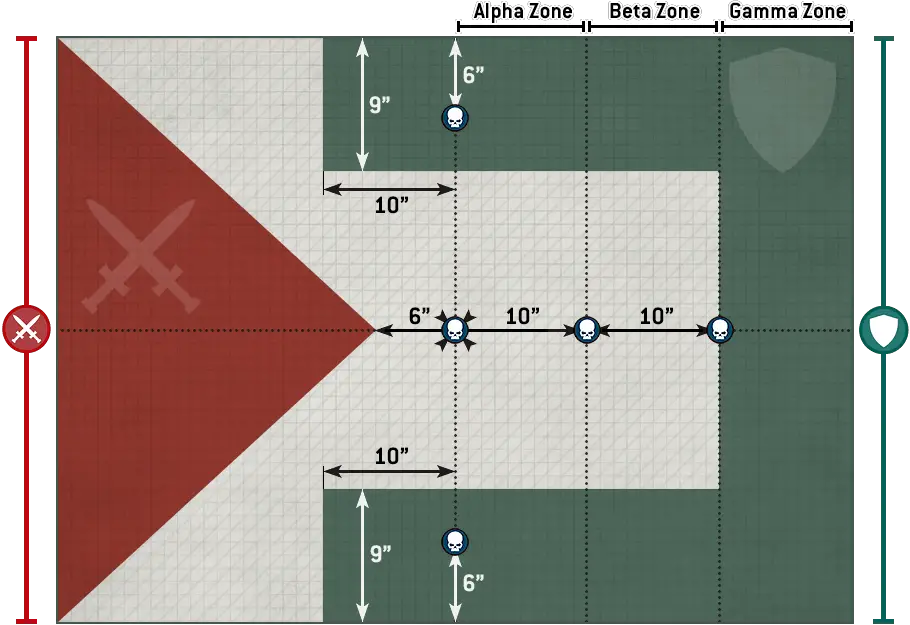
The Gauntlet 5
5Strategic Offensive: The Attacker decides which player has the first turn.
Punch Through Their Defences: At the end of the Attacker’s turn, after scoring VP, any objective markers controlled by the Attacker are removed from the battlefield.
Up the Middle: Units from the Attacker’s army arriving from Tactical Reserves can not be set up within the Defenders deployment zone.
The victors Crusade force gains 1RP and 1SAP.
Defence in depth sees the attacking forces strung out.
- If they control 3 or more objective markers, they score 1VP.
- If there are no enemy units within the Gamma Zone, the Defender scores 1VP.
- If one or more enemy units were destroyed that turn, the Defender scores 1VP.
The attackers drive their spear into the heart of the foe.
- For each objective marker they control, they score 1VP.
- They score VP as indicated in one of the following ways, if one or more units from their Primary Wave are wholly within: the Alpha Zone (1VP); the Beta Zone (2VP); the Gamma Zone (3VP).
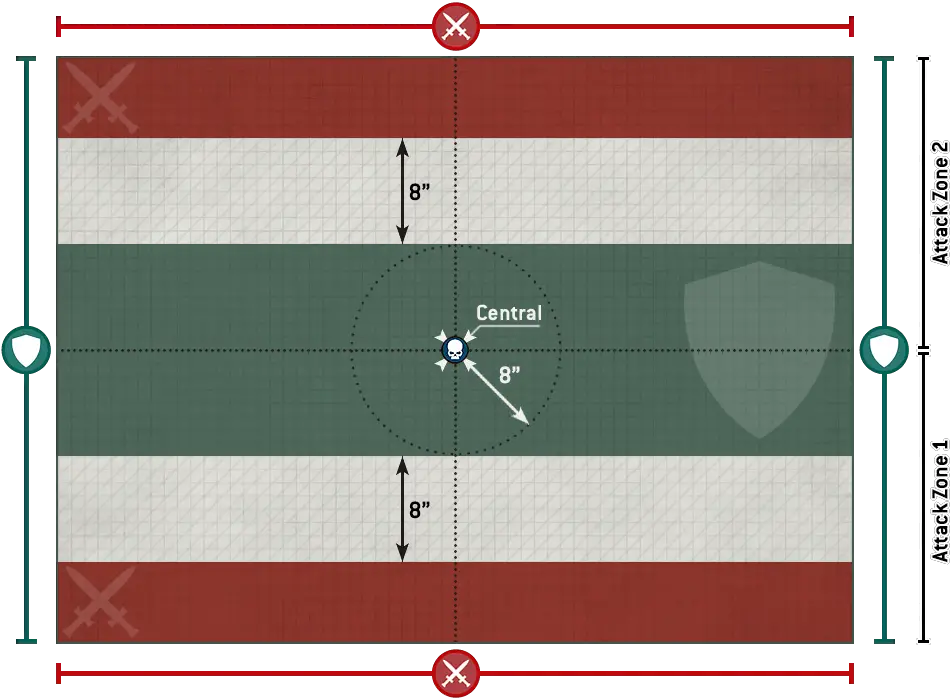
Vital Stronghold 6
6Pincer Attack: At the start of the Reinforcements step of the Defender’s Movement phase in the second battle round, the Defender must select two of their Reinforcement Waves to arrive from Tactical Reserves, but will not be able to select any other Reinforcement Waves to arrive that battle. Each unit from one of those Reinforcement Waves must be set up wholly within Attack Zone 1, and each unit from the other Reinforcement Wave must be set up wholly within Attack Zone 2. One unit from one of the selected Reinforcement Waves may perform a Surgical Deep Strike, however that unit must be set up wholly within Attack Zone 1 or Attack Zone 2.
Stronghold: The Defender must set up five additional objective markers on the battlefield. Two or more objective markers must be set up in No Man’s Land and each objective marker cannot be set up within 6" of one or more other objective markers and/or one or more battlefield edges. If it is not possible to set up an objective marker, it is not set up on the battlefield.
The victor can select one unit from their Crusade army that is wholly within 6" of the centre of the battlefield; that unit gains 5XP.
Victory in this battle will almost certainly go to whichever commander holds onto the strongpoint.
In the fifth battle round, the player who has the second turn scores VP as described above, but does so at the end of the turn instead of at the end of their Command phase.
Seize this point to raise your flag of victory over the very heart of the fortress.
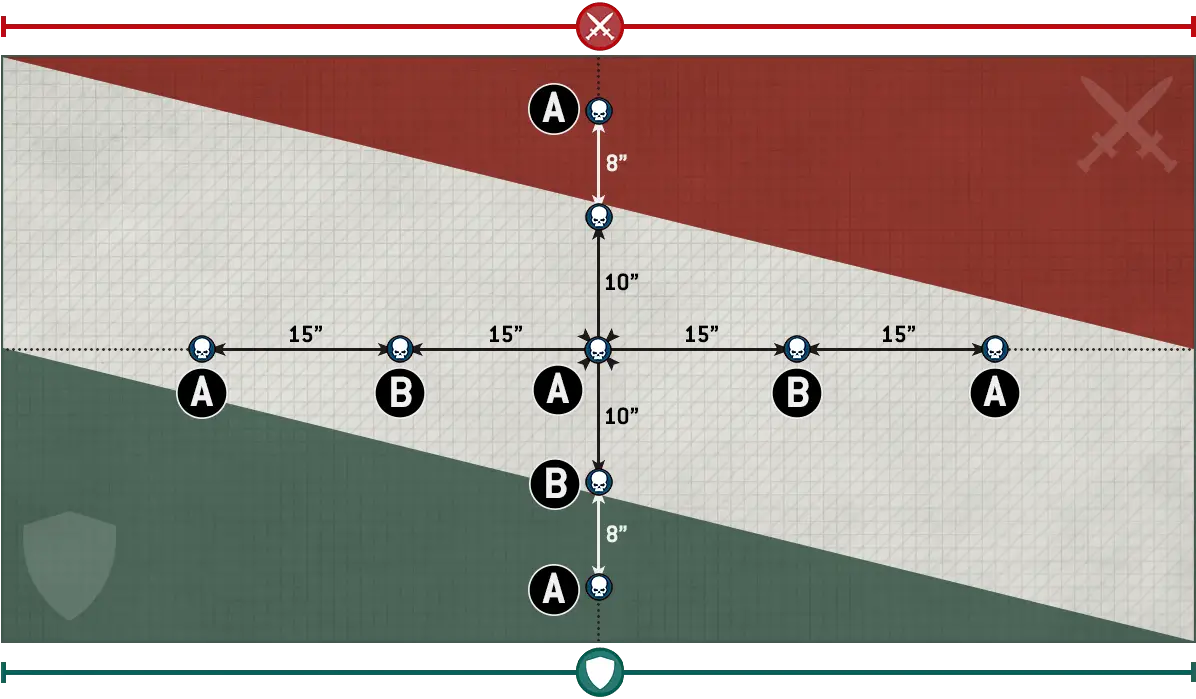
Opportune Moment 1
1Narrow Window: During the second and fourth battle rounds, objective markers labelled A can be controlled normally (objective markers labelled B cannot be controlled). During the third and fifth battle rounds, objective markers labelled B can be controlled normally (objective markers labelled A cannot be controlled).
The victor’s Crusade force gains 1RP and, the victor gains 1SAP.
To secure this fluctuating battlefield, vital sites must be seized in rapid sequence to maximise strategic control.
- For each objective marker they control, they score 1VP.
- If they control more objective markers than their opponent, they score 1VP.
In the fifth battle round, the player who has the second turn scores VP as described above, but does so at the end of the turn instead of at the end of their Command phase.
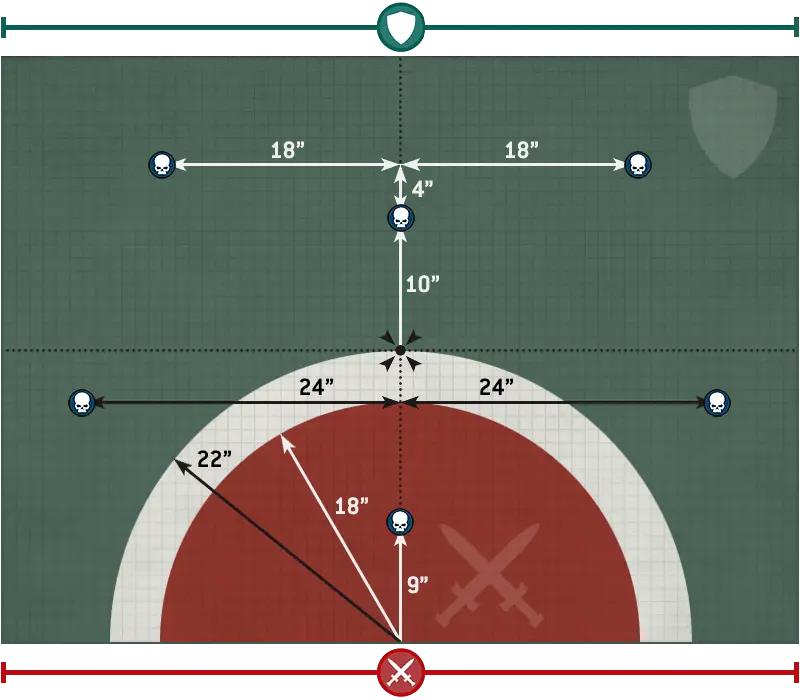
All-out War 2
2Orbital Barrage: At the start of each player’s Shooting phase, that player can select one objective marker on the battlefield. That player then rolls one D6 for each enemy unit within 6" of that objective marker: on a 4+ that enemy unit suffers D3 mortal wounds and it must take a Battle-shock test.
Each unit from the victor’s Crusade army that ended the battle in range of an objective marker that the victor controls gains 1XP.
Nothing short of seizing the battlefield with an iron gauntlet will ensure victory in a battle of this intensity.
- If they control two or more objective markers, they score 1VP.
- If they control three or more objective markers, they score 1VP.
- If they control more objective markers than their opponent, they score 1VP.
- If they control both objective markers in their own deployment zone, they score 1VP for each objective marker in their opponent’s deployment zone that they also control.
In the fifth battle round, the player who has the second turn scores VP as described above, but does so at the end of the turn instead of at the end of their Command phase.
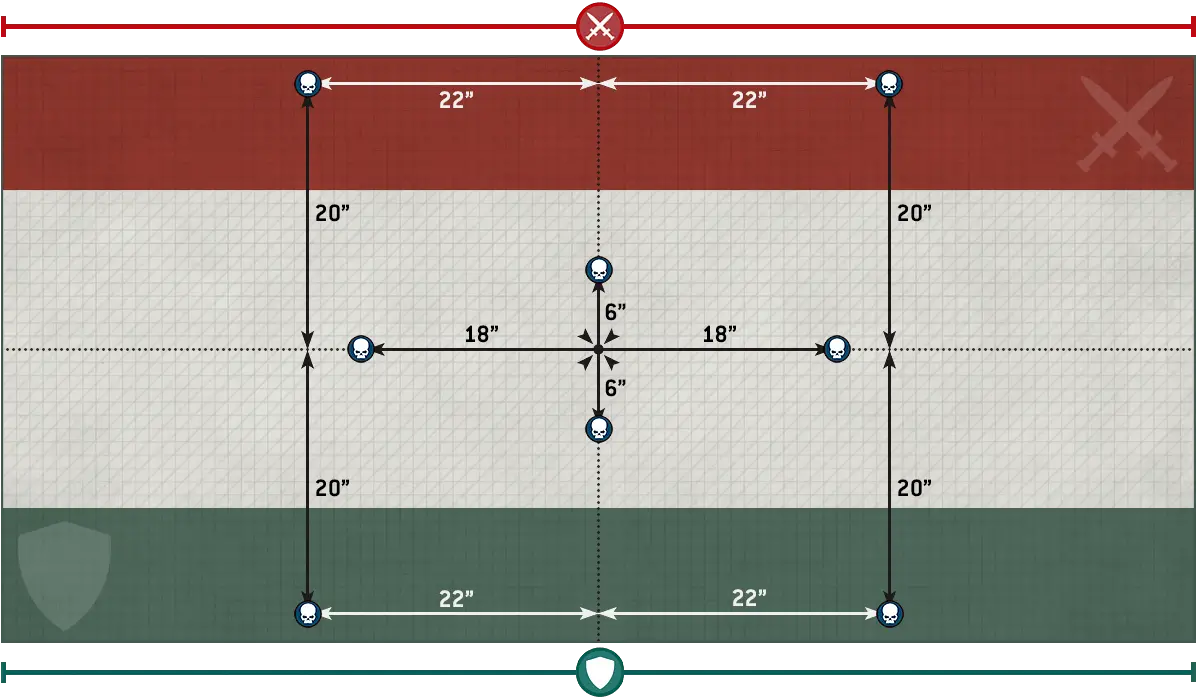
At Any Price 3
3UNITS: One unit from your Primary Wave.
COMPLETES: End of your turn, if that unit is wholly within the Search Area.
IF COMPLETED: The Search Area has been investigated.
Tire victor can select one unit from their Crusade army that completed the Search the Area Action during the battle; that unit gains 5XP. In addition, the victor gains 1SAP.
This vital asset must be bent to your will.
Control of these secondary sites will be vital.
- If they control one or more objective markers, they score 1VP.
- If they control more objective markers than their opponent, they score 2VP.
In the fifth battle round, the player who has the second turn scores VP as described above, but does so at the end of the turn instead of at the end of their Command phase.
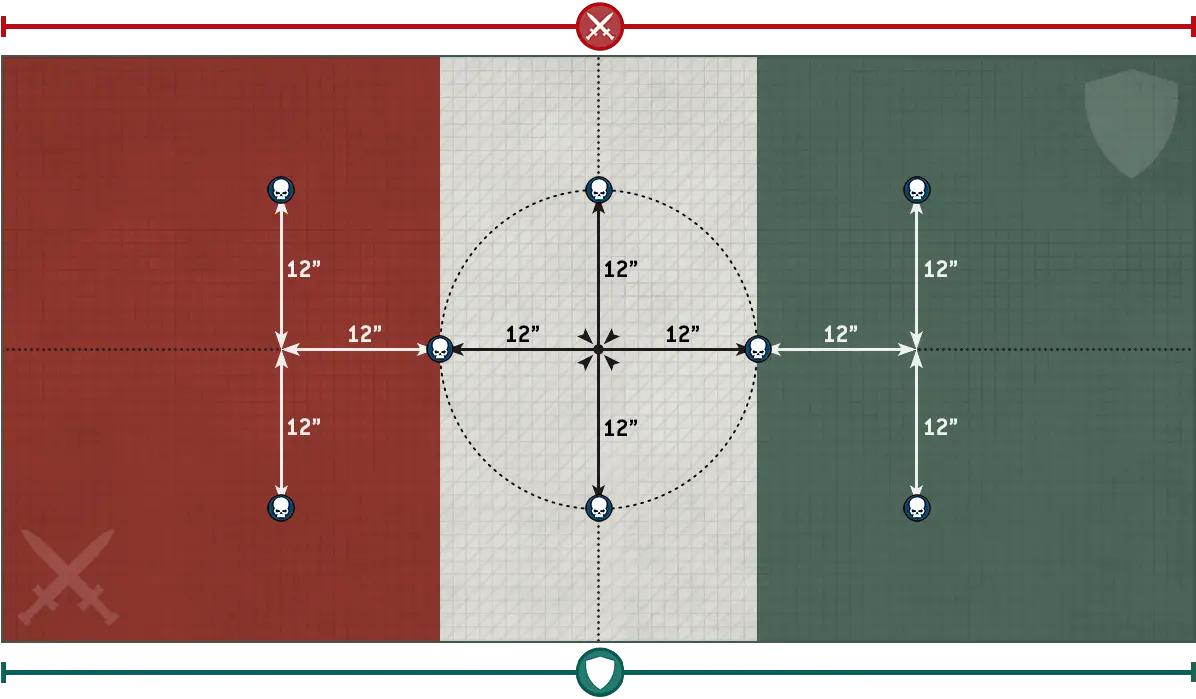
There are several categories of Battle Honours that can be bestowed upon a unit, such as Battle Traits, Weapon Modifications and Crusade Relics. Other categories of Battle Honour may be found in other publications. Each time a unit gains a Battle Honour, you can select from any category.
- Once a unit gains enough XP it will gain a rank.
- Only CHARACTER units can gain the Heroic or Legendary ranks.
- Each time a unit gains a rank, it can gain a Battle Honour.
- There are several categories of Battle Honours, which include:
- Battle Traits: New skills and abilities.
- Weapon Modifications: Upgrade an item of wargear.
- Crusade Relic: Gain a rare and powerful artefact.
- Each time a unit gains a Battle Honour, increase its Crusade points total by 1 (or by 2 if TITANIC).
- Select Model: Select one model in that unit by following the first instruction below that applies:

If a non-CHARACTER model in that unit has lost one or more wounds, you must select that model. Otherwise, if that unit contains one or more non-CHARACTER models, you must select one of those models. Otherwise, if one or more CHARACTER models in that unit have lost one or more wounds, you must select one of those models. Otherwise, you must select one CHARACTER model in that unit. - Resolve Damage: The selected model loses 1 wound. If this reduces that model’s remaining wounds to 0, it is destroyed.
MORTAL WOUNDS AND NORMAL DAMAGE
When resolving attack dice, if those attacks inflict a mixture of both mortal wounds and normal damage, resolve all of the normal damage first, then resolve all of the mortal wounds.
- Normal Damage 06.02.01
The datasheets using EPIC HERO keyword can be found in the following Factions:
Chaos: Chaos Daemons, Chaos Space Marines, Death Guard, Emperor’s Children, Thousand Sons, World Eaters.Imperium: Adepta Sororitas, Adeptus Custodes, Adeptus Mechanicus, Astra Militarum, Grey Knights, Imperial Agents, Imperial Knights, Space Marines.
Xenos: Aeldari, Drukhari, Genestealer Cults, Leagues of Votann, Necrons, Orks, T’au Empire, Tyranids.
The EPIC HERO keyword is used in the following datasheets:


and others...
- While a friendly model is within engagement range of one or more enemy models, those models – and the units they belong to – are engaged with each other.
- While a unit contains no engaged models, that unit is unengaged.
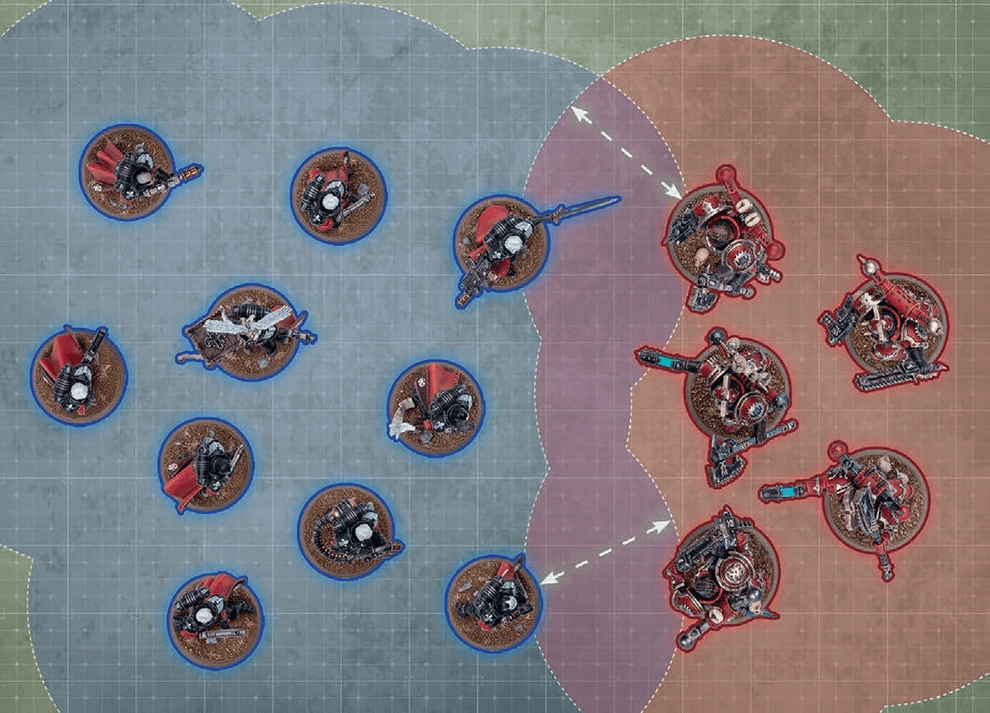
EFFECT: Your unit moves as described in Moving (03).
AFTER MOVING: Your unit must be unengaged.
Many deadly weapons can inflict fatal injuries on any foe, no matter their resilience.
Each time an attack made with a [LETHAL HITS] weapon results in a critical hit, you can choose for that attack to automatically wound the target.
|
The hardiest warriors refuse to be laid low, even by wounds that should by all rights prove lethal.
This ability always takes the form Feel No Pain X+. Each time a model with this ability would lose a wound, roll one D6: on an X+, that wound is not lost.Some rules refer to units being below starting strength, or at – or below – half-strength. The meaning of these terms varies depending on a unit’s starting strength, as shown below.
|
EFFECT: Your unit is set up as described in Set Up (03.02).
BEFORE MOVING: Your unit is set up as described in Set Up (03.02).
WHILE MOVING: Set up your unit wholly within the set-up distance of one or more battlefield edges and more than 8" horizontally from all enemy units.
- Before the Third Battle Round: While doing so, no models can be set up within your opponent’s deployment zone.
There are many ways by which to deploy troops to the field of battle including tunnels, teleportation devices and other esoteric means of transportation.
Each time this unit makes an ingress move (20.04), if every model in this unit has this ability, it can be set up anywhere on the battlefield that is more than 8" horizontally from all enemy units, even if that is within your opponent’s deployment zone.EFFECT: Your unit moves as described in Moving (03).
BEFORE MOVING: Make an advance roll by rolling one D6.
AFTER MOVING:
- Your unit must be unengaged.
- Until the end of the turn, unless otherwise stated, your unit is not eligible to declare a charge or start an action.
Other models and units can be either visible or fully visible to the observing model, as shown below. Note that terrain applies additional rules to visibility (13.07).
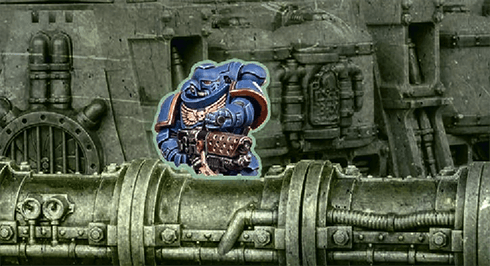
EFFECT: Your unit shoots as described in Making Attacks (04).
WHILE SHOOTING:
- You can only target one visible enemy unit within 24" of your unit (and only if it is an eligible target).
- Each attack only hits on an unmodified hit roll of 6 (irrespective of the attacking weapon’s BS characteristic or any modifiers).
- You cannot re-roll hit rolls.
TARGET: One friendly unengaged unit (excluding TITANIC units).
EFFECT: Your unit shoots using snap shooting.
The most potent weapons strike with such power that they make a mockery of armour and can cleave through several foes.
Each time an attack made with a [DEVASTATING WOUNDS] weapon results in a critical wound, the attack sequence for that attack ends and the target unit suffers a number of mortal wounds equal to the D characteristic of that weapon. These are inflicted after resolving any normal damage inflicted by those attacks.Mortal wounds inflicted by [DEVASTATING WOUNDS] weapons can damage a maximum of one model for each critical wound; any remaining mortal wounds inflicted by that attack are lost.
- If the target unit is an attached unit, use the highest T characteristic amongst bodyguard models in that unit that are on the battlefield.
- Use the highest T characteristic amongst models in that unit that are on the battlefield.
| ||||||||||||||||||||||||||||||
- Multiple Toughness Characteristics 05.02.01
Scouts form the vanguard of many armies. Unnoticed by the enemy, they range ahead of the main force.
This ability always takes the form Scouts X". In the Resolve Pre-battle Abilities step, if every model in a unit has this ability, you can do one of the following:- If that unit is in strategic reserves, you can set up that unit anywhere that is wholly within your deployment zone.
- If that unit is wholly within your deployment zone, it can make a scout move (see below).
- If that unit is embarked within a DEDICATED TRANSPORT that is wholly within your deployment zone, and if every model embarked within that DEDICATED TRANSPORT has the Scouts ability, that DEDICATED TRANSPORT can make a scout move.
EFFECT: Your unit moves as described in Moving (03).
AFTER MOVING: Your unit must be more than 8" horizontally from all enemy units.
EFFECT: No models are moved (either in straight lines or rotated). Units that remain stationary do not trigger any rules that are triggered when a unit starts or ends a move.
TARGET: One friendly unit that is in strategic reserves (excluding AIRCRAFT).
EFFECT: Your unit makes an ingress move (20.04).
RESTRICTIONS: You cannot use this stratagem during the first battle round.
TARGET: One friendly unengaged unit within 12" of one or more enemy units. You can only select a VEHICLE unit if it is a CHARACTER/WALKER unit.
EFFECT: Resolve a charge with your unit (11.02). While doing so, before making the charge roll, you must select one of the following modes:
- Leap to Defend: When selecting charge targets, you can only select enemy units that made a charge move this phase and are within the maximum distance.
- Into the Fray:
- When making the charge roll, if the result is greater than 6 (after modifiers), change it to 6.
- When selecting charge targets, you can select any enemy units that are within 6" of your unit and within the maximum distance.
Those possessed of lightning-fast reactions may strike before the opponent can react.
While every model in a unit has this ability, that unit is a Fights First unit.See the Resolve Fights First Combats step in the Fight phase (12.04).
- That model has the INFANTRY/BEASTS/SWARM keyword and is within a terrain area.
- That model is not fully visible to the attacking model due to one or more intervening terrain features and/or one or more intervening obscuring terrain areas (see below).
Each time a ranged attack targets a unit that has the benefit of cover against it, worsen the BS characteristic of that attack by 1.
The stealthiest warriors can evade the attentions, and the bullets, of their foes.
If every model in a unit has this ability, each time a ranged attack targets that unit, that unit has the benefit of cover against that attack (13.08).- Create Groups: Divide all models in the target unit into the following groups, as many times as required:
- One group for each CHARACTER model.
- One group for all other models with the same W, Sv and InSv characteristics.
- Allocation Order: Declare the order in which those groups will have attacks allocated to them, applying all of the following:
- If a non-CHARACTER group contains a model that has lost one or more wounds, that group must be first in the allocation order.
- No CHARACTER group can be earlier in the allocation order than a non-CHARACTER group.
- CHARACTER groups containing a model that has lost one or more wounds must be earlier in the allocation order than CHARACTER groups containing no wounded models.
- Make Save Rolls: The opposing player makes one save roll for each attack that wounded the target by rolling one D6.
While a model with an aura ability is on the battlefield, it is always within range of its own aura ability.
A unit can be affected by more than one aura ability at a time, but if a unit is within range of the same aura ability more than once, that aura ability only applies to that unit once.
Assassins and other covert agents are difficult to pinpoint in the storm of battle.
Unless part of an attached unit, this unit is not visible to enemy models unless they are within 12" of this unit, and it cannot be targeted by [INDIRECT FIRE] weapons unless the attacking model is within 12" of this unit.If this ability takes the form Lone Operative X", unless part of an attached unit, this unit is not visible to enemy models unless they are within X" of this unit, and it cannot be targeted by [INDIRECT FIRE] weapons unless the attacking model is within X" of this unit.
- To do so, both players roll one D6, and whoever rolls highest wins the roll-off.
- If there is a tie for the highest roll, roll off again.
The datasheets using TITANIC and CHARACTER keywords can be found in the following Factions:
Chaos: Chaos Daemons, Chaos Knights.Imperium: Imperial Knights.
The TITANIC and CHARACTER keywords are used in the following datasheets:


EFFECT: Your unit moves as described in Moving (03).
BEFORE MOVING: Select fall-back mode:
- Ordered Retreat: If your unit is not battle-shocked, you can select this mode.
- Desperate Escape: Otherwise, you must select this mode. Make a hazard roll for each model in your unit (06.03).
- Desperate Escape: Each model that is moved can be moved through enemy models.
- Your unit must be unengaged.
- Until the end of the turn, unless otherwise stated, your unit is not eligible to shoot, declare a charge or start an action.
- Desperate Escape: If your unit is not battle-shocked, you must make a battle-shock roll for your unit (01.07).
Mighty heroes fight at the forefront of battle.
Before the battle, in the Muster Armies step, for each leader and support unit in your army, you can select one friendly bodyguard unit that unit can lead. That unit will then lead that bodyguard unit for the battle and form an attached unit with it.Unless otherwise stated, each bodyguard unit can only have one leader unit and one support unit attached to it.
- That unit is not visible to any other units (units are visible to themselves).
- Any other unit is not visible to that unit.
- Players cannot measure distances to or from that unit (units are within range of their own abilities).
This means units not on the battlefield cannot be selected or targeted by any attack or rule that requires a unit to be visible or within a certain distance (other than their own abilities).
Such units can still use their other rules, and are still units in the controlling player’s army and so can be affected by rules that require a player to select a unit from an army, as well as rules that affect all units in an army.
The controlling player must make battle-shock rolls for units that are not on the battlefield in their Command phase if they are battle-shocked, or if they are at or below half-strength.
- Each model in that unit is within 3" of that TRANSPORT.
- That unit was not set up on the battlefield this turn.
- That unit is eligible to embark within that TRANSPORT, as described on that TRANSPORT’s datasheet.
- That TRANSPORT has sufficient remaining transport capacity for each model in that unit.
When a unit embarks, the active player removes that unit from the battlefield and places it to one side – it is now embarked within that TRANSPORT and is not on the battlefield.
- Not on the Battlefield 01.02.04
The datasheets using TRANSPORT keyword can be found in the following Factions:
Chaos: Chaos Space Marines, Death Guard, Emperor’s Children, Thousand Sons, World Eaters.Imperium: Adepta Sororitas, Adeptus Custodes, Adeptus Mechanicus, Astra Militarum, Grey Knights, Imperial Agents, Space Marines.
Xenos: Aeldari, Drukhari, Genestealer Cults, Leagues of Votann, Necrons, Orks, T’au Empire, Tyranids.
The TRANSPORT keyword is used in the following datasheets:


The datasheets using TITANIC keyword can be found in the following Factions:
Chaos: Chaos Daemons, Chaos Knights, Chaos Space Marines, Death Guard, Thousand Sons, World Eaters.Imperium: Adeptus Titanicus, Astra Militarum, Grey Knights, Imperial Knights, Space Marines.
Xenos: Aeldari, Genestealer Cults, Necrons, Orks, T’au Empire, Tyranids.
The TITANIC keyword is used in the following datasheets:
- A unit has all the keywords of all models in that unit. A model only has its own keywords.
- If a rule specifies that it applies to a unit with a keyword, it applies to a unit which includes one or more models with that keyword.
- If a rule specifies that it applies to a model with a keyword, it only applies to a model with that keyword.
- If a rule specifies that it applies to ‘non-KEYWORD’ models/units, it only applies to models/units that do not have that keyword. For example, if a rule applies to non-VEHICLE units, it only applies to units that do not have the VEHICLE keyword.
- Some units can contain models that have different keywords. While this is the case, such a unit is considered to have all of the keywords of all of its models, and so is affected by any rule that applies to units with any of those keywords. Remember that attacks are made against units, not models.
- If a rule only applies to models with a specific keyword, then it instead only applies to models in such a unit that have the correct keyword.
- A rule with a comma-separated list of keywords, or a series of keywords separated by slashes (‘/’), or two keywords separated by the word ‘or’ (e.g. ‘an IMMORTALS, DEATHMARKS or LYCHGUARD unit’) refers to a model/unit that has any one of those keywords.
- A rule with multiple adjacent keywords (e.g. ‘an AELDARI GUARDIANS unit’) only refers to a model/unit that has all of those keywords.
- Some older rules use keywords without specifying model or unit: for example, MONSTER/VEHICLE or TRANSPORT. These rules refer to units with those keywords.
- Singular and plural instances of the same keyword function in the same way.
Some rules are linked to one or more keywords. For example, a rule might say that it applies to INFANTRY units. This means it only applies to units that have the INFANTRY keyword. Singular and plural instances of the same keyword function in the same way.
- Using Keywords & Mixed Keywords in Units 02.05.01
- If that roll succeeds, that unit does not become battle-shocked.
- If that roll fails, that unit, and each model in it, is battle-shocked.
While a unit is battle-shocked:
- The Objective Control (OC) characteristic of all of its models is modified to ‘-’ (02.02).
- Its controlling player cannot target that unit with stratagems (15).
- It is not eligible to start an action (16), and any action it has started cannot be completed.
- Battlefield Morale 01.07.01
- Battle-shock Test 01.07.02