
War on the Vespator Front

The Detachments found in 500 Worlds: Titus - Detachments includes new ways of marshalling armies of Space Marines and Necrons. These evoke some of the iconic strike forces and infamous legions involved in fighting not only across the Vespator Front, but throughout the Five Hundred Worlds. The Space Marine Detachments represent not only the Shield Chapter forces fighting to reclaim Ultramar, but also others - such as the Wardens of Ultramar - whose duty is to hold back heretic influence and xenos invasions seeking to exploit any cracks in the growing realm.
The Necron Detachments, meanwhile, typify the dread cohorts under Ammentar’s influence spreading throughout Ultramar, as well as those of other dynasties using desperate tactics to hold back the Nekrosor’s fanatics from their vaults or to punish any living soldiery daring to invade their tombs.
In the Vespator Front Campaign, armies take part in one of the wars being fought across the eastern tetra of the Five Hundred Worlds. Armies’ aims may be the establishment of a stellar realm, the founding of a nightmarish empire or the expansion of a network preying on the resources and shipping lanes of others. You will be able to take command of one of these armies, coordinating interstellar strategies with others in an alliance, and moving your fleet from system to system in order to conquer or reinforce key planets, with power and influence shifting on the outcomes. The battles fought on these worlds will be for vital infrastructure in pivotal theatres of the Vespator Front, whilst the fickle hands of fortune and peril can aid or blight any of those fighting in this war-ravaged reach.
On this page you will find a map-based campaign that can be played by two or more players. The Detachments found within 500 Worlds: Titus - Detachments represent a number of themed forces presented in 500 Worlds: Titus, but can also be used to represent wider examples of such Space Marine or Necron armies. Each offers new tactical and strategic options, providing a fresh way to experience your collection.
Over the course of several months, this campaign will let players build up powerful dominions while simultaneously trying to overthrow their rivals as they battle to take control of several systems within the Vespator Front of the Five Hundred Worlds. By the end of the campaign, the planets within this part of the galaxy will be left permanently altered by the events of the conflict as the players wage war on an epic scale.
VESPATOR FRONT MISSIONS
Each of the missions presented in this section is uniquely themed to represent key moments from this system-spanning conflict, and tie directly into the ongoing map-based campaign. These highly narrative battles can also be played by themselves, but are best experienced as part of the wider campaign.
Introduction
The campaign rules found on this page will allow you to fight out a grand scale campaign across the war zone of the Vespator Front, with the Ultramarines’ conquest fanning out over the systems in this region of space. Each of the core worlds in these systems are unique, featuring their own combination of theatres to wage war over as part of the wider conflict.
Players can expect to battle it out across a number of phases, generally averaging a couple of games a month each, over a four-to-six-month period. Although there’s nothing stopping the campaign from being run over a longer time frame or at a faster rate, should the desire for territorial acquisition run strong through your group. What is provided here is a fully fleshed out framework, but if your group wish to adjust it to accommodate your own specific needs, such as starting with some of the planets already destroyed to make for a tighter engagement or restricting the theatres available to better match your terrain collections, feel free to adjust them to fit.
The alliances will also build various pieces of infrastructure across the planets. These have been written from the wider perspective, but can easily represent important centres used by any faction. For example, the Staging Grounds for a Tyranids army might be a large bioship capable of disgorging broods to sites across the planet and the Fortification Lines a swathe of chitinous, spore-crusted extrusions. Or, for Chaos Daemons, a Support Facility might be a giant, continent spanning sigil carved through the planet’s crust which funnel sacrificial power to prolong the incursion.
Vespator Front Campaign
Over the course of this campaign, players will form alliances with one another and take to the stars, waging war on a grand scale across a campaign map spanning multiple star systems. They will battle for dominion over a swathe of planets, launching giant planetfall attacks on enemy strongholds, performing guerrilla sabotage operations and even going so far as to destroy entire worlds.
Players and Alliances
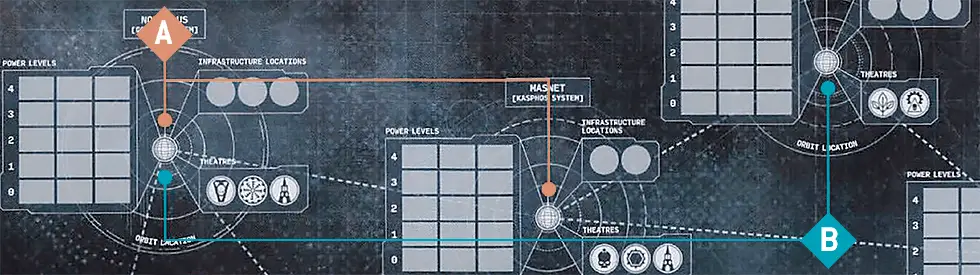
This campaign is recommended for anywhere between 3 and 12 players, although it can easily be used for larger groups if desired. The campaign functions best with 3 Alliances, but with smaller groups of fewer than 6 players it can also be run well with only 2 Alliances.At the start of the campaign, each player will be allocated one or more fleets to place on the map, which represent their armies. Each of these Fleets will have a sticker that should be placed at the Planet where they are currently located. The location of a player’s Fleet on the campaign map will dictate which Planets they will be able to launch attacks against.
The number of Fleets each Alliance has will be based on the number of players, and is decided at the start of the campaign. Players should only use the stickers corresponding to the number of Fleets they are allowed to take.
Warmaster
It is recommended that one player takes on the role of Warmaster. They will be responsible for much of the communication and administration required to run the campaign, including updating the campaign map with the results of battles and ensuring players are all kept in the loop with what is taking place at each point in the campaign.Campaign Points and the Points Tracker
On the campaign map, the Points Tracker is used to keep track of each Alliance’s Campaign points, which will decide the winning Alliance at the end of the campaign. At the end of each Campaign phase, the Warmaster will update the Points Tracker to reflect each Alliance’s current score, which is comprised of that Alliances total Power Level (see Planets and the Campaign Map) and any bonus for their Stronghold being undestroyed.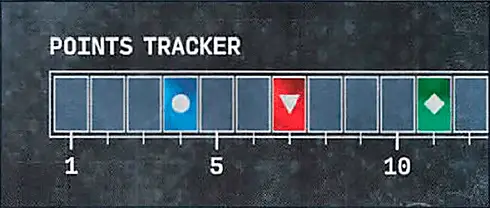
Blue Alliance has 4 Campaign points, Red Alliance has 7 Campaign points and Green Alliance has 11 Campaign points.
Planets and the Campaign Map
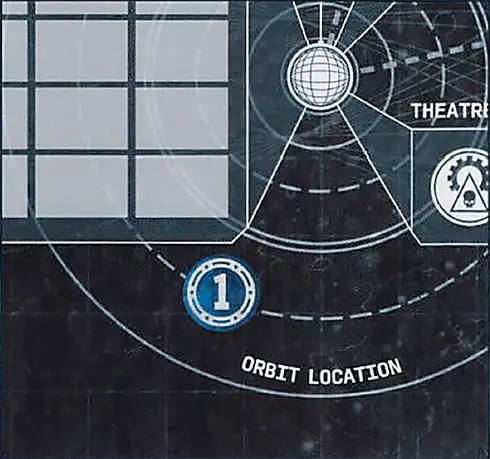
On the campaign map there are a number of Planets the Alliances will be fighting over.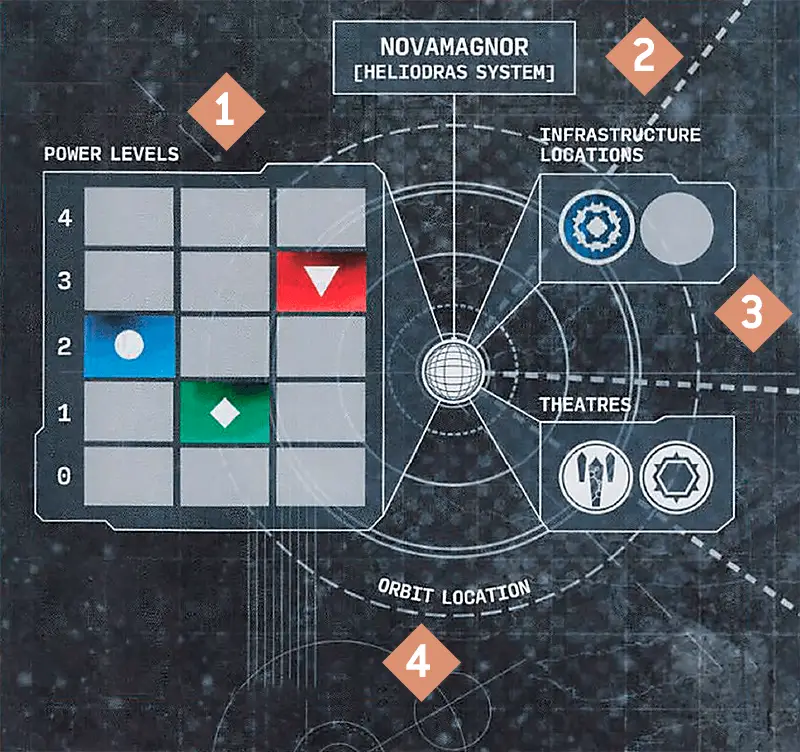
These levels will affect which types of battles are the most effective for which Alliances at that location, and the Campaign Outcomes that each battle results in. Each Alliance has a Power Level sticker that can be placed at the Planet to indicate its value.
Setup the Campaign Map
Before the campaign begins in earnest, with plans being hatched and battles fought, each Alliance has a chance to shape the nature of the campaign map, ensuring a different experience every time the campaign is played. Alliances will be able to choose their home world, where their spheres of influence are, and any pre-existing infrastructure to support their war effort. This is determined by following the sequence below.
1. Determine Warmaster, Alliances and Fleets
- First, one player should be named as the Warmaster.
- Then, players group themselves into the number of Alliances that have been decided upon, be that 2 or 3. There is no need for the number of players in each Alliance to be the same, as the campaign rules will remain fair regardless, and there is no need for specific players to be assigned to specific Alliances. There cannot be more players within an Alliance than there are Fleet stickers for that Alliance, however, as each player will need at least one Fleet to control.
- Then, players decide on the number of Fleets for each Alliance.
Our recommended numbers of Fleets are given below.
| |||||||||||||||||||||
Sometimes, if the number of Fleets in an Alliance is greater than the number of players in it, those Fleets may not divide equally among the players. In this instance, the players within such an Alliance that have more time to play games can be allocated some of the remaining Fleets or, if players prefer, they can alternate who controls the remaining Fleets as the campaign progresses.
2. Determine Campaign Duration
The campaign will be broken up into a number of Campaign phases, in which players will be able to participate in games of Warhammer 40,000 and shape the campaign map. We recommend that a campaign should consist of 6 Campaign phases, but the players can agree as a group whether they want to run longer or shorter campaigns. In general, we expect each campaign phase to last around a month, with the typical player playing two games in this time.Higher Power Levels on a Planet will often grant that Alliance some additional benefits in the battles played at that Planet, and will make it harder for the foes to weaken the Alliance there. We recommend that each Alliance selects roughly three key areas on the campaign map to group their most powerful Planets around.
3. Alliances Decide on Strongholds
Each Alliance secretly decides on the following and then notifies the Warmaster of their decisions:- 1 Planet to build their Stronghold Infrastructure on, which they will have to defend. Their Power Level at this Planet will begin at 4.
- 3 other Planets where their Power Level will begin at 3.
- 4 other Planets where their Power Level will begin at 2.
- At all other Planets their Power Level will begin at 1.
We recommend placing Fortification Lines on Planets where your Alliance has a high Power Level, to help blunt enemy attacks, and Support Facilities or Staging Grounds near the parts of the campaign map where you wish to attack early on.
4. Alliances Decide on Infrastructure
Each Alliance secretly decides on 3 pieces of Infrastructure they wish to build (excluding Strongholds) and on which Planets they wish to build them. These pieces of Infrastructure will aid the Alliance in conquering the map.If playing the campaign with only 2 Alliances, we recommend that each Alliance secretly builds 4 pieces of Infrastructure, instead of 3.
This is then revealed and the campaign map is updated. For each Planet, if Alliances wish to build more pieces of Infrastructure on that Planet than its Infrastructure locations can accommodate, the Warmaster should randomly decide which pieces get built. Then, for the remaining pieces of Infrastructure, the respective Alliances choose new Planets for those pieces to be built on.
The locations of a player’s Fleet will affect which Planets they will be able to launch attacks against. We recommend placing your initial Fleets in areas of the campaign map that you wish to expand into in the first two phases of the campaign.
5. Alliances Decide on Fleet Locations
Each Alliance secretly decides on 1 starting Planet for each of their Fleets to begin the campaign at. This is then revealed and the campaign map is updated.The Campaign Phase
Across a sprawling segment of the Vespator Front, opposing armies and their supporting fleets manoeuvre and clash. Mighty hosts drop from the Warp to strike at unsuspecting worlds, guerrilla forces raid vital supply lines, and everywhere the fires of war rage.
Select Operations
In this step, each player selects one Campaign Operation for each of their Fleets from those shown below; that Fleet will perform that Operation later in the Campaign phase. Players can select these by themselves, but we recommend working with other members of your Alliance to build a wider, more cohesive plan. Players then inform the Warmaster of their decisions.Some Campaign Operations will require additional information; for example, a Battle Operation will require the player to decide which type of Battle Operation they wish to initiate, and where and who they wish to attack.
If a player does not provide the Warmaster with a Campaign Operation for a Fleet within an agreed time frame, that Fleet will default to performing the Logistical Auxillia Operation.
We recommend using the Alliance Orders Form to record each Alliance’s decisions.
The most common Campaign Operation will be the Battle Operation, as this will result in a game of Warhammer 40,000 being fought between two players of opposing Alliances. Other Campaign Operations are provided, however, for players that either wish to play fewer games during the current Campaign phase or who wish to provide additional support to the rest of their Alliance.
For your first couple of Campaign phases, we recommend selecting the Battle Operation to perform, and then choosing the Orbital Invasion or Purge and Burn Campaign Attack Types (see below). This way you can get some games in and become more familiar with how other aspects such as Infrastructure work, which will help you gauge whether to perform more unusual Campaign Attack Types such as Planetary Bombardment or Boarding Action later on.
Battle Operation
Battles must be fought for wars to be won and worlds to be claimed.

In the Resolve Battle Operations stage, each Alliance will select players from their Alliance to defend against the Battle Operations that have been declared against them this Campaign phase. For each of those Battle Operations, a player from that Alliance can be selected to play a game of Warhammer 40,000 against the player whose Fleet declared it. Each Campaign Attack Type has a bespoke mission that can be played, and a different set of Campaign Outcomes that will change the situation on the campaign map. Alternatively, players can play a different mission from another Warhammer 40,000 publication (such as one from a Chapter Approved mission deck), then apply the Campaign Outcomes for the selected Campaign Attack Type after that battle.
Campaign Attack Types
- Seize Power Base: The attacking Alliance attempts to take over pieces of Infrastructure that the opposing Alliance has constructed at the selected Planet or aims to destroy them in order raise their own over the ruins.
- Purge and Burn: The attacking Alliance attempts to reduce the Power Level of the opposing Alliance at the selected Planet by exterminating the foe and preventing them spreading elsewhere; this is particularly beneficial if the attacking Alliance has a higher Power Level.
- Orbital Invasion: The attacking Alliance attempts to reduce the Power Level of the opposing Alliance at the selected Planet by seizing a beachhead and pouring in reinforcements to hold off the surrounding foe; this is particularly beneficial if the attacking Alliance has a lower Power Level.
- Planetary Bombardment: By weakening the defender’s protection and making them vulnerable to a catastrophic bombardment the attacking Alliance attempts to destroy the Planet’s Infrastructure locations, and potentially make the Planet uncontrollable.
- Supply Base Raid: The attacking Alliance attempts a daring sabotage or theft at a key site such as a shipyard, transit hub or way station. Their aim is to cut down the defender’s ability to move resources and reinforcements to and from the Planet, reducing the Power Level of the opposing Alliance here or at connected Planets.
- Boarding Action: The attacking Alliance strikes at an opposing Alliance’s Fleet stationed in orbit at the Planet, aiming to cause enough destruction to force the defending Fleet to relocate to another system.
Void Leap Operation
Whether by risking the tides of the Warp, employing strange energy gates, or some other method of extended interstellar travel, fleets and armies leap across vast gulfs of space.

Raise Edifices Operation
While armed forces stand guard on the ground and in the void, teeming masses toil to raise new strategically vital structures on captured worlds.

Logistical Auxilia Operation
Whether performing advanced augury and scouting missions, guarding supply lines from void piracy, or staging diversionary raids to overstretch enemy garrison forces, these assets fight not for their own glory, but instead to enable others.

Deploy Kill Teams Operation
Where massed formations risk being cut to pieces by superior enemy forces, elite kill team deployments can perform acts of sabotage and guerrilla raids to weaken the foes’ grip.

Perform Operations
In this step, players will fight battles with one another, build Infrastructure and move their Fleets around the campaign map. This is done by following the stages below.2.1 Reveal Alliance Operations
The Warmaster reveals each Alliance’s Campaign Operations for this Campaign phase to the rest of the players. If the Alliance Orders Form was used, this can simply be shared with the whole group.The Warmaster also provides each Alliance with a list of all the Battle Operations they were selected as targets of.
2.2 Edifice Raising Complete
For each Fleet that selected the Raise Edifices Operation, the Warmaster should build the selected piece of Infrastructure at the Planet in question for that Alliance.
If multiple pieces of Infrastructure would be built at the same Planet in this stage, the Warmaster should begin with the Alliance with the highest Power Level at that Planet (rolling off in the event of a tie), then proceed to the Alliance with the next highest Power Level, and so on. If this would result in all of a Planets Infrastructure locations being built on, all remaining Raise Edifices Operations at that Planet are cancelled and do not take effect.
At the end of this stage, the Warmaster notifies the players of all updates to the campaign map.
2.3 Resolve Battle Operations
This stage will make up the bulk of the campaign. Players will fight battles to resolve the Battle Operations selected in the Select Operations step of this Campaign phase. The player who selected the Battle Operation will be the Attacker in the battle being played. Each time a battle is played, the players should inform the Warmaster of the result and any Campaign Outcomes that were decided upon - these will take effect in the next stage.At the end of this stage, if any Battle Operations have not been resolved by playing a battle, the attacking Fleet is considered to have been victorious in that Battle Operation and its controlling player should decide upon any Campaign Outcomes that are needed.
To allow for all Battle Operations to be resolved, we recommend that the Warmaster sets a fixed time frame of around one month for this stage, subject to the players’ preferences and availability.
2.4 Process Battle Results
At this point, the Warmaster should work through the results of the battles that were fought in the previous stage, starting with the ones that occurred first and progressing through them in chronological order, updating the campaign map as they go.The Campaign Outcomes from each battle will often relate to the Power Level of the victorious Alliance. These Power Levels may well have changed between the point when the victor made their decisions and when they are being processed (due to the results from other, earlier battles). When this happens, it does not change the Campaign Outcome of the battle currently being processed.
Sometimes, however, one or more of the choices made by the victor may no longer apply due to these other battles having taken place (e.g. attempting to steal a piece of Infrastructure that has now been destroyed). In such circumstances, the Warmaster should ask the victor if they wish to make a different selection.
2.5 Fleet Arrival
For each Fleet that selected the Void Leap Operation, the Warmaster should move that Fleet to the selected Planet.2.6 Low-level Resistance
For each Fleet that selected the Deploy Kill Teams Operation, unless the selected Planet is now destroyed, the Warmaster should resolve that Campaign Operation.At the end of this stage, the Warmaster should show players the updated campaign map, revealing the outcomes of the previous stages and how they have changed the shape of the conflict.
Results and Vespator Front Events
In this step, the Warmaster will work out how well each Alliance is doing by calculating their current Campaign points. To do so, for each Alliance, the Warmaster tallies that Alliances combined Power Level across all Planets. They then add 3 to each Alliance’s total if that Alliance’s Stronghold has not been destroyed. Finally, they update the Points Tracker on the campaign map to display these totals for each Alliance.If this is the final Campaign phase, the campaign will now end. The Warmaster will determine the overall winner of the campaign and determine any awards to give to the Alliances and the players.
Otherwise, at this point, a number of Vespator Front Events may take place, potentially altering the balance of power between the Alliances. The Warmaster generates these now.
Move Fleets
In this step, each player will determine the moves they wish to make (if any) for each of the Fleets that they control. To move a Fleet, its player selects one Planet connected to the one it is currently on for that Fleet to move to. The players then inform the Warmaster of their decisions. We recommend using the Move Fleets Form to record each Alliance’s decisions.Build Infrastructure
Working in order from the Alliance with the highest total Power Level across all Planets to the Alliance with the lowest total (rolling off for any ties), each Alliance can build one piece of Infrastructure of any type (excluding Strongholds) on one of the Planets that has any of their Fleets at it, or on one that is connected to such a Planet.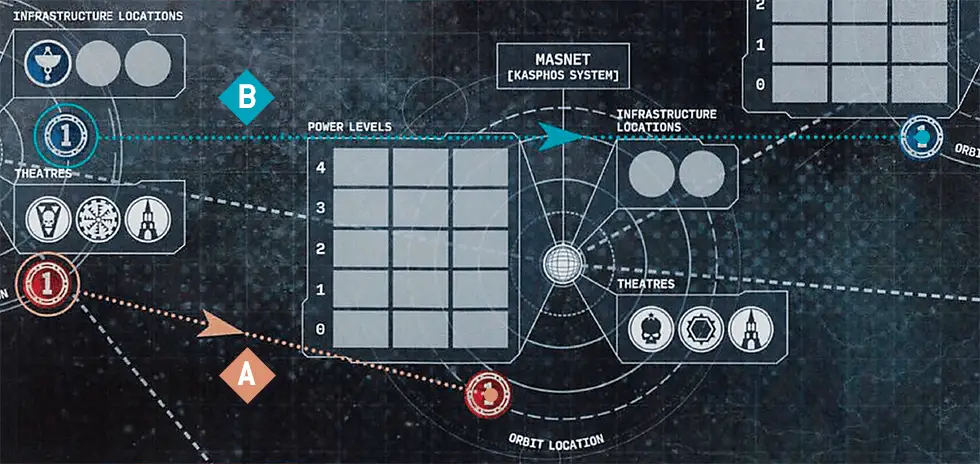
End of the Campaign
Campaign Medals
Next, the Warmaster will determine which Alliances (and the players within them) win the Campaign Medals presented below. Each Campaign Medal specifies the criteria that must be met for it to be awarded. In the event of any ties, the Warmaster should prioritise the Alliance with the fewest other Campaign Medals.Each Campaign Medal offers unique benefits should players wish to embark on another campaign. When doing so, once players have formed their new Alliances, the Warmaster should check to see which Alliance has the most players with each Campaign Medal (rolling off in the event of a tie); in each case, that Alliance will receive the benefit of that Campaign Medal for the duration of that campaign.
Laurel of Victory
One victory merely lays the foundations for yet greater glories to come as the war for the Five Hundred Worlds rages on.
Award To: The victorious Alliance.Benefit: While setting up the campaign map, at the start of the Alliances Decide on Strongholds step, this Alliance selects one Planet:
- This Alliance must select that Planet to build their Stronghold on. When doing so, they build 1 additional Fortification Line on that Planet.
- No other Alliance can build any Infrastructure on that Planet.
- No other Alliances can select for that Planet to have a Power Level of more than 1 for their Alliance.
- No Fleets from other Alliances can start at that Planet.
Penumbral Wreath
Though the battle might be lost, wise commanders husband their surviving forces amidst the shadows, sowing the seeds of triumphs to come in the bitter soil of temporary defeat.
Award To: The Alliance with a Power Level of 1 at the most Planets.Benefit: While setting up the campaign map, at the end of the Alliances Decide on Strongholds step, this Alliance selects two Planets. Their Power Level at those Planets is increased by 2.
Star of the Voidfarer
War on the Vespator Front is ever fluid, and fought over grand interstellar distances. Those who command the space lanes amidst such a conflict soon become masters of the stars themselves.
Award To: The Alliance with the largest distance between any two Planets their Support Facilities are built on (note this requires at least two Support Facilities to be built).Benefit: In the Move Fleets step of the first Campaign phase, each of this Alliance’s Fleets can be moved up to twice.
Sable Dagger
Subtlety and wisdom are weapons as potent as any gun or blade, and those who strive to spy out all that their enemies do are best positioned to wrong-foot their foes.
Award To: The Alliance with the largest distance between any two Planets their Fleets are at.Benefit: While setting up the campaign map, at the end of the Alliances Decide on Fleet Locations step, this Alliance can select two Planets and swap their Power Level at those Planets around. They can do this up to three times.
Infrastructure
Armies without functional supply lines, void transport and strategic coordination would soon perish in the fast-moving wars upon the Vespator Front.
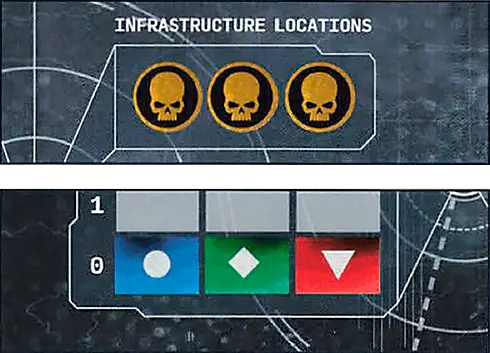
There are four types of Infrastructure that can be built by players. Whenever a player is allowed to build a piece of Infrastructure, they will be told which types of Infrastructure they can build and on which Planets they can build them.If a Planet does not have any undestroyed, unoccupied Infrastructure locations left on it, then a player cannot build any pieces of Infrastructure on that Planet.
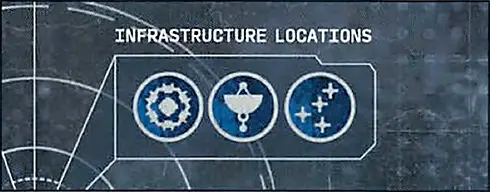
This Planet has 3 Infrastructure locations and each of them has a piece of Infrastructure built on it already. As such, no more Infrastructure can be built on this Planet until one or more of those Infrastructure pieces has been destroyed.
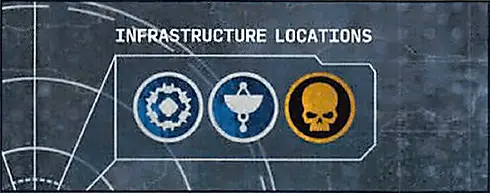
This Planet has 3 Infrastructure locations, but one of them has been destroyed and so cannot have Infrastructure built on it any more. Both of the remaining Infrastructure locations have a piece of Infrastructure built on them already. As such, no more Infrastructure can be built on this Planet until one or more of those Infrastructure pieces has been destroyed.
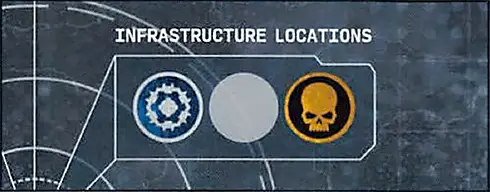
This Planet has 3 Infrastructure locations. One of them has been destroyed and one of them has a piece of Infrastructure built on it already. This leaves the third Infrastructure location, which can still be built on.
Building Infrastructure
The maximum number of Infrastructure pieces each Alliance can build on the campaign map varies by type, as shown in the table below.
|
If a players Alliance already has the maximum number of Infrastructure pieces of a given type on the map, they cannot build any more pieces of that Infrastructure type until one or more of their Alliance’s pieces of that type are captured or destroyed.
Whenever a piece of Infrastructure is built, the corresponding sticker for that Alliance is placed on one of the unused Infrastructure locations on the relevant Planet.
Destroying a Planet
Subjected to Exterminatus, stripped of biomass, or simply reduced to war-torn ruin, this world is no longer of any true strategic use.
When the last of a Planet’s Infrastructure locations is destroyed, that Planet becomes uninhabitable. When this happens:- The Power Level of every Alliance at that Planet is reduced to 0.
- Fleets can continue to be moved to that Planet, but it cannot be selected for any Campaign Operations.
Infrastructure Types
Each type of Infrastructure has different rules that apply to it, as presented below.
Stronghold
Every conquest must be commanded from a central position of greatest strength. Such strongholds are the sleepless mind and beating heart both of an empire’s ambitions of conquest.
Each time a player who is part of this Infrastructure’s Alliance wins a battle at this or a connected Planet, they can treat their Alliance’s Power Level at that Planet as 1 higher or lower than it actually is for the purposes of that battle’s Campaign Outcomes.Designer’s Note: While an Alliance’s Stronghold remains undestroyed, it will also contribute to the overall Campaign points scored by that Alliance.

Staging Grounds
Be it forward operating bases, well-positioned Webway gates, rifts in the fabric of realspace or hidden training grounds and marshalling sites, these locations allow commanders to rapidly deploy the right forces into rapidly evolving conflict zones.
Each time a player who is part of this Infrastructure’s Alliance fights a battle at this or a connected Planet, they can treat their Alliance’s Power Level at that Planet as 1 higher or lower than it actually is for the purposes of that battle’s Mission Rules. The effect of multiple Staging Grounds is not cumulative (so can only take effect once in each battle).
Support Facility
From promethium fuelling facilities and orbital docks to astropathic sanctums, biomass larders, shrines to the gods or colossal translocation gates, these facilities provide battle groups with the means to swiftly cross interstellar gulfs.
For players who are part of this Infrastructure’s Alliance, Planets at a distance of 2 from this Planet are considered connected to it, but not vice versa.
Fortification Line
Some fortifications are unsubtle things: miles-long curtain walls, hulking scrap forts, or trench networks bristling with guns. Others are more subtle, be they webs of illusion, sorcerous snares or layers of invisible force fields. All achieve the same purpose: to stymie the foes’ advance.
The minimum Power Level of this Infrastructure’s Alliance at this Planet is increased by 1. When this Infrastructure is built, if it increases the minimum Power Level of its Alliance above its current Power Level at this Planet, increase the Power Level accordingly. Each time a rule would reduce that Alliance’s Power Level below that point, one of that Alliance’s Fortification Lines at this Planet is destroyed instead.Vespator Front Events
As the campaign progresses, additional events will be introduced into the campaign to maintain an exciting narrative. Some of these can happen in any phase of the campaign, but others will only take effect if one Alliance begins to pull too far ahead or fall too far behind.- First, if one Alliance is more than 5 Campaign points ahead of each of the others on the Points Tracker, that Alliance is said to be the dominating Alliance and the Warmaster rolls one D6: on a 4+, they generate one Perils of Power Event to take effect.
- Then, if one Alliance is more than 5 Campaign points behind each of the others on the Points Tracker, that Alliance is said to be the trailing Alliance and the Warmaster rolls one D6: on a 4+, they generate one Desperate Measures Event to take effect.
- Finally, the Warmaster rolls one D6, adding 1 to the result if it is the fourth Campaign phase or later: on a 4+, they generate one Fortunes of War Event (see below) to take effect.
Fortunes of War Events
To generate one of these Events, the Warmaster rolls one D33 and applies the relevant Event from those in this section. To roll a D33, roll two D3 one after the other; the first result determines the ‘tens’ and the second determines the ‘units’. For example, if the first result is a 2 and the second is a 1, the D33 result is 21.
|
Bloodied and exhausted by recent battles, the warring factions pause to consolidate their positions.
- That Alliance can build one of the following pieces of Infrastructure on a Planet: Fortification Line; Support Facility; Staging Grounds.
- That Alliance can move each of its Fleets to one connected Planet.
An upsurge in void piracy sees fleets forces to move cautiously lest they be caught in ambushes or leave their supply routes open and undefended.
- Fleets cannot declare the Void Leap Operation.
- The Support Facility Infrastructure rules do not take effect.
With interstellar battle lines shifting, once-mighty worlds become virtual backwaters while planets of little former note become new seats of strategic power.
Oracles mutter dire portents. Spies return contradictory reports of troubling movements and inauspicious stellar conjunctions, while unsettled commanders wrestle with misleading intelligence.
- Fleets cannot declare the Logistical Auxilia Operation.
- Each time a Planet is attacked, the Theatre used is selected randomly, instead of by the player from the attacking Alliance.
Precious, ancient technological relics have been dug up on remote worlds in this region. Those who seize them, succeed in denying them to their foes, or who ambush those lured in by such riches will claim a distinct strategic advantage.
The hardships of ongoing war ravage planetary populations and garrison forces throughout this section of the Vespator Front, leading to sickness, death and scattered rebel uprisings.
Be it Barghesi infestations, territorial void whale pods, or some other massed movements of dangerous alien beasts, warring armies are forced to hurriedly get out of the creatures' paths.
A plague of strange visions visits commanders throughout this region, sent - though they know it not - by subtle servants ofTzeentch. Some see duplicitous opportunity and seize it, while others are tricked or driven mad enough to betray their oldest comrades.
If one or more players wish to do so, the Warmaster should try to move all players around so that each has at least one Fleet for their desired Alliance. If this is not possible then some players may not be able to defect and the Warmaster should decide which Players can defect. Any unclaimed Fleets are then assigned amongst the remaining players of the relevant Alliances.
Cascading waves of cosmic energy goad local stars to sudden fury, their surging flares destroying communication networks and setting worlds aflame.
The Warmaster rolls one D6 for each Planet with only one undestroyed Infrastructure location: on a 4+, that Infrastructure location is destroyed (note this can cause the Planet to be destroyed).
Perils of Power Events
To generate one of these Events, the Warmaster rolls one D3 and applies the relevant Event from those in this section.
|
Dissident zealots rise up all across this world, their religious riots and targeted acts of sabotage causing escalating destruction and anarchy.
- First, for each piece of Infrastructure at that Planet, roll one D6: on a 3-5, that piece of Infrastructure is destroyed; on a 6, that piece of Infrastructure is destroyed and its Infrastructure location is destroyed (note, this can cause the Planet to be destroyed).
- Then, for each Power Level of the dominating Alliance at that Planet, roll one D6, subtracting 1 from the result if there is a Fleet from that Alliance at that Planet: for each 4+, subtract 1 from that Alliance’s Power Level at that Planet.
So long has the shadow cast by this faction become, that even sworn enemies engulfed in its icy gloom find common cause to fight back as one.
The more overstretched an empire becomes, the more easily spies slip through the gaps to discover its secrets.
Desperate Measures Events
To generate one of these Events, the Warmaster rolls one D3 and applies the relevant Event from those in this section.
|
What binding oaths have been sworn or heavy price paid to secure the allegiance of this world's rulers, is a problem for another day. For now, it is enough that their allegiance has been bought.
Faced with the very real possibility of defeat and destruction, a wild fervour takes hold amongst this faction's armed forces, propelling them into a furious crusade to retake lost ground.
After rapidly breaking down all essential systems and structures for void transit, this faction secretly stows these vital assets aboard smugglers' vessels - with or without the knowledge and blessing of their shipmasters - so that they can be borne away to new locations.
Theatres of the Five Hundred Worlds
The planets designated by Guilliman’s plan as being part of the Five Hundred Worlds are many and varied. Towering mountain ranges flow into baking deserts. The regimented crops of agri worlds sway alongside rugged tundra zones and bustling spaceports, while teeming hive cities tower over toxic wastelands and deserts of irradiated ash. Those who seek to invade a world must choose wisely where they land their forces, for the theatre of war through which they fight will inevitably have an impact upon the battles to come.
When playing a game as part of this campaign (excluding a Boarding Actions game), in the relevant step of the mission sequence the Attacker will be able to select one of the Theatres from the planet the battle is taking place on. That player then rolls one D6 to determine which of that Theatre’s Twists will apply to the battle.
If the players are playing a mission from another Warhammer 40,000 publication that uses Twists (e.g. a Chapter Approved Mission Deck), this Twist is used instead of any Twists provided in that publication.

Spaceport
Packed with communication and coordination technologies, spaceports not only facilitate rapid force deployment, but are also prime strategic hubs.
Tactical Benefits: These Twists make control of objective markers easier and provide improved reactive manoeuvrability, with units able to Fall Back and continue to operate effectively. It is suited to more elite armies that can take advantage of such rules to prevent their units from becoming bogged down and trapped by more numerous foes.Recommended Terrain: For this Theatre, we recommend using tall buildings and ruins as terrain features. These should be placed plentifully across the battlefield, but with gaps between them wide enough for larger VEHICLES to navigate. Some of these can be connected with barricades to represent cordons and barricades.
|


Desolate Wastes
Whether polluted wastelands, endless ferrocrete expanses or dry grassland, these wind-scoured regions are open, largely empty, and often easily traversed.
Tactical Benefits: These Twists are particularly suited to skirmishing forces largely comprising INFANTRY and MOUNTED units, enabling them to deploy more aggressively and reposition themselves later in the game.Recommended Terrain: For this Theatre, we recommend using lots of AREA TERRAIN features with a smaller footprint, to represent nomad camps and scattered outcroppings. These can be scattered through no man’s land to indicate a largely uninhabited wilderness region.
|

Xenoflora Jungle
From temperate forest to seething jungle, regions overrun with alien undergrowth present a close and hazardous environment in which to do battle.
Tactical Benefits: These Twists provide a boost to melee-orientated armies, contributing improved damage dealing, protection from Overwatch and punishment of units that Fall Back.Recommended Terrain: For this Theatre, we recommend using a mixture of woods and ruins to represent a largely forested region dotted with the remains of overgrown structures. There should be a large number of such terrain features scattered fairly equally across the battlefield, to reflect the sheer density of the area’s flora.
|

Rad Zone
Rendered extremely hazardous by the impact of a rad warhead during the ongoing wars of reclamation, irradiated ash carpets this region as thickly as dense snowfall.
Tactical Benefits: These Twists cause significant disruption to communications and attempts to launch immediate attacks on the enemy, reducing lethality and improving the durability of units. It is suited to armies that favour a more attritional style of play.Recommended Terrain: For this Theatre, we recommend using tall hills to limit visibility. Ruins and buildings should not be placed on these hills, to represent clusters of hardened structures huddled in the more sheltered lowlands of this hostile theatre.
|

Forge Complex
Adeptus Mechanicus forge complexes can sprawl across entire continents, and do not stop their labours even should battle rage between their thundering machines and over their rivers of acrid runoff.
Tactical Benefits: These Twists predominantly aid tough, durable units; those that are more numerous and more lightly armoured will take increased damage as a result of the volatile gases, ferocious heat and hostile elements present in such locations.Recommended Terrain: For this Theatre, we recommend using lots of OBSTACLE terrain features and industrial pipes and machinery to represent the still-operational forge shrines and manufacturing lines of the complex.
|

Hab Sprawl
Many of the worlds designated part of Greater Ultramar are heavily settled, boasting hive cities and mile upon mile of hab blocks. When battle comes to such theatres it swiftly becomes a grinding city fight.
Tactical Benefits: These Twists provide a boost to units within AREA TERRAIN features, increasing their survivability or lethality. As such, this Theatre is well suited to armies with large amounts of INFANTRY that can take advantage of such terrain.Recommended Terrain: For this Theatre, we recommend a dense coverage of AREA TERRAIN features, predominantly comprising ruins, placed evenly across the battlefield.
|

Delvesite Facility
Whether clashing in the flicker-lit depths of a mining delvesite or doing battle on the surface between pit heads and massed machinery, this is a hazardous theatre for any force to fight in.
Tactical Benefits: These Twists primarily benefit attacks against tougher units, with scavenged explosives and jury-rigged mining machinery helping weaker models bring down imposing adversaries.Recommended Terrain: For this Theatre, we recommend using a good number of fuel pipes, containers, barrels and barricades as well as Sector Fronteris structures to reflect mining infrastructure and rugged mine buildings. Some of these should be placed within each player’s deployment zone, as well as in No Man’s Land, to represent an interconnected network of this apparatus.
|

Dead Lands
Be they regions reduced to lifeless desert by harsh stars, zones poisoned by heavy industry, or the blasted result of long-ago orbital bombardments, these bleak theatres often play host to clashes of heavy armour as they afford plentiful room for massed manoeuvres.
Tactical Benefits: These Twists primarily benefit MONSTER and VEHICLE units, providing them with increased speed, durability and lethality.Recommended Terrain: For this Theatre, we recommend clustering some AREA TERRAIN features together, with wider gaps between them to allow for increased MONSTER and VEHICLE manoeuvrability, and to represent the intermittent outcroppings of settlements or geological features that cling on amidst the desolation.
|

Tomb Complex
Necron tombs lurk beneath the surface of many worlds that Guilliman wishes claimed for his empire. As they wake, their eldritch structures rumble up from below to unleash terrible destruction.
Tactical Benefits: These Twists are somewhat unpredictable. They do not necessarily suit any one particular army style, but can make for varied and interesting battles for those brave enough to use them.Recommended Terrain: For this Theatre, we recommend that players use their imagination to create the kind of terrain layout that best fits their own narrative. Tomb complexes can be hidden below any other sort of landscape, although we do recommend mixing in a few esoteric pieces of terrain to represent the Necron architecture that has risen from below or phased into existence.
|
Vespator Front Mission Sequence
A Vespator Front battle is waged by following the sequence below.
Read Mission
The Campaign Attack being carried out will correspond to a specific mission, as detailed in the Campaign rules. The players can play the relevant mission or, if they both agree, they can play a different mission from another Warhammer 40,000 publication (such as a Chapter Approved mission deck). If they do, whichever mission they play, the player whose Fleet declared the Campaign Attack Type will be the Attacker and their opponent will be the Defender.Each mission will list one or more additional mission rules that will apply for the duration of the battle, and a series of mission objectives, which may be different for the Attacker and the Defender. Players should read and familiarise themselves with the mission rules before proceeding.
If playing a mission from another publication, or playing a Boarding Actions game as a result of the Boarding Action Campaign Attack Type, follow the relevant mission sequence for that battle, then jump to the Resolve Campaign Outcome step (see below).
Select Battle Size
Players must first select the battle size they wish to play: Incursion, Strike Force or Onslaught. The table below gives a rough guide of how long each size of battle should take.
| |||||||||||||||
Muster Armies
Each player must then muster an army as described in the Core Rules, and provide a copy of their Army Roster to their opponent to read through.Place Objective Markers
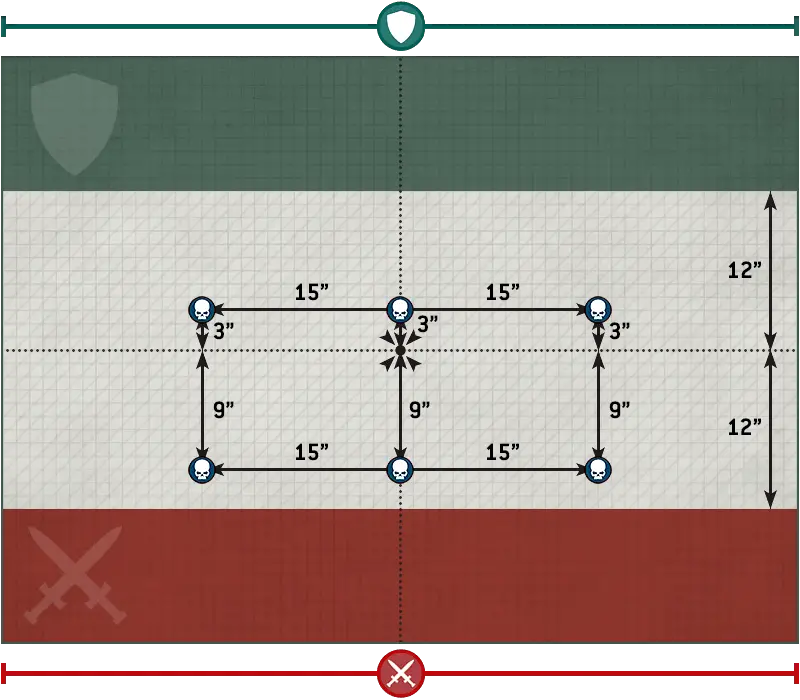
Players now set objective markers up on the battlefield. Each mission’s deployment map will show the players how many to set up and where each should be placed.Determine Theatre Twist
The Attacker selects one of this Planet’s Theatres and generates a Twist for it.Create the Battlefield
Next players create the battlefield and set up terrain features. The minimum size of the battlefield depends on the battle size selected, as shown in the table below.
| ||||||||
Unless otherwise stated, when setting up terrain features, use the guidelines detailed in the Core Rules. Players must use the rules presented in the Core Rules for terrain features.
Terrain features should not be set up with any impassable sections (such as the walls of a ruin) within 1" of any objective markers.
Determine Attacker and Defender
The player whose Fleet declared the Campaign Attack Type will be the Attacker, and their opponent will be the Defender.Declare Battle Formations
Players secretly note down which of their Leader units will start the battle attached to which Bodyguard units, which of their units will start the battle embarked within which TRANSPORTS, and which of their units will start the battle in Reserves (including Strategic Reserves). Players then reveal these decisions. When both players have done so, they declare their selections to their opponent.The following Reserves restrictions apply:
- No more than half of the units in your army can start the battle in Reserves, and the points total of those units cannot be more than half of the points total of your army (units embarked within a TRANSPORT that is set up in Reserves also count towards these limits).
- Reserves units cannot arrive on the battlefield during the first battle round (excluding units placed into Strategic Reserves during the battle).
- Any Reserves units that have not arrived on the battlefield by the end of the third battle round are destroyed, as are any units embarked within them (excluding units placed into Strategic Reserves during the battle).
Deploy Armies
Players take it in turns to set up their remaining units one at a time, starting with the Defender. A player’s models must be set up wholly within their deployment zone. If a player sets up a TITANIC unit when it is their turn to set up a unit, they skip their next turn to set up a unit. If one player finishes deploying all of their units, their opponent then deploys the remainder of their units.Mission Objectives
During the battle, players can gain Victory points (VP) by achieving mission objectives.Mission objectives can either be ‘Progressive’ or ‘End Game’. Progressive mission objectives are scored during the battle (exactly when is detailed on the mission objective itself), and can be achieved, and hence award VP, several times. End Game mission objectives are scored at the end of the battle. Some Progressive objectives will award VP ‘each time’ an enemy model or unit is destroyed. A model or unit can, if it is resurrected for any reason (i.e. it was destroyed and subsequently returned to the battlefield), potentially contribute several VP due to these types of mission objectives (assuming it is resurrected and subsequently destroyed several times over).
Redeploy Units
Some rules allow players to redeploy certain units after both armies are deployed. Unless otherwise stated, such rules are resolved in this step. Players alternate resolving any such rules, starting with the Attacker.Determine First Turn
Unless the mission rules state otherwise, players roll off and the winner takes the first turn.Resolve Pre-battle Rules
Players alternate resolving any pre-battle rules units from their army may have, starting with the player who will take the first turn.Begin the Battle
The first battle round begins. Players continue to resolve battle rounds until the battle ends.End the Battle
The battle ends after five battle rounds have been completed. If one player has no models remaining in their army at the start of their turn, the other player may continue to play out their turns until the battle ends.Determine the Victor
At the end of the battle, the player with the most VP is the victor. If players are tied, the battle is a draw. If every model in a player’s army is painted to a Battle Ready standard, that player is awarded a bonus 10VP.Resolve Campaign Outcome
The victor resolves the Campaign Attack’s Campaign Outcome, making any necessary decisions, and then reports this back to the Warmaster for processing in the Process Battle Results Campaign step.Seize Power Base
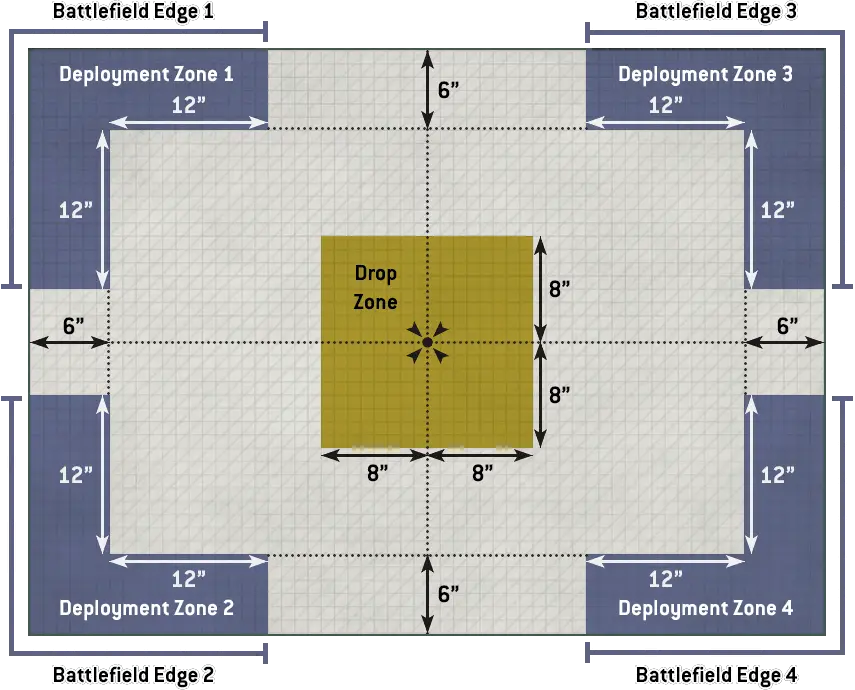
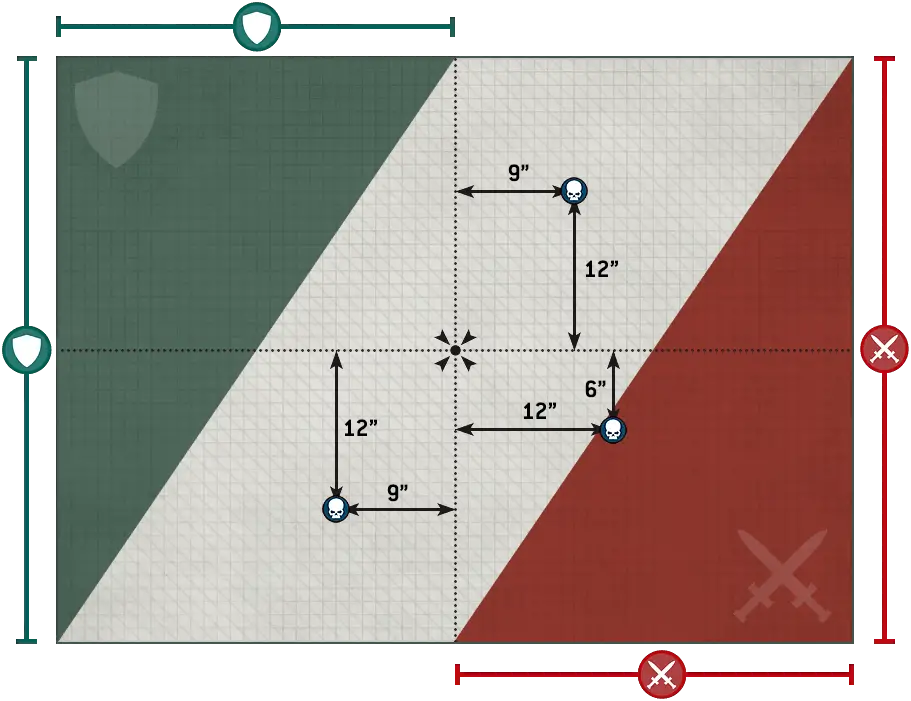
Critical Assets: At the end of the Create the Battlefield step, the Defender sets up four objective markers anywhere on the battlefield more than 6" away from all deployment zones and battlefield edges, and more than 9" away from all other objective markers. At least one of those objective markers must be placed wholly within the Attacker’s battlefield half. If playing an Incursion sized battle, the Defender sets up three objective markers in this way instead.
For each piece of Infrastructure that the Defenders Alliance has at this Planet, they can select one of those objective markers to have the relevant ability below (no objective marker can have more than one ability):
- Comms Network: Stronghold required. Each time a player selects a unit from their army within range of this objective marker as the target of a Stratagem, they roll one D6: on a 4+, that player gains 1CP.
- Unstable Materiel Duct: Support Facility required. Models within range of this objective marker have the Deadly Demise 1 ability.
- Augury Fane: Staging Grounds required. While a model is within range of this objective marker, ranged weapons equipped by that model have the [SUSTAINED HITS 1] ability.
- Prepared Defences: Fortification Lines required. Each time an attack targets a unit within range of this objective marker, if it is a ranged attack or if the attacking model made a Charge move this turn, subtract 1 from the Hit roll.
Asset Guards: At the start of the Deploy Armies step, the Defender can select a number of units from their army up to their Alliances Power Level at this Planet to be asset guard units. When doing so, TITANIC units count as two selections and, if possible, they must select units without the MONSTER or VEHICLE keyword. For each objective marker, they can select one asset guard unit and set that unit up anywhere on the battlefield wholly within range of that objective marker.
Vanguard Prowlers: At the start of the first battle round, the Attacker can select a number of units from their army up to their Alliance’s Power Level at this Planet. When doing so, Titanic units count as two selections and, if possible, they must select units without the MONSTER or VEHICLE keyword. Until the end of the battle, models in those units have the Scouts 6" ability.
It is not enough to merely seize access to this world’s infrastructure. The longer it is held, the greater the control which can be exerted over this reach of the front.
- They control two or more objective markers.
- They control more objective markers than their opponent.
A vital juncture approaches, one when these critical assets will be at their most vulnerable and the access to the world’s key sites within reach. Timing is everything; ensure you have control when the moment comes.
CAMPAIGN OUTCOME
With victory in the wake of their sudden assault, the conquerors waste no time in taking over or dismantling the foe’s centres of strategic power. The way is paved to strengthen expansion in this reach of the front.
In order:- The Attacker selects one of the Defending Alliance’s Infrastructure pieces at this Planet (excluding a Stronghold). That Infrastructure piece is removed and the Attacking Alliance builds one piece of Infrastructure of that type in its place. If there are no such pieces of Infrastructure, the Attacking Alliance builds one piece of Infrastructure (excluding a Stronghold) instead.
- If the Attacking Alliance’s Power Level at this Planet is 3 or more, they build one piece of Infrastructure (excluding a Stronghold) at this Planet as well.
- Add 1 to the Attacking Alliances Power Level at this Planet.
After a ferocious defence, the invaders have been repelled. Strategic assessment in the aftermath of the victory sees the world’s key strategic sites reinforced. The planet’s reputation as a territorial linchpin grows, serving to dissuade foes from daring to strike here again.
In order:- The Defending Alliance can build one Fortification Lines at this Planet or at a connected Planet. If the Defending Alliances Power Level at this Planet is 3 or more, they can build one Staging Grounds instead.
- Add 1 to the Defending Alliances Power Level at this Planet.
Purge and Burn
Baited Ambush Routes: At the end of the Deploy Armies step, the Defender can set up two ambush markers on the battlefield (circular 40mm diameter markers should be used). If their Alliance’s Power Level at this Planet is 3 or more, they can set up one additional ambush marker. Each ambush marker must be set up more than 9" away from all other ambush markers, and not within either player’s deployment zone.
Each time a unit ends a Normal, Advance or Fall Back move within 3" of an ambush marker:
- First, roll one D6: on a 2-4, that unit suffers D3 mortal wounds; on a 5+, that unit suffers 3 mortal wounds.
- Then, roll one D6: on a 5+, remove that ambush marker from the battlefield.
Encirclement: In the Declare Battle Formations step, the maximum combined points value of the Attacker’s units that can be placed into Strategic Reserves is shown in the table below.
| ||||||||||
Oppression Tactics: At the start of the first battle round, the Attacker can select a number of enemy units up to their Alliances Power Level at this Planet (to a maximum of three). For each of those units:
- That unit must take a Battle-shock test, subtracting 1 from the result.
- Until the end of the battle round, subtract 2 from that unit’s Move characteristic and subtract 2 from Charge rolls made for that unit (this is not cumulative with any other negative modifiers to that unit’s Move characteristic or Charge rolls made for it).
Smash through the foe’s choke points and evade their interceptions. Reach the extraction route by any means necessary.
|
Do not allow your prey to slip away. Track them down, cut off their escape routes and terminate their attempts to reinforce other worlds. This hunt must end here.
|
CAMPAIGN OUTCOME
Between their preparatory assaults sowing disorder and their encirclement cutting off escape routes, the victors have crushed the power of their foes and - more importantly - prevented them from moving their power base to support their allies.
In order:- If the Attacking Alliance’s Power Level at this Planet is equal to or greater than the Defending Alliances Power Level at this Planet, subtract 1 from that Defending Alliance’s Power Level.
- Add 1 to the Attacking Alliance’s Power Level at this Planet.
Other worlds, other systems, of the Vespator Front beckon. Having thwarted the attackers’ aims to cull their numbers, the victors are now in a position to reinforce multiple outposts in neighbouring systems with greater strength.
In order:- The Defender can subtract 1 from their Alliance’s Power Level at this Planet any number of times. Each time they do, they can add 1 to their Alliance’s Power Level at a connected Planet.
- Add 1 to the Defending Alliance’s Power Level at a connected Planet.
Orbital Invasion
Beachhead Deployment: In the Declare Battle Formations step, the Attacker can select up to six units from their army to be beachhead assault units (see below). When doing so, TITANIC units count as two selections. If playing an Incursion sized battle, the Attacker selects up to three units in this way instead. All other units from the Attacker’s army that do not start the battle in Reserves are placed into Strategic Reserves.
- First, at the start of the Deploy Armies step, the Attacker sets up three objective markers anywhere wholly within the Drop Zone and not within 6" of each other.
- Then, the Defender selects a number of deployment zones equal to their Alliances Power Level at this Planet (to a maximum of three deployment zones) and deploys their army.
- Finally, for each of the objective markers, the Attacker selects up to two of their beachhead assault units and sets them up wholly within range of that objective marker.
Precision Deployment: Each time a unit from the Attacker’s army is set up on the battlefield using the Deep Strike ability, it can be set up anywhere on the battlefield that is more than 6" horizontally away from all enemy units. When doing so, if that unit is set up within 9" of one or more enemy units and was not set up wholly within range of one or more objective markers, until the end of the turn, it is not eligible to declare a charge.
Converge on the invaders’ landing sites; overwhelm them. Then stand ready to hurl every wave that attempts to reinforce them back into the cursed void whence they came.
- They control one or more objective markers.
- They control two or more objective markers.
- They control all three objective markers.
- They control more objective markers than their opponent.
A properly coordinated invasion will be required to seize victory. Make sure you hold key locations when the plan dictates to align this invasion with orbital assets and infiltrating allies.
CAMPAIGN OUTCOME
Between the beachhead assault and the funnelling of successive waves of reinforcements the invaders have successfully gained a foothold. Breaking the enemy’s iron-hard grip on this world is but a step from annihilating them altogether.
In order:- If the Attacking Alliance’s Power Level at this Planet is less than the Defending Alliance’s Power Level at this Planet, subtract 1 from that Defending Alliance’s Power Level.
- Add 1 to the Attacking Alliance’s Power Level at this Planet.
The invaders’ gambit has failed. With the remnants of their orbital strength forced into retreat, the path is clear to expand the power of this enduring holdfast to critical worlds and strengthen the resources of both.
The Defender can select one connected Planet and do one of the following:- Remove any number of the Defending Alliance’s pieces of Infrastructure at this Planet. For each of those pieces of Infrastructure, the Defending Alliance can build one piece of Infrastructure of that type at that connected Planet.
- Remove any number of the Defending Alliance’s pieces of Infrastructure at that connected Planet. For each of those pieces of Infrastructure, the Defending Alliance can build one piece of Infrastructure of that type at this Planet.
Planetary Bombardment
Anti-orbital Defences: Each objective marker has a shield value. At the start of the Deploy Armies step, the Attacker:
- Selects one objective marker to have a shield value of 4.
- Selects one other objective marker to have a shield value of 3.
- Selects the remaining objective marker to have a shield value of 2.
Saboteur Vanguard: At the start of the Deploy Armies step, the Attacker can select a number of units equal to up to half of their Alliance’s Power Level at this Planet (rounding up). When doing so, TITANIC units count as two selections and, if possible, they must select units without the MONSTER or VEHICLE keyword. Until the end of the battle, models in those units have the Infiltrators ability.
Compromised Shield Emitters: At the start of the first battle round, each objective marker within No Mans Land is controlled by the Attacker, and remains under their control until the Defenders Level of Control over that objective marker is greater than the Attackers at the end of a phase.
Shield Sabotage: At the end of the battle round, for each objective marker that is on the battlefield and controlled by the Attacker, subtract 1 from that objective marker’s shield value. If that objective marker’s shield value is 0, remove that objective marker from the battlefield. The Defender then selects up to two units from the Attacker’s army to be condemned units.
Restabilise Shields: At the end of the Attacker’s turn, for each objective marker controlled by the Defender, the Defender rolls one D6, adding 1 to the result if their Alliance’s Power Level at this Planet is 3 or more: on a 6+, add 1 to that objective marker’s shield value.
Slay the saboteurs who dare strive to weaken our defences. Take bloody vengeance whilst you can, lest their flame from the heavens be the last light we see!
With every shield emitter, supernatural ward or illusory defence that is broken, the bombardment will scour more of the foe from this planet.
- The Attacker scores 30VP for each objective marker that was removed from the battlefield.
- The Defender scores 20VP for each objective marker that is on the battlefield. If all three objective markers are still on the battlefield, they score an additional 30VP.
CAMPAIGN OUTCOME
The saboteurs’ success has weakened the defenders’ shields enough that the bombardment has eradicated a huge area, annihilating vital enemy positions.
In order:- The Attacker selects one Infrastructure Location at this Planet that is unoccupied or that has a piece of the Defending Alliance’s Infrastructure built on it. If possible, this cannot be a location with a Stronghold built on it. The Attacker rolls one D6, adding 1 to the result if their Alliance’s Power Level at this Planet is 3 or more: on a 3+, that Infrastructure Location is destroyed (as is any Infrastructure built on it).
- Add 1 to the Attacking Alliances Power Level at this Planet.
Vengeance against the would-be planet killers! Not only has the restabilised shield held against the threatened bombardment, but the victors have exploited the massive amount of materiel the attackers committed to this act and dealt a catastrophic counterblow where their forces are weak.
In order:- The Defender selects one connected Planet and one Infrastructure Location at that Planet. If possible, this cannot be a Location with a Stronghold built on it. Then they roll one D6: on a 4-5, any Infrastructure built on that location is destroyed; on a 6, that Infrastructure Location is destroyed (as is any Infrastructure built on it). If the Defending Alliances Power Level at this Planet is 3 or more, the Defender can repeat this one additional time at that connected Planet.
- Add 1 to the Defending Alliance’s Power Level at this Planet.
Supply Base Raid
Power Redirection: At the start of the first battle round, the Defender gains two Power Redirect uses (see below). If their Alliance’s Power Level at this Planet is 3 or more, they gain three Power Redirect uses instead.
Servo-haulers Activate: At the start of the battle round, the Attacker randomly selects three objective markers. If the Defender has any unused Power Redirects remaining, they can then use one of these to swap one of those selected objective markers for one of the other unselected objective markers, determined randomly. Until the end of the battle round, the selected objective markers are loaded. The Attacker then randomly selects one of those loaded objective markers and, until the end of the battle round, that objective marker is heavily loaded as well.
Hauler Network Sabotage: In the Attacker’s Command phase, they can select one unit from their army that is not within Engagement Range of one or more enemy units and is within range of one or more loaded objective markers they control. If they do, they can select one enemy unit within range of a loaded objective marker and roll one D6, adding 2 to the result if the Attacking Alliances Power Level at this Planet is 3 or more: on a 5+, that enemy unit suffers D3 mortal wounds.
Identify the accessible servo-haulers and seize whatever munitions, systems or resources they convey. See that it does not leave orbit to feed the enemy’s armies.
- The Attacker scores 5VP for each loaded objective marker they control.
- The Attacker scores an additional 5VP if one of those objective markers is the heavily loaded objective marker.
This supply base and its transit routes to and from the surface must remain active. Retake the hauler network and repel the scavengers’ acquisitive grasp.
CAMPAIGN OUTCOME
Through the acquisition of seized assets and resources, or by destroying the foe’s ability to easily move them from system to system, the attackers have the power to exert greater dominance on this region of the Vespator Front.
In order:- The Attacker selects this Planet or one connected Planet and rolls one D6: on a 4+, subtract 1 from the Defending Alliances Power Level at the selected Planet. If the Attacking Alliance’s Power Level at this Planet is 3 or more, the Attacker can repeat this one additional time.
- Add 1 to the Attacking Alliances Power Level at this Planet.
With the predatory raid repelled, the victorious defenders have safeguarded vital surface-to-orbit arteries. Now the victors exploit their enemies’ failure, strengthening their intersystem networks against future predation.
In order:- Subtract 1 from the Attacking Alliance’s Power Level at this Planet. If the Defending Alliances Power Level at this Planet is 3 or more, they can do this at one connected Planet instead.
- Add 1 to the Defending Alliance’s Power Level at this Planet.
Boarding Action
CAMPAIGN OUTCOME
A key vessel of the enemy fleet is critically damaged, boarding parties having breached its vital systems or decimated its officer corps. So severe is the blow to the foes naval strength that their fleet is driven into a hasty escape, seeking a safer harbour for repairs.
- The Attacker can select one of the Defending Alliance’s Fleets at this Planet and move that Fleet up to two times, following the rules in the Move Fleets step.
- Add 1 to the Attacking Alliance’s Power Level at this Planet.
With a coordinated counterstrike spearheaded by elite specialists, the raiders are thrown back in such disarray that the enemy fleet is stalled and left out of position. The defenders capitalise on their victory, outmanoeuvring the foe in the void.
- The Attacking Fleet cannot move in this Campaign phase’s Move Fleets step.
- The Defender can select one of the Defending Alliance’s Fleets at this Planet and move it one time, following the rules in the Move Fleets step.
- Add 1 to the Defending Alliances Power Level at this Planet.
The Space Marine Detachments represent not only the Shield Chapter forces fighting to reclaim Ultramar, but also others - such as the Wardens of Ultramar - whose duty is to hold back heretic influence and xenos invasions seeking to exploit any cracks in the growing realm:
The Necron Detachments, meanwhile, typify the dread cohorts under Ammentar’s influence spreading throughout Ultramar, as well as those of other dynasties using desperate tactics to hold back the Nekrosor’s fanatics from their vaults or to punish any living soldiery daring to invade their tombs:
Be it forward operating bases, well-positioned Webway gates, rifts in the fabric of realspace or hidden training grounds and marshalling sites, these locations allow commanders to rapidly deploy the right forces into rapidly evolving conflict zones.
Each time a player who is part of this Infrastructure’s Alliance fights a battle at this or a connected Planet, they can treat their Alliance’s Power Level at that Planet as 1 higher or lower than it actually is for the purposes of that battle’s Mission Rules. The effect of multiple Staging Grounds is not cumulative (so can only take effect once in each battle).Some fortifications are unsubtle things: miles-long curtain walls, hulking scrap forts, or trench networks bristling with guns. Others are more subtle, be they webs of illusion, sorcerous snares or layers of invisible force fields. All achieve the same purpose: to stymie the foes’ advance.
The minimum Power Level of this Infrastructure’s Alliance at this Planet is increased by 1. When this Infrastructure is built, if it increases the minimum Power Level of its Alliance above its current Power Level at this Planet, increase the Power Level accordingly. Each time a rule would reduce that Alliance’s Power Level below that point, one of that Alliance’s Fortification Lines at this Planet is destroyed instead.From promethium fuelling facilities and orbital docks to astropathic sanctums, biomass larders, shrines to the gods or colossal translocation gates, these facilities provide battle groups with the means to swiftly cross interstellar gulfs.
For players who are part of this Infrastructure’s Alliance, Planets at a distance of 2 from this Planet are considered connected to it, but not vice versa.Every conquest must be commanded from a central position of greatest strength. Such strongholds are the sleepless mind and beating heart both of an empire’s ambitions of conquest.
Each time a player who is part of this Infrastructure’s Alliance wins a battle at this or a connected Planet, they can treat their Alliance’s Power Level at that Planet as 1 higher or lower than it actually is for the purposes of that battle’s Campaign Outcomes.Designer’s Note: While an Alliance’s Stronghold remains undestroyed, it will also contribute to the overall Campaign points scored by that Alliance.
- Seize Power Base: The attacking Alliance attempts to take over pieces of Infrastructure that the opposing Alliance has constructed at the selected Planet or aims to destroy them in order raise their own over the ruins.
- Purge and Burn: The attacking Alliance attempts to reduce the Power Level of the opposing Alliance at the selected Planet by exterminating the foe and preventing them spreading elsewhere; this is particularly beneficial if the attacking Alliance has a higher Power Level.
- Orbital Invasion: The attacking Alliance attempts to reduce the Power Level of the opposing Alliance at the selected Planet by seizing a beachhead and pouring in reinforcements to hold off the surrounding foe; this is particularly beneficial if the attacking Alliance has a lower Power Level.
- Planetary Bombardment: By weakening the defender’s protection and making them vulnerable to a catastrophic bombardment the attacking Alliance attempts to destroy the Planet’s Infrastructure locations, and potentially make the Planet uncontrollable.
- Supply Base Raid: The attacking Alliance attempts a daring sabotage or theft at a key site such as a shipyard, transit hub or way station. Their aim is to cut down the defender’s ability to move resources and reinforcements to and from the Planet, reducing the Power Level of the opposing Alliance here or at connected Planets.
- Boarding Action: The attacking Alliance strikes at an opposing Alliance’s Fleet stationed in orbit at the Planet, aiming to cause enough destruction to force the defending Fleet to relocate to another system.
When setting objective markers up on the battlefield, place them so they are centred on the point specified by the mission. When measuring distances to and from objective markers, measure to and from the closest part of them. Models can move over objective markers as if they were not there, but they cannot end a move on top of an objective marker.
At the start of the battle, each objective marker on the battlefield is said to be contested, and so is not controlled by either player. To control an objective marker, a player will first need to move models within range of it. A model is within range of an objective marker if it is within 3" horizontally and 5" vertically of that objective marker.
Every model has an Objective Control (OC) characteristic listed on its datasheet. To determine a player’s Level of Control over an objective marker, add together the OC characteristics of all the models from that player’s army that are within range of that objective marker. A player will control an objective marker at the end of any phase or turn if their Level of Control over it is greater than their opponent’s. If both players have the same Level of Control over an objective marker, that objective marker is contested.
- A model is within range of an objective marker if within 3" horizontally and 5" vertically.
- Level of Control: Add together the OC characteristics of all of a player’s models within range of the objective marker.
- An objective marker is controlled by the player with the highest Level of Control over it (in a tie, it is contested).
- Models cannot end a move on top of an objective marker.
A unit cannot shoot or declare a charge in the same turn that it Fell Back.
Desperate Escape Tests
Unlike when making other types of move, models can move over enemy models when making a Fall Back move as if those enemy models were not there, but you must take a Desperate Escape test for each model that will do so (excluding models that are TITANIC or can FLY) before any models in that unit are moved. In addition, if a unit is Battle-shocked when it is selected to Fall Back, you must take a Desperate Escape test for every model in that unit before any are moved.
- Fall Back Move: Models move up to M".
- Units that Fall Back cannot shoot or declare a charge in the same turn.
- Models can move over enemy models when Falling Back, but you must take Desperate Escape tests for them before they do so (excluding models that are TITANIC or can FLY).
- If a Battle-shocked unit is selected to Fall Back, take a Desperate Escape test for every model in that unit.
- Desperate Escape Test: Roll one D6. On a 1-2, one model from that unit is destroyed.
Models cannot be set up or end a Normal, Advance or Fall Back move within Engagement Range of any enemy models. If for any reason a model cannot meet this condition, that model is destroyed.
- Engagement Range: Within 1" horizontally and 5" vertically.
- Models cannot be set up or end a Normal, Advance or Fall Back move within Engagement Range of any enemy models.
- Advance Move: Models move up to M+D6".
- Cannot move within Engagement Range of any enemy models.
- Units that Advance cannot shoot or charge this turn.
You then make a Charge roll for the charging unit by rolling 2D6. The result is the maximum number of inches each model in that unit can be moved if a Charge move is possible. For a Charge move to be possible, the Charge roll must be sufficient to enable the charging unit to end that move:
- Within Engagement Range of every unit that you selected as a target of the charge.
- Without moving within Engagement Range of any enemy units that were not a target of the charge.
- In Unit Coherency.
- Charge Roll: 2D6".
- Targets of a charge must be within 12" but do not need to be visible.
- If the distance rolled is insufficient to move within Engagement Range of all targets while maintaining Unit Coherency, the charge fails.
- Cannot move within Engagement Range of any unit that was not a target of the charge.
- If the charge is successful, each model makes a Charge move less than or equal to the Charge roll, and must move into base-to-base contact with an enemy model if possible.
The Starting Strength of an Attached unit is equal to the combined Starting Strengths of all of its units (i.e. the number of models in the Leader unit added to the number of models in the Bodyguard unit). If either the Leader unit or the Bodyguard unit in an Attached unit is destroyed, the Starting Strength of the remaining unit is changed to be equal to its original Starting Strength.
For the purposes of rules that are triggered when a unit is destroyed, such rules are still triggered when one of the individual units that made up an Attached unit is destroyed (the Leader or the Bodyguard unit).
Scouts form the vanguard of many armies. Unnoticed by the enemy, they range ahead of the main force.
Some units have ‘Scouts x"’ listed in their abilities. If every model in a unit has this ability, then at the start of the first battle round, before the first turn begins, it can make a Normal move of up to x", with the exception that, while making that move, the distance moved by each model in that unit can be greater than that model's Move characteristic, as long as it is not greater than x".DEDICATED TRANSPORT models can make use of any Scouts x" ability listed in their abilities, or a Scouts x" ability that a unit that starts the battle embarked within that DEDICATED TRANSPORT model has (provided only models with this ability are embarked within that DEDICATED TRANSPORT model), regardless of how that embarked unit gained this ability (e.g. listed in their abilities, conferred by an Enhancement or by an attached CHARACTER, etc.).
A unit that moves using this ability must end that move more than 9" horizontally away from all enemy models. If both players have units that can do this, the player who is taking the first turn moves their units first.
- Scouts x": Unit can make a Normal move of up to x" before the first turn begins.
- If embarked in a DEDICATED TRANSPORT, that DEDICATED TRANSPORT can make this move instead.
- Must end this move more than 9" horizontally away from all enemy models.
Assault weapons fire so indiscriminately that they can be shot from the hip as warriors dash forward.
Weapons with [ASSAULT] in their profile are known as Assault weapons. If a unit that Advanced this turn contains any models equipped with Assault weapons, it is still eligible to shoot in this turn’s Shooting phase. When such a unit is selected to shoot, you can only resolve attacks using Assault weapons its models are equipped with.- Can be shot even if the bearer’s unit Advanced.
- Normal Move: Models move up to M".
- Cannot move within Engagement Range of any enemy models.
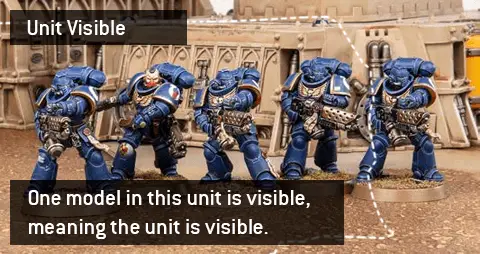
An unmodified Hit roll of 6 is called a Critical Hit and is always successful. An unmodified Hit roll of 1 always fails. A Hit roll can never be modified by more than -1 or +1.
- Hit Roll (Ranged Attack): A hit is scored if the D6 result equals or exceeds that attack’s BS.
- Hit Roll (Melee Attack): A hit is scored if the D6 result equals or exceeds that attack’s WS.
- Critical Hit: Unmodified Hit roll of 6. Always successful.
- An unmodified Hit roll of 1 always fails.
- A Hit roll can never be modified by more than -1 or +1.
TARGET: One unit from your army that is within 24" of that enemy unit and that would be eligible to shoot if it were your Shooting phase.
EFFECT: If that enemy unit is visible to your unit, your unit can shoot that enemy unit as if it were your Shooting phase.
RESTRICTIONS: You cannot target a TITANIC unit with this Stratagem. Until the end of the phase, each time a model in your unit makes a ranged attack, an unmodified Hit roll of 6 is required to score a hit, irrespective of the attacking weapon’s Ballistic Skill or any modifiers. You can only use this Stratagem once per turn.
While a unit is Battle-shocked:
- The Objective Control characteristic of all of its models is 0.
- If it Falls Back, you must take a Desperate Escape test for every model in that unit.
- Its controlling player cannot use Stratagems to affect that unit.
Once you have taken Battle-shock tests for all of your units that require them, your Command phase ends and you progress to your Movement phase.
In this step, if for any reason a unit is forced to take a Battle-shock test for being below its Starting Strength, unless otherwise stated, that unit does not also have to take a Battle-shock test for being Below Half-strength. While a unit is Battle-shocked, all models in that unit are also Battle-shocked.
- Take a Battle-shock test for each unit from your army on the battlefield that is Below Half-strength.
- Roll 2D6: if the result is greater than or equal to the unit’s Leadership, the test is passed. Otherwise, the unit is Battle-shocked until the start of your next Command phase.
- Battle-shocked units have an OC of 0 and their controlling player cannot use Stratagems to affect them.
- Battle-shocked units must take Desperate Escape tests if they Fall Back.
High-explosives can fell several warriors in a single blast, but firing them where your comrades will get caught in the ensuing detonation is simply unwise.
Weapons with [BLAST] in their profile are known as Blast weapons, and they make a random number of attacks. Each time you determine how many attacks are made with a Blast weapon, add 1 to the result for every five models that were in the target unit when you selected it as the target (rounding down). Blast weapons can never be used to make attacks against a unit that is within Engagement Range of one or more units from the attacking model’s army (including its own unit).- Add 1 to the Attacks characteristic for every five models in the target unit (rounding down).
- Can never be used against a target that is within Engagement Range of any units from the attacking model’s army (including its own).
Some warriors are masters of disguise and concealment.
If every model in a unit has this ability, then each time a ranged attack is made against it, subtract 1 from that attack’s Hit roll.Weapons powered by unstable and dangerous energy sources pose a substantial risk to the wielder every time they are used.
Weapons with [HAZARDOUS] in their profile are known as Hazardous weapons. Each time a unit is selected to shoot or fight, after that unit has resolved all of its attacks, for each Hazardous weapon that targets were selected for when resolving those attacks, that unit must take one Hazardous test. To do so, roll one D6: on a 1, that test is failed. For each failed test you must resolve the following sequence (resolve each failed test one at a time):- If possible, select one model in that unit that has lost one or more wounds and is equipped with one or more Hazardous weapons.
- Otherwise, if possible, select one model in that unit (excluding CHARACTER models) equipped with one or more Hazardous weapons.
- Otherwise, select one CHARACTER model in that unit equipped with one or more Hazardous weapons.
If a unit from a player’s army is selected as the target of the Fire Overwatch Stratagem in their opponent’s Charge phase, any mortal wounds inflicted by Hazardous tests are allocated after the charging unit has ended its Charge move.
- After a unit shoots or fights, roll one Hazardous test (one D6) for each Hazardous weapon used. For each 1, a model equipped with a hazardous weapon suffers 3 mortal wounds, that must be allocated to the selected model.
- A Critical Wound inflicts mortal wounds equal to the weapon’s Damage characteristic, instead of any normal damage.
Some attacks are so powerful that no armour or force field can withstand their fury.
Some rules inflict mortal wounds on units. Each time mortal wounds are inflicted on a unit, each of those mortal wounds inflicts one point of damage to that unit, and they are always applied one at a time. Each mortal wound is allocated to a model in the same manner as allocating an attack. Excess damage from mortal wounds is not lost if the damage can be allocated to another model. Instead, keep allocating damage to another model in the target unit until either all the damage has been allocated or the target unit is destroyed.If an attack inflicts mortal wounds in addition to any normal damage, do not make a Wound roll or saving throw (including invulnerable saving throws) against those mortal wounds. If those mortal wounds are inflicted by an attack that has the [PRECISION] ability, the attacking model’s controlling player can allocate those mortal wounds to a CHARACTER model in that unit.
If mortal wounds are being inflicted as a result of the [HAZARDOUS] ability or by an attack with the [DEVASTATING WOUNDS] ability that scored a Critical Wound, each time those mortal wounds are allocated to a model, if that model is destroyed as a result of those mortal wounds, the remaining mortal wounds from that attack are lost, just as with a normal attack.
If, when a unit is selected to shoot or fight, one or more of its attacks can inflict mortal wounds on the target, resolve any normal damage inflicted by the attacking unit’s attacks on that target before inflicting any mortal wounds on that target. If an attack inflicts mortal wounds in addition to any normal damage, but the normal damage is subsequently saved, the target unit still suffers those mortal wounds, as described above.
- Each mortal wound inflicted on a unit causes one model in that unit to lose one wound.
- Unless the source of the mortal wounds is the [HAZARDOUS] ability or an attack with the [DEVASTATING WOUNDS] ability, damage from mortal wounds is not lost if it can be allocated to another model.
- No saving throws can be made against mortal wounds.
- Mortal wounds inflicted by attacks always apply after any normal damage, even if that damage was saved.
| ||||||||||||||


If the result of the Wound roll is greater than or equal to the required number shown in the table above, then that Wound roll is successful and scores one wound against the target unit. Otherwise, the attack fails and the attack sequence ends.
An unmodified Wound roll of 6 is called a Critical Wound and is always successful. An unmodified Wound roll of 1 always fails. A Wound roll can never be modified by more than -1 or +1.
- Critical Wound: Unmodified Wound roll of 6. Always successful.
- An unmodified Wound roll of 1 always fails.
- A Wound roll can never be modified by more than -1 or +1.
Some weapons can inflict fatal injuries on any foe, no matter their resilience.
Weapons with [LETHAL HITS] in their profile are known as Lethal Hits weapons. Each time an attack is made with such a weapon, a Critical Hit automatically wounds the target.Whether shielded by force fields, enveloped in mystical energies or simply possessed of preternatural senses and lightning-fast reflexes, some warriors are protected by more than mere physical armour.
Some models have an invulnerable save listed on their datasheet. Each time an attack is allocated to a model with an invulnerable save, the controlling player must choose to use either that model’s Save characteristic or its invulnerable save, but not both. If a model has more than one invulnerable save, it can only use one of them – choose which it will use.Unlike armour saving throws (which use a model’s Save characteristic), invulnerable saving throws are never modified by an attack’s Armour Penetration characteristic, but otherwise follow the normal rules for saving throws.
- Invulnerable Save: Never modified by an attack’s AP.
- The controlling player can choose to use either a model’s invulnerable save or its Save characteristic.
Mighty heroes fight at the forefront of battle.
Some CHARACTER units have ‘Leader’ listed on their datasheets. Such CHARACTER units are known as Leaders, and the units they can lead – known as their Bodyguard units – are listed on their datasheet.During the Declare Battle Formations step, for each Leader in your army, if your army also includes one or more of that Leader’s Bodyguard units, you can select one of those Bodyguard units. That Leader will then attach to that Bodyguard unit for the duration of the battle and is said to be leading that unit. Each Bodyguard unit can only have one Leader attached to it.
While a Bodyguard unit contains a Leader, it is known as an Attached unit and, with the exception of rules that are triggered when units are destroyed, it is treated as a single unit for all rules purposes. Each time an attack targets an Attached unit, until the attacking unit has resolved all of its attacks, you must use the Toughness characteristic of the Bodyguard models in that unit, even if a Leader in that unit has a different Toughness characteristic. Each time an attack sucessfully wounds an Attached unit, that attack cannot be allocated to a CHARACTER model in that unit, even if that CHARACTER model has lost one or more wounds or has already had attacks allocated to it this phase. As soon as the last Bodyguard model in an Attached unit has been destroyed, any attacks made against that unit that have yet to be allocated can then be allocated to CHARACTER models in that unit.
Each time the last model in a Bodyguard unit is destroyed, each CHARACTER unit that is part of that Attached unit is no longer part of an Attached unit. It becomes a separate unit, with its original Starting Strength. If this happens as the result of an attack, they become separate units after the attacking unit has resolved all of its attacks.
Each time the last model in a CHARACTER unit that is attached to a Bodyguard unit is destroyed and there is not another CHARACTER unit attached, that Attached unit’s Bodyguard unit is no longer part of an Attached unit. It becomes a separate unit, with its original Starting Strength. If this happens as the result of an attack, they become separate units after the attacking unit has resolved all of its attacks.
Each time a unit that is part of an Attached unit is destroyed, it does not have the keywords of any other units that make up that Attached unit (unless it has those keywords on its own datasheet) for the purposes of any rules that would be triggered when that unit is destroyed.
- Before the battle, CHARACTER units with the Leader ability can be attached to one of their Bodyguard units to form an Attached unit.
- Attached units can only contain one Leader.
- Attacks cannot be allocated to CHARACTER models in Attached units.
- A unit can embark within a friendly TRANSPORT if all of its models end a Normal, Advance or Fall Back move within 3" of that TRANSPORT.
- A unit cannot embark and disembark in the same phase.
The datasheets using TITANIC keyword can be found in the following Factions:
Unaligned: Unaligned Forces.Chaos: Chaos Daemons, Chaos Knights, Chaos Space Marines, Death Guard, Thousand Sons, World Eaters.
Imperium: Adeptus Titanicus, Astra Militarum, Grey Knights, Imperial Knights, Space Marines.
Xenos: Aeldari, Genestealer Cults, Necrons, Orks, T’au Empire, Tyranids.
The TITANIC keyword is used in the following datasheets:
When a unit disembarks from a TRANSPORT model, set it up on the battlefield so that it is wholly within 3" of that TRANSPORT model and not within Engagement Range of any enemy models. If, for any reason, a disembarking model cannot be set up, that model’s unit cannot disembark.
Units that disembark from a TRANSPORT model that either Remained Stationary this phase or has not yet made a Normal, Advance or Fall Back move this phase can then act normally (make a Normal move, Advance, shoot, declare a charge, fight, etc.) in the remainder of the turn. Such a disembarking unit cannot choose to Remain Stationary.
Units that disembark from a TRANSPORT model that made a Normal move this phase count as having made a Normal move themselves; they cannot move further during this phase. Such a unit also cannot declare a charge in the same turn, but can otherwise act normally in the remainder of the turn.
Units cannot disembark from a TRANSPORT model that either Advanced or Fell Back this turn.
- Units that start your Movement phase embarked within a TRANSPORT can disembark this phase, provided their TRANSPORT has not Advanced or Fallen Back.
- If a unit disembarks before its TRANSPORT moves, it can act normally.
- If a unit disembarks after its TRANSPORT moves, it cannot move or charge this turn, but can otherwise act normally.
- Disembarking units must be set up wholly within 3" of their TRANSPORT and not within Engagement Range of any enemy models (or the unit cannot disembark).
- Units that disembark this turn cannot Remain Stationary.
From detonating ammo stores to corrosive innards or frenzied death throes, some targets are deadly even in defeat.
Some models have ‘Deadly Demise x’ listed in their abilities. When such a model is destroyed, roll one D6 before removing it from play (if such a model is a TRANSPORT, roll before any embarked models disembark). On a 6, each unit within 6" of that model suffers a number of mortal wounds denoted by ‘x’ (if this is a random number, roll separately for each unit within 6").- Deadly Demise x: When this model is destroyed, roll one D6. On a 6, each unit within 6" suffers ‘x’ mortal wounds.
Some weapons strike in a flurry of blows, tearing the foe apart with relentless ferocity.
Weapons with [SUSTAINED HITS X] in their profile are known as Sustained Hits weapons. Each time an attack is made with such a weapon, if a Critical Hit is rolled, that attack scores a number of additional hits on the target as denoted by ‘x’.- [SUSTAINED HITS X]: Each Critical Hit scores ‘x’ additional hits on the target.
Some units make their way to battle via tunnelling, teleportation, high-altitude descent or other extraordinary means that allow them to appear suddenly in the thick of the fighting.
During the Declare Battle Formations step, if every model in a unit has this ability, you can set it up in Reserves instead of setting it up on the battlefield. If you do, in the Reinforcements step of one of your Movement phases you can set up this unit anywhere on the battlefield that is more than 9" horizontally away from all enemy models. If a unit with the Deep Strike ability arrives from Strategic Reserves, the controlling player can choose for that unit to be set up either using the rules for Strategic Reserves or using the Deep Strike ability.- Unit can be set up in Reserves instead of on the battlefield.
- Unit can be set up in your Reinforcements step, more than 9" horizontally away from all enemy models.
Many armies employ reconnaissance units who can sit concealed, waiting for the right moment to strike.
During deployment, if every model in a unit has this ability, then when you set it up, it can be set up anywhere on the battlefield that is more than 9" horizontally away from the enemy deployment zone and all enemy models.