Chapter Approved 2025-26

Books
| Book | Kind | Edition | Version | Last update |
 Chapter Approved 2025-26: Mission Deck Chapter Approved 2025-26: Mission Deck | ||||
| Chapter Approved 2025-26: Mission Deck | Expansion | 10 | 1.5 | February 2026 |
| Chapter Approved Tournament Companion | ||||
| Chapter Approved Tournament Companion | Expansion | 10 | 1.5 | February 2026 |
FAQ
| Q: | If I destroy the Bodyguard unit of an Attached unit that meets the criteria for Cull the Horde (Starting Strength of 13+), but the Leader unit survives, do I score the VP for destroying the Bodyguard unit? |
| A: | If the Bodyguard unit would have had a Starting Strength of 13+ had it not been part of an Attached unit, then yes. Otherwise, no. Example: If you destroy a unit of 16 Accursed Cultists, but their Cultist Firebrand Leader survives, you score the VP for that unit. If you destroy a 10-strong Cultist Mob, but don’t destroy the Dark Commune attached to them, you do not score the VP for that unit. |
| Q: | If a unit that is part of an Attached unit is destroyed, and that Attached unit was performing an Action, can the remaining unit(s) in that Attached unit still complete that Action? |
| A: | Yes. |
| Q: | If my opponent selects an Attached unit for the Marked for Death Secondary Mission, which units forming that Attached unit must I destroy to score VP? |
| A: | To score VP, you must destroy the Bodyguard unit and at least one of the Leader units that was attached to it. For example, if your opponent selects a unit of Boyz led by a Warboss and a Weirdboy, and you destroy that Boyz unit so that the Warboss and Weirdboy each become individual units, you must also destroy either that Warboss or that Weirdboy (or one of them must be removed from the battlefield for any other reason) to score VP from Marked for Death. |
| Q: | When selecting units for the Marked for Death Secondary Mission, can I select a Leader within an Attached unit? |
| A: | No. |
| Q: | When performing the Terraform Action, can I terraform an objective marker my opponent has already terraformed? |
| A: | Yes. |
| Q: | In the Burden of Trust Primary Mission, how many times can each player score VP for guarding an objective marker they control? |
| A: | The player going first can score VP for guarding an objective marker they control at the end of their opponent’s first, second, third, fourth and fifth turn. The player going second can score VP for guarding an objective marker they control at the end of their opponent’s second, third, fourth and fifth turn. |
| Q: | When setting up objective markers as part of step 4 of the Chapter Approved Tournament Mission Sequence, or setting up a new objective marker as part of a Primary Mission (such as The Ritual), do I measure from/to the centre or the edge of the objective marker? |
| A: | In all of these instances, you measure from the centre of the objective marker. This also includes the central objective marker in the Search and Destroy deployment map when measuring the boundaries of the deployment zones. |
| Q: | To start performing the Sabotage Action, does it require both the terrain feature and your unit to not be within your deployment zone? Or is it just your unit that must not be within your deployment zone? |
| A: | Only your unit must not be within your deployment zone to start performing the Sabotage Action. |
| Q: | In Burden of Trust, can you guard objective markers in your own deployment zone? |
| A: | Yes. |
| Q: | If I Terraform an objective in my opponent’s deployment zone, can my opponent Terraform that objective back? |
| A: | No, as a player can’t perform the Terraform action on an objective marker within their deployment zone. |
| Q: | If I complete the Terraform action on an objective that was Terraformed by my opponent, is the objective now Terraformed by me? |
| A: | Yes. |
| Q: | For Primary and Secondary Missions that award VP for destroying CHARACTER models or units, if those models or units are returned to the battlefield and then subsequently destroyed again, will such Primary and Secondary Missions award VP for them being destroyed again? |
| A: | Yes, unless that Primary or Secondary Mission specifies otherwise. |
| Q: | For the purposes of the Mission Pack, are there any amendments to the Core Rules regarding how Ruins affect charging units and which models can fight? |
| A: | No. This means models can be positioned to make it difficult to charge directly through sections of terrain features into combat, as models can’t end their Charge move where any part of their model or base would be within sections of those terrain features (e.g. a solid Ruins wall). This may mean the result of a Charge roll needs to be greater to allow a unit to make a Charge move that ends within Engagement Range and not within any sections of those terrain features, while still following all other conditions of charging. Designer’s Note: Organisers, if your terrain collection includes large enclosed structures that units would be able to move within, but may render ending a Charge move within Engagement Range of those units within that terrain impossible, you may wish to include additional clarification for your particular terrain elements within your event packs to avoid uninteractive situations. |
Chapter Approved Battles
A Chapter Approved battle is waged by following the sequence below.
Set Mission Parameters
Choose what sort of mission you want to play. Your decision determines which decks of cards you use for the mission.Incursion: Players have mirrored deployment zones and the same aim.
Strike Force: Players have mirrored deployment zones and the same aim.
Asymmetric War: The Attacker and Defender have different deployment zones and aims. Designed for 2000+ points per army.
Incursion: Incursion Deployment cards; Primary Mission cards; Secondary Mission cards (Attacker and Defender decks); Challenger cards.
Strike Force: Strike Force Deployment cards; Primary Mission cards; Secondary Mission cards (Attacker and Defender decks); Challenger cards.
Asymmetric War: Asymmetric War Deployment cards; Asymmetric War Primary Mission cards; Secondary Mission cards (Attacker and Defender decks); Challenger cards.
In any of these missions, you can also use the Twist deck to add thematic conditions to the battle.
Asymmetric War cards and the Twist cards not included in Chapter Approved Tournament. This document also assumes you will be playing Strike Force sized games; as such, the layouts are designed to be used with the Strike Force Deployment cards.
Muster Armies
Muster armies as described in the Core Rules.In an Incursion mission, we suggest the following changes to the Muster Armies rules for a better experience for both players.
- Your army can contain up to two units with each datasheet name - or up to four units with each datasheet name if it is a BATTLELINE or DEDICATED TRANSPORT unit.
- Your army can contain up to one TITANIC CHARACTER.
Determine Mission
Draw one Deployment card, one Primary Mission card and, if you’re using them, one Twist card. Together these describe where you can deploy your armies, how to score Victory points (VP), and any additional conditions.Instead of shuffling and drawing from the Deployment and Primary Mission decks, players should use the pre-generated missions from the Chapter Approved Tournament Mission Pool. Set aside the Secondary Mission cards deck as normal (players will receive these later).
Read Mission
Read the Primary Mission. The Primary Mission card details how and when you score Victory points (VP), and may also apply additional conditions to the battle. You can also score VP by achieving Secondary Missions (described later). Twist cards and Challenger cards will not be used.Place Objective Markers
Set up objective markers on the battlefield, as shown on the Deployment card drawn.Players now set up objective markers on the battlefield. Each Deployment card’s deployment map will show players how many objective markers to set up and where each should be placed. In Chapter Approved Tournament Missions, models can end any type of move on top of an objective marker.
Designer’s Note: In the Warhammer 40,000 Core Rules, objective markers are physical artefacts that models cannot end a move on, representing vital data caches, xenos relics, Chaos portals or anything else that suits your narrative. While this adds to the cinematic nature of the battlefield and offers exciting hobby opportunities, it can sometimes result in model-positioning circumstances that not everyone will enjoy equally. As such, these guidelines recommend treating objective markers as flat, circular markers 40mm in diameter that offer no impediment to the movement or placement of models.
Create The Battlefield
Create the battlefield and set up terrain features (see the Core Rules). Missions are played on rectangular battlefields 44" by 60" in size. Terrain features should not be set up within any impassable sections (such as the walls of a ruin) within 1" of any objective markers.Players now create the battlefield and set up terrain features. Missions are played on rectangular battlefields whose dimensions are approximately 44" by 60". When setting up terrain features, use the guidelines detailed in the Terrain Layouts section of this pack. Players must use the rules for terrain features detailed in the Core Rules. While other approaches to terrain layout may work within the collections of experienced organisers, we recommend these terrain guidelines when otherwise in doubt.
Determine Attacker and Defender
Look at the Deployment card drawn and agree which edges of your battlefield are the Attacker’s and Defender’s battlefield edges. Roll off: the winner decides who will be the Attacker and who will be the Defender (or decide together if both players agree).Select Secondary Missions
Secondary Mission cards detail additional ways to score VP, and must be used either as Fixed or Tactical Missions. Players now secretly note down whether they will use Fixed or Tactical Missions; if using Fixed Missions, they must also note down which two Fixed Missions they will use (see below). Players then reveal these decisions and proceed accordingly.Designer’s Note: If you’re not sure, use Tactical Missions.
Fixed Missions are those marked with the symbol shown on the left. After revealing the two Fixed Missions you will use, set aside the remainder of your Secondary Mission deck (it will not be needed during the battle). Your selected Fixed Mission cards cannot be discarded for any reason other than the Adapt or Die Mission Rule card.
After revealing that you will use Tactical Missions, shuffle your Secondary Mission deck.
- At the start of your first Command phase, draw two cards from your Secondary Mission deck; those two Secondary Mission cards are active for you until you achieve them. At the start of each of your subsequent Command phases, if you have fewer than two active Secondary Mission cards, draw from your Secondary Mission deck until you have two active Secondary Mission cards.
- At the end of your Command phase, you can spend CP to use the New Orders Stratagem below.
TARGET: One of your active Secondary Mission cards.
EFFECT: Discard it and draw one new Secondary Mission card.
At the end of each player’s turn, each player using Tactical Missions does the following, starting with the player whose turn it is:
- First, if you scored 1 or more VP from a Secondary Mission card, discard that Secondary Mission card – it is achieved.
- Then, you can discard one or more of your active Secondary Mission cards. If you do, and it is your turn, you gain 1CP.
- If your Secondary Mission deck runs out, you cannot generate any additional Secondary Missions during the battle.
Declare Battle Formations
Players secretly note down which of their Leader units will start the battle attached to which Bodyguard units, which of their units will start the battle embarked within which TRANSPORTS, and which of their units will start the battle in Reserves (including Strategic Reserves). Players then reveal these decisions.- No more than half of the units in your army can start the battle in Reserves, and the points total of those units cannot be more than half of the points total of your army (units embarked within a TRANSPORT that is set up in Reserves also count towards these limits).
- Reserves units cannot arrive on the battlefield during the first battle round (excluding units placed into Strategic Reserves during the battle).
- Any Reserves units that have not arrived on the battlefield by the end of the third battle round count as having been destroyed, as do any units embarked within them (excluding units placed into Strategic Reserves during the battle).
Deploy Armies
Players take it in turns to set up their remaining units one at a time, starting with the Defender. A player’s models must be set up wholly within their deployment zone. If a player sets up a TITANIC unit when it is their turn to set up a unit, they skip their next turn to set up a unit. If one player finishes deploying all of their units, their opponent then deploys the remainder of their units.Asymmetric War Missions: In an Asymmetric War mission, starting with the Attacker, each player sets up all of their units wholly within their deployment zone. Once a player has finished setting up units, if that player has any units that have not been set up (for example, because there isn’t room), those units start the battle in Reserves. Players must still observe the Reserves restrictions above. If a unit cannot be set up in this step or start the battle in Reserves, it is destroyed.
Redeploy Units
Some rules allow players to redeploy certain units after both armies are deployed. Unless otherwise stated, such rules are resolved in this step. Players alternate resolving any such rules, starting with the Attacker.Determine First Turn
Roll off: the winner takes the first turn.Asymmetric War Missions: In an Asymmetric War mission, the Attacker takes the first turn.
Resolve Pre-battle Rules
Players alternate resolving any pre-battle rules units from their army may have, starting with the player who will take the first turn.Begin the Battle
The first battle round begins. Players continue to resolve battle rounds until the battle ends.Challenger Cards
A player becomes the Challenger if, at the start of the battle round, they have fewer VP than their opponent, and the difference between their VP totals is 6 or more. That player remains the Challenger until the end of the battle round.While you are the Challenger, draw one Challenger card at the start of your Command phase. Each Challenger card presents one Stratagem and one Mission. You can complete the Mission, or you can use the card as a Stratagem – you cannot do both. Note that both players use the same deck of Challenger cards.
Rules cannot change the cost of the Stratagem on a Challenger card, and rules that generate Command points cannot be triggered by the Stratagem on a Challenger card.
At the end of your turn, if you have not used that Stratagem or completed that Mission, discard the card. If you use that Stratagem or complete that Mission, discard the card.
End the Battle
The battle ends after five battle rounds have been completed. Even if one player has no models remaining in their army at the start of their turn, players continue to play out their turns until the battle ends.Determine Victor
At the end of the battle, the player with the most VP is the winner. If the players are tied, the battle is a draw.The maximum VP each player can score is 100VP. Each player scores 10VP if their army is painted to a Battle Ready standard. The maximum VP that can be scored from each source of VP is detailed below. In all cases, any excess VP awarded above these maximums are lost.
| ||||||||||||||||||||||
Designer’s Notes
Deployment Card Key


|

|


Actions
Your forces can attempt daring battlefield tasks to turn the conflict in your favour.Some cards feature Actions that certain units can perform. Each Action states which units can perform it, when it is started and completed, and what the effects of completing it are. A unit cannot start to perform an Action if one or more of the following apply to that unit:
- It is an Aircraft unit.
- It is Battle-shocked.
- It has an Objective Control characteristic of 0.
- It is within Engagement Range of one or more enemy units (unless it is a TITANIC CHARACTER unit).
- It Advanced or Fell Back this turn.
- It is not eligible to shoot this phase (including units that have already been selected to shoot this phase).
If a unit starts to perform an Action, until that Action is completed or until the end of the turn (whichever is later), that unit is not eligible to shoot or declare a charge (if it is a TITANIC CHARACTER unit, that unit cannot start to perform another Action and is not eligible to declare a charge instead).
If a unit performing an Action makes a move (excluding Pile-in and Consolidation moves) or leaves the battlefield, that Action cannot be completed.
In an Incursion mission:
- Advancing does not make a BATTLELINE unit ineligible to start an Action.
- Starting an Action does not make a BATTLELINE unit ineligible to shoot.
Battle Ready
Playing games of Warhammer is a shared experience that we all want to look and feel great. To reflect this, Chapter Approved games reward you for having a fully painted ‘Battle Ready’ army. Here we explain what that means, and where to find achievable online tutorials and painting guides to get your army ready for action!
When you play a Chapter Approved game, there are 10 victory points available if every model in your army is painted to a Battle Ready standard. Battle Ready means your models are fully painted with a detailed or textured base.
This is considered to be the minimum standard of miniature painting for a Chapter Approved mission, as well as a guaranteed method of scoring some victory points before the dice even start rolling.
The Citadel Colour range includes all the paints and hobby supplies you’ll need to paint your miniatures quickly and efficiently, In fact, Contrast paints were created especially to help you get your armies Battle Ready in no time — just one coat of Contrast paint lays down both a base colour and a bit of shade — while Technical paints give you a textured base with one application. It’s never been easier to get your army ready for a tournament.
Chapter Approved Tournament Companion
Introduction
Welcome to the Chapter Approved Tournament Companion! The following guidelines are designed to support organisers of Warhammer 40,000 events in delivering a fine-tuned tournament experience using the Chapter Approved Mission Deck. That product offers great scope for all kinds of matched play, and its many variables create a dizzying array of potential missions – thousands, in fact! Some of these are particularly well suited to the most hotly contested scenarios, and this pack provides suggestions for the best event configurations. We have also taken the opportunity to optimise certain Core Rules concepts for tournament play.This document provides a ready-made framework for levelling the playing field and getting games underway quickly, whether you are planning your first matched play event or have years of experience organising the largest and most acclaimed tournaments. Its recommendations will be followed in full at most Games Workshop matched play events, and are considered the official way to play Warhammer 40,000 in a tournament setting, but can be adapted to suit your own circumstances – the terrain layout advice is aimed primarily at newer organisers, for example, and those with large established terrain collections should feel free to interpret it accordingly.
- Chapter Approved Tournament Mission Sequence: Adjustments to the steps players would normally follow to generate a mission and prepare the battlefield.
- Chapter Approved Mission Deck Errata & FAQ: Updates to certain cards and answers to frequently asked questions.
- Chapter Approved Tournament Mission Pool: 20 recommended tournament rounds to draw from, with pre-set Primary Missions and deployment modes that put all players on an equal footing and minimise pre-game admin.
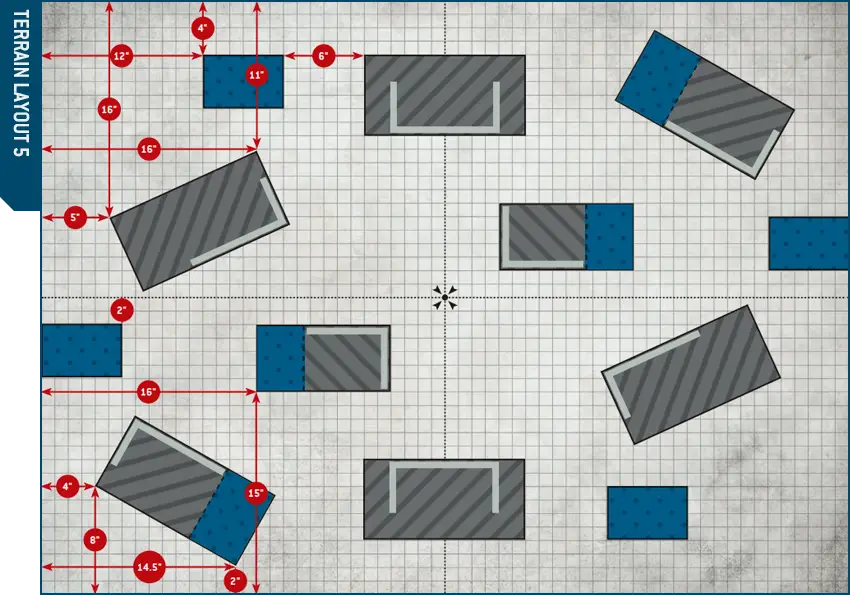
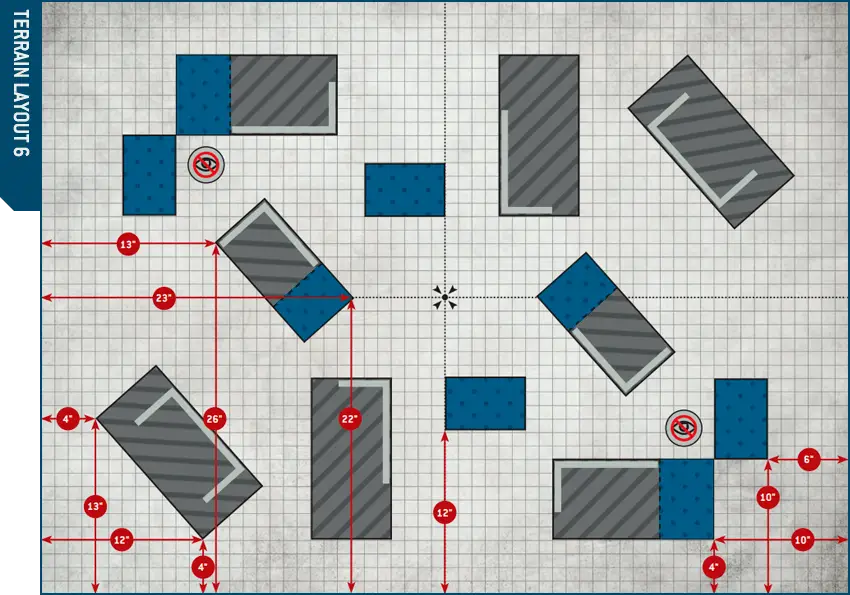
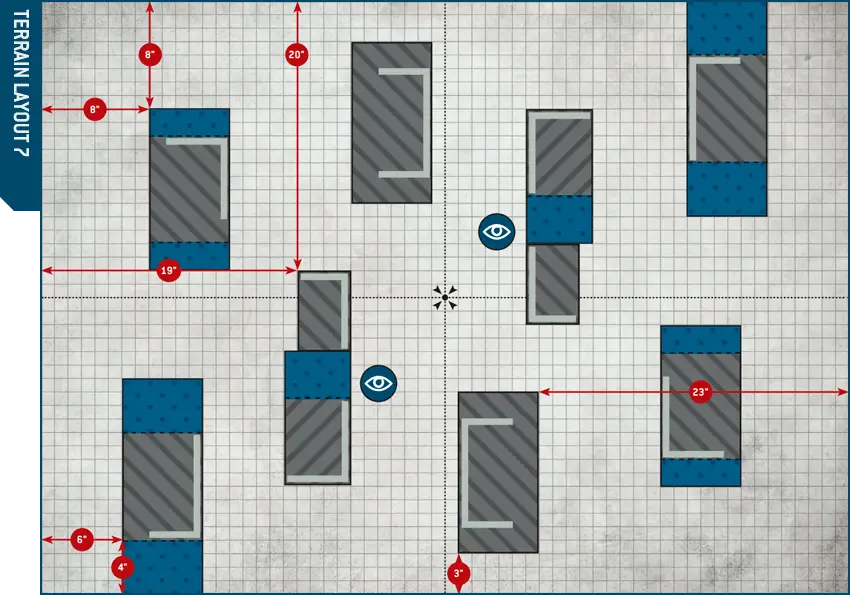
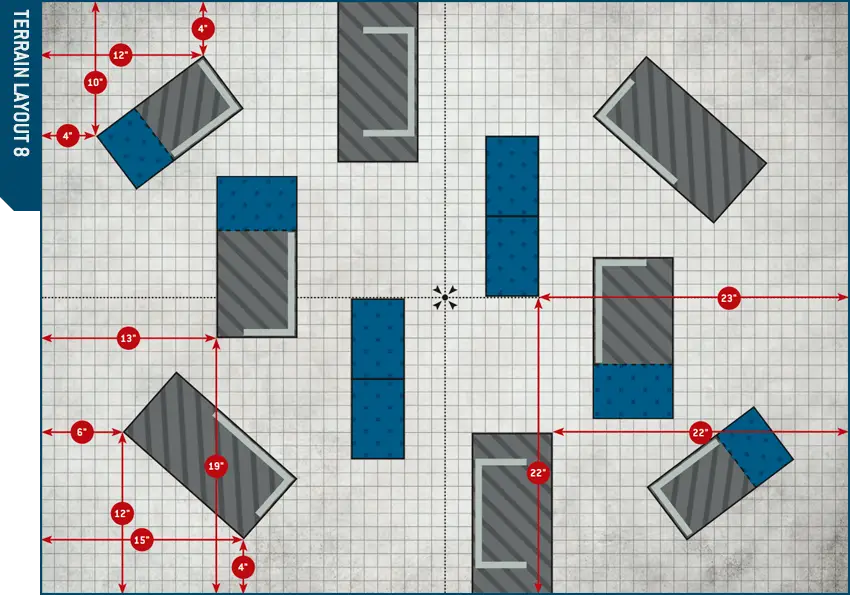
- Terrain Layouts: A suite of carefully designed terrain setups to be used in conjunction with the Chapter Approved Tournament Mission Pool.
- Pairings and Rankings: Advice for fairly pairing players and determining rankings.
Designer’s Note: This document does not use the full contents of your Chapter Approved Mission Deck; it has been written to provide the best experience for strangers to play a pick-up game or face off in an event. For this reason we have not included the Asymmetric War cards, the Twist cards or the Challenger cards, which are left for pick-up-and-play games where you can plan and prepare. In addition, this document assumes you will be playing Strike Force sized games; as such, the layouts are designed to be used with the Strike Force Deployment cards. We recommend that tournament organisers who wish to run an Incursion event should adjust these layouts as appropriate.
Chapter Approved Tournament Mission Pool
The 20 Chapter Approved Tournament Missions in this section are designed to act as a pool from which organisers can build their events, selecting from it in random order. Further commentary on these is given below.
The Chapter Approved Mission Deck includes 10 Primary Missions, for the best balanced experience we have used a mix of 7 of these Primary Missions for organisers to build their events. We recommend selecting options that span a variety of different Primary Missions, to provide different challenges for the players to adapt to.
For those running longer-format events, or whose attendees are particularly expectant of a perfectly balanced mission every time, we have included the more straightforward Primary Missions in a greater number of configurations.
When using the recommended terrain layouts in this pack, please note the layouts best suited for each deployment mode, as shown in the table below. We recommend structuring your mission order to facilitate any changes to terrain layouts you will need to make during your event, if, as the organiser, you choose to set up the tables for the players.
| ||||||||||||||||||||||||||||||||||||||||||||||||||||||||||||||||||||||||||||||||||||||||
Terrain Layouts
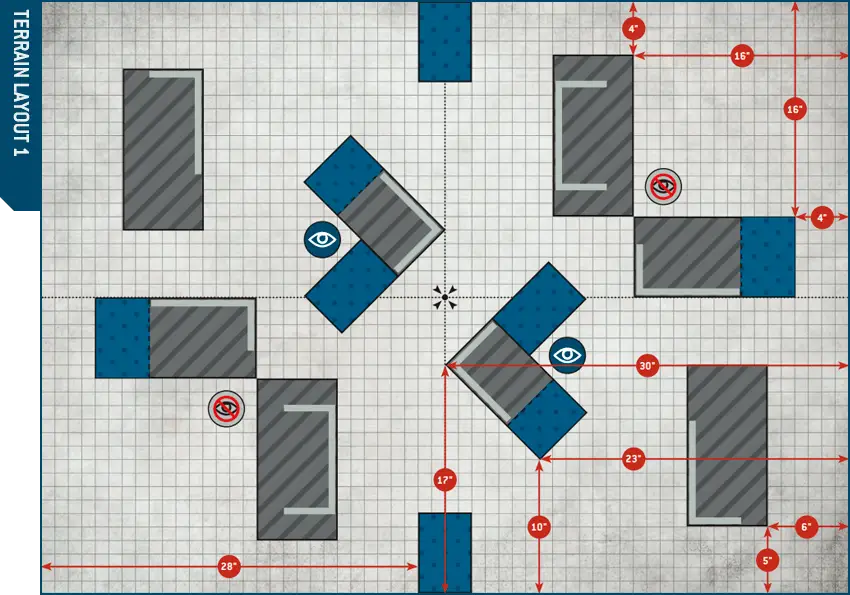
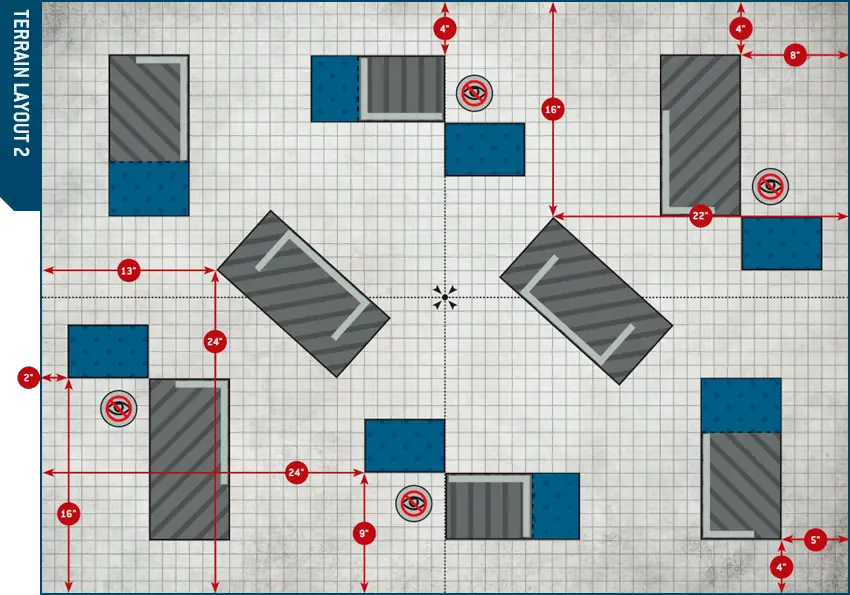
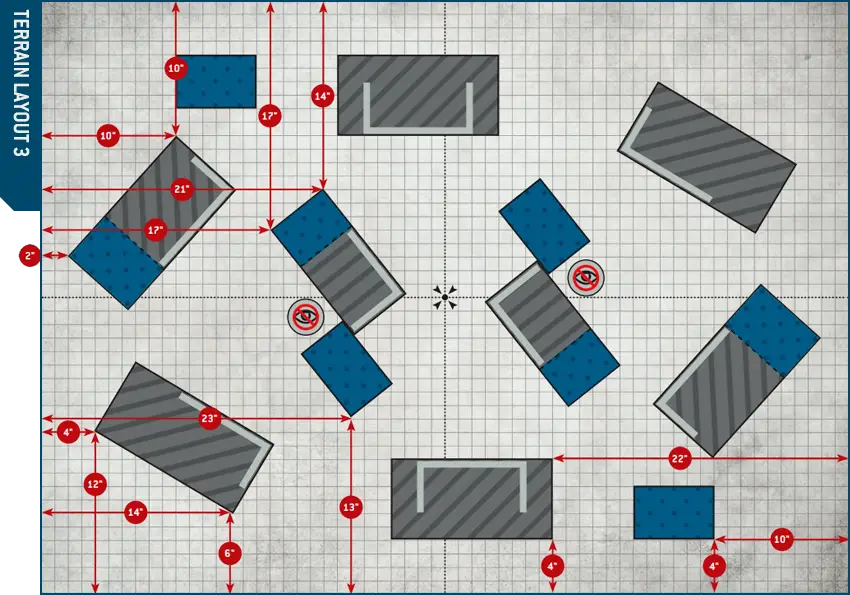
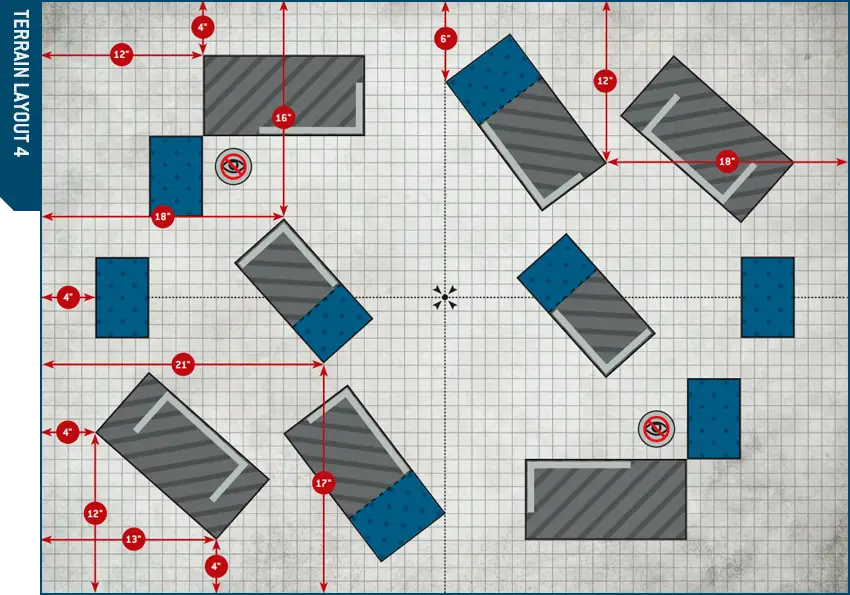
The following battlefield recommendations are intended primarily for newer organisers and those looking for a steer in building up a terrain collection for regular tournament play. These layouts will be seen at most Games Workshop matched play events, and reflect the type of terrain density that creates risk-and-reward decisions that a wide variety of army types can engage with. They are by no means the only way to set up a battlefield for balanced play, but represent a reliable starting point when in doubt.
They are by no means the only way to set up a battlefield for balanced play, but represent a reliable starting point when in doubt. These layouts were designed with a few key principles in mind:
Recommended Measurements
For all of the battlefield recommendations we use a combination of three different sizes of area terrain outlines:
|
Using the area terrain outlines detailed above, all of the battlefield recommendations have preset measurements provided. This allows for organisers to easily set up the tables, or allow the players themselves to set up their own tables at the beginning of each round.
Objective Markers
Objective markers can and sometimes will be either hidden within terrain or placed in the open.Use of Ruins
The following layouts primarily use the Ruins terrain feature. This efficiently achieves a good amount of line-of-sight blockage and cover appropriate for balanced games, thanks to the natural abstraction of line of sight within the rules for Ruins. Remember that a variety of terrain heights not only adds to the immersive nature of the battlefield, but is also important for line of sight and rules such as Plunging Fire. For organisers and players with a more robust terrain collection (especially elements that block true line of sight), incorporating features such as Woods, Barricades and Hills into your chosen layouts is perfectly acceptable.
|

|

Below are examples of Ruins terrain placements within area terrain sections, as well as icons that denote if connected area terrain outlines are a single area terrain section or separate area terrain sections when determining line of sight.
These height and Ruin placement guidelines help provide a balanced tournament experience; as organisers you are free to adjust this to suit your terrain collection.
|


Pairings and Rankings
Pairing Players
While the first round of most tournaments is randomly paired, subsequent round pairing can be done in a number of ways. The first pairing metric will almost always be player record, i.e. pairing a 3-1 player with another 3-1 player, and so on. Given that most rounds will include numerous players with the same record, however, deciding pairings beyond this metric can be quite nuanced, and the different methods available can have significant impacts on the experience of players at an event. We recommend pairing players by the following criteria:- First – by record (i.e. the number of wins, losses and draws)
- Second – by win path (i.e. the timing of the rounds in which a player won or lost their games)
- Third – randomly within players of the same ranking
A player’s ‘win path’ refers not to their number of wins and losses, but to the timing of those wins and losses. While pairing by win path has an incidental tendency to pair people by strength of schedule, its greatest impact is on the overall enjoyment experienced by all players, as it tends to pair players based upon shared experience.
For example, let’s take two 3-1 players. One of them lost their first game; they likely lowered their expectations for winning the whole event after this, but are probably in a great mood after three consecutive victories. The other won their first three games then lost their fourth – a sharp disappointment after a 3-0 start. Should these players face off, their shared enjoyment may be at odds as they are in very different emotional places. Win path ensures players enter their match with recent common experiences upon which to build a friendship during their next game of Warhammer.
Ranking Players
In many tournaments, the overall Best General will be the single remaining undefeated player at the end of the event. Sometimes, however, there are not enough rounds available to determine a single undefeated player, and players often wish to know their ranking regardless of whether they won the whole event. To help break ties between players who end an event with the same record, we recommend ranking players by the following criteria:- First – by overall record (wins, losses and draws)
- Second – by their opponents’ win records (i.e. those with more wins against opponents with better win records would place higher)
- Third – by total Victory points (VP)
As such, we do not recommend using VP as a pairing metric, nor as a ranking metric until all other metrics have been exhausted, or when further tie-breaking is required (e.g. in larger events where identical rankings become more likely). By contrast, opponent win record is an ideal metric, because when two players end up with the same record, the overall skill of their opponents is a better indicator of which player had the more challenging path along the way.
There are myriad ways to enjoy the Warhammer hobby, and these all manifest themselves at a tournament: gifted hobbyists with beautiful armies, skilled competitors aiming for Best General, casual players looking to face new opponents and make new friends (by far the most common type of attendee), and even practitioners of the niche hobby of Rules Lawyer! These particular hobbyists often find unusual rules interactions at the very fringes of Warhammer 40,000, which can create interesting challenges for tournament organisers looking to provide clear answers and an easy gaming experience for their attendees. For the current edition, the Warhammer Design Studio has created its most robust and comprehensive Rules Commentary, Errata and FAQ to date. Available to download on warhammer-community.com, these living documents will be reviewed periodically to clarify any issues that may be causing uncertainty. Should an odd rules interaction come up during your event and the Core Rules do not provide a clear answer, we recommend consulting these resources.
Mission Generator
To use the mission generator, first press the ‘Start New Game’ button. This will "draw" a new set of Primary Mission, Twist (if you checked ‘Show Twist card’) and Deployment cards. You may also select any desired cards using dropdown lists if you play pre-generated missions from the Chapter Approved Tournament Mission Pool. Note that ‘Start New Game’ and dropdown lists also reset the Challenger card deck and player’s Secondary Mission decks.
Next, choose whether you want to use Tactical or Fixed Secondary Missions using the slider. If you select Fixed, the cards available to you will appear below, and you can use the ‘Pick’ (
 ) and ‘Reject’ (
 ) buttons to select two cards. Once you have your selection, click ‘Confirm’ to begin the game.
During the battle, if you use Tactical Missions, you can use the ‘Draw’ and ‘Discard’ (
 ) buttons to move through your Secondary Mission deck according to the mission rules. In the few cases where you might need to reshuffle a card back into the deck, a ‘Reshuffle’ button will appear. If you press this instead of the ‘Discard’ button, the card will still be available to draw later in the game.
The generator processes ADAPT or DIE Twist card as follows:
- If you have chosen Tactical Missions, then in acceptable cases the ‘Draw’ button with the number of remaining attempts becomes available (there are 2 in total). When you press that button, two cards are drawn. One of them must be returned to the deck using the ‘Reject’ button ().
- If you have chosen Fixed Missions, then the ‘Shuffle’ button (will appear above the cards. By pressing it, you send the specified card back to the deck. At the same time, the shuffle button will still be available for cards that specify the ‘When Drawn...’ condition. This is necessary if the victory conditions cannot be met in the game. Be careful and do not accidentally press this button again (Wahapedia can’t see what is happening on your table to stop you).
 )
)
) button.Note that:
- If you accidentally close the browser or refresh the page your progress will be safe. It is saved on your device in the browser’s local storage.
- If you change the Twist, Primary Mission or Deployment cards, the generator will see it as a new game and reset the Challenger card deck and Secondary Mission decks, losing all progress on your current game.
- It is not recommended to use this generator on multiple tabs of the same browser on the same device. Doing so is pointless and has a high chance of breaking the Mission Generator.
Selected Secondary Missions
Attacker’s Selected Secondary Missions
Secondary Mission Deck
Attacker’s Secondary Mission Deck
Defender’s Selected Secondary Missions
Defender’s Secondary Mission Deck
Card Decks
Primary Mission deck
True victory is built upon a firm foundation. If you cannot hold the centre, then all else will crumble swiftly.
If the player whose turn it is does not control the objective marker in their deployment zone, they score 3VP for each objective marker they control.
The strategic prizes in this region must be guarded at all costs - a duty that falls upon a chosen few.
The player whose turn it is scores 4VP for each objective marker they control that is not within their deployment zone.
The opponent of the player whose turn it is scores 2VP for each of their units (excluding Battle-shocked units) that are within range of and guarding an objective marker they control.
Designer’s Note: Note that the player going second has the first chance to score VP in this way, as they can guard objectives in their first turn and score VP in their opponent’s next turn.
Several strategic locations have been identified in your vicinity. Your orders are to assault these positions, secure them and hold them at any cost.
The player whose turn it is scores 5VP for each objective marker they control (up to 15VP per turn).
Victory here lies in shaping the landscape of the battlefield.
UNITS: One or more units from your army, each within range of a different objective marker that is not within your deployment zone.
COMPLETES: End of the turn, if the unit performing this Action is still within range of the same objective marker and you control that objective marker.
IF COMPLETED: Each of those objective markers is terraformed by you. If that objective marker was terraformed by your opponent, it no longer is.
The player whose turn it is scores 4VP for each objective marker they control (up to 12VP per turn).
Each player scores 1VP for each objective marker that is terraformed by them.
Exterminate the enemy. Show them no mercy.
Each player scores 4VP if one or more enemy units were destroyed this battle round.
Each player scores 4VP if more enemy units than friendly units were destroyed this battle round.
The player whose turn it is scores 4VP if they control one or more objective markers, and an additional 4VP if they control more objective markers than their opponent controls.
What cannot be secured must be burned to ash.
UNITS: One unit from your army within range of an objective marker that is not within your deployment zone.
COMPLETES: End of your opponent’s next turn or the end of the battle (whichever comes first), if your unit is still within range of the same objective marker and you control that objective marker.
IF COMPLETED: That objective marker is burned and removed from the battlefield.
Each time a player burns an objective marker, that player scores 5VP if that objective marker was in No Man’s Land, or 10VP instead if that objective marker was in their opponent’s deployment zone.
The player whose turn it is scores 5VP for each objective marker they control (up to 10VP per turn).
Volatile undetonated material lies in your path. Shifting such hazards towards enemy territory could be the key to victory.
UNITS: One or more units from your army, each within range of a different Hazard objective marker you control.
COMPLETES: End of your turn, if the unit performing this Action is still within range of the same Hazard objective marker and you control that objective marker.
IF COMPLETED: You can move each of those Hazard objective markers up to 6". When doing so, that objective marker cannot end that move on top of any other objective marker or model, or inside impassable parts of terrain features.
The player whose turn it is scores VP as follows:
- 8VP for each Hazard objective marker that is wholly within their opponent’s deployment zone.
- 5VP for each other Hazard objective marker that is wholly within 6" of their opponent’s deployment zone.
- 2VP for each other Hazard objective marker that is wholly within 12" of their opponent’s deployment zone.
Reconnaissance units have uncovered a hidden cache of materiel in this war zone.
Before setting up this new objective marker, players must first move the objective marker in the centre of the battlefield 6" directly towards one of the corners of the battlefield (if No Man’s Land touches any of the corners of the battlefield, you must move the objective marker towards one of those corners). Otherwise, the players roll off, and the winner selects which corner the objective marker is moved towards. Players then set up the new objective marker 6 from the centre of the battlefield towards the diagonally opposite corner of the battlefield to the previously moved objective marker.
The player whose turn it is scores VP as follows (these are cumulative):
- 5VP If they control one objective marker not within their deployment zone.
- 5VP If they control two objective markers not within their deployment zone.
- 5VP if they control more objective markers than their opponent controls.
Bitter foes clash in a race to finish a ritual to either sanctify or corrupt the battlefield.
UNITS: One unit from your army.
COMPLETES: End of your turn.
IF COMPLETED: Set up one objective marker anywhere on the battlefield wholly within No Man’s Land and within 1" of your unit, provided it can be setup exactly 12" from one other objective marker within No Man’s Land and not within 6" of any other objective marker.
The player whose turn it is scores 5VP for each objective marker in No Man’s Land that they control (up to 15VP per turn).
Supplies are inbound. Secure the drop site.
Start of the Fourth Battle Round: The Alpha objective is removed from the battlefield.
Start of the Fifth Battle Round: The Omega objective is removed from the battlefield.
The player whose turn it is scores the following VP for each objective marker in No Man’s Land that they control, depending on the current battle round:
- 5VP in the second and third battle rounds.
- 8VP in the fourth battle round.
- 15VP in the fifth battle round.
Asymmetry War Primary Mission deck
A matrix of potent energy runs beneath the battlefield. You must seize a series of critical power nodes to claim the untapped resource flowing below.
UNITS: Any number of units from your army, each within range of a different objective marker.
COMPLETES: End of your turn, if your unit is still within range of the same objective marker and you control that objective marker.
IF COMPLETED: That objective marker is syphoned.
Each time you syphon an objective marker, the Defender loses VP (to a minimum of 0) and you score the same amount of VP, depending on where that objective marker is, as follows (up to 15VP per turn):
- 2VP if it is within your deployment zone.
- 3VP if it is wholly within No Man’s Land.
- 5VP if it is within your opponent’s deployment zone.
Balancing aggression with discipline, you must establish an iron grip on the battlefield to seal a crushing victory over your foe.
If the player whose turn it is does not control each objective marker in their deployment zone, they score 3VP for each objective marker they control.
Empyric energies continue to warp the battlefield. As the landscape shifts, key objectives are revealed. Prioritise their capture.
The player whose turn it is scores VP as follows (up to 15VP per turn):
- 2VP for each objective marker within their deployment zone that they control.
- 4VP for each objective marker within No Man’s Land that they control.
- 6VP for each objective marker within their opponent’s deployment zone that they control.
Seize your objectives. If they cannot be held, then make sure you deny them to your foe.
Each time you deny an objective marker, you score VP depending on where that objective marker is, as follows:
- 7VP if it is within your deployment zone.
- 10VP if it is wholly within No Man’s Land.
- 16VP if it is within your opponent’s deployment zone.
You score VP as follows (up to 15VP per turn):
- 3VP for each objective marker you control that is within your deployment zone.
- 5VP for each objective marker you control that is within No Man’s Land.
- 8VP for each objective marker you control that is within your opponent’s deployment zone.
The enemy closes in. Stand fast and hold your ground, for there can be no sharing in the spoils of victory.
The player whose turn it is scores 5VP for each objective marker they control (up to 15VP per turn).
Strike Force Deployment deck
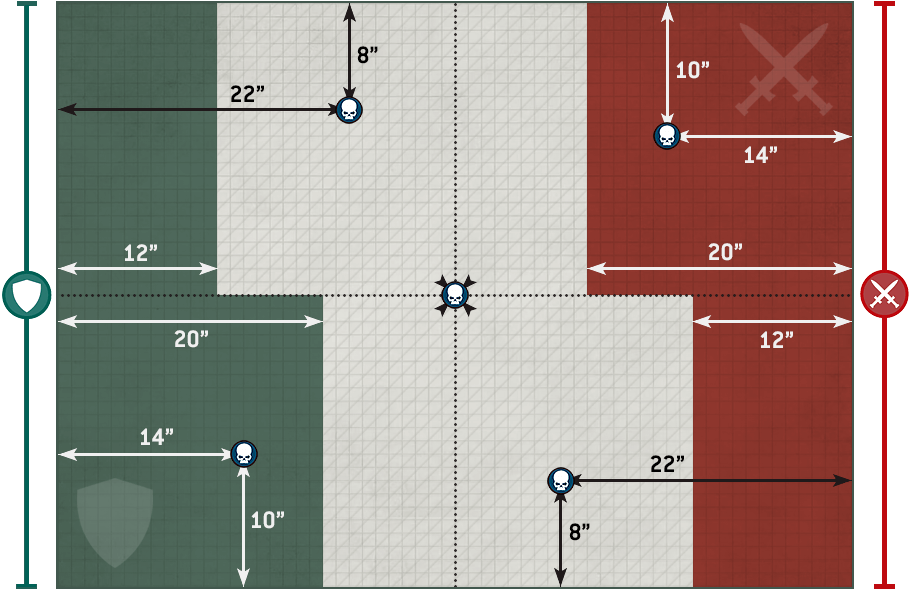
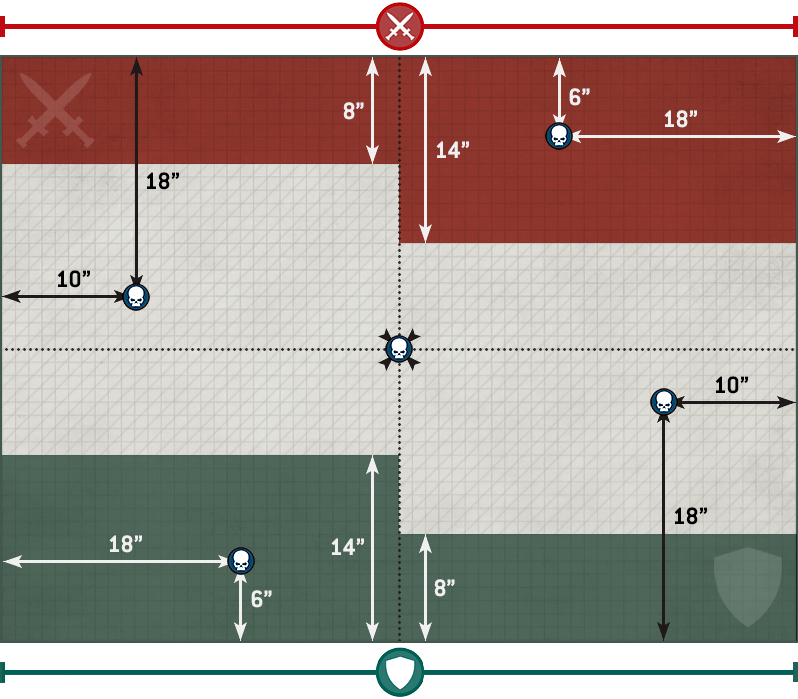
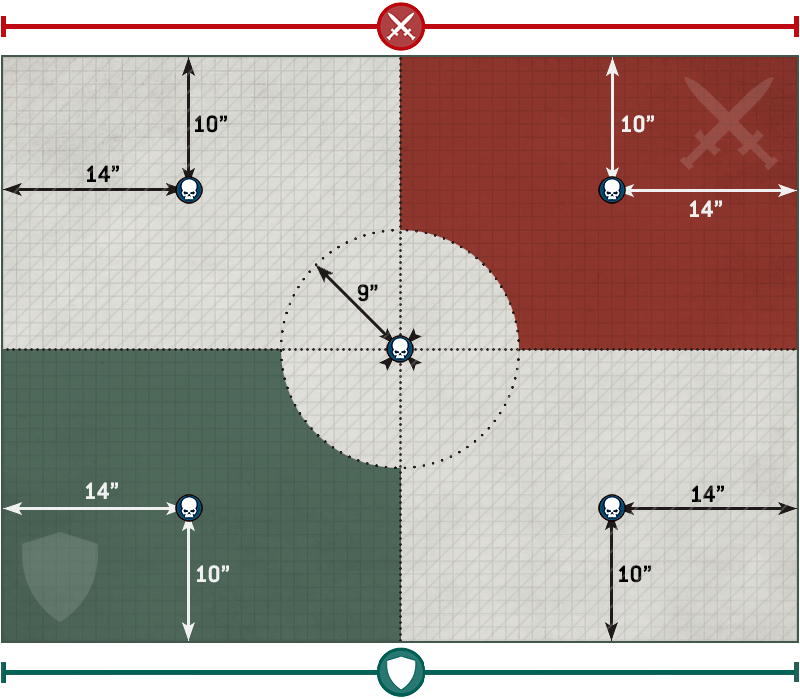
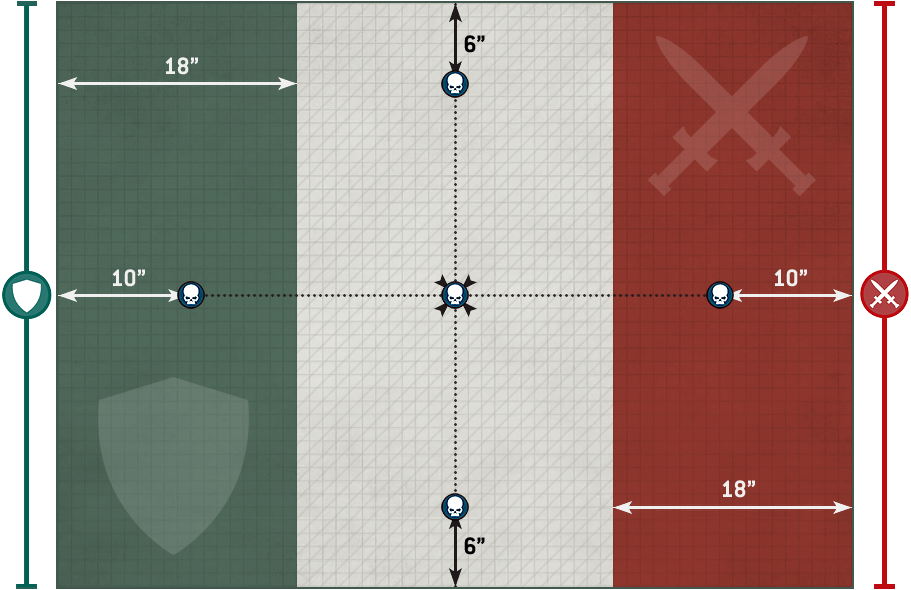
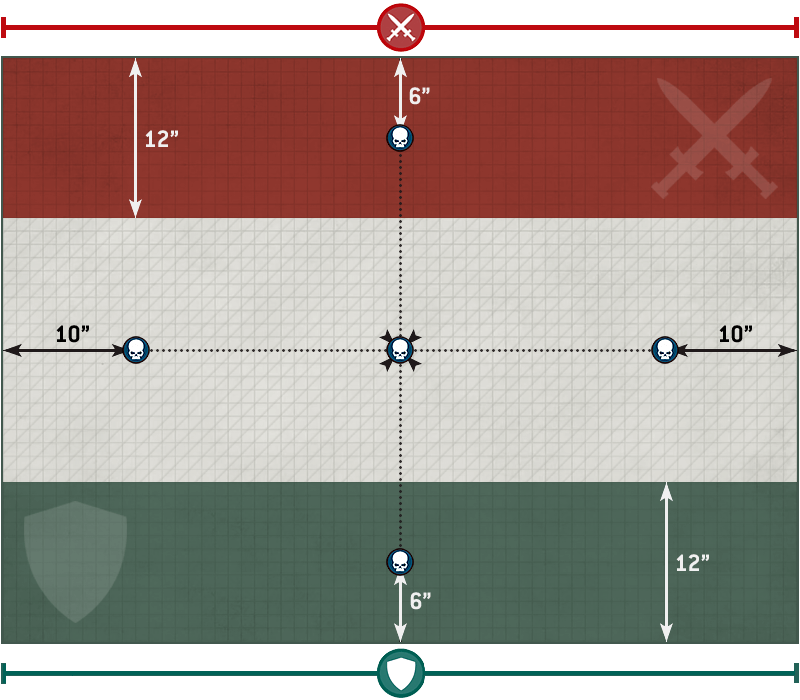
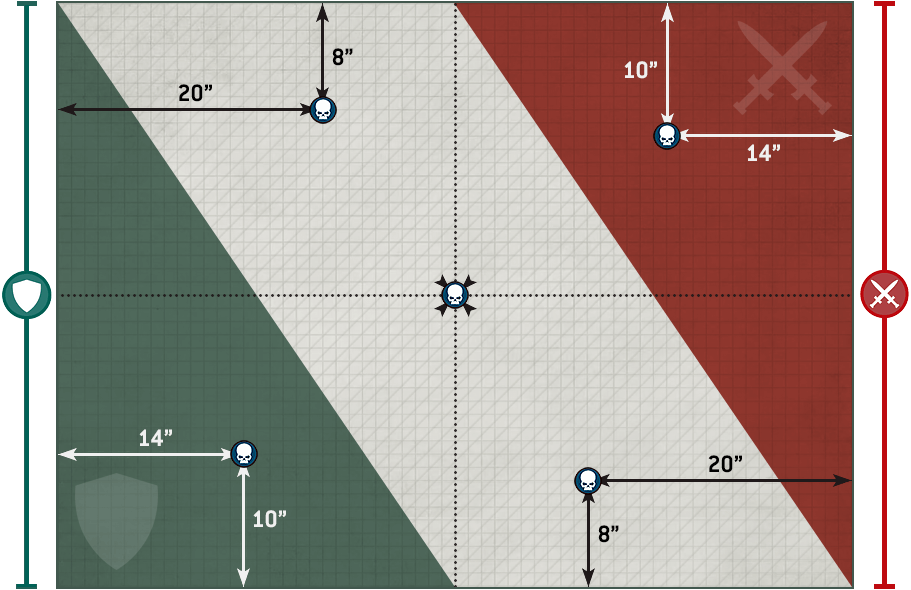
Incursion Deployment deck
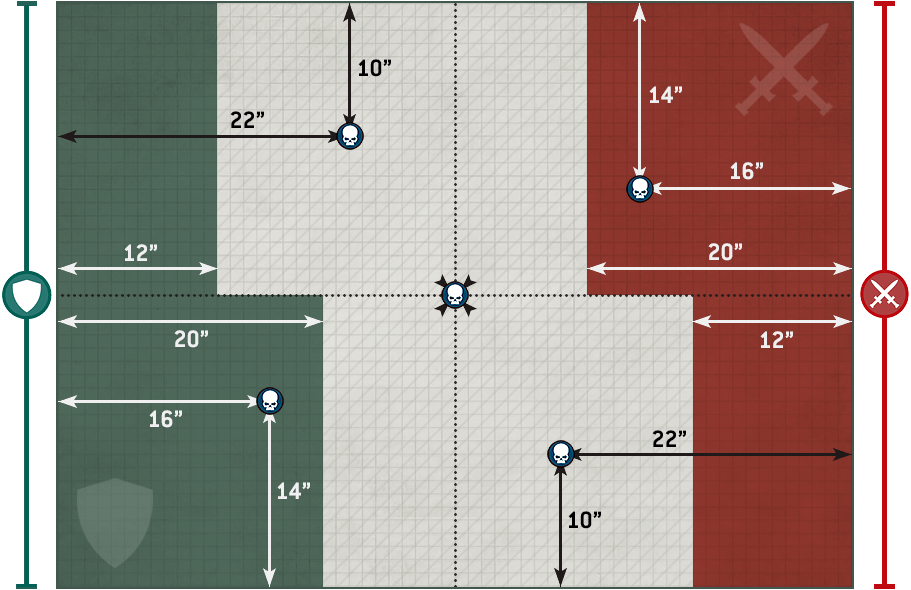
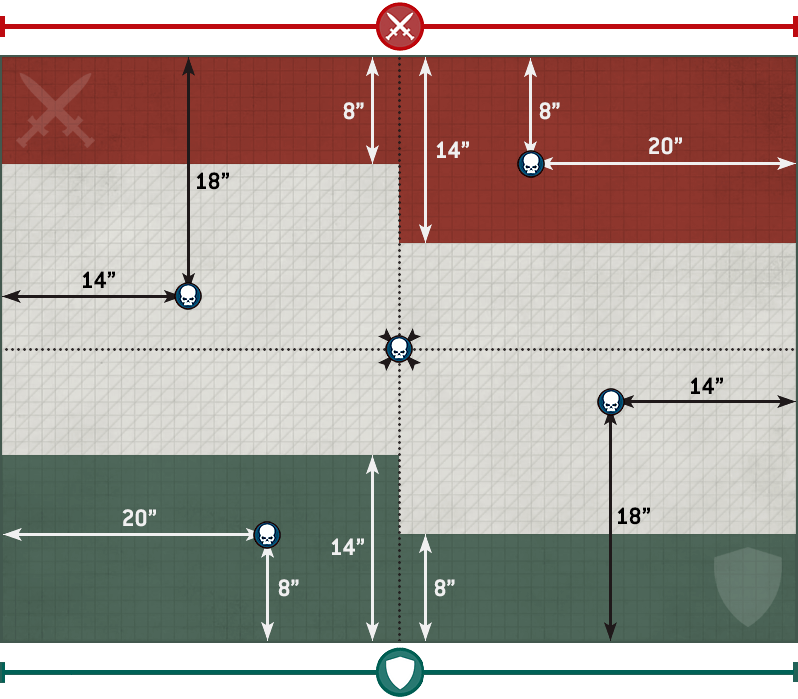
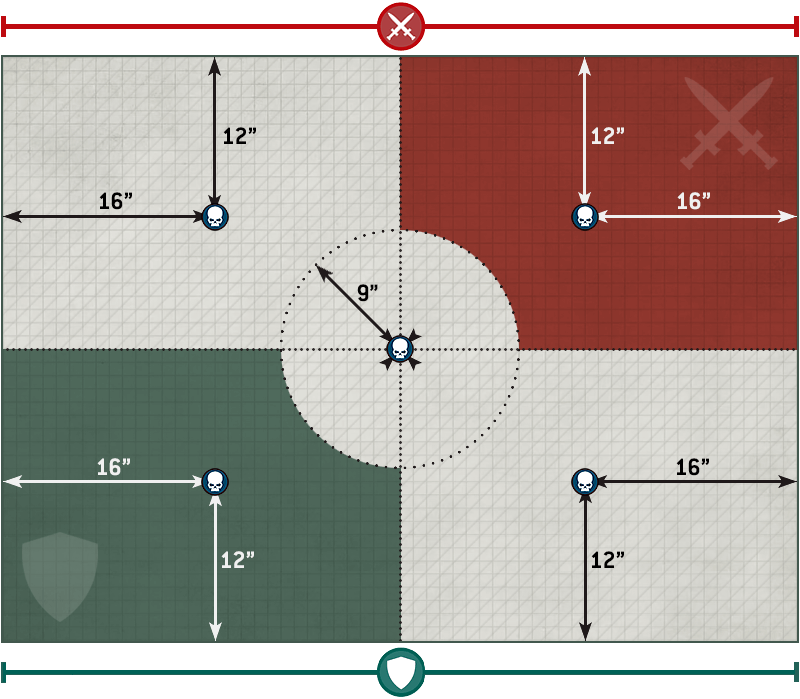
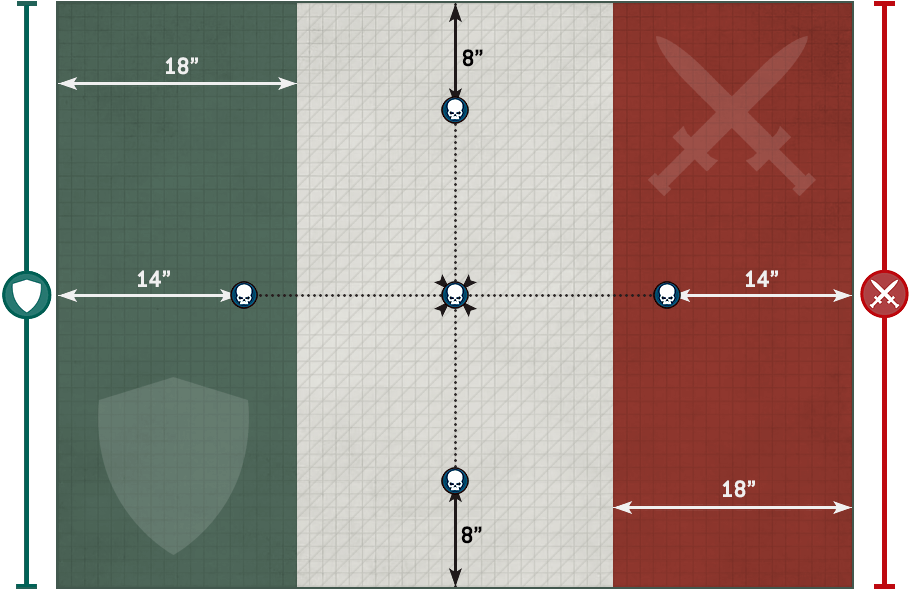
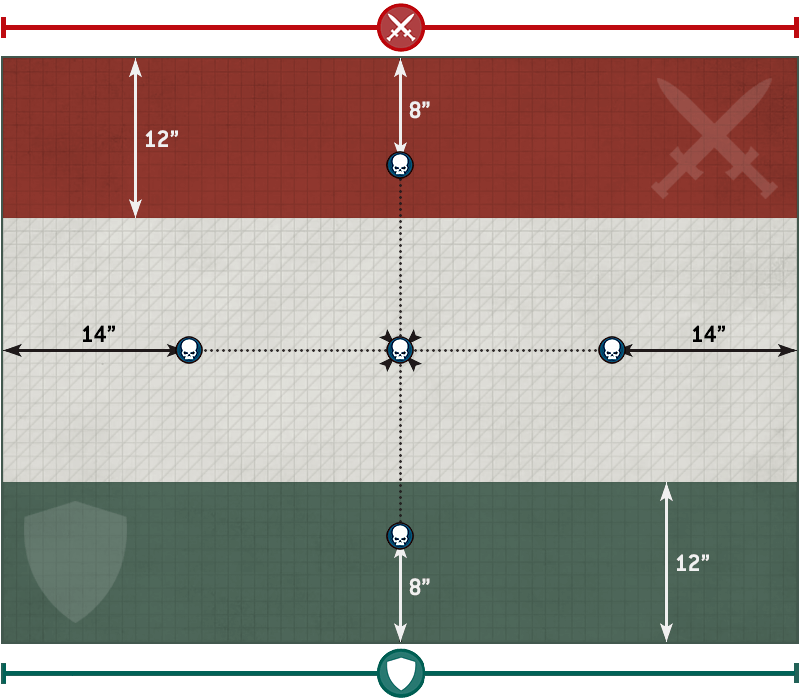
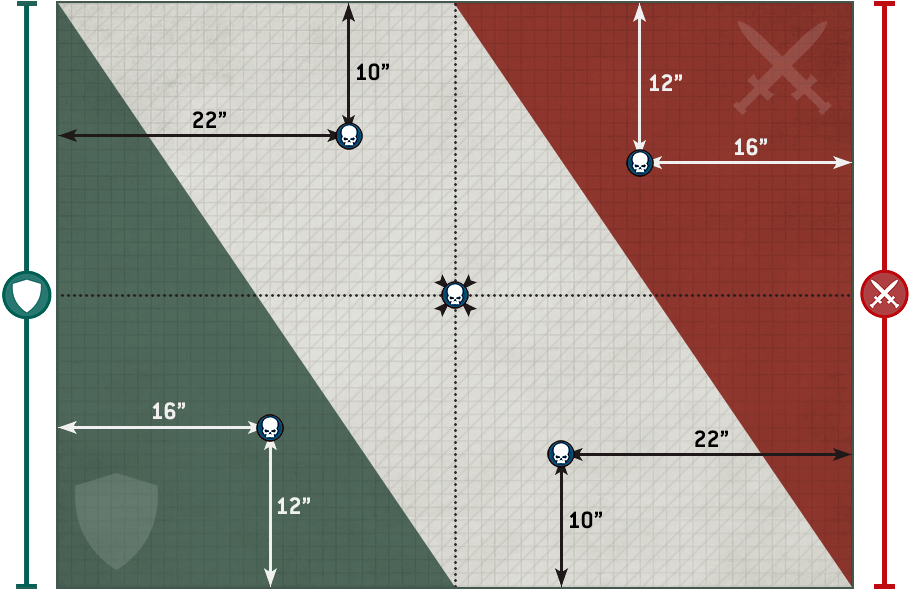
Asymmetric War Deployment deck
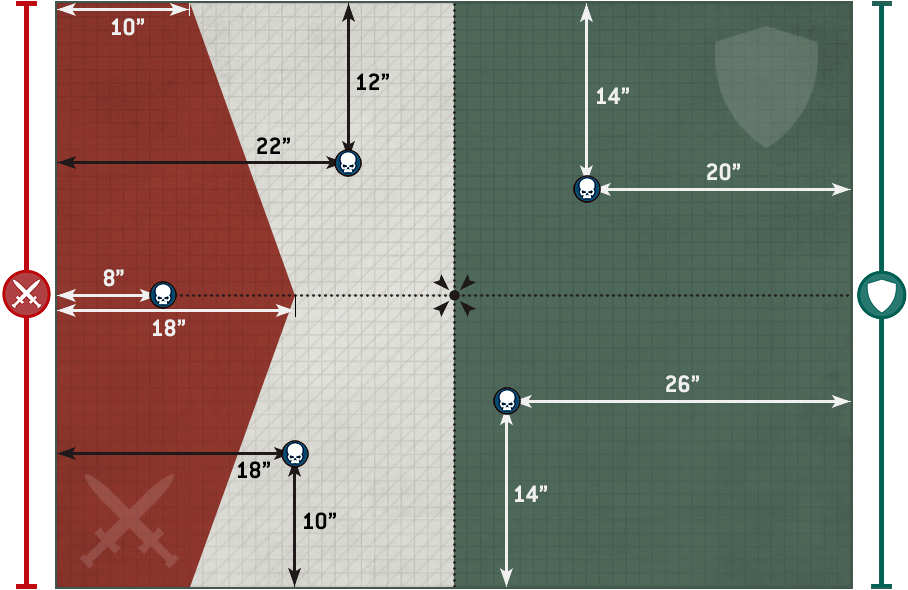
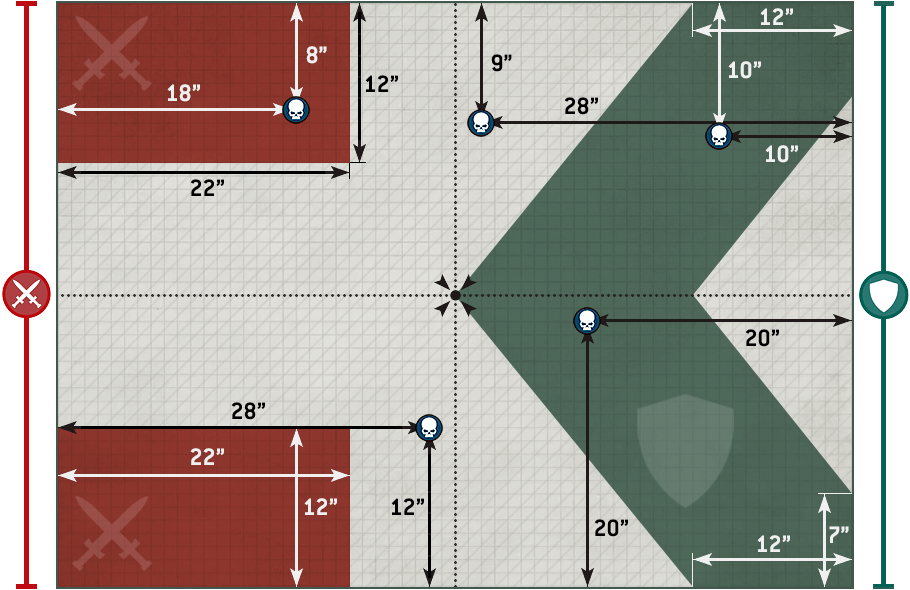
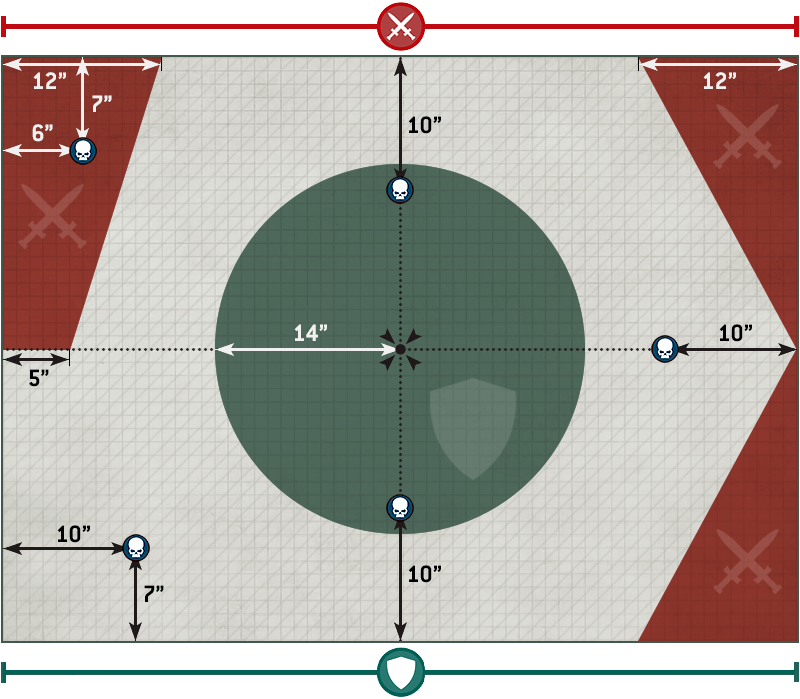
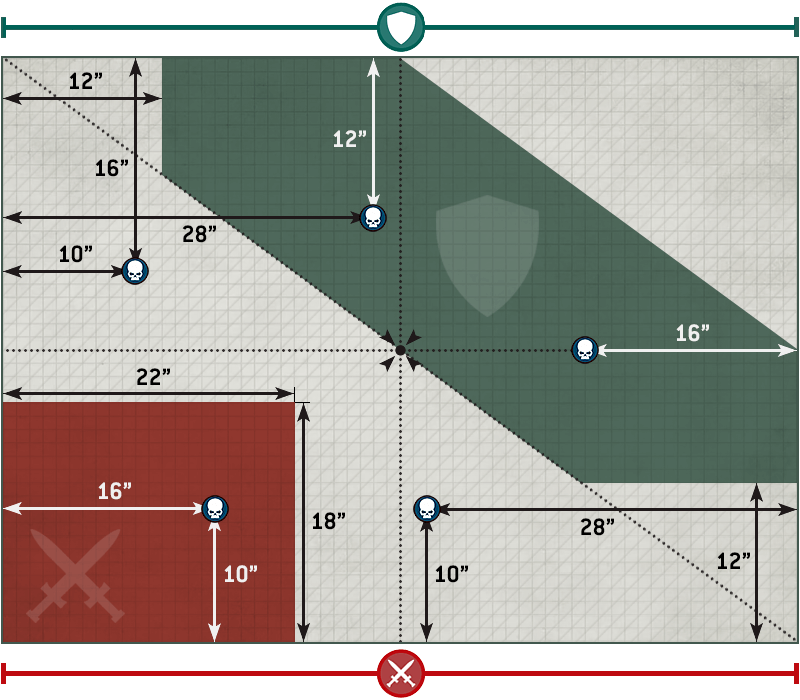
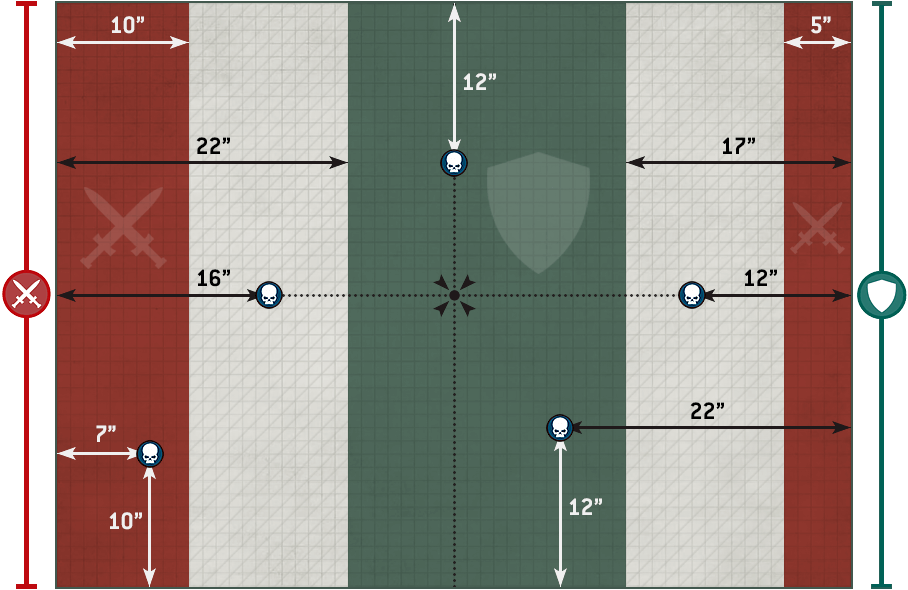
Secondary Mission deck
Your orders are clear: break through the enemy and cut off their escape routes.
| |||||||||||||||||||||
You must dominate the field of battle. Storm every site of tactical import and leave the foe with no place to hide.
| |||||||||||||||||||||||||||
This area is of extreme importance. You are to lead an immediate all-out assault to capture it and deny it to our enemy for good.
| |||||||||||||||||||||||||||||||||
You must guide allied forces onto the battlefield by any means necessary; this objective must be completed swiftly to pave the road to victory.
|
| |||||||||||||||||||||
Your forces have identified a series of tainted objectives in this area; these locations must be purified.
|
| ||||||||||||||||||||||||||||||||
The enemy looks to their champions for courage. You must identify and eliminate such targets with extreme prejudice.
| ||||||||||||||||||||||||||||||||||||
Show no mercy. Exterminate your enemies.
|
This Secondary Mission cannot be selected as a Fixed Mission in tournament play. |
The enemy come forth in teeming masses. Their ranks must be thinned if the day is to be won.
|
The opposing army contains numerous heavily armoured units. You must prioritise their destruction.
| ||||||||||||||||||||||||||||||||||||
You are charged with the defence of a critical objective. It must not be permitted to fall into enemy hands.
|
You have been ordered to eliminate specific enemy assets to ensure victory, no matter how insignificant they may seem.
| |||||||||||||||||||||
You must advance swiftly into no man’s land and seize it before the enemy can, lest they take control of the entire battlefield.
| |||||||||||||||||||||
This region is replete with strategic assets or supply caches vital to your foe. See to it that they are reduced to just so much flaming wreckage.
|
| |||||||||||||||||||||
It is critical that this area is dominated. No enemy vanguard or guerrilla units can be allowed to disrupt your plans.
| |||||||||||||||||||||
You must locate and reclaim scattered strategic assets.
|
| |||||||||||||||||||||
An opportunity to seize a valuable asset has been identified, but the enemy are likely to use it as bait in a trap. Move to secure the site, but be wary of enemy ambushes.
|
The battleground is conquered one yard at a time. Lead your forces forward and establish a strong presence in the area.
| |||||||||||||||||||||
You must scour the enemy from the face of the battlefield.
| ||||||||||||
Intimidation is the most potent of weapons. Degrade the combat abilities of your opponent to demonstrate your superiority and erode enemy morale.
|
Challenger deck
TARGET: One unit from your army (excluding units that made a move this phase).
EFFECT: Your unit can make a Normal move of up to D6", and then cannot move again this phase.
|
TARGET: One unit from your army that is not within Engagement Range of one or more enemy units.
EFFECT: Select one enemy unit that is not within Engagement Range of one or more units from your army and is within 6" of and visible to your unit. Roll six D6: for each 4+, that enemy unit suffers 1 mortal wound.
|
TARGET: One unit from your army that has not been selected to move this phase.
EFFECT: Until the end of the phase, each time your unit makes a Normal or Advance move, it can move horizontally through models and terrain features.
|
TARGET: One unit from your army that has not been selected to move this phase.
EFFECT: Until the end of the phase, add D6" to the Move characteristic of models in your unit.
|
TARGET: One unit from your army.
EFFECT: Until the end of the turn, your unit is eligible to shoot and declare a charge in a turn in which it Advanced or Fell Back.
|
TARGET: One unit from your army that has not been selected to shoot or fight this phase.
EFFECT: Until the end of the phase, each time a model in your unit makes an attack, re-roll a Hit roll of 1 and re-roll a Wound roll of 1.
|
TARGET: One unit from your army that has not been selected to shoot or fight this phase.
EFFECT: Until the end of the phase, weapons equipped by models in your unit have the [HAZARDOUS] ability and your choice of the [LETHAL HITS] or [SUSTAINED HITS 1] ability.
|
TARGET: One unit from your army that has not been selected to fight this phase.
EFFECT: Until the end of the phase, each time a model in your unit makes a Pile-in or Consolidation move, it can move up to 6" instead of up to 3". In addition, it does not need to end that move closer to the closest enemy model, provided it ends it as close as possible to the closest enemy unit.
|
TARGET: One unit from your army (excluding MONSTERS and VEHICLES) that is not within Engagement Range of one or more enemy units.
EFFECT: Remove your unit from the battlefield and place it into Strategic Reserves.
|
Twist deck
The rank and file of your armies are determined to demonstrate their consummate skill, proceeding towards their objectives relentlessly and maintaining a punishing assault as they go about their duties.
Starting an Action does not make a BATTLELINE unit ineligible to shoot (excluding VEHICLE units).
Decades of war have reduced the structures on this battlefield to hollow ruins. Your warriors stalk and scramble through the skeletal remnants of half-destroyed buildings as they close in upon their enemies.
A starless night has fallen across the battlefield, obscuring the vision of your warriors yet providing them with cover.
Designer’s Note: This is a great twist for players who do not yet have a battlefield’s worth of terrain.
Your warriors are addicted to the thrill of speed, the deafening roar of engines and the thunderous sound of booted feet upon the ground.
Your armies hurl themselves recklessly into what is swiftly becoming a maelstrom of battle. With every passing moment, the flames of conflict rage higher.
The warriors at your command are bloodthirsty indeed, hurling themselves into the fight with reckless aggression and frightening speed.
Each time you make a Charge roll, roll 3D6.
On a changing battlefield such as this, you must adapt your strategies swiftly and decisively if you are to stand any chance of seizing victory.
Your warlords are paragons of battle, possessed of both peerless skill at arms and a relentless thirst to demonstrate their martial might in the heaviest of fighting.
Your soldiers excel at close-range combat, utilising the most unwieldy of ranged weapons with great precision, even as the enemy closes in around them.
Some rules refer to units being below starting strength, or at – or below – half-strength. The meaning of these terms varies depending on a unit’s starting strength, as shown below.
|
CULL THE HORDE
The enemy come forth in teeming masses. Their ranks must be thinned if the day is to be won.
When Drawn: If there are no enemy units on the battlefield that satisfy the condition below, you can discard this card and draw a new Secondary Mission card.
|
MARKED FOR DEATH
You have been ordered to eliminate specific enemy assets to ensure victory, no matter how insignificant they may seem.
When Drawn: Your opponent must select three units from their army on the battlefield. If there are only one or two units from their army on the battlefield, they must select those units. The selected units are your Alpha Target units. You can then select one unit from your opponent’s army on the battlefield to be your Gamma Target unit. If there are no units from their army on the battlefield, discard this card and draw a new Secondary Mission card.
| |||||||||||||||||||||
TERRAFORM
Victory here lies in shaping the landscape of the battlefield.
UNITS: One or more units from your army, each within range of a different objective marker that is not within your deployment zone.
COMPLETES: End of the turn, if the unit performing this Action is still within range of the same objective marker and you control that objective marker.
IF COMPLETED: Each of those objective markers is terraformed by you. If that objective marker was terraformed by your opponent, it no longer is.
The player whose turn it is scores 4VP for each objective marker they control (up to 12VP per turn).
Each player scores 1VP for each objective marker that is terraformed by them.
BURDEN OF TRUST
The strategic prizes in this region must be guarded at all costs - a duty that falls upon a chosen few.
At the end of the Command phase, for each objective marker the player whose turn it is controls, they can select one unit from their army (excluding AIRCRAFT) within range of that objective marker to guard it until the start of their next turn.
The player whose turn it is scores 4VP for each objective marker they control that is not within their deployment zone.
The opponent of the player whose turn it is scores 2VP for each of their units (excluding Battle-shocked units) that are within range of and guarding an objective marker they control.
Designer’s Note: Note that the player going second has the first chance to score VP in this way, as they can guard objectives in their first turn and score VP in their opponent’s next turn.
THE RITUAL
Bitter foes clash in a race to finish a ritual to either sanctify or corrupt the battlefield.
UNITS: One unit from your army.
COMPLETES: End of your turn.
IF COMPLETED: Set up one objective marker anywhere on the battlefield wholly within No Man’s Land and within 1" of your unit, provided it can be setup exactly 12" from one other objective marker within No Man’s Land and not within 6" of any other objective marker.
The player whose turn it is scores 5VP for each objective marker in No Man’s Land that they control (up to 15VP per turn).
SEARCH AND DESTROY
SABOTAGE
This region is replete with strategic assets or supply caches vital to your foe. See to it that they are reduced to just so much flaming wreckage.
|
| |||||||||||||||||||||
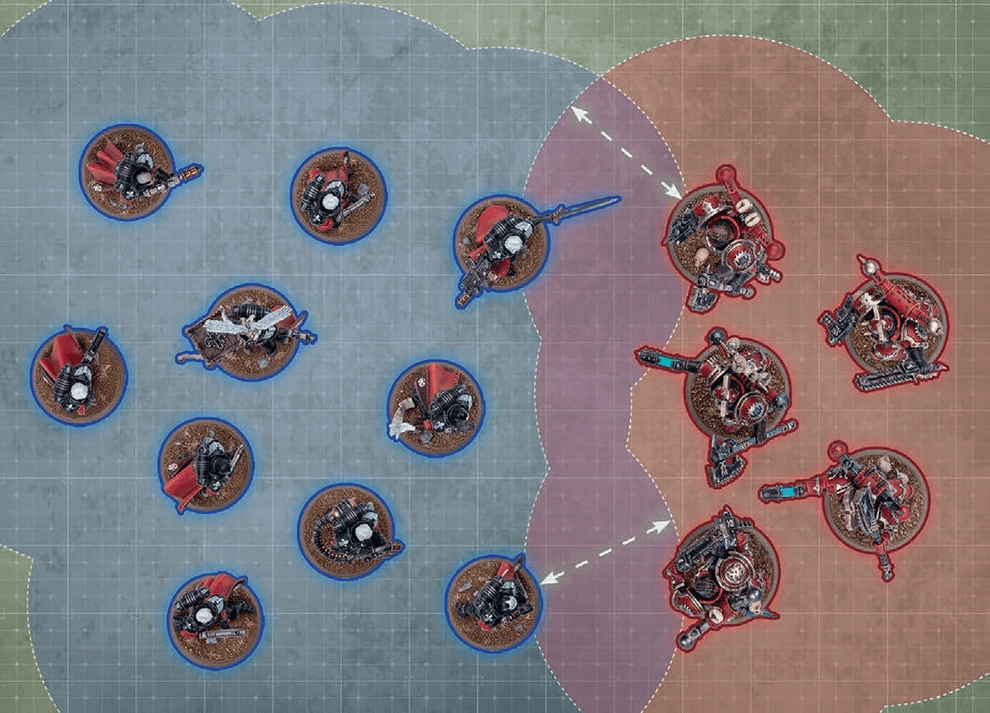
- While a friendly model is within engagement range of one or more enemy models, those models – and the units they belong to – are engaged with each other.
- While a unit contains no engaged models, that unit is unengaged.
The datasheets using BATTLELINE keyword can be found in the following Factions:
Chaos: Chaos Daemons, Chaos Knights, Chaos Space Marines, Death Guard, Emperor’s Children, Thousand Sons, World Eaters.Imperium: Adepta Sororitas, Adeptus Custodes, Adeptus Mechanicus, Astra Militarum, Grey Knights, Imperial Agents, Imperial Knights, Space Marines.
Xenos: Aeldari, Drukhari, Genestealer Cults, Leagues of Votann, Necrons, Orks, T’au Empire, Tyranids.
The BATTLELINE keyword is used in the following datasheets:


The datasheets using DEDICATED TRANSPORT keyword can be found in the following Factions:
Chaos: Chaos Space Marines, Death Guard, Emperor’s Children, Thousand Sons, World Eaters.Imperium: Adepta Sororitas, Adeptus Custodes, Adeptus Mechanicus, Astra Militarum, Grey Knights, Imperial Agents, Space Marines.
Xenos: Aeldari, Drukhari, Genestealer Cults, Leagues of Votann, Necrons, Orks, T’au Empire, Tyranids.
The DEDICATED TRANSPORT keyword is used in the following datasheets:


The datasheets using TITANIC and CHARACTER keywords can be found in the following Factions:
Chaos: Chaos Daemons, Chaos Knights.Imperium: Imperial Knights.
The TITANIC and CHARACTER keywords are used in the following datasheets:


- To do so, both players roll one D6, and whoever rolls highest wins the roll-off.
- If there is a tie for the highest roll, roll off again.
Mighty heroes fight at the forefront of battle.
Before the battle, in the Muster Armies step, for each leader and support unit in your army, you can select one friendly bodyguard unit that unit can lead. That unit will then lead that bodyguard unit for the battle and form an attached unit with it.Unless otherwise stated, each bodyguard unit can only have one leader unit and one support unit attached to it.
- That unit is not visible to any other units (units are visible to themselves).
- Any other unit is not visible to that unit.
- Players cannot measure distances to or from that unit (units are within range of their own abilities).
This means units not on the battlefield cannot be selected or targeted by any attack or rule that requires a unit to be visible or within a certain distance (other than their own abilities).
Such units can still use their other rules, and are still units in the controlling player’s army and so can be affected by rules that require a player to select a unit from an army, as well as rules that affect all units in an army.
The controlling player must make battle-shock rolls for units that are not on the battlefield in their Command phase if they are battle-shocked, or if they are at or below half-strength.
- Each model in that unit is within 3" of that TRANSPORT.
- That unit was not set up on the battlefield this turn.
- That unit is eligible to embark within that TRANSPORT, as described on that TRANSPORT’s datasheet.
- That TRANSPORT has sufficient remaining transport capacity for each model in that unit.
When a unit embarks, the active player removes that unit from the battlefield and places it to one side – it is now embarked within that TRANSPORT and is not on the battlefield.
- Not on the Battlefield 01.02.04
EFFECT: Your unit moves as described in Moving (03).
BEFORE MOVING: Make an advance roll by rolling one D6.
AFTER MOVING:
- Your unit must be unengaged.
- Until the end of the turn, unless otherwise stated, your unit is not eligible to declare a charge or start an action.
EFFECT: Your unit moves as described in Moving (03).
BEFORE MOVING: Select fall-back mode:
- Ordered Retreat: If your unit is not battle-shocked, you can select this mode.
- Desperate Escape: Otherwise, you must select this mode. Make a hazard roll for each model in your unit (06.03).
- Desperate Escape: Each model that is moved can be moved through enemy models.
- Your unit must be unengaged.
- Until the end of the turn, unless otherwise stated, your unit is not eligible to shoot, declare a charge or start an action.
- Desperate Escape: If your unit is not battle-shocked, you must make a battle-shock roll for your unit (01.07).
TAKE AND HOLD
Several strategic locations have been identified in your vicinity. Your orders are to assault these positions, secure them and hold them at any cost.
The player whose turn it is scores 5VP for each objective marker they control (up to 15VP per turn).
TIPPING POINT
Layout 1
Layout 2
Layout 4
Layout 6
Layout 7
Layout 8
SUPPLY DROP
Supplies are inbound. Secure the drop site.
Start of the Battle: Players randomly select two different objective markers within No Man’s Land that are not in the centre of the battlefield; the first selected is the Alpha objective, the second selected is the Omega objective.
Start of the Fourth Battle Round: The Alpha objective is removed from the battlefield.
Start of the Fifth Battle Round: The Omega objective is removed from the battlefield.
The player whose turn it is scores the following VP for each objective marker in No Man’s Land that they control, depending on the current battle round:
- 5VP in the second and third battle rounds.
- 8VP in the fourth battle round.
- 15VP in the fifth battle round.
LINCHPIN
True victory is built upon a firm foundation. If you cannot hold the centre, then all else will crumble swiftly.
If the player whose turn it is does not control the objective marker in their deployment zone, they score 3VP for each objective marker they control.
SCORCHED EARTH
What cannot be secured must be burned to ash.
UNITS: One unit from your army within range of an objective marker that is not within your deployment zone.
COMPLETES: End of your opponent’s next turn or the end of the battle (whichever comes first), if your unit is still within range of the same objective marker and you control that objective marker.
IF COMPLETED: That objective marker is burned and removed from the battlefield.
Each time a player burns an objective marker, that player scores 5VP if that objective marker was in No Man’s Land, or 10VP instead if that objective marker was in their opponent’s deployment zone.
The player whose turn it is scores 5VP for each objective marker they control (up to 10VP per turn).
HAMMER AND ANVIL
HIDDEN SUPPLIES
Reconnaissance units have uncovered a hidden cache of materiel in this war zone.
In the Place Objective Markers step, players must set up one additional objective marker in No Man’s Land.
Before setting up this new objective marker, players must first move the objective marker in the centre of the battlefield 6" directly towards one of the corners of the battlefield (if No Man’s Land touches any of the corners of the battlefield, you must move the objective marker towards one of those corners). Otherwise, the players roll off, and the winner selects which corner the objective marker is moved towards. Players then set up the new objective marker 6 from the centre of the battlefield towards the diagonally opposite corner of the battlefield to the previously moved objective marker.
The player whose turn it is scores VP as follows (these are cumulative):
- 5VP If they control one objective marker not within their deployment zone.
- 5VP If they control two objective markers not within their deployment zone.
- 5VP if they control more objective markers than their opponent controls.
When a model is destroyed, first resolve any rules that are triggered when it is destroyed, then it is removed from the battlefield. If any such rules apply, and if the model was destroyed as the result of an attack, unless otherwise stated, those rules are only resolved and that model is only removed after the attacking unit’s attacks have been resolved. Unless otherwise stated, destroyed models and units cannot use abilities or be selected or targeted by rules.
Some rules only trigger if an enemy model or unit was destroyed by you, or by a model or unit from your army. This means that the enemy model or unit was destroyed by an attack made by a model from your army, or by a player rule you have. Enemy models or units that are destroyed by any other means are not destroyed by you, or by a model or unit from your army.
PURGE THE FOE
Exterminate the enemy. Show them no mercy.
Each player scores 4VP if one or more enemy units were destroyed this battle round.
Each player scores 4VP if more enemy units than friendly units were destroyed this battle round.
The player whose turn it is scores 4VP if they control one or more objective markers, and an additional 4VP if they control more objective markers than their opponent controls.
Layout 3
CRUCIBLE OF BATTLE
SWEEPING ENGAGEMENT
Layout 5
DAWN OF WAR
EFFECT: Your unit moves as described in Moving (03).
AFTER MOVING: Your unit must be unengaged.
Some units make their way to battle via tunnelling, teleportation, high-altitude descent or other extraordinary means that allow them to appear suddenly in the thick of the fighting.
During the Declare Battle Formations step, if every model in a unit has this ability, you can set it up in Reserves instead of setting it up on the battlefield. If you do, in the Reinforcements step of one of your Movement phases you can set up this unit anywhere on the battlefield that is more than 9" horizontally away from all enemy models. If a unit with the Deep Strike ability arrives from Strategic Reserves, the controlling player can choose for that unit to be set up either using the rules for Strategic Reserves or using the Deep Strike ability.- Unit can be set up in Reserves instead of on the battlefield.
- Unit can be set up in your Reinforcements step, more than 9" horizontally away from all enemy models.
High-explosive rounds can fell several warriors in a single blast, but firing them too close to comrades is unwise.
Each time you gather attack dice for a [BLAST] weapon, add one additional attack dice for every five models that were in the target unit in the Select Targets step (rounding down).If this ability takes the form [BLAST X], each time you gather attack dice for such a weapon, add X additional attack dice for every five models that were in the target unit in the Select Targets step (rounding down) instead.
Many deadly weapons can inflict fatal injuries on any foe, no matter their resilience.
Each time an attack made with a [LETHAL HITS] weapon results in a critical hit, you can choose for that attack to automatically wound the target.
|
- Engaged and did not make an advance move this turn.
- Has one or more [CLOSE-QUARTERS] weapons or is a MONSTER/VEHICLE unit.
WHILE SHOOTING: Models in your unit can target enemy units your unit is engaged with.
- MONSTER/VEHICLE Models: Each time a MONSTER/VEHICLE model in your unit makes an attack:
- Unless that attack is made with a [CLOSE-QUARTERS] weapon and targets a unit your unit is engaged with, subtract 1 from the hit roll.
- If that attack is made with a [BLAST] weapon, it still cannot target a unit your unit is engaged with.
- Non-MONSTER/Non-VEHICLE Models: You can only select [CLOSE-QUARTERS] weapons to make attacks with and you can only select enemy units that are engaged with your unit as targets.
Weapons designed for close-quarters fighting can be wielded effectively even in the press of melee combat.
Units containing one or more models with a [CLOSE-QUARTERS] weapon can shoot using close-quarters shooting (10.06).When using another shooting type, for each model in that unit (excluding MONSTER/VEHICLE models), you can only select one of the following to make attacks with:
- One or more of its [CLOSE-QUARTERS] weapons.
- One or more of its other ranged weapons.
Pistols can be wielded even at point-blank range.
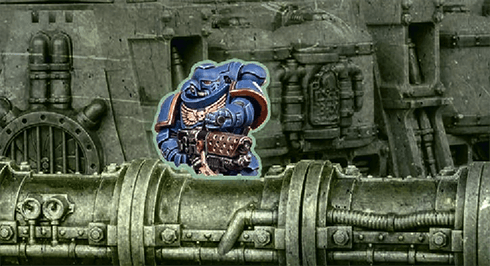
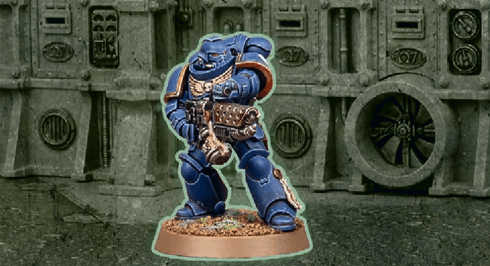
[PISTOL] and [CLOSE-QUARTERS] are identical for all rules purposes. See [CLOSE-QUARTERS].Other models and units can be either visible or fully visible to the observing model, as shown below. Note that terrain applies additional rules to visibility (13.07).
- Select Model: Select one model in that unit by following the first instruction below that applies:

If a non-CHARACTER model in that unit has lost one or more wounds, you must select that model. Otherwise, if that unit contains one or more non-CHARACTER models, you must select one of those models. Otherwise, if one or more CHARACTER models in that unit have lost one or more wounds, you must select one of those models. Otherwise, you must select one CHARACTER model in that unit. - Resolve Damage: The selected model loses 1 wound. If this reduces that model’s remaining wounds to 0, it is destroyed.
MORTAL WOUNDS AND NORMAL DAMAGE
When resolving attack dice, if those attacks inflict a mixture of both mortal wounds and normal damage, resolve all of the normal damage first, then resolve all of the mortal wounds.
- Normal Damage 06.02.01
The most potent weapons strike with such power that they make a mockery of armour and can cleave through several foes.
Each time an attack made with a [DEVASTATING WOUNDS] weapon results in a critical wound, the attack sequence for that attack ends and the target unit suffers a number of mortal wounds equal to the D characteristic of that weapon. These are inflicted after resolving any normal damage inflicted by those attacks.Mortal wounds inflicted by [DEVASTATING WOUNDS] weapons can damage a maximum of one model for each critical wound; any remaining mortal wounds inflicted by that attack are lost.
- If the target unit is an attached unit, use the highest T characteristic amongst bodyguard models in that unit that are on the battlefield.
- Use the highest T characteristic amongst models in that unit that are on the battlefield.
| ||||||||||||||||||||||||||||||
- Multiple Toughness Characteristics 05.02.01
Weapons powered by unstable and dangerous energy sources pose a substantial risk to the wielder and those that stand beside them.
Each time a unit is selected to shoot or selected to fight, after that unit has resolved all of its attacks, make a number of hazard rolls (06.03) for that unit equal to the number of [HAZARDOUS] weapons you selected in the Select Weapons step.Some weapons possess a punishing rate of fire, or can land devastating flurries of blows, tearing the foe apart with relentless ferocity.
This ability always takes the form [SUSTAINED HITS X]. Each time an attack made with a [SUSTAINED HITS] weapon results in a critical hit, that attack results in a number of additional hits on the target as denoted by X.EFFECT: Your unit moves as described in Moving (03).
BEFORE MOVING: Select consolidation mode:
- Ongoing Consolidation:If your unit is engaged, you must select this mode and select every enemy unit it is engaged with.
- Engaging Consolidation:Otherwise, if your unit is within 3" of one or more enemy units, you must select this mode and select one or more of those enemy units.
- Objective Consolidation:Otherwise, if your unit is within 3" of one or more objectives, you must select this mode and select one of those objectives.
- Ongoing Consolidation:Models in base-contact with one or more enemy models cannot be moved. Each model that is moved must end its move closer to the closest selected enemy unit, and engaged with it if possible.
- Engaging Consolidation:Each model that is moved must end its move closer to the closest selected enemy unit, and engaged with it if possible.
- Objective Consolidation:Each model that is moved must end its move within range of the selected objective if possible, or closer to it if not.
- Ongoing Consolidation:Each model that started this move engaged with an enemy unit must still be engaged with that enemy unit.
- Engaging Consolidation:Your unit must be engaged with all of the selected enemy units. If one or more enemy units engaged with your unit have not been selected to fight this phase, your opponent must select each of those units, one at a time; when each is selected, it becomes eligible to fight and is selected to fight (12.04).
- Objective Consolidation:Your unit must be within range of the selected objective.